
1. Make sure you have determined the assigned SCSI addresses.
See Chapter 1, "Before You Start."
2. Make sure you have shut down the system.
See the appropriate handbook for your operating system.
3. Make sure the power switch is in the off (O) position.
4. Loosen the Phillips-head captive screw holding the cover to the back
panel.
See Figure 3-1. The screw remains attached after it is fully loosened from
the back panel.
5. With one hand, press the plastic tab forward with a screwdriver. With the
other hand, lift the cover from the back panel.
See Figure 3-1.
6. When the cover clears the tab, grasp the sides of the cover and lift up until
it is at a 60-degree angle to the chassis. Lift the cover until it is free of the
chassis.
7. Attach a wrist strap to your wrist and a metal part of the chassis.
See "Attaching the Wrist Strap" in this chapter.
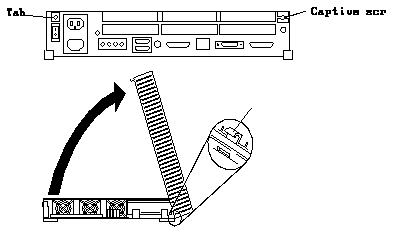
Figure 3-1
Removing the SPARCstation 10 System Cover
1. Unwrap the first two folds of the wrist strap. Wrap the adhesive side
firmly against your wrist. See Figure 3-2.
Figure 3-2
Attaching the Wrist Strap to Your Wrist
2. Peel the liner from the copper foil at the opposite end of the wrist strap.
3. Attach the copper end of the wrist strap to the top of the metal casing of
the power supply. See Figure 3-3.
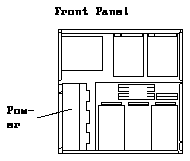
Figure 3-3
SPARCstation 10 Power Supply Location
1. Remove the cover and attach a wrist strap. See the sections "Removing
the Cover" and "Attaching the Wrist Strap" earlier in this chapter.
2. Unpack the disk drive. See Chapter 1, "Before You Start."
Make sure the disk drive is on the antistatic bag it was shipped in.
3. Determine which disk drive position to use.
See Figure 3-4.
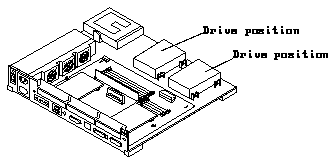
Figure 3-4
SPARCstation 10 System Disk Drive Positions
4. Set the SCSI ID jumpers according to the drive position.
See Table 3-1 and Figure 3-5.
Table 3-1
SCSI Target ID Jumper Settings for the 1.05 Gbyte Disk Drive
----------------------------------------------------


Drive Position       Target ID Jumper   SCSI Address
                     Settings

----------------------------------------------------
0                    A0 installed       3
(middle of chassis)  A1 installed
                     A2 not installed

1                    A0 installed       1
(corner of chassis)  A1 not installed
                     A2 not installed

----------------------------------------------------
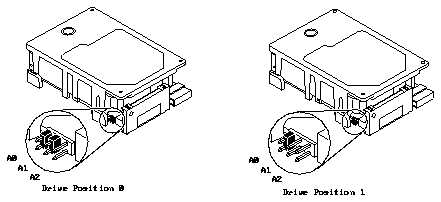
Figure 3-5
SCSI Addresses of Disk Drives in the SPARCstation 10 System
5. Verify that the configuration jumpers are correctly set.
See Figure 3-6 and Table 3-2.
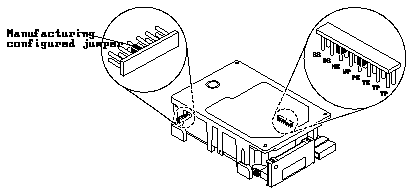
Figure 3-6
Configuration Jumper Settings for the 2.1 Gbyte Disk Drive in the
SPARCstation 10 System
Table 3-2
Configuration Jumper Acronym Definitions
---------------------------------------


Acronym  Definition
---------------------------------------
SS       Reserved

DS       Delay Motor Start

ME       Motor Enable (Remote Spin-up)

WP       Write Protect

PE       Parity Enable

TE       Enable Terminators

TP       Term Power from Drive

TP       Term Power to SCSI Bus

---------------------------------------
1. Shut down the system.
See the appropriate handbook for your operating system.
2. Remove the cover and attach a wrist strap.
See the sections "Removing the Cover" and "Attaching the Wrist Strap."
3. Determine which drive you need to remove.
See Figure 3-7.
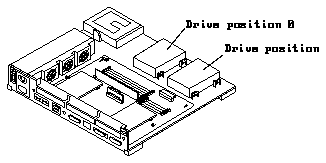
Figure 3-7
SPARCstation 10 System Disk Drive Positions
4. Slide the hard disk drive toward the rear of the chassis to unseat the four
grommets (two on each side) from the drive mounts.
See Figure 3-8.
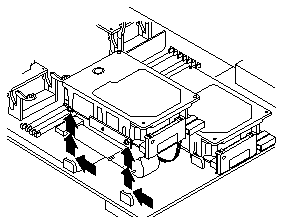
Figure 3-8
Removing a Disk Drive from the SPARCstation 10 System
5. Disconnect the power and data connectors from the drive.
6. Push the disk drive then lift out the disk drive and place it on an
antistatic surface.
1. Complete the steps in the sections "Removing the Cover," "Attaching the
Wrist Strap," and "Setting Jumper Settings" earlier in this chapter.
2. Install the drive bracket. Complete steps a through e.
See Figure 3-9.
a. Install the screw-in grommets and split washers on each side of the
drive rear (away from the connector).
b. Press the two rubber slip-on grommets (without screws) into place over
the metal bracket side tabs.
c. Position the new mounting bracket over the drive (near the connector)
and align the screw slots over the drive circuit board.
d. Secure the bracket to the drive sides. Insert one Phillips-head screw
on each side of the bracket.
e. Secure the bracket base to the drive bottom (board side) with four
Phillips-head screws.

Figure 3-9
Removing or Installing the Disk Drive Bracket
3. Unfold the internal disk cable from the holding clips, if necessary.
Straighten out the internal disk cable and the power harness. Make sure
the DC power harness is long enough to reach the back of the chassis.
See Figure 3-10. If the DC power harness is not long enough to reach the
back of the chassis, try to get more slack by working out more of the cable
out from the clips in the base of the chassis.
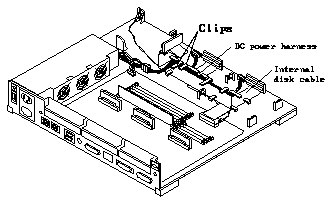
Figure 3-10
Positioning the Internal Disk Cable in the SPARCstation 10 System
4. Hold the drive in one hand and attach both the internal disk connector
and the DC power harness connector to the drive with the other hand.
See Figure 3-11.
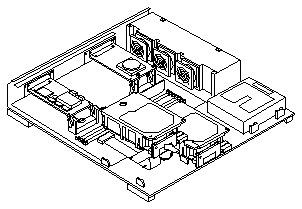
Figure 3-11
Connecting the Drive and Internal Cables of the SPARCstation 10 System
5. Lower the drive into the chassis. Align the four grommets onto the drive
mounts, and firmly seat the grommets by moving the drive forward
towards the connectors.
See Figure 3-12.
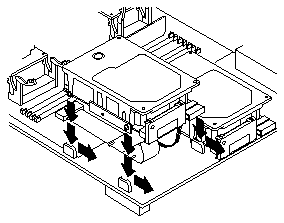
Figure 3-12
Seating the Disk Drive Into the Drive Mounts in the SPARCstation 10
System
6. With one hand at the back of the drive and the other hand on the back of
the connector, push them together to firmly seat the connector in an 90-
degree upright position.
See Figure 3-13. If it is not, repeat steps 5 and 6. If the drive is not seated
properly, the cover will not close correctly.
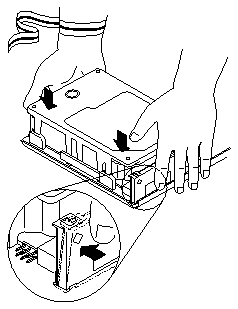
Figure 3-13
Verifying Disk Drive Connector Position in the SPARCstation 10 System
7. Detach the wrist strap then replace the cover.
Seethe section "Replacing the Cover."
8. If you have one or more external SCSI devices daisy-chained to your
system, install a regulated SCSI terminator (P/N 150-1785) on the last
device in the daisy-chain.
The regulated SCSI terminator has the word "REGULATED" stamped on it.
1. Shut down the system.
See the appropriate handbook for your operating system.
2. Remove the cover and attach a wrist strap.
See the sections "Removing the Cover" and "Attaching the Wrist Strap"
earlier in this section.
3. Determine which drive you need to remove.
See Figure 3-14.
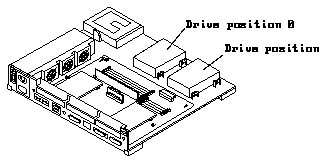
Figure 3-14
SPARCstation 10 System Disk Drive Positions
4. Slide the hard disk drive toward the rear of the chassis to unseat the four
grommets (two on each side) from the drive mounts.
See Figure 3-15.
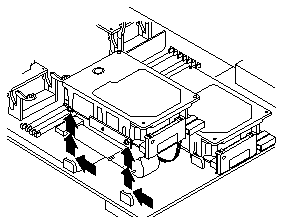
Figure 3-15
Removing a Disk Drive from the SPARCstation 10 System
5. Disconnect the power and data connectors from the drive.
6. Lift out the hard disk drive and place it on an antistatic surface.
1. Gently guide the hinge hooks on the cover into the tab slots on the front
of the system unit. Slowly lower the cover onto the system unit.
See Figure 3-16.
2. Gently push down on the left and right sides of the cover so that the
plastic tab snaps the cover to the back panel.
Make sure the cover is firmly seated to the chassis. See Figure 3-16.
3. Tighten the captive screw at the top right side of the rear panel to the
cover. Do not overtighten the screw.
See Figure 3-16. You are ready to power on the system.

Figure 3-16
Replacing the SPARCstation 10 System Cover


