Chapter 1 Installing the Netra 150 Server
This chapter describes how to install your Netra 150 server.
Netra 150 Server Inventory
You should have received the following items with your Netra 150 server:
-
Sun Microsystems Netra 150 server
-
Power cord
-
Twisted-pair Ethernet (RJ-45) cable
-
Configuration Utilities diskette
-
Netra server: Recovery CD
-
Netra 150 Server Hardware Installation Manual
-
Netra 150 Server Service Manual
-
Netra 150 Server Storage Device User's Guide
-
Netra User's Manual
Figure 1-1 shows the standard inventory for a Netra 150 server.
Figure 1-1 Standard Inventory for the Netra 150 Server
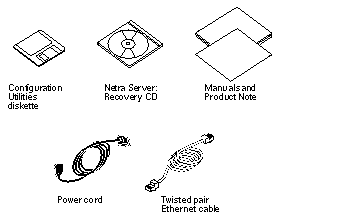
The Netra Server: Recovery CD and the Netra configuration diskette are separate items and do not contain the same types of information. The CD is intended only for limited uses (including emergencies, such as system software recovery). The unintentional use of the CD may cause destruction of email files and other data.
Installing the Netra 150 Server
Note -
If you want to install an internal peripheral, DSIMM or SBus card into your Netra 150 server, do so now. Refer to Chapter 2, Adding or Replacing Hardware in the Netra 150 Server" for those instructions.
Connecting the Server to the Network
-
If you have the rack-ready version of the Netra 150 server, install it in the rack if you haven't already done so.
Refer to the Model 150 Series Rack-Ready Installation Manual for those instructions.
-
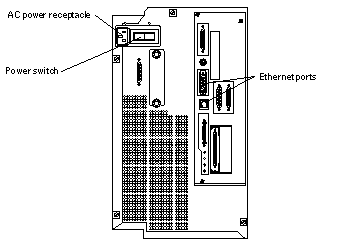
Verify that the Netra 150 server power switch is in the OFF (O) position (Figure 1-2).
Figure 1-2 Connecting the Netra 150 Server to the Network
-
Connect the power cord to the AC power receptacle at the rear of the Netra 150 server (Figure 1-2).
-
Connect a network cable from the Internet connection to one of the two Ethernet ports at the rear of the Netra 150 server (Figure 1-2).
-
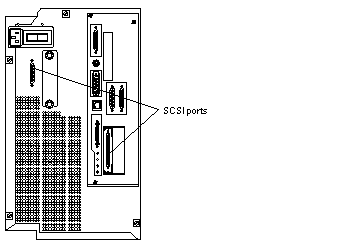
Verify that an external fast wide SCSI cable is connected between the appropriate SCSI ports as shown in Figure 1-3.
Figure 1-3 Connecting the SCSI Cable
-
Determine if you have any other connections to make.
-
If you want to connect an external peripheral to your Netra 150 server, go to "Connecting an External Peripheral".
-
If you want to connect a monitor and keyboard to your Netra 150 server, go to "Connecting a Monitor and Keyboard".
-
If you want to connect a TTY terminal to your Netra 150 server, go to "Connecting a TTY Terminal".
-
If you have no other connections to make, go to "Performing the Initial Configuration".
-
Connecting an External Peripheral
Note -
If you are connecting an external disk enclosure to the Netra NFS version of the Netra 150 server, read Appendix B, Understanding Battery Management Issues for a Netra 150 Server (NFS Version Only)" before proceeding with these instructions.
-
Determine if you are connecting an external peripheral to the Netra Internet or Netra NFS version of the Netra 150 server.
-
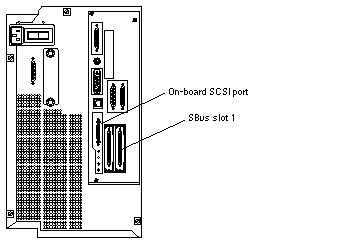
If you are connecting an external peripheral to the Netra Internet version of the Netra 150 server, connect the SCSI cable from the external peripheral to the on-board SCSI port at the rear of the Netra 150 server (Figure 1-4). Note that the internal floppy, tape and CD-ROM drives take SCSI addresses 0, 4 and 6, respectively, so you must verify that none of the drives in the external peripheral use those SCSI addresses.
-
If you are connecting an external tape enclosure to the Netra NFS version of the Netra 150 server, connect the SCSI cable from the external tape enclosure to the on-board SCSI port at the rear of the Netra 150 server (Figure 1-4).
-
If you are connecting an external disk enclosure to the Netra NFS version of the Netra 150 server, connect the SCSI cable from the external disk enclosure to the Fast-Wide SCSI card installed in SBus slot 1 at the rear of the Netra 150 server (Figure 1-4). If you do not have a Fast-Wide SCSI card installed in SBus slot 1, follow the instructions in "Installing an SBus Card" to install a Fast-Wide SCSI card in SBus slot 1, then return here. Do not connect the external disk enclosure to any SCSI port other than the Fast-Wide SCSI card installed in SBus slot 1.
Figure 1-4 Connecting External Peripherals to the Netra 150 Server
-
-
Power on the peripheral.
Refer to the manual that you received with your external peripheral for those instructions.
Note -If you are connecting an external tape drive to your Netra 150 server (such as the SPARCstorage Library) and you want to use the new external tape drive to back up the data on your system, you must make the necessary software changes to make the new tape drive available for backup. Refer to the software manual that came with your system for those instructions.
If you have no other connections to make, go to "Performing the Initial Configuration".
Connecting a Monitor and Keyboard
-
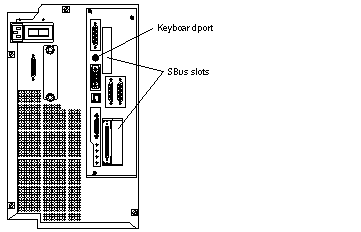
Verify that a frame buffer has been installed in one of the available SBus slots in the Netra 150 server (Figure 1-5).
If you do not have a frame buffer already installed in the Netra 150 server, follow the instructions in "Installing or Replacing SBus Cards" to install one.
Figure 1-5 Connecting a Monitor and Keyboard to the Netra 150 Server
-
Connect the monitor cable to the monitor port on the frame buffer installed in the SBus slot in the Netra 150 server.
-
Connect the keyboard to the keyboard port at the rear of the Netra 150 server (Figure 1-5).
-
Power on the monitor.
Refer to the manual that you received with the monitor for those instructions.
If you have no other connections to make, go to "Performing the Initial Configuration".
Connecting a TTY Terminal
-
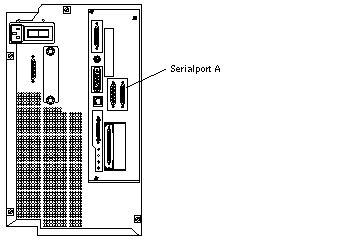
Connect the terminal cable to serial port A (Figure 1-6).
Do not connect the terminal cable to serial port B.
Figure 1-6 Connecting a TTY Terminal to the Netra 150 Server
-
Power on the TTY terminal.
Refer to the manual that you received with the TTY terminal for those instructions.
If you have no other connections to make, go to "Performing the Initial Configuration"."
Performing the Initial Configuration
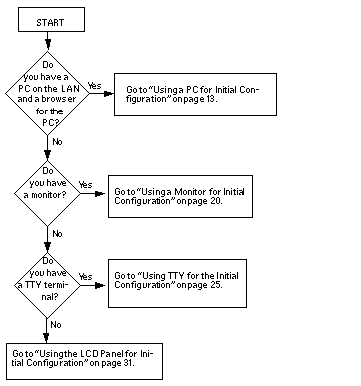
After you have made the necessary hardware connections for the Netra 150 server, you must configure it with information that is specific to your site. You have several choices when performing the initial configuration. See the flowchart in Figure 1-7 for an overview of the configuration process.
Figure 1-7 Flow Chart for Initial Configuration
Using a PC for Initial Configuration
When you use a PC on the LAN for the initial configuration, you will perform the following general tasks:
-
Create a partial configuration diskette using the Utilities diskette that was shipped with your Netra system.
-
Connect the Netra server to the LAN, insert the partial configuration diskette, and power on the Netra server.
-
Use a client on the LAN to complete the initial configuration.
The process is described in detail in the following sections.
To Prepare for Configuration
-
Obtain configuration information for your site:
-
Host name for your Netra server
-
Type of network interface card, Ethernet port, and network protocol
-
LAN interface information (host address and netmask for a TCP/IP network, or network number and frame type for an SPX/IPX network [Netra Internet 150 server only])
-
System administrator alias members
-
Root password
-
Administration Web Server password
-
Date and Time
-
Refer to the Netra User's Manual if you need help obtaining this information.
To Create a Partial Configuration Diskette
-
Insert the Configuration Utilities diskette into the PC diskette drive.
-
c:\ a:
-
a:\ config
This program generates a configuration file
for the local area network interface.
Values shown in square brackets are the default values.
-
Enter the name of the Netra server.
Enter the Host Name for the Netra Server:
-
Enter the number that corresponds to the network interface in your server:
The following interfaces may be available on your Netra server:
1) Lance Ethernet
2) Quad Ethernet
3) Fast Ethernet
4) Token Ring
5) Fast Ethernet 100baseT
6) FDDI
Enter the number corresponding to the interface
to be configured [1]:
-
Enter the Ethernet port that you are using to connect the Netra server to the LAN:
Which port are you using on the Netra to connect to the local area network? [0]:
-
Enter the number corresponding to the type of network you have:
The following types of networks are available:
1) TCP/IP
2) Novell (SPX/IPX)
Enter the number corresponding to the network type [1]:
Note -SPX/IPX is not supported for Netra NFS, so if you have a Netra NFS 150 server, enter 1 (TCP/IP) for this question.
-
Now enter information for your network type as follows.
-
If you typed 1 for a TCP/IP network:
-
Enter the Netra server's local area network host address:
Enter the local area network host address for the
Netra server:
-
Enter the local area network netmask for the
Netra server [255.255.255.0]:
The information you enter is saved on the diskette. This diskette now contains partial configuration information for your Netra server.
-
Go to Step 9.
-
-
If you typed 2, for a Novell (SPX/IPX) network:
-
Enter the IPX network number (refer to the software manual that you received with your system for more information on SPX/IPX network numbers and frame types):
Enter the IPX network number in hexadecimal format:
-
Enter the number for the frame type you are using:
The following frame types are available:
1) Ethernet_802.2
2) Ethernet_802.3
3) Ethernet_II
4) Ethernet_snap
Enter the number corresponding to the frame type being used [1]:
-
The information you enter is saved on the diskette. This diskette now contains partial configuration information for your Netra server.
-
-
Eject the diskette from the drive.
-
Make sure your Netra server is connected to the LAN.
Refer to "Connecting the Server to the Network" for this procedure.
-
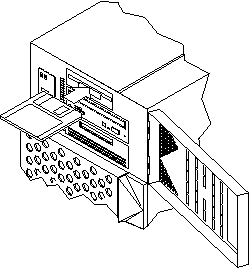
Insert the configuration diskette into the diskette drive at the front of the Netra 150 server (Figure 1-8).
Figure 1-8 Inserting the Configuration Diskette
-
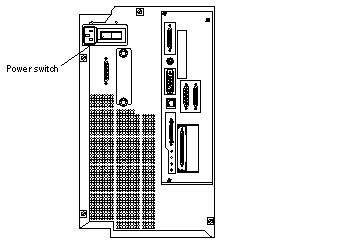
Turn the power switch at the rear of the Netra 150 server to the ON ([boxv ]) position (Figure 1-9).
Figure 1-9 Powering On the Netra 150 Server
Note -When you first power on the Netra 150 server, the LCD display will wait for input indefinitely until you do one of the following:
-
Input the IP address and netmask through the LCD, or
-
Press Return on the console keyboard.
-
To Complete the Initial Configuration
-
Start a browser on a client PC on the LAN.
-
Open the following URL in the browser:
A password window is displayed.
-
Enter setup for the User ID; then enter setup for the Password.
The Netra Welcome page is displayed.
-
Select the Administration option.
The Initial Configuration page is displayed with the remaining configuration tasks.
-
Select the highlighted System Administrator Alias option.
-
Enter the mail addresses of the alias members.
-
Use the Forward Arrow icon at the bottom of the page to go directly to the next configuration task.
-
Complete the Root Password, Administration Web Server, and Date and Time configuration tasks.
Note -When you reach the Change Root Password screen during the initial configuration, press Return in the Current Root Password field, leaving it blank. When you reach the Administration Web Server screen during the initial configuration, enter setup in the Current Administration Password field.
Note -If you change the Administration Web Server password, you must reauthenticate the browser connection.
-
If you have a Netra NFS 150 server, complete the Performance Tuning configuration task (the Performance Tuning configuration task will not appear for the Netra Internet 150 server).
Performance tuning tunes the Netra NFS 150 server to deliver the most optimal throughput (NFS operations/second) at as low a response time as possible for the amount of installed memory and the number of disks configured.
-
Use the Forward Arrow icon to go to the Main Administration page.
The Main Administration page is displayed.
To Complete Other Configuration Tasks
-
Use the displayed modules to perform any further system configuration tasks (such as setting up mail aliases, configuring a name service, or setting routing options).
Refer to the relevant chapters in the Netra User's Manual for more information on each administration module.
-
Once the Netra server is completely configured, save the configuration information as follows:
-
If you have a Netra NFS 150 server, from the Main Administration page, select Network File System (NFS) Administration:Performance Tuning (this link will not appear for the Netra Internet 150 server).
-
If you see the message saying that your Netra NFS server is tuned but requires a reboot, then you must reboot your Netra NFS 150 server for the performance tuning to take effect.
-
If you see the message "The Netra NFS server is already tuned," then your Netra NFS 150 server has been performance tuned and no further action is required.
-
Using a Monitor for Initial Configuration
To Prepare for Configuration
-
Verify that you have the Netra 150 server connected to the network and that you have a monitor and keyboard connected to the server.
Refer to "Connecting the Server to the Network" and "Connecting a Monitor and Keyboard" if you need more information.
-
Obtain the following configuration information for your site:
-
Host name for your Netra server
-
System administrator alias members
-
Root password
-
Administration Web Server password
-
LAN interface information (host address and netmask for a TCP/IP network, or network number and frame type for an SPX/IPX network [Netra Internet 150 server only])
-
Date and Time
Refer to the Netra User's Manual if you need help obtaining this information.
-
To Log In to the Netra Server
-
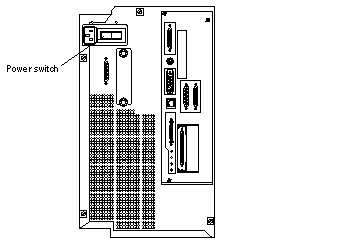
Turn the power switch at the rear of the Netra 150 server to the ON (|) position (Figure 1-10).
Figure 1-10 Powering On the Netra 150 Server
Note -When you first power on the Netra 150 server, the LCD display will wait for input indefinitely until you do one of the following:
-
Input the IP address and netmask through the LCD, or
-
Press Return on the console keyboard.
Note -When you power on the Netra 150 server, you may see messages similar to the following on your screen: /dev/md/rdsk/d0: INCORRECT BLOCK COUNT I=284912 (6 should be 0) (CORRECTED) These messages may appear because the system was not shut down cleanly, but they do not represent any loss of data or file system integrity.
-
-
At the NewNetra console login prompt, enter setup.
Note that an unconfigured Netra server uses the name NewNetra.
-
At the Password prompt, enter setup again.
The Netscape browser is automatically started on your system, and a Netscape Password window is displayed.
-
Enter setup for the User ID; then enter setup for the Password.
The Netra Welcome page is displayed.
To Perform the Initial Configuration
-
Select the Administration option.
The Initial Configuration page is displayed. The administration modules are shown in the order in which they should be configured.
-
Select the highlighted Host Name option.
The Host Name Administration page is displayed.
-
Enter the name for the Netra server.
A message saying the Netra server needs to be restarted is displayed. You can restart the Netra server once you finish configuring it.
Note -If you choose to restart the Netra server immediately, you must repeat the initial login sequence (notice that the new host name is used) to bring you to the Initial Configuration page. At this point, the Host Name option will not show as one of the remaining configuration tasks. Proceed to the next administration module.
-
Use the Forward Arrow icon at the bottom of the page to go directly to the next configuration task.
-
Complete the System Administrator Alias, Root Password, Administration Web Server, Local Area Network, and Date and Time configuration tasks.
Note -When you reach the Change Root Password screen during the initial configuration, press Return in the Current Root Password field, leaving it blank. When you reach the Administration Web Server screen during the initial configuration, enter setup in the Current Administration Password field.
Note -If you change the Administration Web Server password, you must reauthenticate the browser connection.
-
If you have a Netra NFS 150 server, complete the Performance Tuning configuration task (the Performance Tuning configuration task will not appear for the Netra Internet 150 server).
Performance tuning tunes the Netra NFS 150 server to deliver the most optimal throughput (NFS operations/second) at as low a response time as possible for the amount of installed memory and the number of disks configured.
-
Use the Forward Arrow icon to go to the Main Administration page.
The Main Administration page is displayed.
To Complete the Configuration
-
Use the displayed modules to perform any further system configuration tasks (such as setting up mail aliases, configuring a name service, or setting routing options).
Refer to the relevant chapters in the Netra User's Manual for more information on each administration module.
-
Once the Netra server is completely configured, save the configuration information as follows:
-
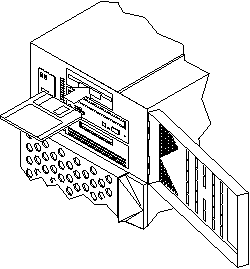
Insert a blank diskette into the diskette drive at the front of the Netra 150 server (Figure 1-11).
Figure 1-11 Inserting the Configuration Diskette
-
Select System Administration: Save and Restore Configuration.
-
Select Save configuration to diskette.
This saves your configuration to the diskette.
-
-
If you did not restart the Netra server after entering the host name, do the following:
-
If you have a Netra NFS 150 server, from the Main Administration page, select Network File System (NFS) Administration:Performance Tuning (this link will not appear for the Netra Internet 150 server).
-
If you see the message saying that your Netra NFS server is tuned but requires a reboot, then you must reboot your Netra NFS 150 server for the performance tuning to take effect.
-
If you see the message "The Netra NFS server is already tuned," then your Netra NFS 150 server has been performance tuned and no further action is required.
-
Using TTY for the Initial Configuration
To Prepare for Configuration
-
Assemble the hardware:
-
PC/VT100 terminal
-
Serial cable
-
Null modem serial cable for the terminal or PC
-
RS-232 cable to connect a modem (if necessary) to the server
-
Null modem adaptor
If you use a PC, it must have terminal emulator software (for example, VT100 emulation). Set the terminal or PC to these line settings (for specific instructions, refer to the user's manual for the terminal or PC):
Table 1-1 PC or Terminal Line SettingsBaud rate
9600
Data bits
8
Parity
none
Stop bits
1
-
-
Verify that you have connected the Netra server to the LAN and attached the TTY terminal to the Netra server.
Refer to "Connecting the Server to the Network" and "Connecting a TTY Terminal" for more information.
-
Obtain configuration information for your site:
-
LAN interface information (host address and netmask for a TCP/IP network, or network number and frame type for an SPX/IPX network [Netra Internet 150 server only])
-
Host name for your Netra server
-
System administrator alias members
-
Root password
-
Administration Web Server password
-
Date and Time
-
Refer to the Netra User's Manual if you need help obtaining this information.
To Run the Setup Script
-
Power on the Netra 150 server and the TTY terminal.
Note -When you first power on the Netra 150 server, the LCD display will wait for input indefinitely until you do one of the following:
-
Input the IP address and netmask through the LCD, or
-
Press Return on the console keyboard.
Note -When you power on the Netra 150 server, you may see messages similar to the following on your screen: /dev/md/rdsk/d0: INCORRECT BLOCK COUNT I=284912 (6 should be 0) (CORRECTED) These messages may appear because the system was not shut down cleanly, but they do not represent any loss of data or file system integrity.
-
-
At the NewNetra console login prompt, enter setup.
Note that an unconfigured Netra server uses the name NewNetra.
-
At the Password prompt, enter setup again.
The following screen is displayed:
This program generates a configuration file
for the local area network interface.
Values shown in square brackets are the default values.
-
Enter the number that corresponds to the network interface in your server:
The following interfaces are available:
1) Lance Ethernet Port 0
2) Lance Ethernet Port 1
Enter the number corresponding to the interface
to be configured [1]:
Note -The interfaces you see in this screen will vary depending on the type of networking cards you have installed in your system.
-
Enter the number corresponding to the type of network you have:
The following types of networks are available:
1) TCP/IP
2) Novell (SPX/IPX)
Enter the number corresponding to the network type [1]:
Note -SPX/IPX is not supported for Netra NFS, so if you have a Netra NFS 150 server, enter 1 (TCP/IP) for this question.
-
Enter information for your network type as follows.
-
If you typed 1 for a TCP/IP network:
-
Enter the Netra server's local area network host address:
Enter the local area network host address for the
Netra server:
-
Enter the local area network netmask for the
Netra server [255.255.255.0]:
-
Confirm that the entered information is correct:
The following configuration information has been entered:

Interface:      your interface
IP Address:     your host address
IP Netmask:     255.255.255.0

Select from the following options:
1) Configure le0 with these values.
2) Discard these values and input new values.
3) Discard these values and exit.
Enter an option [1]:
Lance Ethernet Port 0 has been configured for TCP/IP operation.
IP address:     your host address
Netmask:        255.255.255.0
-
If you typed 2, for a Novell (SPX/IPX) network:
-
Enter the IPX network number (refer to the Netra User's Manual for more information on SPX/IPX network numbers and frame types):
Enter the IPX network number in hexadecimal format:
-
Enter the number for the frame type you are using:
The following frame types are available:
1) Ethernet_802.2
2) Ethernet_802.3
3) Ethernet_II
4) Ethernet_snap
Enter the number corresponding to the frame type being used [1]:
-
Confirm that the entered information is correct:
The following configuration information has been entered:

Interface:      your interface
Frame type:     your frame type
Network number: your network number

Select from the following options:
1) Configure le0 with these values.
2) Discard these values and input new values.
3) Discard these values and exit.
Enter an option [1]:
Lance Ethernet Port 0 has been configured SPX/IPX operation.
Frame type:     your frame type
Network number: your network number
-
-
-
-
To Complete the Initial Configuration from a Client PC
-
Start a browser on a client PC on the LAN.
-
Open the following URL in the browser:
-
Enter setup for the User ID; then enter setup for the Password.
The Netra Welcome page is displayed.
-
Select the Administration option.
The Initial Configuration page is displayed.
Note -The Initial Configuration page will show only the remaining tasks that you must complete to fully configure your Netra server.
-
Select the highlighted Host Name option.
The Host Name Administration page is displayed.
-
Enter the name for the Netra server.
A message saying the Netra server needs to be restarted is displayed. You can restart the Netra server once you finish configuring it.
Note -If you choose to restart the Netra server immediately, you must repeat the initial login sequence (notice that the new host name is used) to bring you to the Initial Configuration page. At this point, the Host Name option will not show as one of the remaining configuration tasks. Proceed to the next administration module.
-
Use the Forward Arrow icon at the bottom of the page to go directly to the next configuration task.
-
Complete the System Administrator Alias, Root Password, Administration Web Server, and Date and Time configuration tasks.
Note -When you reach the Change Root Password screen during the initial configuration, press Return in the Current Root Password field, leaving it blank. When you reach the Administration Web Server screen during the initial configuration, enter setup in the Current Administration Password field.
Note -If you change the Administration Web Server password, you must reauthenticate the browser connection.
-
If you have a Netra NFS 150 server, complete the Performance Tuning configuration task (the Performance Tuning configuration task will not appear for the Netra Internet 150 server).
Performance tuning tunes the Netra NFS 150 server to deliver the most optimal throughput (NFS operations/second) at as low a response time as possible for the amount of installed memory and the number of disks configured.
-
Use the Forward Arrow icon to go to the Main Administration page.
The Main Administration page is displayed.
To Complete Other Configuration Tasks
-
Use the displayed modules to perform any further system configuration tasks (such as setting up mail aliases, configuring a name service, or setting routing options).
Refer to the relevant chapters in the Netra User's Manual for more information on each administration module.
-
Once the Netra server is completely configured, save the configuration information as follows:
-
If you have a Netra NFS 150 server, from the Main Administration page, select Network File System (NFS) Administration:Performance Tuning (this link will not appear for the Netra Internet 150 server).
-
If you see the message saying that your Netra NFS server is tuned but requires a reboot, then you must reboot your Netra NFS 150 server for the performance tuning to take effect.
-
If you see the message "The Netra NFS server is already tuned," then your Netra NFS 150 server has been performance tuned and no further action is required.
-
Using the LCD Panel for Initial Configuration
You can go through a partial initial configuration using the LCD panel on the front of the Netra 150 server.
To Prepare for Configuration
-
Obtain the following configuration information for your site:
-
Host name for your Netra server
-
System administrator alias members
-
Root password
-
Administration Web Server password
-
LAN interface information (host address and netmask for a TCP/IP network, or network number and frame type for an SPX/IPX network [Netra Internet 150 server only])
-
Date and Time
Refer to the Netra User's Manual if you need help obtaining this information.
-
To Perform the Initial Configuration Using the LCD Display
-
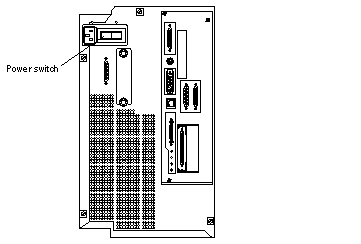
Turn the power switch at the rear of the Netra 150 server to the ON ([boxv ]) position (Figure 1-12).
Figure 1-12 Powering On the Netra NFS 150 Server
When you first power on the Netra 150 server, the LCD display will wait for input indefinitely until you do one of the following:
-
Input the IP address and netmask through the LCD, or
-
Press Return on the console keyboard.
-
-
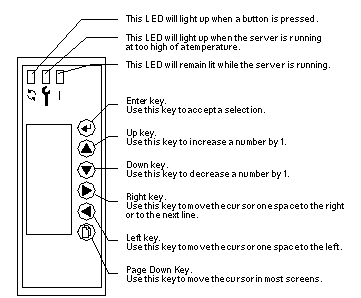
Familiarize yourself with the LCD display at the front of the Netra 150 server (Figure 1-13).
Figure 1-13 Netra 150 Server LCD Display
-
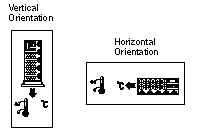
Select the LCD orientation of the Netra 150 server.
Figure 1-14 LCD Display Orientation
-
Wait several minutes until the IP Entry screen is displayed.
-
At the IP Entry screen (Figure 1-15), enter the Netra 150 server's IP address.
Figure 1-15 LCD Display's IP Entry Screen

-
Use the Up and Down arrow keys to increase or decrease the number for the highlighted IP address digit by 1.
-
Use the Left and Right arrow keys to move the cursor through the digits of the IP address.
Note that you must enter a "0" when you have a blank spot in the IP address, so an IP address of 123.123.1.123 would look like this on the LCD display:
Figure 1-16 Sample IP Address in the LCD Display

-
Press the Enter key when you have completed inputting the IP Address.
Note -If you entered an incorrect IP address, you will see an error screen. Press the Enter key to go back to the IP Entry screen.
-
-
At the Mask Entry screen (Figure 1-17), enter the Netra 150 server's network mask address.
Figure 1-17 LCD Display's Mask Entry Screen

-
Use the Up and Down arrow keys to increase or decrease the number for the highlighted network mask address digit by 1.
-
Use the Left and Right arrow keys to move the cursor through the digits of the network mask address.
Note that you must enter a "0" when you have a blank spot in the network mask address, just as you did when entering the IP address.
-
Press the Enter key when you have completed inputting the network mask Address.
Note -If you entered an incorrect network mask address, you will see an error screen. Press the Enter key to go back to the Mask Entry screen.
-
If you have entered the correct addresses, you will now see the status screen on the LCD display (Figure 1-18).
Figure 1-18 LCD Display's Status Screen

To Complete the Initial Configuration
-
Start a browser on a client PC on the LAN.
-
Open the following URL in the browser:
http://netra_host_address:81
A password window is displayed.
-
Enter setup for the User ID; then enter setup for the Password.
The Netra Welcome page is displayed.
-
Select the Administration option.
The Initial Configuration page is displayed with the remaining configuration tasks.
-
Select the highlighted Host Name option.
The Host Name Administration page is displayed.
-
Enter the name for the Netra server.
A message saying the Netra server needs to be restarted is displayed. You can restart the Netra server once you finish configuring it.
Note -If you choose to restart the Netra server immediately, you must repeat the initial login sequence (notice that the new host name is used) to bring you to the Initial Configuration page. At this point, the Host Name option will not show as one of the remaining configuration tasks. Proceed to the next administration module.
-
Use the Forward Arrow icon at the bottom of the page to go directly to the next configuration task.
-
Complete the System Administrator Alias, Root Password, Administration Web Server, and Date and Time configuration tasks.
Note -When you reach the Change Root Password screen during the initial configuration, press Return in the Current Root Password field, leaving it blank. When you reach the Administration Web Server screen during the initial configuration, enter setup in the Current Administration Password field.
Note -If you change the Administration Web Server password, you must reauthenticate the browser connection.
-
If you have a Netra NFS 150 server, complete the Performance Tuning configuration task (the Performance Tuning configuration task will not appear for the Netra Internet 150 server).
Performance tuning tunes the Netra NFS 150 server to deliver the most optimal throughput (NFS operations/second) at as low a response time as possible for the amount of installed memory and the number of disks configured.
-
Use the Forward Arrow icon to go to the Main Administration page.
The Main Administration page is displayed.
To Complete the Configuration
-
Use the displayed modules to perform any further system configuration tasks (such as setting up mail aliases, configuring a name service, or setting routing options).
Refer to the relevant chapters in the Netra User's Manual for more information on each administration module.
-
Once the Netra server is completely configured, save the configuration information as follows:
-
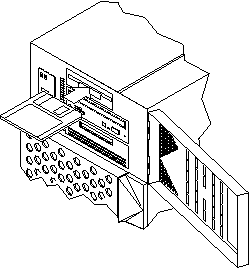
Insert a blank diskette into the diskette drive at the front of the Netra 150 server (Figure 1-19).
Figure 1-19 Inserting the Configuration Diskette
-
Select System Administration: Save and Restore Configuration.
-
Select Save configuration to diskette.
This saves your configuration to the diskette.
-
-
If you did not restart the Netra server after entering the host name, do the following:
-
If you have a Netra NFS 150 server, from the Main Administration page, select Network File System (NFS) Administration:Performance Tuning (this link will not appear for the Netra Internet 150 server).
-
If you see the message saying that your Netra NFS server is tuned but requires a reboot, then you must reboot your Netra NFS 150 server for the performance tuning to take effect.
-
If you see the message "The Netra NFS server is already tuned," then your Netra NFS 150 server has been performance tuned and no further action is required.
-
Powering Off the System
Before turning off the system power, you must halt the operating system or data loss may occur.
To shut down the system and give users a shutdown warning:
-
Notify users that the system is going down.
-
Back up the system files and data to tape, if necessary.
-
Halt the system.
Refer to the Netra User's Manual for those instructions.
Note -Always halt the system using the HTML interface instructions given in the Netra User's Manual; if you halt the system using the command line interface, you may have to reset one of the power supplies inside the Netra 150 before you can fully restart it.
-
If you have a monitor or terminal connected to the Netra 150 server, wait for the system-halted message and the boot monitor prompt.
-
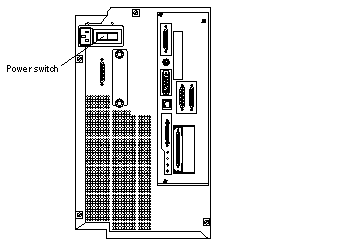
Locate the power switch at the rear of the Netra 150 server (Figure 1-20).
Figure 1-20 Netra 150 Server Power Switch
-
Turn the power switch to the OFF (O) position.
 Caution -
 Some versions of the Netra 150 server come equipped with an Uninterruptible Power Supply (UPS). If a UPS is present in your system, under some fault conditions it is possible for the UPS to continue providing power to the unit even though the power switch is turned off. If you can still hear the cooling fans operating after you have turned the power switch to the OFF (O) position, then this fault condition is present and the UPS is still providing power to the unit. If this occurs, do not attempt to service the unit until the UPS is fully discharged. To discharge the UPS, disconnect the power cord from the rear of the system and turn the power switch back on. It will take approximately 20 minutes for the UPS to fully discharge. Contact your local Sun service representative to correct the UPS problem before attempting to service the Netra 150 server.
- © 2010, Oracle Corporation and/or its affiliates
