Installing the Netra 150 Server
Note -
If you want to install an internal peripheral, DSIMM or SBus card into your Netra 150 server, do so now. Refer to Chapter 2, Adding or Replacing Hardware in the Netra 150 Server" for those instructions.
Connecting the Server to the Network
-
If you have the rack-ready version of the Netra 150 server, install it in the rack if you haven't already done so.
Refer to the Model 150 Series Rack-Ready Installation Manual for those instructions.
-
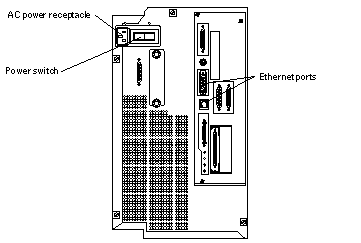
Verify that the Netra 150 server power switch is in the OFF (O) position (Figure 1-2).
Figure 1-2 Connecting the Netra 150 Server to the Network
-
Connect the power cord to the AC power receptacle at the rear of the Netra 150 server (Figure 1-2).
-
Connect a network cable from the Internet connection to one of the two Ethernet ports at the rear of the Netra 150 server (Figure 1-2).
-
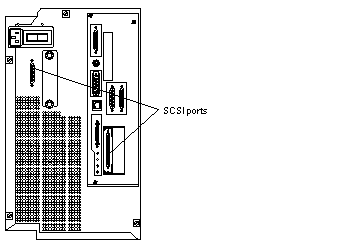
Verify that an external fast wide SCSI cable is connected between the appropriate SCSI ports as shown in Figure 1-3.
Figure 1-3 Connecting the SCSI Cable
-
Determine if you have any other connections to make.
-
If you want to connect an external peripheral to your Netra 150 server, go to "Connecting an External Peripheral".
-
If you want to connect a monitor and keyboard to your Netra 150 server, go to "Connecting a Monitor and Keyboard".
-
If you want to connect a TTY terminal to your Netra 150 server, go to "Connecting a TTY Terminal".
-
If you have no other connections to make, go to "Performing the Initial Configuration".
-
Connecting an External Peripheral
Note -
If you are connecting an external disk enclosure to the Netra NFS version of the Netra 150 server, read Appendix B, Understanding Battery Management Issues for a Netra 150 Server (NFS Version Only)" before proceeding with these instructions.
-
Determine if you are connecting an external peripheral to the Netra Internet or Netra NFS version of the Netra 150 server.
-
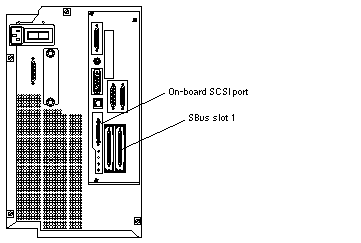
If you are connecting an external peripheral to the Netra Internet version of the Netra 150 server, connect the SCSI cable from the external peripheral to the on-board SCSI port at the rear of the Netra 150 server (Figure 1-4). Note that the internal floppy, tape and CD-ROM drives take SCSI addresses 0, 4 and 6, respectively, so you must verify that none of the drives in the external peripheral use those SCSI addresses.
-
If you are connecting an external tape enclosure to the Netra NFS version of the Netra 150 server, connect the SCSI cable from the external tape enclosure to the on-board SCSI port at the rear of the Netra 150 server (Figure 1-4).
-
If you are connecting an external disk enclosure to the Netra NFS version of the Netra 150 server, connect the SCSI cable from the external disk enclosure to the Fast-Wide SCSI card installed in SBus slot 1 at the rear of the Netra 150 server (Figure 1-4). If you do not have a Fast-Wide SCSI card installed in SBus slot 1, follow the instructions in "Installing an SBus Card" to install a Fast-Wide SCSI card in SBus slot 1, then return here. Do not connect the external disk enclosure to any SCSI port other than the Fast-Wide SCSI card installed in SBus slot 1.
Figure 1-4 Connecting External Peripherals to the Netra 150 Server
-
-
Power on the peripheral.
Refer to the manual that you received with your external peripheral for those instructions.
Note -If you are connecting an external tape drive to your Netra 150 server (such as the SPARCstorage Library) and you want to use the new external tape drive to back up the data on your system, you must make the necessary software changes to make the new tape drive available for backup. Refer to the software manual that came with your system for those instructions.
If you have no other connections to make, go to "Performing the Initial Configuration".
Connecting a Monitor and Keyboard
-
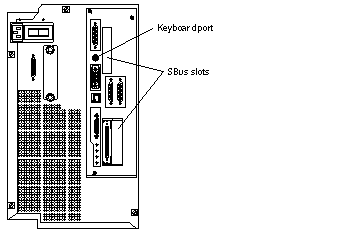
Verify that a frame buffer has been installed in one of the available SBus slots in the Netra 150 server (Figure 1-5).
If you do not have a frame buffer already installed in the Netra 150 server, follow the instructions in "Installing or Replacing SBus Cards" to install one.
Figure 1-5 Connecting a Monitor and Keyboard to the Netra 150 Server
-
Connect the monitor cable to the monitor port on the frame buffer installed in the SBus slot in the Netra 150 server.
-
Connect the keyboard to the keyboard port at the rear of the Netra 150 server (Figure 1-5).
-
Power on the monitor.
Refer to the manual that you received with the monitor for those instructions.
If you have no other connections to make, go to "Performing the Initial Configuration".
Connecting a TTY Terminal
-
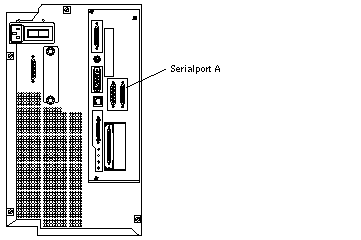
Connect the terminal cable to serial port A (Figure 1-6).
Do not connect the terminal cable to serial port B.
Figure 1-6 Connecting a TTY Terminal to the Netra 150 Server
-
Power on the TTY terminal.
Refer to the manual that you received with the TTY terminal for those instructions.
If you have no other connections to make, go to "Performing the Initial Configuration"."
- © 2010, Oracle Corporation and/or its affiliates
