Using a PC for Initial Configuration
When you use a PC on the LAN for the initial configuration, you will perform the following general tasks:
-
Create a partial configuration diskette using the Utilities diskette that was shipped with your Netra system.
-
Connect the Netra server to the LAN, insert the partial configuration diskette, and power on the Netra server.
-
Use a client on the LAN to complete the initial configuration.
The process is described in detail in the following sections.
To Prepare for Configuration
-
Obtain configuration information for your site:
-
Host name for your Netra server
-
Type of network interface card, Ethernet port, and network protocol
-
LAN interface information (host address and netmask for a TCP/IP network, or network number and frame type for an SPX/IPX network [Netra Internet 150 server only])
-
System administrator alias members
-
Root password
-
Administration Web Server password
-
Date and Time
-
Refer to the Netra User's Manual if you need help obtaining this information.
To Create a Partial Configuration Diskette
-
Insert the Configuration Utilities diskette into the PC diskette drive.
-
c:\ a:
-
a:\ config
This program generates a configuration file
for the local area network interface.
Values shown in square brackets are the default values.
-
Enter the name of the Netra server.
Enter the Host Name for the Netra Server:
-
Enter the number that corresponds to the network interface in your server:
The following interfaces may be available on your Netra server:
1) Lance Ethernet
2) Quad Ethernet
3) Fast Ethernet
4) Token Ring
5) Fast Ethernet 100baseT
6) FDDI
Enter the number corresponding to the interface
to be configured [1]:
-
Enter the Ethernet port that you are using to connect the Netra server to the LAN:
Which port are you using on the Netra to connect to the local area network? [0]:
-
Enter the number corresponding to the type of network you have:
The following types of networks are available:
1) TCP/IP
2) Novell (SPX/IPX)
Enter the number corresponding to the network type [1]:
Note -SPX/IPX is not supported for Netra NFS, so if you have a Netra NFS 150 server, enter 1 (TCP/IP) for this question.
-
Now enter information for your network type as follows.
-
If you typed 1 for a TCP/IP network:
-
Enter the Netra server's local area network host address:
Enter the local area network host address for the
Netra server:
-
Enter the local area network netmask for the
Netra server [255.255.255.0]:
The information you enter is saved on the diskette. This diskette now contains partial configuration information for your Netra server.
-
Go to Step 9.
-
-
If you typed 2, for a Novell (SPX/IPX) network:
-
Enter the IPX network number (refer to the software manual that you received with your system for more information on SPX/IPX network numbers and frame types):
Enter the IPX network number in hexadecimal format:
-
Enter the number for the frame type you are using:
The following frame types are available:
1) Ethernet_802.2
2) Ethernet_802.3
3) Ethernet_II
4) Ethernet_snap
Enter the number corresponding to the frame type being used [1]:
-
The information you enter is saved on the diskette. This diskette now contains partial configuration information for your Netra server.
-
-
Eject the diskette from the drive.
-
Make sure your Netra server is connected to the LAN.
Refer to "Connecting the Server to the Network" for this procedure.
-
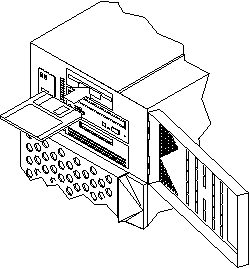
Insert the configuration diskette into the diskette drive at the front of the Netra 150 server (Figure 1-8).
Figure 1-8 Inserting the Configuration Diskette

-
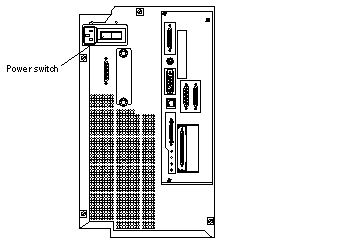
Turn the power switch at the rear of the Netra 150 server to the ON ([boxv ]) position (Figure 1-9).
Figure 1-9 Powering On the Netra 150 Server

Note -When you first power on the Netra 150 server, the LCD display will wait for input indefinitely until you do one of the following:
-
Input the IP address and netmask through the LCD, or
-
Press Return on the console keyboard.
-
To Complete the Initial Configuration
-
Start a browser on a client PC on the LAN.
-
Open the following URL in the browser:
A password window is displayed.
-
Enter setup for the User ID; then enter setup for the Password.
The Netra Welcome page is displayed.
-
Select the Administration option.
The Initial Configuration page is displayed with the remaining configuration tasks.
-
Select the highlighted System Administrator Alias option.
-
Enter the mail addresses of the alias members.
-
Use the Forward Arrow icon at the bottom of the page to go directly to the next configuration task.
-
Complete the Root Password, Administration Web Server, and Date and Time configuration tasks.
Note -When you reach the Change Root Password screen during the initial configuration, press Return in the Current Root Password field, leaving it blank. When you reach the Administration Web Server screen during the initial configuration, enter setup in the Current Administration Password field.
Note -If you change the Administration Web Server password, you must reauthenticate the browser connection.
-
If you have a Netra NFS 150 server, complete the Performance Tuning configuration task (the Performance Tuning configuration task will not appear for the Netra Internet 150 server).
Performance tuning tunes the Netra NFS 150 server to deliver the most optimal throughput (NFS operations/second) at as low a response time as possible for the amount of installed memory and the number of disks configured.
-
Use the Forward Arrow icon to go to the Main Administration page.
The Main Administration page is displayed.
To Complete Other Configuration Tasks
-
Use the displayed modules to perform any further system configuration tasks (such as setting up mail aliases, configuring a name service, or setting routing options).
Refer to the relevant chapters in the Netra User's Manual for more information on each administration module.
-
Once the Netra server is completely configured, save the configuration information as follows:
-
If you have a Netra NFS 150 server, from the Main Administration page, select Network File System (NFS) Administration:Performance Tuning (this link will not appear for the Netra Internet 150 server).
-
If you see the message saying that your Netra NFS server is tuned but requires a reboot, then you must reboot your Netra NFS 150 server for the performance tuning to take effect.
-
If you see the message "The Netra NFS server is already tuned," then your Netra NFS 150 server has been performance tuned and no further action is required.
-
- © 2010, Oracle Corporation and/or its affiliates
