Using a Monitor for Initial Configuration
To Prepare for Configuration
-
Verify that you have the Netra 150 server connected to the network and that you have a monitor and keyboard connected to the server.
Refer to "Connecting the Server to the Network" and "Connecting a Monitor and Keyboard" if you need more information.
-
Obtain the following configuration information for your site:
-
Host name for your Netra server
-
System administrator alias members
-
Root password
-
Administration Web Server password
-
LAN interface information (host address and netmask for a TCP/IP network, or network number and frame type for an SPX/IPX network [Netra Internet 150 server only])
-
Date and Time
Refer to the Netra User's Manual if you need help obtaining this information.
-
To Log In to the Netra Server
-
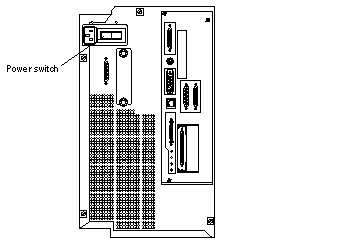
Turn the power switch at the rear of the Netra 150 server to the ON (|) position (Figure 1-10).
Figure 1-10 Powering On the Netra 150 Server

Note -When you first power on the Netra 150 server, the LCD display will wait for input indefinitely until you do one of the following:
-
Input the IP address and netmask through the LCD, or
-
Press Return on the console keyboard.
Note -When you power on the Netra 150 server, you may see messages similar to the following on your screen: /dev/md/rdsk/d0: INCORRECT BLOCK COUNT I=284912 (6 should be 0) (CORRECTED) These messages may appear because the system was not shut down cleanly, but they do not represent any loss of data or file system integrity.
-
-
At the NewNetra console login prompt, enter setup.
Note that an unconfigured Netra server uses the name NewNetra.
-
At the Password prompt, enter setup again.
The Netscape browser is automatically started on your system, and a Netscape Password window is displayed.
-
Enter setup for the User ID; then enter setup for the Password.
The Netra Welcome page is displayed.
To Perform the Initial Configuration
-
Select the Administration option.
The Initial Configuration page is displayed. The administration modules are shown in the order in which they should be configured.
-
Select the highlighted Host Name option.
The Host Name Administration page is displayed.
-
Enter the name for the Netra server.
A message saying the Netra server needs to be restarted is displayed. You can restart the Netra server once you finish configuring it.
Note -If you choose to restart the Netra server immediately, you must repeat the initial login sequence (notice that the new host name is used) to bring you to the Initial Configuration page. At this point, the Host Name option will not show as one of the remaining configuration tasks. Proceed to the next administration module.
-
Use the Forward Arrow icon at the bottom of the page to go directly to the next configuration task.
-
Complete the System Administrator Alias, Root Password, Administration Web Server, Local Area Network, and Date and Time configuration tasks.
Note -When you reach the Change Root Password screen during the initial configuration, press Return in the Current Root Password field, leaving it blank. When you reach the Administration Web Server screen during the initial configuration, enter setup in the Current Administration Password field.
Note -If you change the Administration Web Server password, you must reauthenticate the browser connection.
-
If you have a Netra NFS 150 server, complete the Performance Tuning configuration task (the Performance Tuning configuration task will not appear for the Netra Internet 150 server).
Performance tuning tunes the Netra NFS 150 server to deliver the most optimal throughput (NFS operations/second) at as low a response time as possible for the amount of installed memory and the number of disks configured.
-
Use the Forward Arrow icon to go to the Main Administration page.
The Main Administration page is displayed.
To Complete the Configuration
-
Use the displayed modules to perform any further system configuration tasks (such as setting up mail aliases, configuring a name service, or setting routing options).
Refer to the relevant chapters in the Netra User's Manual for more information on each administration module.
-
Once the Netra server is completely configured, save the configuration information as follows:
-
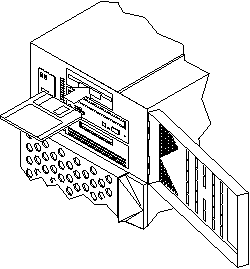
Insert a blank diskette into the diskette drive at the front of the Netra 150 server (Figure 1-11).
Figure 1-11 Inserting the Configuration Diskette

-
Select System Administration: Save and Restore Configuration.
-
Select Save configuration to diskette.
This saves your configuration to the diskette.
-
-
If you did not restart the Netra server after entering the host name, do the following:
-
If you have a Netra NFS 150 server, from the Main Administration page, select Network File System (NFS) Administration:Performance Tuning (this link will not appear for the Netra Internet 150 server).
-
If you see the message saying that your Netra NFS server is tuned but requires a reboot, then you must reboot your Netra NFS 150 server for the performance tuning to take effect.
-
If you see the message "The Netra NFS server is already tuned," then your Netra NFS 150 server has been performance tuned and no further action is required.
-
- © 2010, Oracle Corporation and/or its affiliates
