5.2 Services for the NetWare Realm
This section contains instructions for the following tasks:
5.2.1 Starting NetWare Services
Follow these steps to start the NetWare realm and set its services to accept client connection requests:
-
Follow these links:
-
NetWare Realm->Configuration and Control->Start all NetWare Services
The Confirmation screen appears.
-
-
Click OK.
The Start all NetWare Services screen appears.
-
Click OK.
5.2.2 Shutting Down NetWare Services
Follow these steps to shut down the NetWare realm and set its services to reject client connection requests:
-
Follow these links:
-
NetWare Realm->Configuration and Control->Shutdown all NetWare Services
The Confirmation screen appears.
-
-
Click OK.
The Shutdown all NetWare Services screen appears.
-
Click OK.
5.2.3 Checking Realm Status
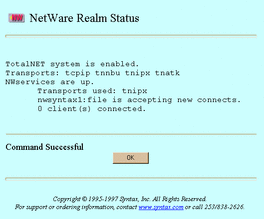
Follow these steps to check the status of the TAS system, transports, services, and client connections in the NetWare realm:
-
Follow these links:
-
NetWare Realm->Configuration and Control->NetWare Realm Status
The NetWare Realm Status screen appears:
-
-
When finished, click OK.
To check realm status from the UNIX command line, use the tnstat command.
5.2.4 Updating Realm Configuration
Follow the steps below to change configuration attributes for this realm. By default, TAS loads user information into the bindery incrementally, as users log in.
-
Follow these links:
-
NetWare Realm->Configuration and Control->Configuration
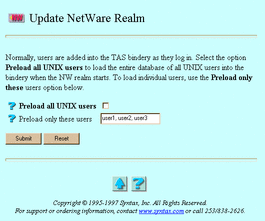
The Update NetWare Realm screen appears:
-
-
Select one of the following options:
-
Pre-load all UNIX users -- The option to direct TAS to add all UNIX user names from the UNIX database--either /etc/passwd or NIS--into the TAS bindery when the realm starts. Pre-loading users reduces the time it takes them to log in for the first time, but the time the server takes to start up and initialize the bindery increases slightly per user. This can take a long time on systems with large numbers of users; do not select this option for sites with more than 500 users or for sites running NIS.
-
Preload only these users -- The option to preload selected users to the bindery when the server starts. Enter those user names in this field. Pre-loading users reduces the time it takes them to log in for the first time, but the time the server takes to start up and initialize the bindery increases slightly per user.
-
-
Click Submit.
The Update NetWare Realm Configuration screen appears.
-
Click OK.
To update realm status configuration from the UNIX command line, use the tnrealm command.
5.2.5 Creating and Modifying File Services
TAS allows NetWare-compatible clients to use UNIX file and print resources.
Follow the steps below to create or modify a file service in the NetWare realm. You can also use the file service creation wizard at NetWare Realm->File Service Creation or System->File Service Creation ->NetWare Realm File Service to create a file service.
-
Follow these links:
-
NetWare Realm->Manage File Services
The List of NetWare File Services screen appears.
-
-
From the list, select the file service you want to modify, or enter the name of a service you want to create in the text field. A file service name can contain up to 47 lower-case, printable, ASCII characters and no spaces, slashes, colons, semicolons, commas, asterisks, or question marks. The list contains nothing if no file services exist.
-
Click Create or Administer. The Administer button does not appear if no file services exist.
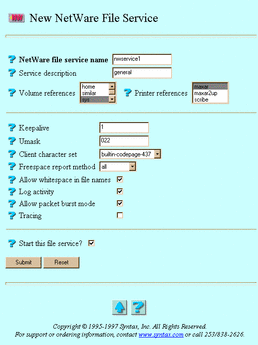
If you clicked Create, the New NetWare File Service screen below appears. Go to Step 4.
If you clicked Administer, the NetWare File Service servicename screen appears. Click Configuration, or click the appropriate link from the following, then click OK on the subsequent screen: Accept Service Connections, Reject Service Connections, Status, Start Service, Shutdown Service. If you click Configuration, the Update NetWare File Service servicename screen, same as the New NetWare File Service screen below, appears. Go to Step 4.
-
Enter or select values for the following attributes, as needed:
-
NetWare file service name -- The file service to which users connect, according to its appearance in their Network Neighborhood lists. The file service name conventionally appears in lower-case on clients and in upper-case on the network. If you clicked Administer and Configuration, this attribute does not appear.
-
Service description -- The description used within TAS for the service. It consists of an arbitrary line of text.
-
Volume references -- A list of the volumes this file service references and exports. You can configure the referenced volumes and their attributes via System->Volumes. Select the volumes you want to reference.
-
Printer references -- A list of printers each file service exports. You can configure the referenced printers and their attributes via System->Printers. Select the printers you want to reference.
-
Keepalive -- The number of minutes between dispatches of keepalive packets. The server sends keepalive probes to detect active client sessions. This attribute defaults to one minute.
-
Umask -- The default file access permissions for TAS clients. The three-digit umask number represents the UNIX file protection mask and works the same as the UNIX umask command. Refer to the UNIX umask(1) man page for more information on how the system interprets digits.
-
Client character set -- The character set that TAS assumes all of this service's clients use. It defaults to builtin-codepage-437. Select a different character set if necessary.
-
Freespace report method -- The method for calculating the amount of free disk space. Systems that do not support the UNIX statfs() system call or its equivalent do not support this option. If set to the default all, this attribute makes TAS report to clients all of the free space on all of the partitions. If set to root, this attribute makes TAS report only the free disk space on the TAS volume for this connection.
-
Allow whitespace in file names -- The option to allow NetWare clients to use spaces in file names.
-
Log activity -- The option to enable activity logging. This directs this file service to record client activity in activity.tn in the TAS home directory. When a client disconnects, TAS appends a line of data about the client's session to the log file at activity.tn. This attribute defaults to no activity logging.
-
Allow packet burst mode -- The option to enable TAS's use of packet-burst mode, a method that NetWare hosts use to improve performance. TAS uses packet burst mode by default.
-
Tracing -- The option to direct this file service to write debugging traces to a file. Syntax Technical Support can use the trace file to help diagnose problems.
-
Start this file service? -- The option to start this file service when you click Submit. If you clicked Administer and Configuration, this attribute does not appear.
-
-
Click Submit.
The Create New NetWare File Service servicename screen or the Update NetWare File Service servicename screen appears.
-
Click OK.
To administer a file service from the UNIX command line, use the tnservice command.
5.2.6 Shutting Down File Services
Follow these steps to shut down a file service:
-
Follow these links:
-
NetWare Realm->Manage File Services
The List of NetWare File Services screen appears.
-
-
From the list, select the file service you want to shut down.
-
Click Administer.
The NetWare File Service servicename screen appears.
-
Click Shutdown Service.
The Confirmation screen appears.
-
Click OK.
The Shutdown servicename Service in NetWare Realm screen appears.
-
Click OK.
5.2.7 Deleting File Services
Follow the steps below to delete file services in the NetWare realm. These steps include instructions for shutting down the file services you want to delete, because you must shut down a file service to delete it.
-
Follow these links:
NetWare Realm->Manage File Services
The List of NetWare File Services screen appears.
-
From the list, select the file service you want to delete.
-
Click Administer.
The NetWare File Service servicename screen appears.
-
Click Shutdown Service.
The Confirmation screen appears.
-
Click OK.
The Shutdown servicename Service in NetWare Realm screen appears.
-
Click OK.
-
Repeat Steps 1-5 for each service you want to delete.
-
Follow these links:
-
NetWare Realm->Manage File Services
The List of NetWare File Services screen reappears.
-
-
From the list, select the file services you want to delete.
-
Click Delete.
The Confirmation screen appears.
-
Click OK.
The Delete NetWare File Service screen appears.
-
Click OK.
5.2.8 Accepting Services
NetWare file services accept client connection requests unless you set them to reject connection requests. Starting TAS also sets its services to accept connection requests.
Follow these steps to make NetWare file services accept client connection requests:
-
Follow these links:
-
NetWare Realm->Configuration and Control->Accept Service Connections
The Confirmation screen appears.
-
-
Click OK.
The Accept NetWare/servicename Service Connections screen appears.
-
Click OK.
To accept services from the UNIX command line, use the tnaccept command.
5.2.9 Rejecting Services
NetWare file services accept client connection requests unless you set them to reject connection requests. Shutting down TAS also sets its services to reject connection requests.
Follow these steps to make NetWare file services reject client connection requests:
-
Follow these links:
NetWare Realm->Configuration and Control->Reject Service Connections
The Confirmation screen appears.
-
Click OK.
The Reject NetWare/servicename Service Connections screen appears.
-
Click OK.
To reject services from the UNIX command line, use the tnreject command.
5.2.10 Administering Attach Points
Follow these steps to create, modify, or delete attach points--points on directory paths at which clients must provide credentials--in the NetWare realm:
-
Follow these links:
-
NetWare Realm->Manage File Services
The List of NetWare File Services screen appears.
-
-
From the list, select the file service in which you want to administer an attach point.
-
Click Administer.
The NetWare File Service servicename screen appears.
-
Click Attach Points.
The List of Defined Attach Points screen appears.
-
From the list, select the attach point you want to modify or delete, or enter the name of an attach point you want to create in the text field. If deleting, you may select more than one attach point. The list contains nothing if no attach points exist.
-
Click Create, Modify, or Delete. The Modify and Delete buttons do not appear if no attach points exist.
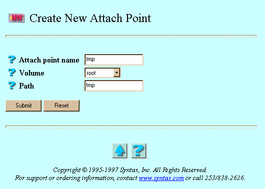
If you clicked Create, the Create New Attach Point screen below appears. Go to Step 7.
If you clicked Modify, the Update Attach Point attachpoint screen, same as the Create New Attach Point screen below, appears. Go to Step 7.
If you clicked Delete, the Confirmation screen appears. Click OK. The Delete Attach Points screen appears. Click OK. Do not go to Step 7.
-
Enter or select values for the following attributes:
-
Attach point name -- The attach point. If you clicked Modify, this attribute does not appear.
-
Volume -- The list of volumes exported by this service. TAS defines volumes at the system level. File services can reference defined volumes; such references export the volumes.
-
Path -- The directory below the selected volume, used as the virtual root by clients who connect to this attach point.
-
-
Click Submit.
The Create New Attach Point attachpoint screen or the Update Attach Point attachpoint screen appears.
-
Click OK.
To administer attach points from the UNIX command line, use the tnattach command.
5.2.11 Configuring Security
Follow these steps to configure NetWare file authentication:
-
Follow these links:
-
NetWare Realm->Manage File Services
The List of NetWare File Services screen appears.
-
-
From the list, select the file service for which you want to configure authentication.
-
Click Administer.
The NetWare File Service servicename screen appears.
-
Click Authentication and Service Mode Options.
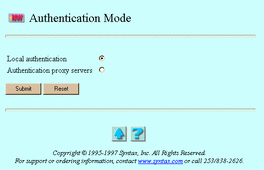
The Authentication Mode screen appears:
-
Select one of the following options:
-
Local authentication -- Authentication by a file server in the NetWare realm. If the server cannot verify a client's user ID and password, it refuses the connection. If the realm uses local authentication, it does not consult a proxy server. You may choose open authentication or secure authentication. With open authentication, client and server exchange clear-text passwords. With secure authentication, client and server exchange a series of messages that allows the server to verify that the client knows the correct password, without transmitting the password or any representation of it.
-
Authentication proxy servers -- Authentication by another NetWare-compatible server. If this other, proxy server cannot verify a client's user ID and password, it refuses the connection. If it accepts the connection, the local server looks up the user name in the local database--either /etc/passwd or NIS--to get the user's UNIX ID.
-
-
Click Submit.
If you selected Local authentication, the Update Local Authentication for servicename screen appears. Select or enter values for the following attributes, as needed:
-
Password encryption -- The option to keep passwords from transmitting across the network. Without password encryption, any UNIX user can potentially connect to the server. In this open authentication environment, client and server exchange clear-text passwords. Password encryption, the secure authentication method, provides improved security, but you must maintain a separate user-password database for it. When you enable password encryption and secure authentication, only users added via Passwords can connect. With secure authentication, client and server exchange a series of messages that allows the server to verify that the client knows the correct password, without transmitting the password or any representation of it.
-
Username map -- The option to allow file services to validate clients by mapping them to valid UNIX users. You must define username maps before selecting this option (see "4.2 Administering Username Maps").
-
Allow null passwords -- The option to allow UNIX users without passwords to access the server. By default, TAS denies such users access to the server, for better security. This option has no effect if you enable Password encryption or Authentication proxy servers.
-
User restrictions -- The option to restrict the users who can connect to this service. Select it by selecting Allow or Deny and entering the names of the users in the adjacent Users field. If you enter no user names, TAS ignores this attribute. Separate user names with commas.
-
DCE authentication -- The option to cause this service to use DCE rather than the native UNIX password facility for authentication. If this service uses Password encryption or Share mode or if you defined Authentication proxy servers, this other authentication method takes precedence. This option appears only if you have TAS-DCE, and it does not control the acquisition of DCE credentials. DCE-enabled host systems always require appropriate DCE credentials, if possible. See TAS-DCE Guide.
If you selected Authentication proxy servers the Update Authentication Proxy Server for servicename screen appears. Enter or select values for the following attributes, as needed:
-
Authentication proxy servers -- The list of servers TAS will contact as a proxy server, each in turn, until one of them responds. Separate servers with commas.
-
Username map -- The option to allow file services to validate clients by mapping them to valid UNIX users. You must define username maps before selecting this option (see "4.2 Administering Username Maps").
-
Allow null passwords -- The option to allow UNIX users without passwords to access the server. By default, TAS denies such users access to the server, for better security. This option has no effect if you enable Password encryption or Authentication proxy servers.
-
User restrictions -- The option to restrict the users who can connect to this service. Select it by selecting either Allow or Deny and entering the names of the users in the adjacent Users field. If you enter no user names, TAS ignores this attribute. Separate user names with commas.
-
-
Click Submit.
The Update Local Authentication for servicename screen or the Update Authentication Proxy Server for servicename screen appears.
-
Click OK.
To configure security from the UNIX command line, use the tnservice command.
5.2.12 Creating and Modifying Terminal Services
Terminal services allow client-based terminal emulator programs to connect to the UNIX host. For many clients, you can simply use the built-in TCP/IP protocol and a vendor-provided--or third-party--telnet program. TAS NetWare terminal services provide the same capability using SPX as a transport. To connect to TAS NetWare terminal services, you need a terminal emulator that supports SPX. Usually, clients with only IPX/SPX available use TAS NetWare terminal services.
Follow these steps to create or modify a terminal service:
-
Follow these links:
-
NetWare Realm->Manage Terminal Services
The List of NetWare Terminal Service screen appears.
-
-
From the list, select the terminal service you want to delete, or enter the name of a service you want to create in the text field. The list contains nothing if no terminal services exist.
-
Click Create or Administer. The Administer button does not appear if no terminal services exist.
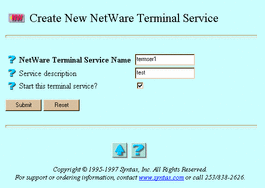
If you clicked Create, the Create New NetWare Terminal Service screen below appears. Go to Step 4.
If you clicked Administer, the NetWare Terminal Service servicename screen appears. Click Configuration, or click the appropriate link from the following, then click OK on the subsequent screen: Accept Service Connections, Reject Service Connections, Status, Start Service, Shutdown Service. If you click Configuration, the Update NetWare Terminal Service servicename screen, same as the Create New NetWare Terminal Service screen below, appears. Go to Step 4.
-
Enter or select values for the following attributes, as needed:
-
NetWare Terminal Service Name -- The terminal service. If you clicked Administer and Configuration, this attribute does not appear.
-
Service description -- The description used within TAS for the service. It consists of an arbitrary line of text.
-
Start this terminal service? -- The option to start this terminal service when you click Submit. If you clicked Administer and Configuration, this attribute does not appear.
-
-
Click Submit.
The Create New NetWare Terminal Service servicename screen or the Update NetWare Terminal Service servicename screen appears.
-
Click OK.
To administer a terminal service from the UNIX command line, use the tnservice command.
5.2.13 Shutting Down Terminal Services
Follow these steps to shut down a terminal service:
-
Follow these links:
NetWare Realm->Manage Terminal Services
The List of NetWare Terminal Service screen appears.
-
From the list, select the terminal service you want to shut down.
-
Click Administer.
The NetWare Terminal Service servicename screen appears.
-
Click Shutdown Service.
The Confirmation screen appears.
-
Click OK.
The Shutdown servicename Service in NetWare Realm screen appears.
-
Click OK.
5.2.14 Deleting Terminal Services
Follow the steps below to delete terminal services in the NetWare realm. These steps include instructions for shutting down the terminal services you want to delete, because you must shut down a terminal service to delete it.
-
Follow these links:
NetWare Realm->Manage Terminal Services
The List of NetWare Terminal Service screen appears.
-
From the list, select the terminal service you want to delete.
-
Click Administer.
The NetWare Terminal Service servicename screen appears.
-
Click Shutdown Service.
The Confirmation screen appears.
-
Click OK.
The Shutdown servicename Service in NetWare Realm screen appears.
-
Click OK.
-
Repeat Steps 1-5 for each service you want to delete.
-
Follow these links:
NetWare Realm->Manage Terminal Services
The List of NetWare Terminal Service screen reappears.
-
From the list, select the file services you want to delete.
-
Click Delete.
The Confirmation screen appears.
-
Click OK.
The Delete NetWare Terminal Service screen appears.
-
Click OK.
5.2.15 Creating and Modifying NVT Services
Terminal services allow client-based terminal emulator programs to connect to the UNIX host. For many clients, you can simply use the built-in TCP/IP protocol and a vendor-provided--or third-party--telnet program. TAS NVT services provide the same capability using NVT as a transport. To connect to TAS NVT services, you need a terminal emulator that supports NVT. Usually, clients with only IPX/SPX available use TAS NVT services.
Follow these steps to create or modify an NVT service:
-
Follow these links:
NetWare Realm->Manage NVT Services
The List of NetWare NVT Service screen appears.
-
From the list, select the NVT service you want to modify, or enter the name of a service you want to create in the text field. The list contains nothing if no NVT services exist.
-
Click Create or Administer. The Administer button does not appear if no NVT services exist.
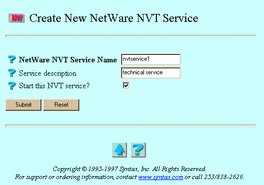
If you clicked Create, the Create New NetWare NVT Service screen below appears. Go to Step 4.
If you clicked Administer, the NetWare NVT Service servicename screen appears. Click Configuration, or click the appropriate link from the following, then click OK on the subsequent screen: Accept Service Connections, Reject Service Connections, Status, Start Services, Shutdown Services. If you click Configuration, the Update NetWare NVT Service servicename screen, same as the Create New NetWare NVT Service screen below, appears. Go to Step 4.
-
Enter or select values for the following attribute, as needed:
-
NetWare NVT Service Name -- The NVT service. If you clicked Administer and Configuration, this attribute does not appear.
-
Service description -- The description used within TAS for the service. It consists of an arbitrary line of text.
-
Start this NVT service? -- The option to start this NVT service when you click Submit. If you clicked Administer and Configuration, this attribute does not appear.
-
-
Click Submit.
The Create New NetWare NVT Service servicename screen or the Update NetWare NVT Service servicename screen appears.
-
Click OK.
To administer NVT services from the UNIX command line, use the tnservice command.
5.2.16 Shutting Down NVT Services
Follow these steps to shut down an NVT service:
-
Follow these links:
NetWare Realm->Manage NVT Services
The List of NetWare NVT Service screen appears.
-
From the list, select the NVT service you want to shut down.
-
Click Administer.
The NetWare NVT Service servicename screen appears.
-
Click Shutdown Service.
The Confirmation screen appears.
-
Click OK.
The Shutdown servicename Service in NetWare Realm screen appears.
-
Click OK.
5.2.17 Deleting NVT Services
Follow the steps below to delete NVT services in the NetWare realm. These steps include instructions for shutting down the NVT services you want to delete, because you must shut down an NVT service to delete it.
-
Follow these links:
NetWare Realm->Manage NVT Services
The List of NetWare NVT Service screen appears.
-
From the list, select the NVT service you want to delete.
-
Click Administer.
The NetWare NVT Service servicename screen appears.
-
Click Shutdown Service.
The Confirmation screen appears.
-
Click OK.
The Shutdown servicename Service in NetWare Realm screen appears.
-
Click OK.
-
Repeat Steps 1-5 for each service you want to delete.
-
Follow these links:
NetWare Realm->Manage NVT Services
The List of NetWare NVT Service screen reappears.
-
From the list, select the file services you want to delete.
-
Click Delete.
The Confirmation screen appears.
-
Click OK.
The Delete NetWare NVT Service screen appears.
-
Click OK.
5.2.18 Sending Messages to Users
Follow the steps below to send a message to one or more connected users. Users must have message reception enabled to receive messages properly.
-
Follow these links:
NetWare Realm->NetWare Connected Users->Send Message to Users
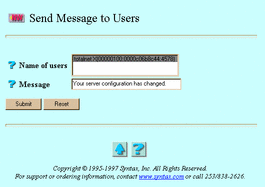
The Send Message to Users screen appears:
-
Select or enter values for the following attributes:
-
Name of users -- The users to receive the message.
-
Message -- The message to send.
-
-
Click Submit.
The Send Message to Users screen reappears, this time containing the statement "Command Successful."
-
Click OK.
To send a message to NetWare users the UNIX command line, use the nwmessage command.
5.2.19 Disconnecting Users
Follow these steps to disconnect connected users:
-
Follow one of these sets of links:
-
NetWare Realm->NetWare Connected Users->Disconnect Users
-
NetWare Realm->Manage File Services->[select a service] ->Administer->Disconnect Users
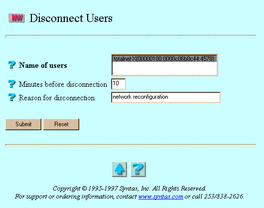
The Disconnect Users screen appears:
-
-
Select or enter values for the following attributes, as needed:
-
Name of users -- The users to disconnect.
-
Minutes before disconnection -- The time, in minutes, before you want to disconnect the users.
-
Reason for disconnection -- A brief message to the users to disconnect. Users must have message reception enabled to see this message.
-
-
Click Submit.
The Disconnect Users screen reappears, this time containing the statement "Command Successful".
-
Click OK.
To disconnect a user from the UNIX command line, use the tnkill command.
5.2.20 Viewing Realm Connections
Follow these steps to list NetWare realm connections:
-
Follow one of these sets of links:
-
NetWare Realm->NetWare Connected Users->Connection Information
-
NetWare Realm->Manage File Services->[select a service] ->Administer->Connection Information
The Connection Information screen appears.
-
-
From the list, select a user whose information you want to view.
-
Click Submit.
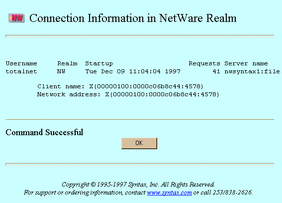
The Connection Information in NetWare Realm screen appears:
-
When finished, click OK.
- © 2010, Oracle Corporation and/or its affiliates
