Chapter 5 Configuring Services
This chapter covers the procedures for configuring and administering services in the LM-NT-OS/2, NetWare, and AppleTalk realms. It contains the following sections:
Configuration and administration screens in this chapter sometimes have both selection lists and text fields for your input regarding an object. If these both apply to one object or attribute and you both select a value and type one in, the value you type overrides the one you select in the list.
5.1 Services for the LM-NT-OS/2 Realm
This section contains instructions for the following tasks:
5.1.1 Starting LM-NT-OS/2 Services
Follow these steps to start the LM-NT-OS/2 realm and set its services to accept client connection requests:
-
Follow these links:
-
LM-NT-OS/2 Realm->Configuration and Control->Start all LM-NT-OS/2 Services
The Confirmation screen appears.
-
-
Click OK.
The Start all LM-NT-OS/2 Services screen appears.
-
Click OK.
5.1.2 Shutting Down LM-NT-OS/2 Services
Follow these steps to shut down the LM-NT-OS/2 realm and set its services to reject client connection requests:
-
Follow these links:
-
LM-NT-OS/2 Realm->Configuration and Control->Shutdown all LM-NT-OS/2 Services
The Confirmation screen appears.
-
-
Click OK.
The Shutdown all LM-NT-OS/2 Services screen appears.
-
Click OK.
5.1.3 Checking Realm Status
Follow these steps to check the status of the TAS system, transports, services, and client connections in the LM-NT-OS/2 realm:
-
Follow these links:
-
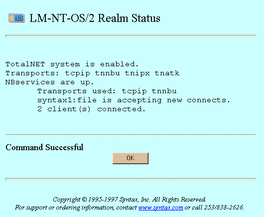
LM-NT-OS/2 Realm->Configuration and Control->LM-NT-OS/2 Realm Status
The LM-NT-OS/2 Realm Status screen appears:
-
-
When finished, click OK.
To check realm status from the UNIX command line, use the tnstat command.
5.1.4 Updating Realm Configuration
Follow the steps below to change configuration attributes for this realm. TAS provides NetBIOS-over-TCP/IP and NetBIOS-over-NetBEUI services in the LM-NT-OS/2 realm.
-
Follow these links:
-
LM-NT-OS/2 Realm->Configuration and Control ->Configuration
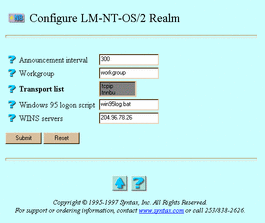
The Configure LM-NT-OS/2 Realm screen appears:
-
-
Enter or select values for the following attributes, as needed:
-
Announcement interval -- The number of seconds between services' broadcasts of their names on the network. If you enter no value, TAS sets the announcement interval at 300 seconds (5 minutes). To reduce the amount of broadcast traffic on a network with OS/2 or Windows for Workgroups clients, increase this value. To make servers appear more promptly on users' Network Neighborhood or Chooser lists, decrease this value. If you only have Windows 95 and NT in your LM-NT-OS/2 realm, this number makes little difference.
-
Workgroup -- The group of LAN Manager-style nodes, also called the LAN Manager domain and the NT domain, on the network. Workgroup defaults to workgroup or langroup in most cases.
-
Transport list -- At least one of the tnnbu (NetBEUI) and tcpip (TCP/IP) protocols, over which you can access the services in the LM-NT-OS/2 realm. Your choice of protocols depends on the protocols the client machines use.
-
Windows 95 logon script -- The .BAT file or other executable file the client PC's operating system executes when it first connects. This file must exist in a volume or attach point named NETLOGON and execute properly.
-
WINS servers -- The attribute that allows TAS to participate as a WINS NetBIOS node, so that PCs using WINS can locate the TAS services you define. It also allows TAS utilities and services--such as the remote utilities, nbmessage, and LMfile using proxy authentication--to use WINS to locate other machines. If you have a large network with multiple logical networks and subnets, Windows Internet Name Service (WINS) lets you treat the entire network as a single entity. That way, any PC can locate a file server in any part of the network. To use WINS, enter the IP address of a WINS server. You may have multiple WINS servers; if so, separate their addresses by commas.
-
-
Click Submit.
The Update LM-NT-OS/2 Realm Configuration screen appears.
-
Click OK.
To update the realm configuration from the UNIX command line, use the tnrealm command.
5.1.5 Creating and Modifying File Services
TAS allows LM-NT-OS/2-compatible clients to share file and print resources by connecting them through the LM-NT-OS/2 realm.
Follow the steps below to create or modify a file service in the LM-NT-OS/2 realm. You can also use the file service creation wizard at LM-NT-OS/2 Realm->File Service Creation or System->File Service Creation->LM-NT-OS/2 Realm File Service to create a file service.
-
Follow these links:
-
LM-NT-OS/2 Realm->Manage File Services
The List of LM-NT-OS/2 File Services screen appears.
-
-
From the list, select the file service you want to modify, or enter the name of a service you want to create in the text field. A file service name can contain up to 15 ASCII characters and no spaces, and it must not begin with an asterisk (*). The list contains nothing if no file services exist.
-
Click Create or Administer. The Administer button does not appear if no file services exist.
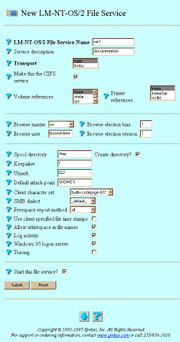
If you clicked Create, the New LM-NT-OS/2 File Service screen below appears. Go to Step 4.
If you clicked Administer, the LM-NT-OS/2 File Service servicename screen appears. Click Configuration, or click the appropriate link from the following, then click OK on the subsequent screen: Accept Service Connections, Reject Service Connections, Status, Start Service, Shutdown Service. If you click Configuration, the Update LM-NT-OS/2 File Service servicename screen, same as the New LM-NT-OS/2 File Service screen below, appears. Go to Step 4.
-
Enter or select values for the following attributes, as needed:
-
LM-NT-OS/2 File Service Name -- The file service to which users connect, according to its appearance in their Network Neighborhood lists. The file service name conventionally appears in lower-case on clients and in upper-case on the network. Windows, DOS, and OS/2 clients convert service names to uppercase. If you clicked Administer and Configuration, this attribute does not appear.
-
Service description -- The description used within TAS for the service. It consists of an arbitrary line of text.
-
Transport -- The transports supported in the LM-NT-OS/2 realm: TCP/IP (tcpip) and TAS NetBEUI (tnnbu). You may select one or both transports, depending on the protocols your clients use.
-
Make this the CIFS service -- The option to allow some PCs, such as Windows NT 4.0 PCs, to locate and connect to servers using TCP/IP name resolution or IP addresses, bypassing the need for NetBIOS. To enable CIFS (Common Internet File System), you must enable the TCP/IP transport for this service and ensure that no other service has CIFS enabled. You should also match the service name to the system host name, if possible.
-
Volume references -- A list of the volumes this file service references and exports. You can configure the referenced volumes and their attributes via System->Volumes. Select the volumes you want to reference.
-
Printer references -- A list of the printers this file service exports. You can configure the referenced printers and their attributes via System->Printers. Select the printers you want to reference.
-
Browse master -- LM-NT-OS/2 file service participation in the browse master election. The service attempts to become browse master for the LM-NT-OS/2 realm. This attribute defaults to off. If you select domain, the file service becomes the domain browse master--browse master for its network segment--by means of rigged elections. You may only configure one service in a domain as the domain browse master.
-
Browse user -- The UNIX user identity you want LM-NT-OS/2 realm clients who log in solely for accessing Network Neighborhood windows to assume. This attribute defaults to the TotalNET administrator. It has no effect with Browse master set to off.
-
Browse election bias -- Configuration of the LM-NT-OS/2 realm to attempt to win the browse-master election. Select a value from 0 to 255. TAS associates the following numbers and operating systems: 1 for Windows for Workgroups and Windows 95, 16 for Windows NT workstations, and 32 for Windows NT servers. A value of 255 causes the service to try as hard as possible to win the election. The value defaults to 0, indicating that this attribute does not exist. This attribute has no effect with Browse master set to off.
-
Browse election version -- Decision between two hosts with the same operating system in a browser election. Select a value from 0 to 65535. A value of 65535 causes the service to try as hard as possible to win the election. The value defaults to 0, indicating that this attribute does not exist. This attribute has no effect with Browse master set to off.
-
Spool directory -- The directory in which TAS spools print data files for the service. The attribute defaults to /tmp. On some UNIX systems, the /tmp directory has the "sticky bit" set. This prevents the system from deleting spooled files after users print them. On such systems, do not use this directory as the spool directory.
-
Create directory? -- The option to create the specified spool directory if it does not already exist.
-
Keepalive -- The number of minutes between dispatches of keepalive packets. The server sends keepalive probes to detect active client sessions. Keepalive here refers to a NetBIOS keepalive. Use it only with inactive TCP keepalives or TCP keepalives with too lengthy of an interval. This attribute defaults to 1 minute.
-
Umask -- The default file access permissions for TAS clients. The three-digit umask number represents the UNIX file protection mask. It works the same as the UNIX umask command. Refer to the UNIX umask(1) man page for more information on how the system interprets umask digits.
-
Default attach point -- The server directory to which clients connect when they do not specify volume names. The attach point defaults to the first volume defined for this file service.
-
Client character set -- The character set that TAS assumes all of this service's clients use. It defaults to builtin-codepage-437. Select a different character set if necessary.
-
SMB dialect -- The dialect level at which the service identifies itself to client PCs. Choosing default allows the file server to set its identification to the highest level supported by both the server and the client machine. Other levels include the following:
core
lanman 1.0
lanman 2.0
lanman 2.1
basic service
performance-enhanced network IO
long OS/2 and NT file names
long Windows95 file names
named pipe support
OS/2 extended file attributes
secure authentication
-
Freespace report method -- The method for calculating the amount of free disk space. Systems that do not support the UNIX statfs() system call or its equivalent do not support this option. If set to the default all, this attribute makes TAS report to clients all of the free space on all of the partitions. If set to root, this attribute makes TAS report only the free disk space on the TAS volume for this connection.
-
Use client specified file time stamps -- The option to stamp files created or modified on the server by clients with the clients' date and time rather than the server's date and time.
-
Allow whitespace in file names -- The option to allow LM-NT-OS/2-compatible clients to use spaces in file names.
-
Log activity -- The option to enable activity logging. This directs this file service to record client activity in activity.tn in the TAS home directory. When a client disconnects, TAS appends a line of data about the client's session to the log file at activity.tn. This attribute defaults to no activity logging.
-
Windows 95 logon server -- The option to cause the LM-NT-OS/2 file service to act as a logon server for its domain. Only Windows 95 clients support this attribute. If you select this option, you must also have a NETLOGON volume reference or attach point for this file service; the absence of a NETLOGON volume reference causes unexpected errors for clients when they connect.
-
Tracing -- The option to direct this file service to write debugging traces to a file. Syntax Technical Support can use the trace file to help diagnose problems.
-
Start this file service? -- The option to start this file service when you click Submit. If you clicked Administer and Configuration, this attribute does not appear.
-
-
Click Submit.
The Create New LM-NT-OS/2 File Service servicename screen or the Update LM-NT-OS/2 File Service servicename screen appears.
-
Click OK.
To administer a file service from the UNIX command line, use the tnservice command.
5.1.6 Shutting Down File Services
Follow these steps to shut down a file service:
-
Follow these links:
-
LM-NT-OS/2 Realm->Manage File Services
The List of LM-NT-OS/2 File Services screen appears.
-
-
From the list, select the file service you want to shut down.
-
Click Administer.
The LM-NT-OS/2 File Service servicename screen appears.
-
Click Shutdown Service.
The Confirmation screen appears.
-
Click OK.
The Shutdown servicename Service in the LM-NT-OS/2 Realm screen appears.
-
Click OK.
5.1.7 Deleting File Services
Follow the steps below to delete file services in the LM-NT-OS/2 realm. These steps include instructions for shutting down the file services you want to delete, because you must shut down a file service to delete it.
-
Follow these links:
-
LM-NT-OS/2 Realm->Manage File Services
The List of LM-NT-OS/2 File Services screen appears.
-
-
From the list, select the file service you want to delete.
-
Click Administer.
The LM-NT-OS/2 File Service servicename screen appears.
-
Click Shutdown Service.
The Confirmation screen appears.
-
Click OK.
The Shutdown servicename Service in the LM-NT-OS/2 Realm screen appears.
-
Click OK.
-
Repeat Steps 1-5 for each service you want to delete.
-
Follow these links:
LM-NT-OS/2 Realm->Manage File Services
The List of LM-NT-OS/2 File Services screen reappears.
-
From the list, select the file services you want to delete.
-
Click Delete.
The Confirmation screen appears.
-
Click OK.
The Delete LM-NT-OS/2 File Service screen appears.
-
Click OK.
5.1.8 Accepting Services
LM-NT-OS/2 file services accept client connection requests unless you set them to reject connection requests. Starting TAS also sets its services to accept connection requests.
Follow these steps to make LM-NT-OS/2 file services accept client connection requests:
-
Follow these links:
-
LM-NT-OS/2 Realm->Configuration and Control->Accept Service Connections
The Confirmation screen appears.
-
-
Click OK.
The Accept all LM-NT-OS/2 Service Connections screen appears.
-
Click OK.
To accept services from the UNIX command line, use the tnaccept command.
5.1.9 Rejecting Services
LM-NT-OS/2 file services accept client connection requests unless you set them to reject connection requests. Shutting down TAS also sets its services to reject connection requests.
Follow these steps to make LM-NT-OS/2 file services reject client connection requests:
-
Follow these links:
-
LM-NT-OS/2 Realm->Configuration and Control->Reject Service Connections
The Confirmation screen appears.
-
-
Click OK.
The Reject all LM-NT-OS/2 Service Connections screen appears.
-
Click OK.
To reject services from the UNIX command line, use the tnreject command.
5.1.10 Administering Attach Points
Follow these steps to create, modify, or delete attach points--points on directory paths at which clients must provide credentials--in the LM-NT-OS/2 realm:
-
Follow these links:
-
LM-NT-OS/2 Realm->Manage File Services
The List of LM-NT-OS/2 File Services screen appears.
-
-
From the list, select the file service in which you want to administer an attach point.
-
Click Administer.
The LM-NT-OS/2 File Service servicename screen appears.
-
Click Attach Points.
The List of Defined Attach Points screen appears.
-
From the list, select the attach point you want to modify or delete, or enter the name of an attach point you want to create in the text field. If deleting, you may select more than one attach point. The list contains nothing if no attach points exist.
-
Click Create, Modify, or Delete. The Modify and Delete buttons do not appear if no attach points exist.
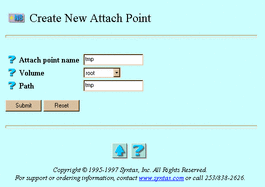
If you clicked Create, the Create New Attach Point screen below appears. Go to Step 7.
If you clicked Modify, the Update Attach Point attachpoint screen, same as the Create New Attach Point screen below, appears. Go to Step 7.
If you clicked Delete, the Confirmation screen appears. Click OK. The Delete Attach Points screen appears. Click OK. Do not go to Step 7.
-
Enter or select values for the following attributes:
-
Attach point name -- The attach point. If you clicked Modify, this attribute does not appear.
-
Volume -- The list of volumes exported by this service. TAS defines volumes at the system level. File services can reference defined volumes; such references export the volumes.
-
Path -- The directory below the selected volume, used as the virtual root by clients who connect to this attach point.
-
-
Click Submit.
The Create New Attach Point screen or the Update Attach Point attachpoint screen appears.
-
Click OK.
To administer attach points from the UNIX command line, use the tnattach command.
5.1.11 Configuring Security
Follow these steps to configure LM-NT-OS/2 file authentication or service mode options:
-
Follow these links:
-
LM-NT-OS/2 Realm->Manage File Services
The List of LM-NT-OS/2 File Services screen appears.
-
-
From the list, select the file service for which you want to configure authentication or service mode options.
-
Click Administer.
The LM-NT-OS/2 File Service servicename screen appears.
-
Click Authentication and Service Mode Options.
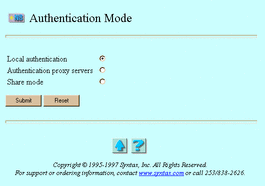
The Authentication Mode screen appears:
-
Select one of the following options:
-
Local authentication -- Authentication by a file server in the LM-NT-OS/2 realm. If the server cannot verify a client's user ID and password, it refuses the connection. If the realm uses local authentication, it does not consult a proxy server. You may choose open authentication or secure authentication. With open authentication, client and server exchange clear-text passwords. With secure authentication, client and server exchange a series of messages that allows the server to verify that the client knows the correct password, without transmitting the password or any representation of it.
-
Authentication proxy servers -- Authentication by another LM-NT-OS/2-compatible server. If this other, proxy server cannot verify a client's user ID and password, it refuses the connection. If it accepts the connection, the local server looks up the user name in the local database--either /etc/passwd or NIS--to get the user's UNIX ID.
-
Share mode -- Group-level access. No security exists in share mode, which allows clients to connect to shared volumes anonymously. If you choose Share mode, the file service's configuration no longer records user-mode (local or proxy) authentication information. You will not see proxy servers' names if you later change to Authentication proxy servers.
-
-
Click Submit.
If you selected Local Authentication, the Update Local Authentication for servicename screen appears. Select or enter values for the following attributes, as needed:
-
Password encryption -- The option to keep passwords from transmitting across the network. Without password encryption, any UNIX user can potentially connect to the server. In this open authentication environment, client and server exchange clear-text passwords. Password encryption, the secure authentication method, provides improved security, but you must maintain a separate user-password database for it. When you enable password encryption and secure authentication, only users added via Passwords can connect. With secure authentication, client and server exchange a series of messages that allows the server to verify that the client knows the correct password, without transmitting the password or any representation of it. Most LAN Manager-style clients support secure authentication.
-
Username map -- The option to allow file services to validate clients by mapping them to valid UNIX users. You must define username maps before selecting this option (see "4.2 Administering Username Maps").
-
Allow null passwords -- The option to allow UNIX users without passwords to access the server. By default, TAS denies such users access to the server, for better security. This option has no effect if you enable Password encryption or Authentication proxy servers.
-
User restrictions -- The option to restrict the users who can connect to this service. Select it by selecting either Allow or Deny and entering the names of the users in the adjacent Users field. If you enter no user names, TAS ignores this attribute. Separate user names with commas.
If you selected Authentication proxy servers, the Update Authentication Proxy Server for servicename screen appears. Enter or select values for the following attributes, as needed:
-
Authentication proxy servers -- The list of servers TAS will contact as a proxy server, each in turn, until one of them responds. Separate servers with commas.
-
Username map -- The option to allow file services to validate clients by mapping them to valid UNIX users. You must define username maps before selecting this option (see "4.2 Administering Username Maps").
-
Allow null passwords -- The option to allow UNIX users without passwords to access the server. By default, TAS denies such users access to the server, for better security. This option has no effect if you enable Password encryption or Authentication proxy servers.
-
User restrictions --The option to restrict the users who can connect to this service. Select it by selecting either Allow or Deny and entering the names of the users in the adjacent Users field. If you enter no user names, TAS ignores this attribute. Separate user names with commas.
If you selected Share mode, the Update Share Mode Options for servicename screen appears. Enter a value for the following attribute, as needed:
-
Share user -- The UNIX user name for the service to associate with files that its clients create in share mode.
-
-
Click Submit.
The Update Local Authentication for servicename screen, the Update Authentication Proxy Server for servicename screen, or the Share Mode for servicename screen appears.
-
Click OK.
To configure security from the UNIX command line, use the tnservice command.
5.1.12 Creating and Modifying Terminal Services
Terminal services allow client-based terminal emulator programs to connect to the UNIX host. For many clients, you can simply use the built-in TCP/IP protocol and a vendor-provided--or third-party--telnet program. TAS LM-NT-OS/2 terminal services provide the same capability using NetBIOS--either TCP/IP or NetBEUI--as a transport. To connect to TAS LM-NT-OS/2 terminal services, you need a terminal emulator that supports NetBIOS, such as Kermit. Usually, clients with only NetBEUI available use TAS LM-NT-OS/2 terminal services.
Follow these steps to create or modify a terminal service:
-
Follow these links:
-
LM-NT-OS/2 Realm->Manage Terminal Services
The List of LM-NT-OS/2 Terminal Service screen appears.
-
-
From the list, select the terminal service you want to modify, or enter the name of a service you want to create in the text field. The list contains nothing if no terminal services exist.
-
Click Create or Administer. The Administer button does not appear if no terminal services exist.
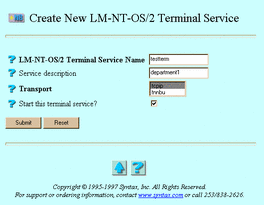
If you clicked Create, the Create New LM-NT-OS/2 Terminal Service screen below appears. Go to Step 4.
If you clicked Administer, the LM-NT-OS/2 Terminal Service servicename screen appears. Click Configuration, or click the appropriate link from the following, then click OK on the subsequent screen: Accept Service Connections, Reject Service Connections, Status, Start Service, Shutdown Service. If you click Configuration, the Update LM-NT-OS/2 Terminal Service servicename screen, same as the Create New LM-NT-OS/2 Terminal Service screen below, appears. Go to Step 4.
-
Enter or select values for the following attributes, as needed:
-
LM-NT-OS/2 Terminal Service Name -- The terminal service. If you clicked Administer and Configuration, this attribute does not appear.
-
Service description -- The description used within TAS for the service. It consists of an arbitrary line of text.
-
Transport -- The protocol stacks over which you may offer the service. The LM-NT-OS/2 realm can use tcpip (TCP/IP) and tnnbu (TotalNET NetBIOS-over-NetBEUI).
-
Start this terminal service? -- The option to start this terminal service when you click Submit. If you clicked Administer and Configuration, this attribute does not appear.
-
-
Click Submit.
The Create New LM-NT-OS/2 Terminal Service servicename screen or the Update LM-NT-OS/2 Terminal Service servicename screen appears.
-
Click OK.
To administer terminal services from the UNIX command line, use the tnservice command.
5.1.13 Shutting Down Terminal Services
Follow these steps to shut down a terminal service:
-
Follow these links:
-
LM-NT-OS/2 Realm->Manage Terminal Services
The List of LM-NT-OS/2 Terminal Service screen appears.
-
-
From the list, select the file service you want to shut down.
-
Click Administer.
The LM-NT-OS/2 Terminal Service servicename screen appears.
-
Click Shutdown Service.
The Confirmation screen appears.
-
Click OK.
The Shutdown servicename Service in the LM-NT-OS/2 Realm screen appears.
-
Click OK.
5.1.14 Deleting Terminal Services
Follow the steps below to delete terminal services in the LM-NT-OS/2 realm. These steps include instructions for shutting down the terminal services you want to delete, because you must shut down a terminal service to delete it.
-
Follow these links:
-
LM-NT-OS/2 Realm->Manage Terminal Services
The List of LM-NT-OS/2 Terminal Service screen appears.
-
-
From the list, select the file service you want to delete.
-
Click Administer.
The LM-NT-OS/2 Terminal Service servicename screen appears.
-
Click Shutdown Service.
The Confirmation screen appears.
-
Click OK.
The Shutdown servicename Service in the LM-NT-OS/2 Realm screen appears.
-
Click OK.
-
Repeat Steps 1-5 for each service you want to delete.
-
Follow these links:
LM-NT-OS/2 Realm->Manage Terminal Services
The List of LM-NT-OS/2 Terminal Service screen reappears.
-
From the list, select the terminal services you want to delete.
-
Click Delete.
The Confirmation screen appears.
-
Click OK.
The Delete LM-NT-OS/2 Terminal Service screen appears.
-
Click OK.
5.1.15 Enabling Multiple Users per Client Connection
Follow these steps to enable allow multiple users per client connection, called "multiplexing", for Solaris 2.5.1 platforms with ClearCase:
-
Follow these links:
LM-NT-OS/2 Realm->Configuration and Control->Load Multi-user Kernel Drivers
The Confirmation screen appears.
-
Click OK.
The Load Multi-user Kernel Drivers screen appears.
-
Click OK.
5.1.16 Disabling Multiple Users per Client Connection
Follow these steps to disable TAS multiplexing:
-
Follow these links:
LM-NT-OS/2 Realm->Configuration and Control->Unload Multi-user Kernel Drivers
The Confirmation screen appears.
-
Click OK.
The Unload Multi-user Kernel Drivers screen appears.
-
Click OK.
5.1.17 Sending Messages to Users
Follow the steps below to send a message to one or more connected users. Users must have message reception enabled, by a program such as Winpopup, to receive messages properly.
-
Follow these links:
-
LM-NT-OS/2 Realm->LM-NT-OS/2 Connected Users->Send Message to Users
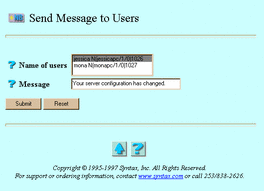
The Send Message to Users screen appears:
-
-
Select or enter values for the following attributes:
-
Name of users -- The users to receive the message.
-
Message -- The message to send.
-
-
Click Submit.
The Send Message to Users screen reappears, this time containing the statement "Command Successful".
-
Click OK.
To send a message to LM-NT-OS/2 users from the UNIX command line, use the nbmessage command.
5.1.18 Disconnecting Users
Follow the steps below to disconnect connected users. Windows 95 and NT clients usually attempt to re-establish broken connections, so the disconnection may not last. To prevent this from happening, set the file services to reject client connection requests (see "5.1.9 Rejecting Services").
-
Follow one of these sets of links:
-
LM-NT-OS/2 Realm->LM-NT-OS/2 Connected Users ->Disconnect Users
-
LM-NT-OS/2 Realm->Manage File Service->[select a service] ->Administer->Disconnect Users
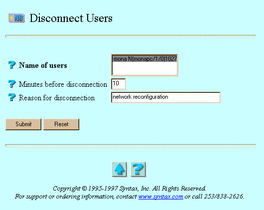
The Disconnect Users screen appears:
-
-
Select or enter values for the following attributes, as needed:
-
Name of users -- The users to disconnect.
-
Minutes before disconnection -- The time, in minutes, before you want to disconnect the users.
-
Reason for disconnection -- A brief message to the users to disconnect. Users must have message reception enabled, by a program such as Winpopup, to see this message.
-
-
Click Submit.
The Disconnect Users screen reappears, this time containing the statement "Command Successful".
-
Click OK.
To disconnect a user from the UNIX command line, use the tnkill command.
5.1.19 Viewing Realm Connections
Follow these steps to list LM-NT-OS/2 realm connections:
Follow one of these sets of links:
-
LM-NT-OS/2 Realm->LM-NT-OS/2 Connected Users ->Connection Information
-
LM-NT-OS/2 Realm->Manage File Services->[select a service] ->Administer->Connection Information
The Connection Information screen appears.
-
From the list, select a user whose information you want to view.
-
Click Submit.
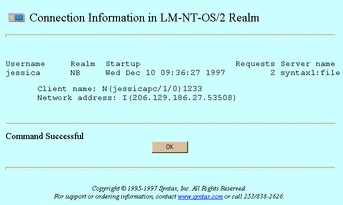
The Connection Information in LM-NT-OS/2 Realm screen appears:
-
When finished, click OK.
5.2 Services for the NetWare Realm
This section contains instructions for the following tasks:
5.2.1 Starting NetWare Services
Follow these steps to start the NetWare realm and set its services to accept client connection requests:
-
Follow these links:
-
NetWare Realm->Configuration and Control->Start all NetWare Services
The Confirmation screen appears.
-
-
Click OK.
The Start all NetWare Services screen appears.
-
Click OK.
5.2.2 Shutting Down NetWare Services
Follow these steps to shut down the NetWare realm and set its services to reject client connection requests:
-
Follow these links:
-
NetWare Realm->Configuration and Control->Shutdown all NetWare Services
The Confirmation screen appears.
-
-
Click OK.
The Shutdown all NetWare Services screen appears.
-
Click OK.
5.2.3 Checking Realm Status
Follow these steps to check the status of the TAS system, transports, services, and client connections in the NetWare realm:
-
Follow these links:
-
NetWare Realm->Configuration and Control->NetWare Realm Status
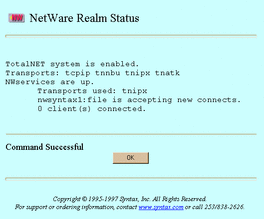
The NetWare Realm Status screen appears:
-
-
When finished, click OK.
To check realm status from the UNIX command line, use the tnstat command.
5.2.4 Updating Realm Configuration
Follow the steps below to change configuration attributes for this realm. By default, TAS loads user information into the bindery incrementally, as users log in.
-
Follow these links:
-
NetWare Realm->Configuration and Control->Configuration
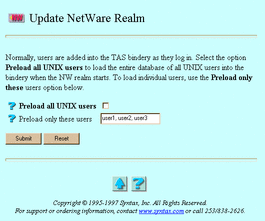
The Update NetWare Realm screen appears:
-
-
Select one of the following options:
-
Pre-load all UNIX users -- The option to direct TAS to add all UNIX user names from the UNIX database--either /etc/passwd or NIS--into the TAS bindery when the realm starts. Pre-loading users reduces the time it takes them to log in for the first time, but the time the server takes to start up and initialize the bindery increases slightly per user. This can take a long time on systems with large numbers of users; do not select this option for sites with more than 500 users or for sites running NIS.
-
Preload only these users -- The option to preload selected users to the bindery when the server starts. Enter those user names in this field. Pre-loading users reduces the time it takes them to log in for the first time, but the time the server takes to start up and initialize the bindery increases slightly per user.
-
-
Click Submit.
The Update NetWare Realm Configuration screen appears.
-
Click OK.
To update realm status configuration from the UNIX command line, use the tnrealm command.
5.2.5 Creating and Modifying File Services
TAS allows NetWare-compatible clients to use UNIX file and print resources.
Follow the steps below to create or modify a file service in the NetWare realm. You can also use the file service creation wizard at NetWare Realm->File Service Creation or System->File Service Creation ->NetWare Realm File Service to create a file service.
-
Follow these links:
-
NetWare Realm->Manage File Services
The List of NetWare File Services screen appears.
-
-
From the list, select the file service you want to modify, or enter the name of a service you want to create in the text field. A file service name can contain up to 47 lower-case, printable, ASCII characters and no spaces, slashes, colons, semicolons, commas, asterisks, or question marks. The list contains nothing if no file services exist.
-
Click Create or Administer. The Administer button does not appear if no file services exist.
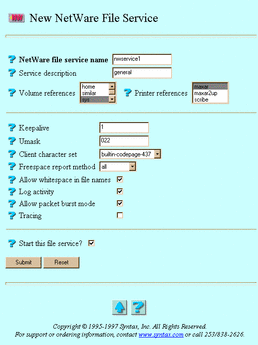
If you clicked Create, the New NetWare File Service screen below appears. Go to Step 4.
If you clicked Administer, the NetWare File Service servicename screen appears. Click Configuration, or click the appropriate link from the following, then click OK on the subsequent screen: Accept Service Connections, Reject Service Connections, Status, Start Service, Shutdown Service. If you click Configuration, the Update NetWare File Service servicename screen, same as the New NetWare File Service screen below, appears. Go to Step 4.
-
Enter or select values for the following attributes, as needed:
-
NetWare file service name -- The file service to which users connect, according to its appearance in their Network Neighborhood lists. The file service name conventionally appears in lower-case on clients and in upper-case on the network. If you clicked Administer and Configuration, this attribute does not appear.
-
Service description -- The description used within TAS for the service. It consists of an arbitrary line of text.
-
Volume references -- A list of the volumes this file service references and exports. You can configure the referenced volumes and their attributes via System->Volumes. Select the volumes you want to reference.
-
Printer references -- A list of printers each file service exports. You can configure the referenced printers and their attributes via System->Printers. Select the printers you want to reference.
-
Keepalive -- The number of minutes between dispatches of keepalive packets. The server sends keepalive probes to detect active client sessions. This attribute defaults to one minute.
-
Umask -- The default file access permissions for TAS clients. The three-digit umask number represents the UNIX file protection mask and works the same as the UNIX umask command. Refer to the UNIX umask(1) man page for more information on how the system interprets digits.
-
Client character set -- The character set that TAS assumes all of this service's clients use. It defaults to builtin-codepage-437. Select a different character set if necessary.
-
Freespace report method -- The method for calculating the amount of free disk space. Systems that do not support the UNIX statfs() system call or its equivalent do not support this option. If set to the default all, this attribute makes TAS report to clients all of the free space on all of the partitions. If set to root, this attribute makes TAS report only the free disk space on the TAS volume for this connection.
-
Allow whitespace in file names -- The option to allow NetWare clients to use spaces in file names.
-
Log activity -- The option to enable activity logging. This directs this file service to record client activity in activity.tn in the TAS home directory. When a client disconnects, TAS appends a line of data about the client's session to the log file at activity.tn. This attribute defaults to no activity logging.
-
Allow packet burst mode -- The option to enable TAS's use of packet-burst mode, a method that NetWare hosts use to improve performance. TAS uses packet burst mode by default.
-
Tracing -- The option to direct this file service to write debugging traces to a file. Syntax Technical Support can use the trace file to help diagnose problems.
-
Start this file service? -- The option to start this file service when you click Submit. If you clicked Administer and Configuration, this attribute does not appear.
-
-
Click Submit.
The Create New NetWare File Service servicename screen or the Update NetWare File Service servicename screen appears.
-
Click OK.
To administer a file service from the UNIX command line, use the tnservice command.
5.2.6 Shutting Down File Services
Follow these steps to shut down a file service:
-
Follow these links:
-
NetWare Realm->Manage File Services
The List of NetWare File Services screen appears.
-
-
From the list, select the file service you want to shut down.
-
Click Administer.
The NetWare File Service servicename screen appears.
-
Click Shutdown Service.
The Confirmation screen appears.
-
Click OK.
The Shutdown servicename Service in NetWare Realm screen appears.
-
Click OK.
5.2.7 Deleting File Services
Follow the steps below to delete file services in the NetWare realm. These steps include instructions for shutting down the file services you want to delete, because you must shut down a file service to delete it.
-
Follow these links:
NetWare Realm->Manage File Services
The List of NetWare File Services screen appears.
-
From the list, select the file service you want to delete.
-
Click Administer.
The NetWare File Service servicename screen appears.
-
Click Shutdown Service.
The Confirmation screen appears.
-
Click OK.
The Shutdown servicename Service in NetWare Realm screen appears.
-
Click OK.
-
Repeat Steps 1-5 for each service you want to delete.
-
Follow these links:
-
NetWare Realm->Manage File Services
The List of NetWare File Services screen reappears.
-
-
From the list, select the file services you want to delete.
-
Click Delete.
The Confirmation screen appears.
-
Click OK.
The Delete NetWare File Service screen appears.
-
Click OK.
5.2.8 Accepting Services
NetWare file services accept client connection requests unless you set them to reject connection requests. Starting TAS also sets its services to accept connection requests.
Follow these steps to make NetWare file services accept client connection requests:
-
Follow these links:
-
NetWare Realm->Configuration and Control->Accept Service Connections
The Confirmation screen appears.
-
-
Click OK.
The Accept NetWare/servicename Service Connections screen appears.
-
Click OK.
To accept services from the UNIX command line, use the tnaccept command.
5.2.9 Rejecting Services
NetWare file services accept client connection requests unless you set them to reject connection requests. Shutting down TAS also sets its services to reject connection requests.
Follow these steps to make NetWare file services reject client connection requests:
-
Follow these links:
NetWare Realm->Configuration and Control->Reject Service Connections
The Confirmation screen appears.
-
Click OK.
The Reject NetWare/servicename Service Connections screen appears.
-
Click OK.
To reject services from the UNIX command line, use the tnreject command.
5.2.10 Administering Attach Points
Follow these steps to create, modify, or delete attach points--points on directory paths at which clients must provide credentials--in the NetWare realm:
-
Follow these links:
-
NetWare Realm->Manage File Services
The List of NetWare File Services screen appears.
-
-
From the list, select the file service in which you want to administer an attach point.
-
Click Administer.
The NetWare File Service servicename screen appears.
-
Click Attach Points.
The List of Defined Attach Points screen appears.
-
From the list, select the attach point you want to modify or delete, or enter the name of an attach point you want to create in the text field. If deleting, you may select more than one attach point. The list contains nothing if no attach points exist.
-
Click Create, Modify, or Delete. The Modify and Delete buttons do not appear if no attach points exist.
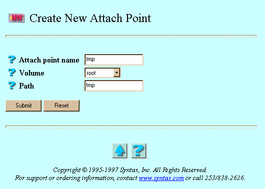
If you clicked Create, the Create New Attach Point screen below appears. Go to Step 7.
If you clicked Modify, the Update Attach Point attachpoint screen, same as the Create New Attach Point screen below, appears. Go to Step 7.
If you clicked Delete, the Confirmation screen appears. Click OK. The Delete Attach Points screen appears. Click OK. Do not go to Step 7.
-
Enter or select values for the following attributes:
-
Attach point name -- The attach point. If you clicked Modify, this attribute does not appear.
-
Volume -- The list of volumes exported by this service. TAS defines volumes at the system level. File services can reference defined volumes; such references export the volumes.
-
Path -- The directory below the selected volume, used as the virtual root by clients who connect to this attach point.
-
-
Click Submit.
The Create New Attach Point attachpoint screen or the Update Attach Point attachpoint screen appears.
-
Click OK.
To administer attach points from the UNIX command line, use the tnattach command.
5.2.11 Configuring Security
Follow these steps to configure NetWare file authentication:
-
Follow these links:
-
NetWare Realm->Manage File Services
The List of NetWare File Services screen appears.
-
-
From the list, select the file service for which you want to configure authentication.
-
Click Administer.
The NetWare File Service servicename screen appears.
-
Click Authentication and Service Mode Options.
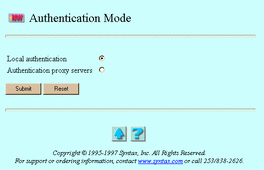
The Authentication Mode screen appears:
-
Select one of the following options:
-
Local authentication -- Authentication by a file server in the NetWare realm. If the server cannot verify a client's user ID and password, it refuses the connection. If the realm uses local authentication, it does not consult a proxy server. You may choose open authentication or secure authentication. With open authentication, client and server exchange clear-text passwords. With secure authentication, client and server exchange a series of messages that allows the server to verify that the client knows the correct password, without transmitting the password or any representation of it.
-
Authentication proxy servers -- Authentication by another NetWare-compatible server. If this other, proxy server cannot verify a client's user ID and password, it refuses the connection. If it accepts the connection, the local server looks up the user name in the local database--either /etc/passwd or NIS--to get the user's UNIX ID.
-
-
Click Submit.
If you selected Local authentication, the Update Local Authentication for servicename screen appears. Select or enter values for the following attributes, as needed:
-
Password encryption -- The option to keep passwords from transmitting across the network. Without password encryption, any UNIX user can potentially connect to the server. In this open authentication environment, client and server exchange clear-text passwords. Password encryption, the secure authentication method, provides improved security, but you must maintain a separate user-password database for it. When you enable password encryption and secure authentication, only users added via Passwords can connect. With secure authentication, client and server exchange a series of messages that allows the server to verify that the client knows the correct password, without transmitting the password or any representation of it.
-
Username map -- The option to allow file services to validate clients by mapping them to valid UNIX users. You must define username maps before selecting this option (see "4.2 Administering Username Maps").
-
Allow null passwords -- The option to allow UNIX users without passwords to access the server. By default, TAS denies such users access to the server, for better security. This option has no effect if you enable Password encryption or Authentication proxy servers.
-
User restrictions -- The option to restrict the users who can connect to this service. Select it by selecting Allow or Deny and entering the names of the users in the adjacent Users field. If you enter no user names, TAS ignores this attribute. Separate user names with commas.
-
DCE authentication -- The option to cause this service to use DCE rather than the native UNIX password facility for authentication. If this service uses Password encryption or Share mode or if you defined Authentication proxy servers, this other authentication method takes precedence. This option appears only if you have TAS-DCE, and it does not control the acquisition of DCE credentials. DCE-enabled host systems always require appropriate DCE credentials, if possible. See TAS-DCE Guide.
If you selected Authentication proxy servers the Update Authentication Proxy Server for servicename screen appears. Enter or select values for the following attributes, as needed:
-
Authentication proxy servers -- The list of servers TAS will contact as a proxy server, each in turn, until one of them responds. Separate servers with commas.
-
Username map -- The option to allow file services to validate clients by mapping them to valid UNIX users. You must define username maps before selecting this option (see "4.2 Administering Username Maps").
-
Allow null passwords -- The option to allow UNIX users without passwords to access the server. By default, TAS denies such users access to the server, for better security. This option has no effect if you enable Password encryption or Authentication proxy servers.
-
User restrictions -- The option to restrict the users who can connect to this service. Select it by selecting either Allow or Deny and entering the names of the users in the adjacent Users field. If you enter no user names, TAS ignores this attribute. Separate user names with commas.
-
-
Click Submit.
The Update Local Authentication for servicename screen or the Update Authentication Proxy Server for servicename screen appears.
-
Click OK.
To configure security from the UNIX command line, use the tnservice command.
5.2.12 Creating and Modifying Terminal Services
Terminal services allow client-based terminal emulator programs to connect to the UNIX host. For many clients, you can simply use the built-in TCP/IP protocol and a vendor-provided--or third-party--telnet program. TAS NetWare terminal services provide the same capability using SPX as a transport. To connect to TAS NetWare terminal services, you need a terminal emulator that supports SPX. Usually, clients with only IPX/SPX available use TAS NetWare terminal services.
Follow these steps to create or modify a terminal service:
-
Follow these links:
-
NetWare Realm->Manage Terminal Services
The List of NetWare Terminal Service screen appears.
-
-
From the list, select the terminal service you want to delete, or enter the name of a service you want to create in the text field. The list contains nothing if no terminal services exist.
-
Click Create or Administer. The Administer button does not appear if no terminal services exist.
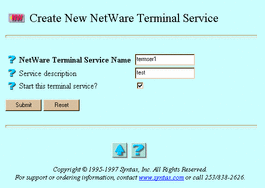
If you clicked Create, the Create New NetWare Terminal Service screen below appears. Go to Step 4.
If you clicked Administer, the NetWare Terminal Service servicename screen appears. Click Configuration, or click the appropriate link from the following, then click OK on the subsequent screen: Accept Service Connections, Reject Service Connections, Status, Start Service, Shutdown Service. If you click Configuration, the Update NetWare Terminal Service servicename screen, same as the Create New NetWare Terminal Service screen below, appears. Go to Step 4.
-
Enter or select values for the following attributes, as needed:
-
NetWare Terminal Service Name -- The terminal service. If you clicked Administer and Configuration, this attribute does not appear.
-
Service description -- The description used within TAS for the service. It consists of an arbitrary line of text.
-
Start this terminal service? -- The option to start this terminal service when you click Submit. If you clicked Administer and Configuration, this attribute does not appear.
-
-
Click Submit.
The Create New NetWare Terminal Service servicename screen or the Update NetWare Terminal Service servicename screen appears.
-
Click OK.
To administer a terminal service from the UNIX command line, use the tnservice command.
5.2.13 Shutting Down Terminal Services
Follow these steps to shut down a terminal service:
-
Follow these links:
NetWare Realm->Manage Terminal Services
The List of NetWare Terminal Service screen appears.
-
From the list, select the terminal service you want to shut down.
-
Click Administer.
The NetWare Terminal Service servicename screen appears.
-
Click Shutdown Service.
The Confirmation screen appears.
-
Click OK.
The Shutdown servicename Service in NetWare Realm screen appears.
-
Click OK.
5.2.14 Deleting Terminal Services
Follow the steps below to delete terminal services in the NetWare realm. These steps include instructions for shutting down the terminal services you want to delete, because you must shut down a terminal service to delete it.
-
Follow these links:
NetWare Realm->Manage Terminal Services
The List of NetWare Terminal Service screen appears.
-
From the list, select the terminal service you want to delete.
-
Click Administer.
The NetWare Terminal Service servicename screen appears.
-
Click Shutdown Service.
The Confirmation screen appears.
-
Click OK.
The Shutdown servicename Service in NetWare Realm screen appears.
-
Click OK.
-
Repeat Steps 1-5 for each service you want to delete.
-
Follow these links:
NetWare Realm->Manage Terminal Services
The List of NetWare Terminal Service screen reappears.
-
From the list, select the file services you want to delete.
-
Click Delete.
The Confirmation screen appears.
-
Click OK.
The Delete NetWare Terminal Service screen appears.
-
Click OK.
5.2.15 Creating and Modifying NVT Services
Terminal services allow client-based terminal emulator programs to connect to the UNIX host. For many clients, you can simply use the built-in TCP/IP protocol and a vendor-provided--or third-party--telnet program. TAS NVT services provide the same capability using NVT as a transport. To connect to TAS NVT services, you need a terminal emulator that supports NVT. Usually, clients with only IPX/SPX available use TAS NVT services.
Follow these steps to create or modify an NVT service:
-
Follow these links:
NetWare Realm->Manage NVT Services
The List of NetWare NVT Service screen appears.
-
From the list, select the NVT service you want to modify, or enter the name of a service you want to create in the text field. The list contains nothing if no NVT services exist.
-
Click Create or Administer. The Administer button does not appear if no NVT services exist.
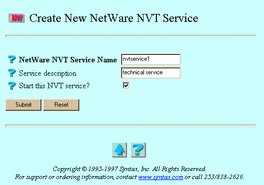
If you clicked Create, the Create New NetWare NVT Service screen below appears. Go to Step 4.
If you clicked Administer, the NetWare NVT Service servicename screen appears. Click Configuration, or click the appropriate link from the following, then click OK on the subsequent screen: Accept Service Connections, Reject Service Connections, Status, Start Services, Shutdown Services. If you click Configuration, the Update NetWare NVT Service servicename screen, same as the Create New NetWare NVT Service screen below, appears. Go to Step 4.
-
Enter or select values for the following attribute, as needed:
-
NetWare NVT Service Name -- The NVT service. If you clicked Administer and Configuration, this attribute does not appear.
-
Service description -- The description used within TAS for the service. It consists of an arbitrary line of text.
-
Start this NVT service? -- The option to start this NVT service when you click Submit. If you clicked Administer and Configuration, this attribute does not appear.
-
-
Click Submit.
The Create New NetWare NVT Service servicename screen or the Update NetWare NVT Service servicename screen appears.
-
Click OK.
To administer NVT services from the UNIX command line, use the tnservice command.
5.2.16 Shutting Down NVT Services
Follow these steps to shut down an NVT service:
-
Follow these links:
NetWare Realm->Manage NVT Services
The List of NetWare NVT Service screen appears.
-
From the list, select the NVT service you want to shut down.
-
Click Administer.
The NetWare NVT Service servicename screen appears.
-
Click Shutdown Service.
The Confirmation screen appears.
-
Click OK.
The Shutdown servicename Service in NetWare Realm screen appears.
-
Click OK.
5.2.17 Deleting NVT Services
Follow the steps below to delete NVT services in the NetWare realm. These steps include instructions for shutting down the NVT services you want to delete, because you must shut down an NVT service to delete it.
-
Follow these links:
NetWare Realm->Manage NVT Services
The List of NetWare NVT Service screen appears.
-
From the list, select the NVT service you want to delete.
-
Click Administer.
The NetWare NVT Service servicename screen appears.
-
Click Shutdown Service.
The Confirmation screen appears.
-
Click OK.
The Shutdown servicename Service in NetWare Realm screen appears.
-
Click OK.
-
Repeat Steps 1-5 for each service you want to delete.
-
Follow these links:
NetWare Realm->Manage NVT Services
The List of NetWare NVT Service screen reappears.
-
From the list, select the file services you want to delete.
-
Click Delete.
The Confirmation screen appears.
-
Click OK.
The Delete NetWare NVT Service screen appears.
-
Click OK.
5.2.18 Sending Messages to Users
Follow the steps below to send a message to one or more connected users. Users must have message reception enabled to receive messages properly.
-
Follow these links:
NetWare Realm->NetWare Connected Users->Send Message to Users
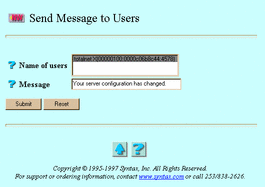
The Send Message to Users screen appears:
-
Select or enter values for the following attributes:
-
Name of users -- The users to receive the message.
-
Message -- The message to send.
-
-
Click Submit.
The Send Message to Users screen reappears, this time containing the statement "Command Successful."
-
Click OK.
To send a message to NetWare users the UNIX command line, use the nwmessage command.
5.2.19 Disconnecting Users
Follow these steps to disconnect connected users:
-
Follow one of these sets of links:
-
NetWare Realm->NetWare Connected Users->Disconnect Users
-
NetWare Realm->Manage File Services->[select a service] ->Administer->Disconnect Users
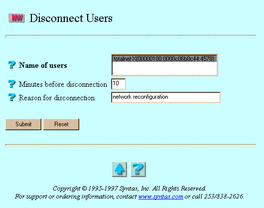
The Disconnect Users screen appears:
-
-
Select or enter values for the following attributes, as needed:
-
Name of users -- The users to disconnect.
-
Minutes before disconnection -- The time, in minutes, before you want to disconnect the users.
-
Reason for disconnection -- A brief message to the users to disconnect. Users must have message reception enabled to see this message.
-
-
Click Submit.
The Disconnect Users screen reappears, this time containing the statement "Command Successful".
-
Click OK.
To disconnect a user from the UNIX command line, use the tnkill command.
5.2.20 Viewing Realm Connections
Follow these steps to list NetWare realm connections:
-
Follow one of these sets of links:
-
NetWare Realm->NetWare Connected Users->Connection Information
-
NetWare Realm->Manage File Services->[select a service] ->Administer->Connection Information
The Connection Information screen appears.
-
-
From the list, select a user whose information you want to view.
-
Click Submit.
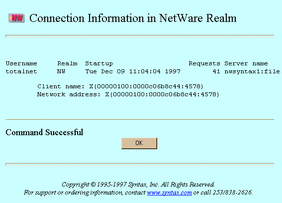
The Connection Information in NetWare Realm screen appears:
-
When finished, click OK.
5.3 Services for the AppleTalk Realm
This section contains instructions for the following tasks:
5.3.1 Starting AppleTalk Services
Follow these steps to start the AppleTalk realm and set its services to accept client connection requests:
-
Follow these links:
AppleTalk Realm->Configuration and Control->Start all AppleTalk Services
The Confirmation screen appears.
-
Click OK.
The Start all AppleTalk Services screen appears.
-
Click OK.
5.3.2 Shutting Down AppleTalk Services
Follow these steps to shut down in the AppleTalk realm and set its services to reject client connection requests:
-
Follow these links:
-
AppleTalk Realm->Configuration and Control->Shutdown all AppleTalk Services
The Confirmation screen appears.
-
-
Click OK.
The Shutdown all AppleTalk Services screen appears.
-
Click OK.
5.3.3 Checking Realm Status
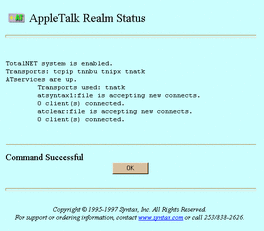
Follow these steps to check the status of the TAS system, transports, services, and client connections in the AppleTalk realm:
-
Follow these links:
-
AppleTalk Realm->Configuration and Control->AppleTalk Realm Status
The AppleTalk Realm Status screen appears:
-
-
When finished, click OK.
To check realm status from the UNIX command line, use the tnstat command.
5.3.4 Creating and Modifying File Services
TAS allows AppleTalk-compatible clients to share file and print resources by connecting them through the AppleTalk realm.
Follow the steps below to create or modify a file service in the AppleTalk realm. You can also use the file service creation wizard at AppleTalk Realm->File Service Creation or System->File Service Creation->AppleTalk Realm File Service to create a file service.
-
Follow these links:
-
AppleTalk Realm->Manage File Services
The List of AppleTalk File Services screen appears.
-
-
From the list, select the file service you want to modify, or enter the name of a service you want to create in the text field. A file service name can contain up to 15 ASCII characters and no spaces, and it must not begin with an asterisk (*). The list contains nothing if no file services exist.
-
Click Create or Administer. The Administer button does not appear if no file services exist.
If you clicked Create, the Create New AppleTalk File Service screen below appears. Go to Step 4.
If you clicked Administer, the AppleTalk File Service servicename screen appears. Click Configuration, or click the appropriate link from the following, then click OK on the subsequent screen: Accept Service Connections, Reject Service Connections, Status, Start Service, Shutdown Service. If you click Configuration, the Update AppleTalk File Service servicename screen, same as the Create New AppleTalk File Service screen below, appears. Go to Step 4.

-
Enter or select values for the following attributes, as needed:
-
AppleTalk file service name -- The file service to which users connect, according to its appearance in their Chooser lists. The file service name conventionally appears in lower-case on clients and in upper-case on the network. If you clicked Administer and Configuration, this attribute does not appear.
-
Service description -- The description used within TAS for the service. It consists of an arbitrary line of text.
-
Volume references -- A list of the volumes this file service references and exports. You can configure the referenced volumes and their attributes via System->Volumes. Select the volumes you want to reference.
-
Umask -- The default file access permissions for TAS clients. This three-digit octal-number represents the UNIX file protection mask and works the same as the UNIX umask command. Refer to the UNIX umask(1) man page for more information on how the system interprets digits.
-
Client character set -- The character set that TAS assumes all of this service's clients use. It defaults to builtin-mac-roman. Select a different character set if necessary.
-
Freespace report method -- The method for calculating the amount of free disk space. Systems that do not support the UNIX statfs() system call or its equivalent do not support this option. If set to the default all, this attribute makes TAS report to clients the free space on all of the partitions. If set to root, this attribute makes TAS report only free disk space on the partition in which the virtual root of a client's connection resides.
-
Allow whitespace in file names -- The option to allow AppleTalk clients to use spaces in file names.
-
Use client specified file time stamps -- The option to stamp files created or modified on the server by clients with the clients' date and time rather than the server's date and time.
-
Log activity -- The option to enable activity logging. This directs this file service to record client activity in activity.tn in the TAS home directory. When a client disconnects, TAS appends a line of data about the client's session to the log file at activity.tn. This attribute defaults to no activity logging.
-
Tracing -- The option to direct this file service to write debugging traces to a file. Syntax Technical Support can use the trace file to help diagnose problems.
-
Start this file service? -- The option to start this file service when you click Submit. If you clicked Administer and Configuration, this attribute does not appear.
-
-
Click Submit.
The Create New AppleTalk File Service servicename screen or the Update AppleTalk File Service servicename screen appears.
-
Click OK.
To administer a file service from the UNIX command line, use the tnservice command.
5.3.5 Shutting Down File Services
Follow these steps to shut down a file service:
-
Follow these links:
AppleTalk Realm->Manage File Services
The List of AppleTalk File Services screen appears.
-
From the list, select the file service you want to shut down.
-
Click Administer.
The AppleTalk File Service servicename screen appears.
-
Click Shutdown Service.
The Confirmation screen appears.
-
Click OK.
The Shutdown servicename Service on AppleTalk Compatible Realm screen appears.
-
Click OK.
5.3.6 Deleting File Services
Follow the steps below to delete file services in the AppleTalk realm. These steps include instructions for shutting down the file services you want to delete, because you must shut down a file service to delete it.
-
Follow these links:
-
AppleTalk Realm->Manage File Services
The List of AppleTalk File Services screen appears.
-
-
From the list, select the file service you want to delete.
-
Click Administer.
The AppleTalk File Service servicename screen appears.
-
Click Shutdown Service.
The Confirmation screen appears.
-
Click OK.
The Shutdown servicename Service on AppleTalk Compatible Realm screen appears.
-
Click OK.
-
Repeat Steps 1-5 for each service you want to delete.
-
Follow these links:
AppleTalk Realm->Manage File Services
The List of AppleTalk File Services screen reappears.
-
From the list, select the file services you want to delete.
-
Click Delete.
The Confirmation screen appears.
-
Click OK.
The Delete AppleTalk File Service screen appears.
-
Click OK.
5.3.7 Accepting Services
AppleTalk file services accept connection requests unless you set them to reject connection requests. Starting TAS also sets its services to accept connection requests.
Follow these steps to make AppleTalk file services accept client connection requests:
-
Follow these links:
AppleTalk Realm->Configuration and Control->Accept Service Connections
The Confirmation screen appears.
-
Click OK.
The Accept all AppleTalk Service Connections screen appears.
-
Click OK.
To accept services from the UNIX command line, use the tnaccept command.
5.3.8 Rejecting Services
AppleTalk file services accept connection requests unless you set them to reject connection requests. Shutting down TAS also sets its services to reject connection requests.
Follow these steps to make AppleTalk file services reject client connection requests:
-
Follow these links:
AppleTalk Realm->Configuration and Control->Reject Service Connections
The Confirmation screen appears.
-
Click OK.
The Reject all AppleTalk Service Connections screen appears.
-
Click OK.
To reject services from the UNIX command line, use the tnreject command.
5.3.9 Administering Attach Points
Follow these steps to create, modify, or delete attach points--points on directory paths at which clients must provide credentials--in the AppleTalk realm:
-
Follow these links:
-
AppleTalk Realm->Manage File Services
The List of AppleTalk File Services screen appears.
-
-
From the list, select the file service in which you want to administer an attach point.
-
Click Administer.
The AppleTalk File Service servicename screen appears.
-
Click Attach Points.
The List of Defined Attach Points screen appears.
-
From the list, select the attach point you want to modify or delete, or enter the name of an attach point you want to create in the text field. If deleting, you may select more than one attach point. The list contains nothing if no attach points exist.
-
Click Create, Modify, or Delete. The Modify and Delete buttons do not appear if no attach points exist.
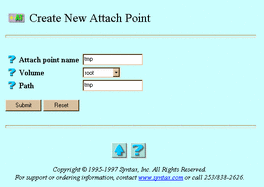
If you clicked Create, the Create New Attach Point screen below appears. Go to Step 7.
If you clicked Modify, the Update Attach Point attachpoint screen, same as the Create New Attach Point screen below, appears. Go to Step 7.
If you clicked Delete, the Confirmation screen appears. Click OK. The Delete Attach Points screen appears. Click OK. Do not go to Step 7.
-
Enter or select values for the following attributes:
-
Attach point name -- The attach point. If you clicked Modify, this attribute does not appear.
-
Volume -- The list of volumes exported by the service. TAS defines volumes at the system level. File services can reference defined volumes; such references export the volumes.
-
Path -- The directory below the selected volume, used as the virtual root by clients who connect to this attach point.
-
-
Click Submit.
The Create New Attach Point attachpoint screen or the Update Attach Point attachpoint screen appears.
-
Click OK.
To administer attach points from the UNIX command line, use the tnattach command.
5.3.10 Creating and Modifying Print Services
Follow these steps to create or modify an AppleTalk print service:
-
Follow these links:
AppleTalk Realm->Manage AppleTalk Print Services
The List of AppleTalk Print Services screen appears.
-
From the list, select the print service you want to delete, or enter the name of a service you want to create in the text field. The list contains nothing if no print services exist.
-
Click Create or Administer. The Administer button does not appear if no print services exist.
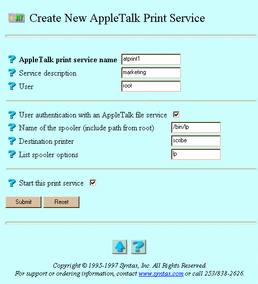
If you clicked Create, the Create New AppleTalk Print Service screen below appears. Go to Step 4.
If you clicked Administer, the AppleTalk Print Service servicename screen appears. Click Configuration, or click the appropriate link from the following, then click OK on the subsequent screen: Accept Service Connections, Reject Service Connections, Status, Start Service, Shutdown Service. If you click Configuration, the Update AppleTalk Print Service screen, same as the Create New AppleTalk Print Service screen below, appears. Go to Step 4.
-
Enter or select values for the following attributes, as needed:
-
AppleTalk print service name -- The print service to which users connect. If you clicked Administer and Configuration, this attribute does not appear.
-
Service description -- The description used within TAS for the service. It consists of an arbitrary line of text.
-
User -- The UNIX user identity you want to execute the UNIX command line given in the command directive for the service. The server process inherits the appropriate group list for the user name. This attribute defaults to root.
-
User authentication with an AppleTalk file service -- The option to allow the user to log on to an AppleTalk-compatible file service to print. The user name can appear on the title page of the print job.
-
Name of the spooler (include path from root) -- The name of the UNIX print spooler that the server can execute, needed by the server when printing clients' spooled jobs. Provide the full path of the spooler; for example, /bin/lp or /bin/lpr.
-
Destination printer -- The UNIX printer this print server should use.
-
List Spooler options -- Command line arguments for the print spooler.
-
Start this print service -- The option to start this print service when you click Submit. If you clicked Administer and Configuration, this attribute does not appear.
-
-
Click Submit.
The Create New AppleTalk Print Service servicename screen or the Update AppleTalk Print Service servicename screen appears.
-
Click OK.
To administer AppleTalk print services from the UNIX command line, use the tnservice command.
5.3.11 Shutting Down Print Services
Follow these steps to shut down a print service:
-
Follow these links:
AppleTalk Realm->Manage AppleTalk Print Services
The List of AppleTalk Print Services screen appears.
-
From the list, select the print service you want to shut down.
-
Click Administer.
The AppleTalk Print Service servicename screen appears.
-
Click Shutdown Service.
The Confirmation screen appears.
-
Click OK.
The Shutdown servicename Service on AppleTalk Realm screen appears.
-
Click OK.
5.3.12 Deleting Print Services
Follow the steps below to delete print services in the AppleTalk realm. These steps include instructions for shutting down the print services you want to delete, because you must shut down a print service to delete it.
-
Follow these links:
AppleTalk Realm->Manage AppleTalk Print Services
The List of AppleTalk Print Services screen appears.
-
From the list, select the print service you want to delete.
-
Click Administer.
The AppleTalk Print Service servicename screen appears.
-
Click Shutdown Service.
The Confirmation screen appears.
-
Click OK.
The Shutdown servicename Service on AppleTalk Realm screen appears.
-
Click OK.
-
Repeat Steps 1-5 for each service you want to delete.
-
Follow these links:
AppleTalk Realm->Manage Print Services
The List of AppleTalk Print Services screen reappears.
-
From the list, select the file services you want to delete.
-
Click Delete.
The Confirmation screen appears.
-
Click OK.
The Delete AppleTalk Print Services screen appears.
-
Click OK.
5.3.13 Administering Suffixes for AppleTalk Maps
An AppleTalk map associates file suffixes with Macintosh applications. The client operating system uses these associations to determine which application it should invoke when it accesses a file.
Follow these steps to create, modify, or delete suffixes for AppleTalk maps:
-
Follow these links:
AppleTalk Realm->Suffixes for AppleTalk Map
The List of Suffixes for AppleTalk Map screen appears.
-
From the list, select the suffix you want to modify or delete, or enter a suffix you want to create in the text field. If deleting, you may select more than one map. The list contains nothing if no maps exist.
-
Click Create, Modify, or Delete. The Modify and Delete buttons do not appear if no maps exist.
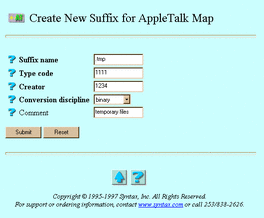
If you clicked Create, the Create New Suffix for AppleTalk Map screen below appears. Go to Step 4.
If you clicked Modify, the Update Suffix suffixname for AppleTalk Map screen, same as the Create New Suffix for AppleTalk Map screen below, appears. Go to Step 4.
If you clicked Delete, the Confirmation screen appears. Click OK. The Delete Suffix for AppleTalk Map screen appears. Click OK. Do not go to Step 4.
-
Enter or select values for the following attributes:
-
Suffix name -- The name of the suffix to associate with the AppleTalk map. If you clicked Modify, this attribute does not appear.
-
Type code -- The four-character Macintosh type code to associate with TAS files for the suffix.
-
Creator -- The Macintosh creator code--a four-byte sequence of characters that uniquely identifies a Macintosh program.
-
Conversion discipline -- The discipline for file conversions between client and server. Macintosh text files use carriage returns for new lines, whereas UNIX files use linefeeds.
-
Comment -- Information you would like to associate with the suffix type.
-
-
Click Submit.
The Create New Suffix suffixname for AppleTalk Map screen or the Update Suffix suffixname for AppleTalk Map screen appears.
-
Click OK.
To administer suffixes for AppleTalk maps from the UNIX command line, use the tnsuffix command.
5.3.14 Configuring Security
Follow these steps to configure AppleTalk file authentication:
-
Follow these links:
AppleTalk Realm->Manage File Services
The List of AppleTalk File Services screen appears.
-
From the list, select a file service for which you want to configure authentication.
-
Click Administer.
The AppleTalk File Service servicename screen appears.
-
Click Authentication and Service Mode Options.
The Update Local Authentication for servicename screen appears:
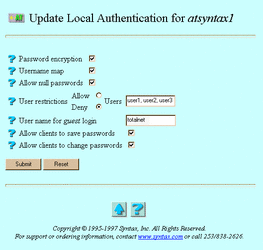
-
Select or enter values for the following attributes, as needed:
-
Password encryption -- The option to keep passwords from transmitting across the network. Without password encryption, any UNIX user can potentially connect to the server. In this open authentication environment, client and server exchange clear-text passwords. Password encryption, the secure authentication method, provides improved security, but you must maintain a separate user-password database for it. When you enable password encryption and secure authentication, only users added via Passwords can connect. With secure authentication, client and server exchange a series of messages that allows the server to verify that the client knows the correct password, without transmitting the password or any representation of it. Most AppleTalk-compatible clients support password encryption.
-
Username map -- The option to allow file services to validate clients by mapping them to valid UNIX users. You must define username maps before selecting this option (see "4.2 Administering Username Maps").
-
Allow null passwords -- The option to allow UNIX users without passwords to access the server. By default, TAS denies such users access to the server, for better security. This option has no effect if you enable Password encryption.
-
User restrictions -- The option to restrict the users who can connect to this service. Select it by selecting either Allow or Deny and the names of the users in the adjacent Users field. If you enter no user names, TAS ignores this attribute. Separate user names with commas.
-
User name for guest login -- The name assigned to LM-NT-OS/2 share-mode clients for accessing the AppleTalk realm.
-
Allow clients to save passwords -- The option to allow clients to save their passwords on the server.
-
Allow clients to change passwords -- The option to allow clients to change their server passwords.
-
-
Click Submit.
The Update Local Authentication for servicename screen appears.
-
Click OK.
To configure security from the UNIX command line, use the tnservice command.
5.3.15 Disconnecting Users
Follow these steps to disconnect connected users:
-
Follow one of these sets of links:
AppleTalk Realm->AppleTalk Connected Users->Disconnect Users
AppleTalk Realm->Manage File Services->[select a service] ->Administer->Disconnect Users
The Disconnect Users screen appears:
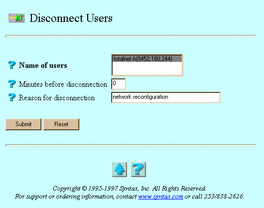
-
Select or enter values for the following attributes, as needed:
-
Name of users -- The users to disconnect
-
Minutes before disconnection -- The time, in minutes, before you want to disconnect the users.
-
Reason for disconnection -- A brief message to the users to disconnect. Users must have message reception enabled to see this message.
-
-
Click Submit.
The Disconnect Users screen reappears, this time containing the statement "Command Successful".
-
Click OK.
To disconnect a user from the UNIX command line, use the tnkill command.
5.3.16 Viewing Realm Connections
Follow these steps to list AppleTalk realm connections:
-
Follow one of these sets of links:
AppleTalk Realm->AppleTalk Connected Users->Connection Information
AppleTalk Realm->Manage File Services->[select a service] ->Administer->Connection Information
The Connection Information screen appears.
-
From the list, select a user whose information you want to view.
-
Click Submit.
The Connection Information in AppleTalk Realm screen appears:
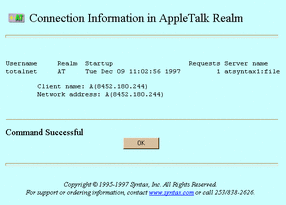
-
When finished, click OK.
- © 2010, Oracle Corporation and/or its affiliates
