Chapter 4 General Administrative Tasks
This chapter covers procedures commonly performed by the network administrator. By following these procedures, you can use the TotalAdmin sphere to manage the processes and objects that provide file and print services to native client machines in LAN Manager, Windows for Workgroups, Windows 95, Windows NT, NetWare, and AppleTalk environments. You can also use TotalNET utilities from the UNIX command line to perform the same tasks. For information on configuring and managing TAS using command line utilities rather than the TotalAdmin sphere, consult TAS Reference Manual.
You must complete Chapter 3, Initial Setup Steps before you can perform any tasks from this chapter to Chapter 7. If you do not run the initial setup wizard, TAS cannot load your transport drivers and the servers cannot start.
Configuration and administration screens in this chapter sometimes have both selection lists and text fields for your input regarding an object. If these both apply to one object or attribute and you both select a value and type one in, the value you type overrides the one you select in the list.
This chapter contains the following sections:
-
"4.1 Controlling the Server System" -- Instructions for performing general server administration tasks, such as starting, shutting down, and checking the status of the system, updating system configuration, and accepting and rejecting client connections to services.
-
"4.2 Administering Username Maps" -- Instructions for creating, modifying, and deleting maps.
-
"4.3 Administering Secure Authentication" -- Instructions for creating, modifying, and deleting secure authentication users.
-
"4.4 Administering Users" -- Instructions for viewing TAS connections and disconnecting TAS users.
-
"4.5 Administering Volumes" -- Instructions for creating, modifying, and deleting TAS volumes.
-
"4.6 Administering Printers" -- Instructions for creating, modifying, and deleting TAS printers. Define AppleTalk-compatible printers in the AppleTalk realm (see "5.3.10 Creating and Modifying Print Services").
-
"4.7 Running UNIX Commands" -- Instructions for running UNIX commands from TotalAdmin.
-
"4.8 Updating UNIX File Attributes" -- Instructions for updating UNIX file attributes from TotalAdmin.
4.1 Controlling the Server System
This section contains instructions for the following tasks:
4.1.1 Starting TAS Services
Follow these steps to start the TAS system and set all services to accept client connections:
-
Follow these links:
-
System->System Administration->Start Services
The Confirmation screen appears.
-
-
Click OK.
The Start all TAS Services screen appears.
-
Click OK.
To start TAS services from the UNIX command line, use the tnstart command.
4.1.2 Shutting Down TAS Services
Follow these steps to shut down the TAS system and set all services to reject client connections:
-
Follow these links:
-
System->System Administration->Shutdown Services
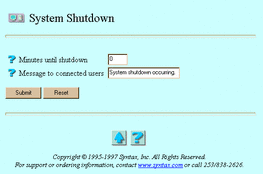
The System Shutdown screen appears:
-
-
Enter values for the following attributes, as needed:
-
Minutes until shutdown -- The amount of time you want to elapse before shutdown. This option does not appear if you already initiated a shutdown.
-
Message to connected users -- A brief message to send to connected file service clients as shutdown nears and when shutdown commences. TAS sends your message every five minutes until shutdown occurs. Five minutes until shutdown, TAS sets all services to reject client connections. This option does not appear if you already initiated a shutdown.
-
Cancel a pending shutdown -- The option to stop a shutdown in progress. This option only appears when you already initiated a shutdown.
-
-
Click Submit.
The Shutdown Services screen appears.
-
Click OK.
To cancel the shutdown, click Cancel, select Cancel a pending shutdown, and click Submit.
To shut down TAS services from the UNIX command line, use the tnshut command.
4.1.3 Checking TAS System Status
Follow these steps to check the status of services and client connections in the TAS system:
-
Follow these links:
-
System->System Administration->Service Status
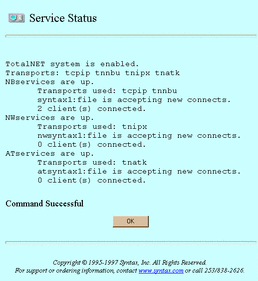
The Service Status screen appears:
-
-
When finished, click OK.
You may also check TAS system status by clicking the Status at a Glance link and the TAS icon on the first screen that appears before you log in.
To check TAS system status from the UNIX command line, use the tnstat command.
4.1.4 Updating System Configuration
Follow these steps to change system configuration attributes:
-
Follow these links:
-
System->System Administration->System Setup
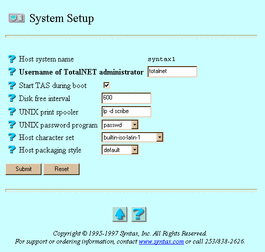
The System Setup screen appears:
-
-
Enter or select values for the following attributes, as needed:
-
Username of TotalNET administrator -- The UNIX name of the TAS administrator. The TAS administrator must own the TAS home directory. This attribute defaults to totalnet.
-
Start TAS during boot -- The option to cause TAS processes to start when the operating system starts.
-
Disk free interval -- The number of seconds you wish to pass between recalculations of free disk space by the TNdiskfree program. This attribute defaults to 600 seconds--one recalculation every 10 minutes.
-
UNIX print spooler -- If the UNIX system has more than one spooler installed, the full path name of the UNIX print spooler program you want to use.
-
UNIX password program -- The UNIX program for changing users' UNIX passwords. If your system uses NIS, select yppasswd; if it uses NIS+, select nispasswd; if it uses neither, select passwd.
-
Host character set -- Part of the scheme for mapping file names across realms. This attribute designates the name of the character set used by the host. It defaults to builtin-iso-latin-1--the built-in version of the ISO-8859-1 character set, a superset of ASCII.
-
Host packaging style -- The field that designates the way TAS puts together, within a byte-stream, the character set used by the host. Select one of the following: default to indicate that the Host character set value determines the packaging style, single if the host character set contains only one-byte characters, euc if it contains one-, two- and three-byte characters, shift-jis if it contains only one- and two-byte characters.
-
-
Click Submit.
The Updating System Setup screen appears.
-
Click OK.
To update system configuration from the UNIX command line, use the tnsystem command.
4.1.5 Accepting Services
TAS services accept client connections unless you set them to reject connections. Starting TAS also sets its services to accept connections.
Follow these steps to make all defined TAS services accept client connections:
-
Follow these links:
-
System->System Administration->Accept Service Connections
The Confirmation screen appears.
-
-
Click OK.
The Accept Service Connections screen appears.
-
Click OK.
To accept services from the UNIX command line, use the tnaccept command.
4.1.6 Rejecting Services
TAS services accept client connections unless you set them to reject connections. Shutting down TAS also sets its services to reject connections.
Follow these steps to make all defined TAS services reject client connections:
-
Follow these links:
-
System->System Administration->Reject Service Connections
The Confirmation screen appears.
-
-
Click OK.
The Reject Service Connections screen appears.
-
Click OK.
To reject services from the UNIX command line, use the command.
4.2 Administering Username Maps
User name maps translate multiple user names to a single UNIX user account for authentication. For example, a map from the user names Clark, CLARK, and clark to the UNIX account clark makes the authentication program see them all as clark.
Follow these steps to create, modify, or delete a user name map:
-
Follow these links:
-
System->Username Maps
The UNIX Username Maps screen appears.
-
-
From the list, select the user whose mapping scheme you want to modify or delete, or enter the name of a user whose name you want to map, in the text field. If deleting, you may select more than one name. The list contains nothing if no maps exist.
-
Click Create, Modify, or Delete. The Modify and Delete options do not appear if no maps exist.
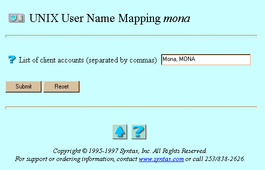
If you clicked Create or Modify, the UNIX User Name Mapping username screen below appears. Go to Step 4.
If you clicked Delete, the Confirmation screen appears. Click OK. Do not go to Step 4.
-
Enter a value for the following attribute:
-
List of client accounts (separated by commas) -- All the names you want to map to the UNIX user account. Separate them with commas.
-
-
Click Submit.
The UNIX Username Maps screen reappears, this time containing the statement "Update Successful".
-
Click OK.
To administer username maps from the UNIX command line, use the tnumap and tnumapuser commands.
4.3 Administering Secure Authentication
All clients except those using share-mode file services must have file service authentication to access files and resources. TAS provides two methods for authenticating clients: UNIX open authentication and secure authentication.
Clients using open authentication send passwords in clear-text over the network. The file service process checks these passwords against those in the standard UNIX user database, such as /etc/passwd or NIS.
Secure authentication requires a separate, TAS-maintained user-password database. A client using this method does not send a clear-text password over the network. Instead, the client and server exchange a random message, and each encodes it with the user's password. The client sends the result of its encoding to the server, and the server compares it with the result of the server's encoding.
You can use this client-server dialog to create and update user-password entries for file services. You can also name a script file for Windows 95 clients to use when they connect to LM-NT-OS/2 realm services that support this feature.
Follow these steps to create, modify, or delete a secure authentication user:
-
Click the Passwords link.
The Password Users screen appears.
-
From the list, select the name of the secure authentication user whose password you want to modify or delete, or enter the name of a user you want to add, in the text field. If deleting, you may select more than one name. The list contains nothing if no secure authentication user names exist.
-
Click Create, Modify, or Delete. The Modify and Delete options do not appear if no secure authentication user names exist.
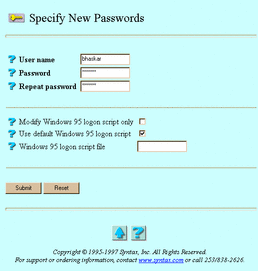
If you clicked Create, the Specify New Passwords screen below appears. Go to Step 4.
If you clicked Modify, the Specify Passwords for username screen, same as the Specify New Passwords screen below, appears. Go to Step 4.
If you clicked Delete, the Confirmation screen appears. Click OK. Do not go to Step 4.
-
Enter values for the following attributes, as needed:
-
User name -- An existing user entry in the UNIX database. If you clicked Modify, this attribute does not appear.
-
Password -- The user's new password.
-
Repeat password -- Confirmation of the user's new password. Type in the password again.
-
Password for realms -- The realms for which the password changes. If you clicked Create, this option does not appear.
-
Modify Windows 95 logon script only -- The option to modify the logon script options only, ignoring any password options.
-
Use default Windows 95 logon script -- The option to cause the user's client to follow a file service's default logon script. If you select this option, do not enter information for Windows 95 logon script file.
-
Windows 95 logon script file -- The name of a file other than the default to execute when this user first connects. The logon script, an executable file, executes when the PC connects to the server. Make sure that the file exists and executes properly. Also, a volume or attach point named NETLOGON, accessible from the file service to which the user connects, must contain your Windows 95 logon script file. If you enter information for this attribute, do not select Use default Windows 95 logon script.
-
-
Click Submit.
The Creating new Passwords for username or the Updating Passwords for username screen appears.
-
Click OK.
To administer secure authentication from the UNIX command line, use the tnpasswd command.
4.4 Administering Users
This section contains instructions for the following tasks:
4.4.1 Viewing TAS Connections
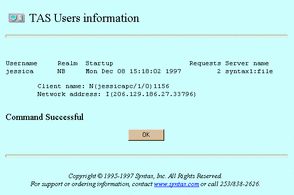
Follow these steps to list TAS connected users by UNIX name, along with their realms, connection dates and times, number of connection requests, server names and types, client names, and network addresses:
-
Follow these links:
-
System->TAS Connected Users->User Information
The Users screen appears.
-
-
Select from the list or type in the text field the names of the users whose information you want to view.
-
Click View.
The TAS Users information screen appears:
-
When finished, click OK.
4.4.2 Disconnecting TAS Users
Follow the steps below to disconnect selected users. Network clients that automatically reconnect broken connections cannot effectively disconnect.
-
Follow these links:
-
System->TAS Connected Users->Disconnect Users
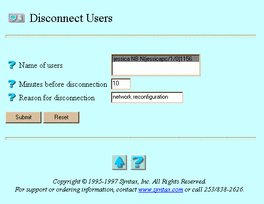
The Disconnect Users screen appears:
-
-
Select or enter values for the following attributes, as needed:
-
Name of users -- The users whose sessions you want to disconnect.
-
Minutes before disconnection -- The number of minutes before forced disconnection.
-
Reason for disconnection -- A brief message TAS sends to client users before terminating their sessions.
-
-
Click Submit.
The Disconnect Users screen appears.
-
Click OK.
To disconnect a TAS user from the UNIX command line, use the tnkill command.
4.5 Administering Volumes
Volumes--short names for directory paths--reside in the UNIX file system. Network clients use volume names in net use and map commands, their Windows equivalents, or the Macintosh chooser's volume list. You can create volume directories and assign user and group ownership and file protection masks.
File services can export only those parts of the UNIX file system defined as volumes. To allow clients to access a volume, you must reference it from one or more file services.
Follow these steps to create, modify, or delete a volume:
-
Follow these links:
-
System->Volumes
The Volumes screen appears.
-
-
From the list, select the volume you want to modify or delete, or enter the name of a volume to want to add, in the text field. For the LM-NT-OS/2 realm, volume names can contain up to 12 characters; NetWare realm volume names can contain up to 15; and AppleTalk realm volume names can contain up to 27. You can create names exceeding these maximums, but if you do, the clients whose limits such names exceed cannot see the names in their browse lists. The volume list contains nothing if no volumes exist.
-
Click Create, Modify, or Delete. If you have made references to the volume, you cannot delete it without first deleting the volume references from the file service. Do so by clicking Modify and clearing the selected file services at the bottom of the Update Volume Definition for volumename screen. Clear a service by clicking on the service or, if your web browser does not respond to that, by holding down the Control or Shift key and clicking on the service. The Modify and Delete buttons do not appear if no volumes exist.
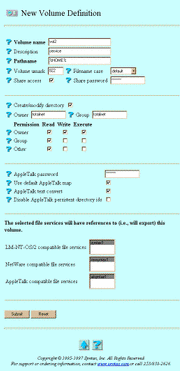
If you clicked Create, the New Volume Definition screen below appears. Go to Step 4.
If you clicked Modify, the Update Volume Definition for volumename screen, same as the New Volume Definition screen below, appears. Go to Step 4.
If you clicked Delete, the Confirmation screen appears. Click OK. Do not go to Step 4.
-
Enter or select values for the following attributes, as needed:
-
Volume name -- The name used in net use and map commands, their Windows equivalents, or the Macintosh chooser's volume list. If you clicked Modify, this attribute does not appear.
-
Description -- A volume description to appear in Network Neighborhood or Chooser windows or at the net view command.
-
Pathname -- The full directory path, beginning with "/", to the UNIX directory that serves as the virtual root of the volume. Clients connect to the volume or to attach points below the volume path and cannot see files or directories above the path. Volumes may overlap; that is, one volume's root may lie within another volume. TAS resolves the following strings in volume path names at the time of connection:
-
%USER% - The user name.
-
%GROUP% - The user's primary group.
-
%CLIENT% - The client name.
-
%HOME% - The user's home directory.
-
%SYSTEM% - The system name.
-
%REALM% - The realm name--NW, NB, or AT.
-
%SERVICE% - The file service name.
-
%% - An actual percent sign.
-
Volume umask -- The default file permissions for files created on this volume. This designation overrides the umask defined for the file service, if any. This attribute defaults to the umask for the file service. It affects new files only; you cannot set existing files' permissions with it.
-
Filename case -- One of the following ways that file services handle the case in file names in the volume:
lower
The case in which TAS stores file names on the server. This efficiently implements the case insensitivity expected by clients. Clients see file names in mixed case but can use either case for any letters in when supplying file names to access the files. This handling can cause problems for UNIX applications that expect files to have the mixed-case names as supplied by clients.
default
preserve.
preserve
The same as lower, except both clients and UNIX applications see a file name in exactly the case created by the client. Clients may use any case when supplying the file name to access the file.
-
Share access -- The option to make a volume accessible through share-level security mode services, which only the LM-NT-OS/2 realm supports. If you do not select this option, users can only access the volume through user-level security services. If you select this option, TAS requires users to supply the Share password to access the volume.
-
Share password -- The password a user must supply to access a share-mode volume. This option has no effect unless you enable Share access. If you enter no password, TAS allows users to access the volume in share mode without passwords. If a password already exists, TAS indicates it with an asterisk (*). This password changes only if you remove it or enter a new one. Setting the password to "#" causes TAS to deny all access to this volume in share mode. A user, when making connections to TAS and prompted for a connection password, must precede each upper-case character in the password with a tilde (~).
-
Create/modify directory -- The option that, when selected creates or modifies the volume directory to your specifications in Pathname and this section of the screen. When you create a new directory, the parent directory must exist, because this option only creates the lowest level of the directory path.
-
Owner -- The owner of the UNIX directory.
-
Group -- The group of the UNIX directory.
-
Permission (Read, Write, and Execute for Owner, Group, and Other) -- UNIX file permissions on a directory, as follows:
Read
Permission to read the names of files in the directory.
Write
Permission to create and remove files in the directory.
Execute
Permission to access the directory.
-
AppleTalk password -- The password, distinct from the Share password, with which AppleTalk-compatible clients access the volume. If a password already exists, TAS indicates it with an asterisk (*). This password changes only if you remove it or enter a new one.
-
Use default AppleTalk map -- The option to designate file-name mappings between files, Macintosh types, and owner applications, for the AppleTalk realm.
-
AppleTalk text convert -- The option to direct TAS to automatically map between UNIX and Macintosh text file formats. This occurs for clients connecting to services in the AppleTalk realm only.
-
Disable AppleTalk persistent directory ids -- The option to disable the ability of Macintosh clients to retain the directory ID between sessions. This option causes TAS to keep directory IDs only for the duration of single client sessions, and prevents features that depend on persistent IDs, such as the MacOS alias facility, from functioning across successive sessions to a file service. In normal circumstances, you need not disable this feature. For particularly large volumes, however, the overhead required to keep track of the directory IDs may become excessive. If it does, you may want to disable it.
-
LM-NT-OS/2 compatible file services -- The list of LM-NT-OS/2-compatible file services. Select the file services from which to reference the volume.
-
NetWare compatible file services -- The list of NetWare-compatible file services. Select the file services from which to reference the volume.
-
AppleTalk compatible file services -- The list of AppleTalk-compatible file services. Select the file services from which to reference the volume.
-
-
Click Submit.
The Creating new Volume Definition for volumename screen or the Updating Volume Definition for volumename screen appears.
-
Click OK.
To administer volumes from the UNIX command line, use the tnvolume command.
4.6 Administering Printers
Network clients use printer names in net use and capture commands and their Windows equivalents. File services can export only those print queues defined as printers. To allow network clients access to a printer and its queue, define it by referencing it to the LM-NT-OS/2 and NetWare file services for the clients. In TAS 5.2, you can make AppleTalk network printers available to LM-NT-OS/2 and NetWare clients.
TAS handles printing in the AppleTalk realm with dedicated print services rather than file services. The AppleTalk-compatible print service configuration contains the printer information for AppleTalk realm clients.
Follow these steps to create, modify, or delete a printer:
-
Follow these links:
-
System->Printers
The Printers screen appears.
-
-
From the list, select the name of the printer you want to modify or delete, or enter the name of a printer you want to add, in the text field. If deleting, you may select more than one printer. The list contains nothing if no printers exist.
-
Click Create, Modify, or Delete. The Modify and Delete buttons do not appear if no printers exist.
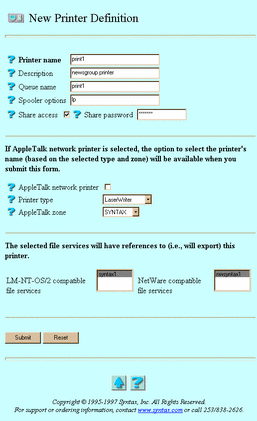
If you clicked Create, the New Printer Definition screen below appears. Go to Step 4.
If you clicked Modify, the Update Printer Definition for printername screen, same as the New Printer Definition screen below, appears. Go to Step 4.
If you clicked Delete, the Confirmation screen appears. Click OK. Do not go to Step 4.
-
Enter or select values for the following attributes, as needed:
-
Printer name -- The name used in net use and capture commands and their Windows equivalents. If you clicked Modify, this attribute does not appear.
-
Description -- A printer description to appear in Network Neighborhood or Chooser windows or at the net view command.
-
Queue name -- The UNIX print queue associated with the printer. If you do not define this attribute, it defaults to the printer name.
-
Spooler options -- UNIX command line options that pass to the UNIX print spool program when a print job starts.
-
Share access -- The option to make a printer accessible through share-level security mode services, which only the LM-NT-OS/2 realm supports. If you do not select this option, users can only access the printer through user-level security services. If you select this option, TAS requires users to supply the Share password to access the printer.
-
Share password -- The password a user must supply to access a share-mode printer. This option has no effect unless you enable Share access. If you enter no password, TAS allows users to access the printer in share mode without passwords. If a password already exists, TAS indicates it with an asterisk (*). This password changes only if you remove it or enter a new one. Setting the password to "#" causes TAS to deny all access to this printer in share mode. A user, when making connections to TAS and prompted for a connection password, must precede each upper-case character in the password with a tilde (~).
-
AppleTalk network printer -- The option to make an AppleTalk printer available on the network. The list contains available AppleTalk network printer names based on of Printer type in AppleTalk zone. The AppleTalk network printer, Printer type, and AppleTalk zone designations make up the AppleTalk entity name.
-
Printer type -- The type of the AppleTalk printer you want to make available. This list contains supported AppleTalk printer types. The AppleTalk network printer, Printer type, and AppleTalk zone designations make up the AppleTalk entity name.
-
AppleTalk zone -- The AppleTalk zone for which you want to make the printer available. The list contains the AppleTalk zones discovered in the network segment. The AppleTalk network printer, Printer type, and AppleTalk zone designations make up the AppleTalk entity name.
-
LM-NT-OS/2 compatible file services -- The list of LM-NT-OS/2 file services. Select the file services from which you wish to reference the printer.
-
NetWare compatible file services -- The list of NetWare-compatible file services. Select the file services from which you wish to reference the printer.
-
-
Click Submit.
The Creating new Printer Definition for printername screen or the Updating Printer Definition for printername screen appears.
-
Click OK.
To administer printers from the UNIX command line, use the tnprinter command.
4.7 Running UNIX Commands
The capability to run UNIX commands from TotalAdmin provides a way for Syntax Technical Support to gather information at your site. Syntax Technical Support representatives may ask you to run certain UNIX commands via this interface as a means of solving problems. Do not use this function for general-purpose access to the UNIX command line. Use TAS Reference Manual to learn how to administer TAS from the UNIX command line.
Follow these steps to run a UNIX command from TotalAdmin:
-
Follow these links:
-
System->UNIX Command
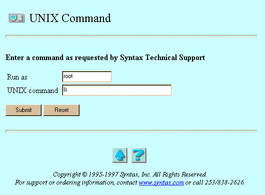
The UNIX Command screen appears:
-
-
Enter values for the following attributes:
-
Run as -- The user name to want to use to run the command. This option only appears if you logged in as root.
-
UNIX command -- The command you want to execute.
-
-
Click Submit.
The UNIX Command commandname screen appears.
-
When finished, click OK.
4.8 Updating UNIX File Attributes
This section shows you how to modify the permissions of one or more UNIX files under a volume. When you reconfigure permissions, TotalAdmin displays the new permissions for the selected files. Volumes must exist for you to configure file and directory access permissions in them. To create a volume, see "4.5 Administering Volumes".
Follow these steps to update UNIX file attributes:
-
Click the File Permissions link.
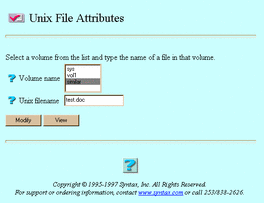
The UNIX File Attributes screen appears:
-
Select or enter values for the following attributes:
-
Volume name -- The volume containing the files you want to modify. If no volumes appear, you have configured none, or their path specification includes substitution strings like %HOME% or %USER%.
-
UNIX filename -- The names of the files to modify or view. To modify more than one file, you can use UNIX wildcards, such as *.txt. You cannot use two consecutive dots in the path name you provide.
-
-
Click Modify or View.
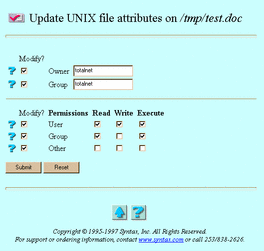
If you clicked Modify, the Update UNIX file attributes on filepath screen below appears. Go to Step 4.
If you clicked View, the Listing for filename screen appears. It displays the following information for each file: its permissions, number of links, owner, group, size, modification date, modification time, and file name. When finished, click OK. Do not go to Step 4.
-
Select or enter values for the following attributes, as needed:
-
Modify? (Owner and Group) -- The option that changes the ownership of the path. To select it, select the appropriate boxes under Modify? and fill in the corresponding fields. Ownership changes in a field only if you select its corresponding box under Modify? and enter an owner name.
-
Modify? (Read, Write, and Execute Permissions for User, Group, and Other) -- The option that designates permissions for the path. To select it, select the boxes under Modify? that indicate the permissions levels you want to designate and select the corresponding boxes. A permission only changes if you select a box under Modify? and a corresponding box from the Read, Write, or Execute columns.
-
-
Click Submit.
The File Attributes screen appears.
-
Click OK.
- © 2010, Oracle Corporation and/or its affiliates
