Chapter 3 Initial Setup Steps
This chapter provides instructions for initial configuration of TAS from TotalAdmin. Configure TAS only after you complete all the appropriate installation steps in TAS Release Notes. You must perform initial configuration immediately after TAS installation to complete all system-level configuration tasks.
1. Starting the Initial Setup Wizard
Follow these steps to start the initial setup wizard:
-
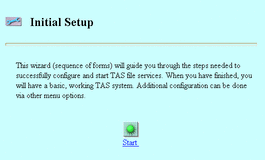
After you connect to TNAS as instructed in your TAS Release Notes, click the first menu link in the TotalAdmin menu frame--Initial Setup.
The Initial Setup screen appears:
-
Click the "Start" button:

Sections 2-6 of this chapter guide you through the initial setup wizard.
2. Entering the License Key
The initial setup wizard advances to the TAS Activation Key screen:

Without a license key, TAS supports only single-user mode, with which you can evaluate TAS. You need a license key to add users to TAS. Each time you start TAS and execute a server daemon, TAS verifies the identification number of its host server, checks the licensed user limit, and, if applicable, checks the expiration date of the license. Contact your Sun Microsystems sales representative to purchase additional licenses. After you successfully configure TAS, you do not need to enter the license key if you re-run the initial setup wizard.
-
Enter the value for the following attribute:
Key -- Your license key. To use TAS in single-user mode, click Next without entering anything in this field. Enter letters in the key in the case provided by your Sun License Center.
-
Click Next.
3. Configuring General TAS Settings
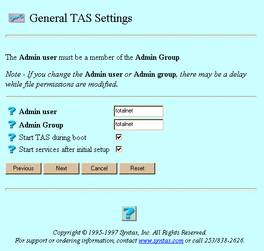
The initial setup wizard advances to the General TAS Settings screen:
-
Enter values for the following attributes, as needed:
Admin user -- The primary administrative user of TAS. The user you select must exist before you can use it here. The installation kit automatically creates the user totalnet in the group totalnet.
Admin Group -- The group of Admin user. The group you select must exist before you can use it here. The installation kit automatically creates the user totalnet in the group totalnet.
Start TAS during boot -- The option to start TAS automatically when the UNIX system reboots.
Start services after initial setup -- The option to automatically start services after you finish the initial setup wizard. It starts one file service per configured realm.
-
Click Next. Changing the user or group from the default may take a few minutes.
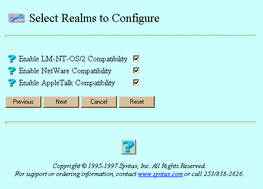
The Select Realms to Configure screen appears:
-
Select the realms you want to enable.
-
Click Next.
4. Configuring the LM-NT-OS/2 Realm
If you did not select Enable LM-NT-OS/2 Compatibility, click Next on the screen that appears and skip to "5. Configuring the NetWare Realm".
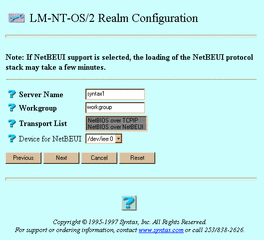
If you selected Enable LM-NT-OS/2 Compatibility, the initial setup wizard advances to the LM-NT-OS/2 Realm Configuration screen:
-
Enter or select values for the following attributes, as needed:
Server Name -- The file service name, a name not already used on the network with no spaces and 15 or fewer characters. Users connect to this service. TAS gives a default name, hostname, to this service. The hostname variable represents the name of your UNIX host server for TAS, as reported by the UNIX hostname and uname -n commands.
Workgroup -- The name of the LM-NT-OS/2-compatible clients' domain, such as workgroup or langroup.
Transport List -- NetBIOS over TCP/IP and, if TAS supports NetBEUI on your platform, NetBIOS over NetBEUI. Select one or both for your transport. If you select NetBIOS over NetBEUI and your system has multiple devices, select a name for Device for NetBEUI.
Device for NetBEUI -- The device name for your NetBIOS-over-NetBEUI transport. Select a name for this attribute only if you select NetBIOS over NetBEUI for Transport List.
-
Click Next.
5. Configuring the NetWare Realm
If you did not select Enable NetWare Compatibility, click Next on the screen that appears and skip to "6. Configuring the AppleTalk Realm".
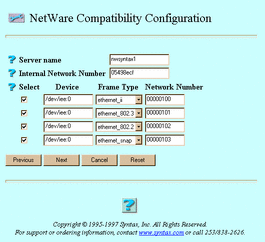
If you selected Enable NetWare Compatibility, the initial setup wizard advances to the NetWare Compatibility Configuration screen:
-
Enter or select values for the following attributes, as needed:
Server name -- The file service name, a name not already used on your network with no spaces and 47 or fewer characters. Users connect to this service. TAS gives a default name, nwhostname, to this service. The hostname variable represents the name of your UNIX host server for TAS, as reported by the UNIX hostname and uname -n commands.
Internal Network Number -- The number of the internal interface. Never delete this number. To configure the device interfaces that connect to the realm, you must have a valid internal network number and at least one interface with the device value set to a network/DLPI device name and frame type. TAS assigns an eight-digit, hexadecimal internal network number to the internal frame type. The number cannot have a value of zero, and the network can contain only one number of this value. Internal Network Number defaults to the value given by the UNIX hostid command.
Select -- The list of options to enable the corresponding device, frame type, and network number designations to the right. TAS does not configure values corresponding to empty Select boxes.
Device -- The list of devices you wish to configure, in the format device-file:ppa-number. The device-file variable represents the location of the device file, and the ppa-number variable represents the physical point attachment (PPA) number for the data-link provider interface (DLPI). For example, if the UNIX command netstat -i returns the network name le0, enter /dev/le:0 for this field.
Frame Type -- The list of frame types you may configure for an interface. You can configure one interface with more than one frame type, provided the interface supports each frame type. You may wish to avoid configuring interfaces that correspond to unused frame types in your environment. For example, if ethernet_snap appears under Frame Type and your network does not use ethernet_snap, you can clear the Select checkbox on that line. Not counting the internal interface, TAS supports six interface types for system configuration. After you finish the initial setup wizard, you can add transport interfaces from the TotalAdmin sphere via Transports->IPX/SPX Interfaces. If the configuration file contains interfaces that do not appear in the result returned from system lookup, this page gives a warning. You can erase those redundant interfaces as described in Chapter 6, Configuring Transports.
Network Number -- The number to identify a network segment. You should use the same network number for all nodes on the network segment.
The following example shows Device, Frame Type, and Network Number entries:
/dev/dlpi/en:0
ethernet_ii
100
/dev/dlpi/et:0
ethernet_802.2
102
/dev/dlpi/et:0
ethernet_802.3
101
/dev/dlpi/et:0
ethernet_snap
103
-
Click Next.
6. Configuring the AppleTalk Realm
If you did not select Enable AppleTalk Compatibility, click Next on the screen that appears and skip to "7. Starting the Configured Server".
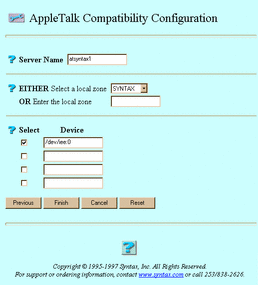
If you selected Enable AppleTalk Compatibility, the initial setup wizard advances to the AppleTalk Compatibility Configuration screen:
-
Enter or select values for the following attributes, as needed:
Server Name -- The file service name, a name not already used on your network with 32 or fewer characters. Users connect to this service. TAS gives a default name, athostname, to this service. The hostname variable represents the name of your UNIX host server for TAS, as reported by the UNIX hostname and uname -n commands.
EITHER Select a local zone OR Enter the local zone -- The zone designation. Either select the AppleTalk network zone in which TAS resides from the list or enter a zone name other than the default in the text field. If you type a name and select one from the list, the typed name takes priority over the name in the list. The list displays those zone names discovered on your network by the AppleTalk detection program. If you do not know the zone name information, find it by running the atkprobe command.
Select -- The list of options to enable the corresponding device name to the right. TAS does not configure values corresponding to empty Select boxes.
Device -- The name of the device for the AppleTalk transport.
-
Click Finish.
7. Starting the Configured Server
The Initial Setup screen reappears, this time containing the statement "Wizard successful":

Depending on whether you checked the Start services after initial setup box when you configured general TAS settings, the installation program either starts TAS services or exits the wizard. If you did not elect to start services after initial setup, you can start TAS services by following these links:
System->System Administration->Start Services
You have successfully configured TAS!
For instructions on performing general administrative tasks, configuring services, and configuring transports, continue to the next three chapters.
- © 2010, Oracle Corporation and/or its affiliates
