Chapter 6 Configuring Transports
This chapter covers procedures for administering transports and interfaces in the LM-NT-OS/2, NetWare, and AppleTalk realms.
TAS transports--low-level networking protocols defined at the system level and referenced from all realms--consist of the following:
-
TotalNET NetBIOS-over-TCP/IP (tcpip) and TotalNET NetBEUI (tnnbu) in the LM-NT-OS/2 realm
-
TotalNET IPX/SPX (tnipx) in the NetWare realm
-
TotalNET AppleTalk (tnatk) in the AppleTalk realm
Configuration and administration screens in this chapter sometimes have both selection lists and text fields for your input regarding an object. If these both apply to one object or attribute and you both select a value and type one in, the value you type overrides the one you select in the list.
This chapter contains the following sections:
-
"6.1 Modifying TCP/IP Configuration" -- Instructions for modifying operational attributes for NetBIOS-over-TCP/IP and Enterprise Name Service (ENS).
-
"6.2 Administering TCP/IP Interfaces"-- Instructions for creating and deleting the IP addresses over which TAS operates.
-
"6.3 Administering Static NetBIOS Name Mappings" -- Instructions for creating, modifying, and deleting NetBIOS names.
-
"6.4 Administering NetBEUI Interfaces" -- Instructions for creating and deleting NetBEUI interfaces.
-
"6.5 Modifying IPX/SPX Configuration" -- Instructions for modifying IPX/SPX configuration.
-
"6.6 Administering IPX/SPX Interfaces" -- Instructions for creating, modifying, and deleting IPX/SPX transport interfaces.
-
"6.7 Administering Service Advertisement Protocol" -- Instructions for creating, modifying, and deleting SAPs.
-
"6.8 Modifying AppleTalk Configuration" -- Instructions for modifying AppleTalk transport attributes.
-
"6.9 Administering AppleTalk Interfaces" -- Instructions for creating, modifying and deleting AppleTalk interfaces.
6.1 Modifying TCP/IP Configuration
The NetBIOS-over-TCP/IP interface can support multiple subnets across routers, so that LAN Manager, Windows NT, Windows for Workgroups, Windows 95, and OS/2 clients can communicate using NetBIOS broadcasts.
To enable this, you use the built-in Enterprise Name Service (ENS). ENS consists of at least one UNIX ENS agent (ENSA) on each broadcast subnet and a NetBIOS Directory Agent (NDA), which serves as a directory for mapping NetBIOS names to IP addresses. To configure ENS, define the IP address and port number, if different from the default, of the host running NDA.
You can set up any multi-homed host--one with multiple network interfaces, each running NetBIOS-over-TCP--as an ENS client. This allows the host to claim the same NetBIOS names on each network interface without complaint from ENS. All hosts in this network segment must have the same ENS client port. You can also define a NetBIOS name scope if you do so consistently among all relevant NetBIOS nodes.
Follow these steps to modify the TCP/IP configuration:
-
Follow these links:
-
Transports->TCP/IP NetBIOS Configuration
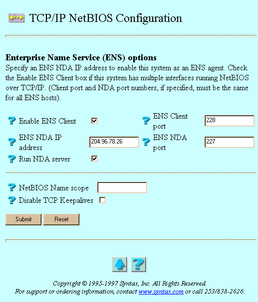
The TCP/IP NetBIOS Configuration screen appears:
-
-
Select or enter values for the following attributes, as needed:
-
Enable ENS Client-- The option to allow multi-homed hosts--those with multiple interfaces, each running NetBIOS-over-TCP/IP--to claim the same NetBIOS name on each interface without complaint from the ENS agent. This option has no effect if the system does not contain an active ENS or if the system has only one interface.
-
ENS Client port -- The port number to which TAS sends ENS client broadcasts. The broadcasts inhibit complaints from the ENS agent about duplicate NetBIOS name claims from this host. Choose a value from 1 to 65535.
-
ENS NDA IP address -- The IP address of the host acting as the Network Directory Agent (NDA). Entering an address enables this host as an ENS agent.
-
ENS NDA port -- The destination IP port number for transmitting data to the NDA. If you have ENS in your network, include this option on every ENSA on the network, if the system does not accept the default port number 227. Use this attribute only if you designate an ENS NDA IP address. Choose a value from 1 to 65535.
-
Run NDA server -- The option to cause the network directory agent (NDA) to run on this system. Only one instance of NDA should run in your network, and all other systems' NetBIOS ENS NDA IP address fields should point to this system. NDA normally starts during system initialization.
-
NetBIOS Name scope -- The invisible string appended to all NetBIOS names that services in the LM-NT-OS/2 realm use and recognize. You may enter any printable ASCII string, up to 256 characters. TAS services and service clients in the LM-NT-OS/2 realm must use identical name scopes to communicate successfully.
-
Disable TCP Keepalives -- An option that, when selected, disables all TCP session keepalives.
-
-
Click Submit.
The TCP/IP NetBIOS Configuration screen appears.
-
Click OK.
To modify TCP/IP configuration from the UNIX command line, use the tntransport command.
6.2 Administering TCP/IP Interfaces
Use this section to add TCP/IP network interfaces for TAS to use. The interfaces' IP addresses must already exist on the TAS host; including them in this list simply makes them available for TAS processes. TAS IP addresses appear in dotted internet notation.
Follow these steps to create or delete TCP/IP interfaces in the LM-NT-OS/2 realm:
-
Follow these links:
Transports->TCP/IP Addresses
The List of TCP/IP Addresses screen appears.
-
From the list, select the TCP/IP address you want to delete or enter an address you want to create in the text field. The Delete button does not appear if no TCP/IP addresses exist.
-
Click Create or Delete.
If you clicked Create, the TCP/IP Address tcpipaddress screen appears. Click OK.
If you clicked Delete, the Confirmation screen appears. Click OK. The TCP/IP Addresses screen appears. Click OK.
To administer TCP/IP interfaces from the UNIX command line, use the tniface command.
6.3 Administering Static NetBIOS Name Mappings
UDP broadcast datagrams normally resolve NetBIOS names owned by remote servers and workstations. You can augment this dynamic resolution by defining static NetBIOS name-to-IP address mappings.
A static NetBIOS name mapping consists of a NetBIOS name from one to 15 characters, a name type from 0 to 255, and a corresponding IP address. TAS resolves a NetBIOS name by first searching the list of static NetBIOS names and, failing that, broadcasting a query for the desired name. You can augment name resolution to effectively cross routers by using the Enterprise Name Service (see "6.1 Modifying TCP/IP Configuration") or Windows Internet Naming Service.
Follow these steps to create, modify, or delete static NetBIOS names:
-
Follow these links:
Transports->Static NetBIOS Name mappings
The Static NetBIOS Name mappings screen appears.
-
From the list, select the NetBIOS name you want to modify or delete, or enter the name you want to create in the text field. If deleting, you may select more than one name. You must use a valid service name and follow it with a type code, usually :20. The list contains nothing if no NetBIOS name mappings exist.
-
Click Create, Modify, or Delete. The Modify and Delete buttons do not appear if no static NetBIOS name mappings exist.
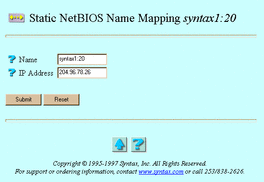
If you clicked Create or Modify, the Static NetBIOS Name Mapping servicename screen below appears. Go to Step 4.
If you clicked Delete, the Confirmation screen appears. Click OK. The Static NetBIOS Names screen appears. Click OK. Do not go to Step 4.
-
Enter values for the following attributes:
-
Name -- The NetBIOS name. If you clicked Modify, this attribute does not appear.
-
IP Address -- The IP address to which Name should map.
-
-
Click Submit.
The Static NetBIOS Name Mapping servicename screen appears.
-
Click OK.
To administer static NetBIOS name mappings from the UNIX command line, use the tnsname command.
6.4 Administering NetBEUI Interfaces
Follow these steps to create or delete NetBEUI interfaces on Solaris and AIX platforms:
-
Follow these links:
Transports->NetBEUI Interfaces
The List of NetBEUI Interfaces screen appears.
-
From the list, select the NetBEUI interfaces you want to delete, or enter the name of the interface you want to create in the text field.
-
If you want to create the interface, click Create. If you want to delete it, click Delete. The Delete button does not appear if no NetBEUI interfaces exist.
If you clicked Create, the NetBEUI interface creation successful screen appears. Click OK.
If you clicked Delete, the Confirmation screen appears. Click OK. The NetBEUI Interface screen appears. Click OK.
6.5 Modifying IPX/SPX Configuration
Default values for IPX/SPX configuration generally suffice. Modify them only if so directed by Syntax Technical Support or to solve a specific problem. IPX/SPX configuration includes routing advertisement designations; IPX Routing Information Protocol (RIP) interpacket gap and maximum entry specifications; IPX Service Advertisement Protocol (SAP) response interpacket gap, maximum entry, and maximum packet size specifications; and maximum SPX packet size designation.
To modify the IPX/SPX configuration from the UNIX command line, use the tntransport command.
6.6 Administering IPX/SPX Interfaces
Follow the steps below to create, modify, or delete IPX/SPX transport interfaces. You can determine valid device names for most UNIX host systems by using the netstat -i command from the UNIX command line.
-
Follow these links:
Transports->IPX/SPX Interfaces
The IPX/SPX Interface List screen appears.
-
Click Create, Modify, or Delete. The list, the Modify button, and the Delete button do not appear if no IPX/SPX interfaces exist.
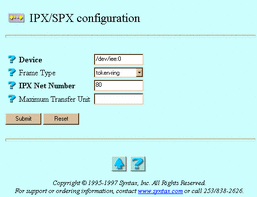
If you clicked Create, the IPX/SPX configuration screen below appears. Go to Step 3.
If you clicked Modify, the IPX/SPX configuration on ipxspxinterface screen, same as the IPX/SPX configuration screen below, appears. Go to Step 3.
If you clicked Delete, the Confirmation screen appears. Click OK. The IPX/SPX Interface screen appears. Click OK. Do not go to Step 3.
-
Select or enter values for the following attributes, as needed:
-
Device -- The device name for the network interface. For systems using DLPI, such as Solaris 2.x, Device takes the form devicename:ppa-number or the special value internal. You must fill in this field to create an interface. If you clicked Modify, this attribute does not appear.
-
Frame Type -- One of the following frame types to use on this interface:
-
ethernet_ii
-
ethernet_802.2
-
ethernet_802.3
-
ethernet_snap
-
token-ring
-
token-ring_snap
-
internal
This attribute defaults to ethernet_ii for Ethernet DLPI devices, token-ring for Token Ring DLPI devices, and internal for special internal networks. If you clicked Modify, this attribute does not appear.
-
-
IPX Net Number -- The hexadecimal IPX network number for this interface.
-
Maximum Transfer Unit -- The maximum transfer unit size for the IPX/SPX network interface. This attribute defaults to the value that the DLPI driver for DLPI services reports, or 8192 for internal devices.
-
-
Click Submit.
The IPX/SPX Interfaces ipxspxinterface screen appears.
-
Click OK.
To administer IPX/SPX interfaces from the UNIX command line, use the tniface command.
6.7 Administering Service Advertisement Protocol
Service Advertisement Protocol (SAP) allows networked devices, such as network servers and routers, to exchange information on available network services.
Workstations use the information made available through SAP to obtain the network addresses of servers that offer the services they need. You can add entries to the IPX SAP table for services you have installed. For more information about SAP, consult your Novell documentation.
Follow these steps to create, modify, or delete SAPs:
-
Follow these links:
Transports->Service Advertisement Protocol Configuration
The Service Advertisement Protocol List screen appears.
-
From the list, select the SAP you want to modify or delete, or enter the name of a SAP you want to create in the text field. If deleting, you may select more than one SAP. You must use a valid service name and follow it with a type code, usually :20. The list contains nothing if no SAPs exist.
-
Click Create, Modify, or Delete. The Modify and Delete buttons do not appear if no SAP exists.
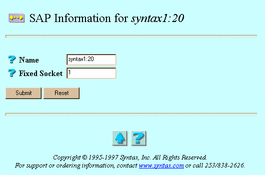
If you clicked Create or Modify, the SAP Information for servicename screen below appears. Go to Step 4.
If you clicked Delete, the Confirmation screen appears. Click OK. The Service Advertisement Protocol screen appears. Click OK. Do not go to Step 4.
-
Enter values for the following attributes, as needed:
-
Name -- The SAP service name. If you clicked Modify, this attribute does not appear.
-
Fixed Socket -- The service's fixed-socket number. The value for the fixed socket consists of a hexadecimal number up to four digits long.
-
-
Click Submit.
The Service Advertisement Protocol sapname screen appears.
-
Click OK.
To administer SAP from the UNIX command line, use the tnadvert command.
6.8 Modifying AppleTalk Configuration
Follow these steps to modify AppleTalk transport attributes:
-
Follow these links:
Transports->AppleTalk Configuration
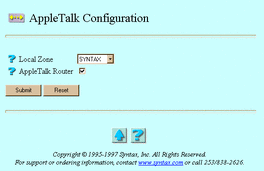
The AppleTalk Configuration screen appears:
-
Enter or select values for the following attributes, as needed:
-
Local Zone -- The name of the local AppleTalk zone for this system.
-
AppleTalk Router -- The option to direct the AppleTalk protocol stack to route packets between multiple network interfaces. Select this option to set up any and all of your AppleTalk interfaces as seed routers.
-
-
Click Submit.
The AppleTalk Configuration screen reappears, this time containing the statement "Update Successful".
-
Click OK.
To administer AppleTalk configuration from the UNIX command line, use the tntransport command.
6.9 Administering AppleTalk Interfaces
Follow these steps to create, modify, or delete AppleTalk interfaces:
-
Follow these links:
Transports->AppleTalk Interfaces
The AppleTalk Interface List screen appears.
-
From the list, select the interface you want to modify or delete, or enter the name of an interface you want to create in the text field. If deleting, you may select more than one interface. The list contains nothing if no AppleTalk interfaces exist.
-
Click Create, Modify, or Delete. The Modify and Delete buttons do not appear if no AppleTalk interfaces exist.
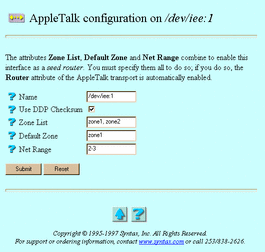
If you clicked Create or Modify, the AppleTalk configuration on interfacename screen below appears. Go to Step 4.
If you clicked Delete, the Confirmation screen appears. Click OK. The AppleTalk Interface screen appears. Click OK. Do not go to Step 4.
-
Enter or select values for the following attributes, as needed:
-
Name -- The interface name. If you clicked Modify, this attribute does not appear.
-
Use DDP Checksum -- The option to cause TAS to control the use of DDP checksums in AppleTalk packets.
-
Zone List -- The AppleTalk zone names available on the local segment, separated by commas. In the AppleTalk environment, a zone consists of a logical grouping of clients. It simplifies scanning the network for resources, such as servers and printers, in similar domains. If you enter information here, you must also enter information for Default Zone and Net Range. These three attributes combine to enable this interface as a seed router.
-
Default Zone -- A zone name from the zone list. If you enter information here, you must also enter information for Zone List and Net Range. These three attributes combine to enable this interface as a seed router.
-
Net Range -- A network number or a range of network numbers, in the number-number form. If you enter a value here, you must also enter values for Zone List and Default Zone. These three attributes combine to enable this interface as a seed router.
-
-
Click Submit.
The AppleTalk Interface interfacename screen appears.
-
Click OK.
To administer AppleTalk interfaces from the UNIX command line, use the tniface command.
- © 2010, Oracle Corporation and/or its affiliates
