Using TeamWare Configuring
You can use TeamWare Configuring through either a graphical user interface (GUI) or command-line interface (CLI). The following procedures use the GUI. For information about the CLI, refer to the bringover(1) and putback(1) man pages.
Getting Started
You can start TeamWare Configuring by typing twconfig at a shell command prompt, followed by the ampersand symbol (&).
If you are running Sun(TM) WorkShop(TM), you can start TeamWare Configuring by:
-
Clicking the TeamWare button on the tool bar in the Sun WorkShop main window
-
Selecting TeamWare from the Tools menu
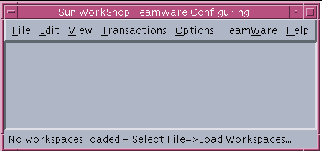
When you start TeamWare Configuring, the Configuring window (see Figure 1-1) opens.
Note -
Before you begin using TeamWare Configuring on your project, you must know the path name of the workspace from which you are to bring over your work
Figure 1-1 Configuring Window

Creating a New Workspace
You can create a new workspace by:
-
Making an existing hierarchy of files into a workspace
-
Creating an empty workspace and then populating it with a hierarchy of new directories and files
-
Copying files from a central (parent) workspace to create a child workspace
Creating a Workspace From an Existing Hierarchy of Files
If you have a directory containing the files that you want to make into a workspace, do the following to create a new workspace:
-
Start TeamWare Configuring.
-
Choose File > Create Workspace.
-
In the Workspace Directory text box, enter the path name to the directory that contains the files.
-
Click OK.
TeamWare Configuring creates a workspace in the directory you have specified and automatically creates an icon for it in the Configuring window. You may notice that a new directory called Codemgr_wsdata has been created in your workspace directory. This is a special directory that TeamWare uses to maintain information about the workspace such as access control, notification lists, and transaction history.
-
TeamWare recognizes only files that are under SCCS version control. If you have not already done so, make sure to check in any files in the workspace directory tree that you wish to be included in the workspace by TeamWare.
You may do this by typing sccs create commands at the command line or by using TeamWare Versioning.
Creating an Empty Workspace
To create a new empty workspace:
-
Start TeamWare Configuring.
-
Choose File > Create Workspace.
-
In the Workspace Directory text box, type the name of an existing directory with a new workspace name.
-
Click OK.
The new workspace is populated with Codemgr_wsdata files only.
Creating a Child Workspace
To create a child workspace:
-
Start TeamWare Configuring.
-
If the workspace from which you must obtain your files is not automatically loaded, choose File > Load Workspaces.
-
Select the workspace in the Load Workspaces dialog box and click Load Workspaces.
The parent workspace is loaded and its icon appears in the Configuring window.
-
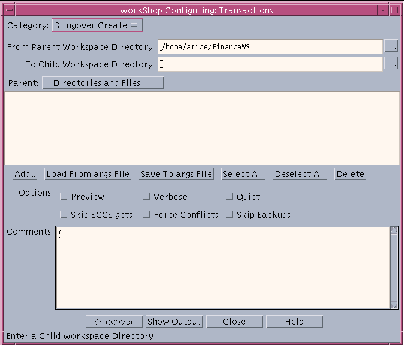
Drag and drop the parent workspace icon onto a vacant space in the Configuring window, or choose Transactions > Bringover > Create, to open the Bringover Create version of the Transactions window (see Figure 1-2).
-
In the Bringover Create Transactions window, type the child workspace path name in the text box labeled: To Child Workspace Directory.
-
In the Directories and Files pane, create the list of directories and files you wish to bring over to your workspace from the parent workspace.
Click Add to open the Add Files dialog box and select files to bring over. Shift-click to select more than one file. To select all of the files, type a period (.) in the Name text box. Click Add Files when you have selected all the files you want.
Note -You can select the Preview option to verify your transaction before you actually transfer any files.
-
Click Bringover in the Transactions window to initiate the Bringover Create transaction.
-
View transaction output in the Transaction Output window.
For more information about the Bringover Create transaction, see "Creating a New Child Workspace (Bringover Create)".
Figure 1-2 Bringover Create Version of Transactions Window

Changing Files in a Child Workspace
To change files in a child workspace, you need to start Versioning (see "Starting Versioning").
Check out the files, edit them, and check them back in under SCCS (see "Checking Files In and Out of SCCS").
Putting Back Changes to the Parent WorkSpace
You can update the parent workspace with the changes you make. This Configuring transaction is called Putback.
To put back changes to the parent workspace:
-
Start a Putback transaction by dragging and dropping your child workspace icon onto the parent workspace icon, or by choosing Transactions > Putback, to open the Putback version of the Transactions window.
Configuring automatically fills in the names of the parent and child workspaces in the Putback Transaction window and includes the same directories and files that you included when you created the child workspace.
-
Type a comment in the Comments text window.
Note -You can select the Preview option to verify your transaction before you transfer any files.
-
Click Putback to initiate the Putback transaction.
-
View transaction output in the Transaction Output window.
For more information about the Putback transaction, see "Updating a Parent Workspace Using Putback".
Updating the Child Workspace
If any of the files have changed in the parent since you brought them over, the Putback transaction is blocked. In this case, you will have to use the Bringover Update transaction to bring those changes into your child workspace.
To update the child workspace:
-
Resolve any conflicts (see "Resolving Conflicts").
-
Put back the files to the parent workspace.
A popup window advises you that the transaction is blocked.
Note -You can select the Preview option to verify your transaction before you transfer any files.
-
Initiate the Bringover Update transaction by clicking Bringover now in the popup window to open the Bringover Update version of the Transactions window.
In the Bringover Update Transactions window, Configuring automatically fills in the names of the parent and child workspaces, and includes the same directories and files that you included when you created the child workspace.
-
Click Bringover to initiate the Bringover Update transaction.
-
View your transaction output in the Transaction Output window.
For more information about the Bringover Update transaction, see "Updating an Existing Child Workspace (Bringover Update)"".
Resolving Conflicts
If any of the files you changed in your child workspace were also changed in the parent workspace, they are in conflict. If Configuring discovers any conflicts during the Bringover Update transaction, it automatically activates a popup window advising you of this.
To resolve conflicts:
-
Initiate the Resolve transaction by clicking Resolve now in the popup window to open the Resolve version of the Transactions window.
Configuring automatically alters the workspace icon to alert you that a workspace contains unresolved conflicts. It also:
-
Lists the path names of the files that are in conflict in the Resolve Transaction window
-
Starts the Merging program, loading the first file in the list
Merging displays two text files (the versions of the file from the parent and child workspaces) for side-by-side comparison, each in a read-only subwindow. Each version is shown in comparison (using glyphs) to the version that existed before the changes were made. Beneath them, Merging displays a subwindow that contains a merged version. The merged version contains selected lines from either or both deltas.
-
-
Merging automatically merges the files for you in the bottom window.
You can override the choices made by the program by using the Left and Right buttons to accept the changes found in the left or right window.
Note -If at any point during resolution, you want to reload the files, abandoning all the conflicts that have been resolved and starting over, click the Reload button. The files are reloaded from disk, and any non-conflicting differences are resolved if the Auto Merge option is selected. You can then proceed with accepting one or the other version of the remaining conflicting lines.
-
When you are satisfied with the merged file, click Save to save the file.
If there are more files in the Transactions window conflict list, Configuring automatically loads the next file in the list into Merging.
For more information about resolving conflicts and merging files, see Chapter 9, Resolving Conflicts."
- © 2010, Oracle Corporation and/or its affiliates
