Chapter 1 QuickStart
Use this chapter to quickly get started using Sun WorkShop TeamWare. For more details, see the other parts of this guide. Also refer to the online help for immediate assistance in completing specific tasks.
This chapter contains the following sections:
Basic Concepts
TeamWare is based on a concurrent development model called Copy-Modify-Merge. Isolated (per developer) workspaces form the TeamWare model. A workspace is a specially designated UNIX directory and its subdirectories. With TeamWare, you copy source from a central workspace into your own workspace, modify the source, and merge your changes in the central workspace with the changes made by other developers.
In addition to providing isolated workspaces, TeamWare enables you to easily and intelligently copy files between workspaces and then merge changes that exist between corresponding files. The intelligent copy feature enables you to copy project files in groups that you (or the project administrator) determine are logically linked, and automatically determines differences between files in the originating workspace and the destination workspace.
TeamWare further assists the concurrent development process by determining whether differences exist between the files in the central workspace and your workspace. If differences are found to exist, TeamWare commands prevent you or another developer from copying over those changes; TeamWare then provides sophisticated window-based tools that help you to merge these differences.
Parent and Child Workspaces
When you copy files from a central workspace to create a new workspace, a special relationship is created between the central workspace and the new one. The central workspace is considered the parent of the newly created child workspace. You can acquire files from any Configuring workspace in this manner, and workspaces can have an unlimited number of children. The portion of the file system that you copy from the parent workspace is determined at the time you copy it. You can copy the entire contents of the parent to the child, making it a clone of the parent, or you can copy only portions of the file system hierarchy that are of interest to you. The TeamWare Configuring transaction used to copy files from a parent workspace to a child workspace is called Bringover.
When development and testing are complete in the child, you copy changes in files that were modified or added in the child, back into the parent workspace. Once the altered files are present in the parent, they can be copied by other children or passed up another level to the parent's parent workspace. The TeamWare Configuring transaction for copying changes in files from a child workspace to a parent workspace is called Putback.
If any of the files you attempt to put back are changed in both the parent and child workspace, the files are in conflict. If this is the case, Configuring will block the transaction. You must then use the Bringover transaction to bring over the changed information from the parent and use the Resolve transaction to resolve the conflict in the child workspace before you can put your work back to the parent.
Source Code Control System
TeamWare Configuring acts only upon files under the Source Code Control System (SCCS). When considering Configuring file transfer transactions, remember that source files are derived from SCCS deltas and are identified by SCCS delta IDs (SIDs). When a file is copied by either a Putback or Bringover transaction, Configuring acts upon (copies or merges) the file's SCCS history file (also known as the "s-dot-file"). How Configuring manipulates and merges the history files is described in Chapter 10, How Configuring Merges SCCS Files."
Changing Names
The current release of TeamWare uses new command names, so Table 1-1 summarizes the correspondences for you. Note that the old commands still work, however this manual uses the new commands and GUI names.
Table 1-1 Correspondences Between Old and New TeamWare Commands|
Old Command |
New Command |
Old Tool Name |
New GUI Name |
|---|---|---|---|
|
codemgrtool |
twconfig, teamware |
CodeManager |
Configuring |
|
vertool |
twversion |
VersionTool |
Versioning |
|
filemerge |
twmerge |
FileMerge |
Merging |
|
maketool |
twbuild |
MakeTool |
Building |
|
freezepttool |
twfreeze |
FreezePoint |
Freezepointing |
Using TeamWare Configuring
You can use TeamWare Configuring through either a graphical user interface (GUI) or command-line interface (CLI). The following procedures use the GUI. For information about the CLI, refer to the bringover(1) and putback(1) man pages.
Getting Started
You can start TeamWare Configuring by typing twconfig at a shell command prompt, followed by the ampersand symbol (&).
If you are running Sun(TM) WorkShop(TM), you can start TeamWare Configuring by:
-
Clicking the TeamWare button on the tool bar in the Sun WorkShop main window
-
Selecting TeamWare from the Tools menu
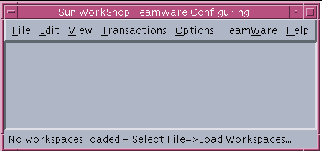
When you start TeamWare Configuring, the Configuring window (see Figure 1-1) opens.
Note -
Before you begin using TeamWare Configuring on your project, you must know the path name of the workspace from which you are to bring over your work
Figure 1-1 Configuring Window

Creating a New Workspace
You can create a new workspace by:
-
Making an existing hierarchy of files into a workspace
-
Creating an empty workspace and then populating it with a hierarchy of new directories and files
-
Copying files from a central (parent) workspace to create a child workspace
Creating a Workspace From an Existing Hierarchy of Files
If you have a directory containing the files that you want to make into a workspace, do the following to create a new workspace:
-
Start TeamWare Configuring.
-
Choose File > Create Workspace.
-
In the Workspace Directory text box, enter the path name to the directory that contains the files.
-
Click OK.
TeamWare Configuring creates a workspace in the directory you have specified and automatically creates an icon for it in the Configuring window. You may notice that a new directory called Codemgr_wsdata has been created in your workspace directory. This is a special directory that TeamWare uses to maintain information about the workspace such as access control, notification lists, and transaction history.
-
TeamWare recognizes only files that are under SCCS version control. If you have not already done so, make sure to check in any files in the workspace directory tree that you wish to be included in the workspace by TeamWare.
You may do this by typing sccs create commands at the command line or by using TeamWare Versioning.
Creating an Empty Workspace
To create a new empty workspace:
-
Start TeamWare Configuring.
-
Choose File > Create Workspace.
-
In the Workspace Directory text box, type the name of an existing directory with a new workspace name.
-
Click OK.
The new workspace is populated with Codemgr_wsdata files only.
Creating a Child Workspace
To create a child workspace:
-
Start TeamWare Configuring.
-
If the workspace from which you must obtain your files is not automatically loaded, choose File > Load Workspaces.
-
Select the workspace in the Load Workspaces dialog box and click Load Workspaces.
The parent workspace is loaded and its icon appears in the Configuring window.
-
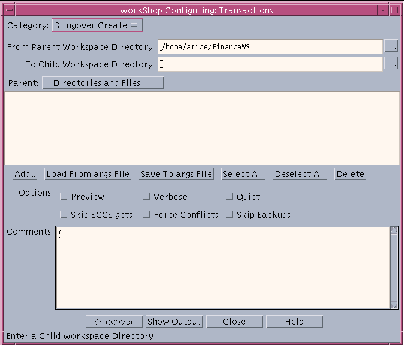
Drag and drop the parent workspace icon onto a vacant space in the Configuring window, or choose Transactions > Bringover > Create, to open the Bringover Create version of the Transactions window (see Figure 1-2).
-
In the Bringover Create Transactions window, type the child workspace path name in the text box labeled: To Child Workspace Directory.
-
In the Directories and Files pane, create the list of directories and files you wish to bring over to your workspace from the parent workspace.
Click Add to open the Add Files dialog box and select files to bring over. Shift-click to select more than one file. To select all of the files, type a period (.) in the Name text box. Click Add Files when you have selected all the files you want.
Note -You can select the Preview option to verify your transaction before you actually transfer any files.
-
Click Bringover in the Transactions window to initiate the Bringover Create transaction.
-
View transaction output in the Transaction Output window.
For more information about the Bringover Create transaction, see "Creating a New Child Workspace (Bringover Create)".
Figure 1-2 Bringover Create Version of Transactions Window

Changing Files in a Child Workspace
To change files in a child workspace, you need to start Versioning (see "Starting Versioning").
Check out the files, edit them, and check them back in under SCCS (see "Checking Files In and Out of SCCS").
Putting Back Changes to the Parent WorkSpace
You can update the parent workspace with the changes you make. This Configuring transaction is called Putback.
To put back changes to the parent workspace:
-
Start a Putback transaction by dragging and dropping your child workspace icon onto the parent workspace icon, or by choosing Transactions > Putback, to open the Putback version of the Transactions window.
Configuring automatically fills in the names of the parent and child workspaces in the Putback Transaction window and includes the same directories and files that you included when you created the child workspace.
-
Type a comment in the Comments text window.
Note -You can select the Preview option to verify your transaction before you transfer any files.
-
Click Putback to initiate the Putback transaction.
-
View transaction output in the Transaction Output window.
For more information about the Putback transaction, see "Updating a Parent Workspace Using Putback".
Updating the Child Workspace
If any of the files have changed in the parent since you brought them over, the Putback transaction is blocked. In this case, you will have to use the Bringover Update transaction to bring those changes into your child workspace.
To update the child workspace:
-
Resolve any conflicts (see "Resolving Conflicts").
-
Put back the files to the parent workspace.
A popup window advises you that the transaction is blocked.
Note -You can select the Preview option to verify your transaction before you transfer any files.
-
Initiate the Bringover Update transaction by clicking Bringover now in the popup window to open the Bringover Update version of the Transactions window.
In the Bringover Update Transactions window, Configuring automatically fills in the names of the parent and child workspaces, and includes the same directories and files that you included when you created the child workspace.
-
Click Bringover to initiate the Bringover Update transaction.
-
View your transaction output in the Transaction Output window.
For more information about the Bringover Update transaction, see "Updating an Existing Child Workspace (Bringover Update)"".
Resolving Conflicts
If any of the files you changed in your child workspace were also changed in the parent workspace, they are in conflict. If Configuring discovers any conflicts during the Bringover Update transaction, it automatically activates a popup window advising you of this.
To resolve conflicts:
-
Initiate the Resolve transaction by clicking Resolve now in the popup window to open the Resolve version of the Transactions window.
Configuring automatically alters the workspace icon to alert you that a workspace contains unresolved conflicts. It also:
-
Lists the path names of the files that are in conflict in the Resolve Transaction window
-
Starts the Merging program, loading the first file in the list
Merging displays two text files (the versions of the file from the parent and child workspaces) for side-by-side comparison, each in a read-only subwindow. Each version is shown in comparison (using glyphs) to the version that existed before the changes were made. Beneath them, Merging displays a subwindow that contains a merged version. The merged version contains selected lines from either or both deltas.
-
-
Merging automatically merges the files for you in the bottom window.
You can override the choices made by the program by using the Left and Right buttons to accept the changes found in the left or right window.
Note -If at any point during resolution, you want to reload the files, abandoning all the conflicts that have been resolved and starting over, click the Reload button. The files are reloaded from disk, and any non-conflicting differences are resolved if the Auto Merge option is selected. You can then proceed with accepting one or the other version of the remaining conflicting lines.
-
When you are satisfied with the merged file, click Save to save the file.
If there are more files in the Transactions window conflict list, Configuring automatically loads the next file in the list into Merging.
For more information about resolving conflicts and merging files, see Chapter 9, Resolving Conflicts."
Using TeamWare Versioning
Versioning is a GUI to SCCS that enables you to manipulate files and perform SCCS functions without having to know SCCS commands. It provides a way to check files in and out, and to display a file's delta history and show differences between deltas. With Versioning, you can do the following:
-
Check out a version of the file for editing
-
Check in files
-
Retrieve copies of any version (delta) of a file
-
Visually peruse the branches of an SCCS history file
-
Scan a workspace for checked out files
-
Scan a workspace for history files that contain unmerged deltas
-
Highlight removed or unmerged deltas
-
Back out changes to a checked-out copy
-
Display differences between selected deltas using Merging
-
Display the version log summarizing executed commands
-
Create new SCCS files
Starting Versioning
You can start Versioning in three ways:
-
Type twversion at a shell command prompt, followed by the ampersand symbol (&).
-
Choose TeamWare > Versioning in the Configuring, Merging, or Freezepointing window.
-
Double-click on a workspace icon in the Configuring window.
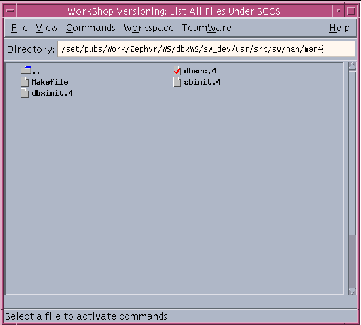
To use Versioning, select a file (or group of files) in the File List pane of the Versioning window (see Figure 1-3) and choose a menu item to operate on it. Commands are located in the:
-
Commands menu
-
View menu
-
File List pane floating menu
Following are two examples that describe how to use Versioning to check out and check in files, and to view and compare a file's delta history.
Figure 1-3 Versioning Window

Checking Files In and Out of SCCS
You can check files in and out of SCCS using Versioning.
Checking a File Out
To check a file out of SCCS:
-
If the directory that contains the file is not automatically loaded, type the directory path name (followed by Return) in the Directory text box.
-
Click a file icon to select a file; use the middle mouse button to extend the selection.
-
Choose either Commands > Checkout > Default or Commands > Checkout > Check Out, and Commands > Edit. As the file is checked out a check mark appears in its icon.
Checking a File In
To check a file in to SCCS:
-
When you are ready to check the file back in, select the file and choose Commands > Check In to open the Check In popup window.
-
Enter a comment in the text pane that describes your changes and click Check In to complete the check in process.
The check mark is removed from the file icon as the file is checked in.
Viewing and Comparing a File's Delta History
To view a graph of a file's delta history:
-
Select the file's icon in the main window and choose View > File History.
-
Select two deltas in the graph.
-
Choose Differences > Use Merging.
Merging displays the two deltas side by side, marking differences with glyphs. For more information about Merging, see Chapter 10, How Configuring Merges SCCS Files."
Merging Previously Unmerged Branch Deltas
To show the version history for a file:
-
Select the file's icon in the main window and choose View > File History.
-
In the History window, select the two versions that you want to merge.
-
Click the right mouse button to open a popup menu that contains the Merge Branches command.
-
Choose Merge Branches from the popup menu.
For more information about TeamWare Versioning, see Chapter 12, Performing Basic SCCS Functions with Versioning."
Using TeamWare Freezepointing
During software development it is often useful to create freezepoints of your work at key junctures. These freezepoints serve as "snapshots" of a project that enable you to recreate the state of the project at key development points. With the Freezepointing program, you preserve these freezepoints using small storage resources. You can use Freezepointing through two functionally equivalent user interfaces:
-
Graphical user interface (twfreeze)
-
Command-line interface (freezept)
The concepts discussed in this section apply to both the GUI and the CLI. Descriptions and examples are included for the GUI only. For information on the CLI, see the man pages: twfreeze(1), freezept(1), and freezepointfile(4).
Freezepointing enables you to create freezepoint files from Configuring workspaces. Freezepointing files are text files that list the default deltas in SCCS history files contained in the workspace. When you later recreate (extract) the files, Freezepointing uses those entries as pointers back to the original history files and to the delta that was the default at the time the freezepoint file was created.
You can also create workspaces from freezepoint files. When you do this, you have the option of extracting the full set of frozen files or a partial set.
Note -
Freezepointing gives you the option of recreating a workspace containing the SCCS histories for all extracted files. Alternatively, you may choose to extract the derived files only; that is, retrieve the default delta using the SCCS get command with no options. In this case, SCCS histories are not recreated and TeamWare does not create a workspace.
Starting Freezepointing
You can start Freezepointing by:
-
Typing twfreeze at a shell command prompt, followed by the ampersand symbol (&)
-
Choosing TeamWare > Freezepointing in the Configuring, Merging, or Versioning window
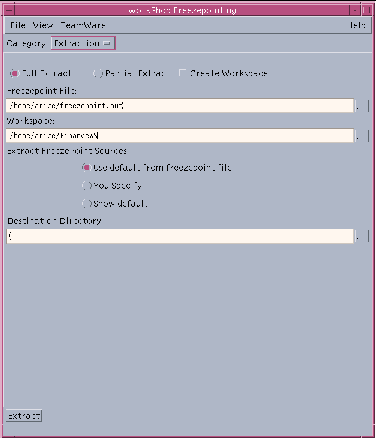
Figure 1-4 Freezepointing Window

Creating and Extracting Freezepoints
The pane below the Control area in the Freezepointing window (see Figure 1-4) is used for both creating and extracting freezepoints. Switch between the Create and Extract panes by choosing the appropriate item from the Category menu. The Create pane is the default and is displayed when you start Freezepointing.
Creating a Freezepoint File
To create a freezepoint file:
-
Select Creation from the Category list box.
-
Type the path name of a freezepoint file in the Freezepoint File text box.
Freezepointing automatically inserts the file name freezepoint.out. Delete it and replace it with a path name of your choosing.
-
Type the path name of the source workspace in the Workspace text box.
This is the workspace that you are "freezepointing."
-
In the Directories and Files text window, compose a list of directories, or files, or both that you wish to freezepoint.
Click Add to open the Add Files dialog box and select files to freezepoint. Shift-click to select more than one file. To select all of the files, type a period (.) in the Name text box. Click Add Files when you have selected all the files you want.
-
Click Create/Update to create the freezepoint.
Extracting a Source Hierarchy
To extract a source hierarchy from a freezepoint file:
-
Select Extraction from the Category list box.
This changes the pane from Creation to Extraction.
-
Type the path name of an existing freezepoint file in the Freezepoint File text box.
-
Type the path name of the destination directory in the Destination Directory text box
This is the directory into which the newly extracted files are placed.
-
Click Extract to execute to extract the freezepoint.
For more information about FreezePointing, see Chapter 15, Preserving Project State With Freezepointing."
Distributed Make
Distributed Make (dmake) marks the evolution of the make utility into a powerful and flexible tool that permits you to take full advantage of the potential of today's networks and powerful multiprocessor workstations. Using dmake, you can concurrently distribute the process of building large projects, consisting of many programs, over a number of workstations and, in the case of multiprocessor systems, over multiple CPUs.
You execute dmake on a dmake host and distribute jobs to build servers. You can also distribute jobs to the dmake host, in which case it is also considered to be a build server. The dmake utility distributes jobs based on makefile targets that it determines (based on your makefiles) can be built concurrently. You can use any machine as a build server that meets the following requirements:
-
From the dmake host (the machine you are using) you must be able to use rsh, without being prompted for a password, to remotely execute commands on the build server. For example:
demo% rsh build_server which dmake
/opt/SUNWspro/bin/dmake
Note -For more information about the rsh command see the rsh(1) man page or the system AnswerBook.
-
The bin directory in which the dmake software is installed must be accessible from the build server.
Note -For more information see the share(1M) mount(1M) man pages or the system AnswerBook.
-
The bin directory in which the dmake software is installed must be in your execution path when you rsh to the build server. Be sure this directory is added to the PATH variable in your .cshrc file (or equivalent), not in your .login file. You can verify this as follows:
demo% rsh build_server which dmake
/opt/SUNWspro/bin/dmake
-
The source hierarchy you are building must be accessible from the build server.
From the dmake host you can control which build servers are used and how many dmake jobs are allotted to each build server. The number of dmake jobs that can run on a given build server can also be limited on that server.
For more information about dmake see Chapter 18, Using the dmake Utility."
- © 2010, Oracle Corporation and/or its affiliates
