Using TeamWare Freezepointing
During software development it is often useful to create freezepoints of your work at key junctures. These freezepoints serve as "snapshots" of a project that enable you to recreate the state of the project at key development points. With the Freezepointing program, you preserve these freezepoints using small storage resources. You can use Freezepointing through two functionally equivalent user interfaces:
-
Graphical user interface (twfreeze)
-
Command-line interface (freezept)
The concepts discussed in this section apply to both the GUI and the CLI. Descriptions and examples are included for the GUI only. For information on the CLI, see the man pages: twfreeze(1), freezept(1), and freezepointfile(4).
Freezepointing enables you to create freezepoint files from Configuring workspaces. Freezepointing files are text files that list the default deltas in SCCS history files contained in the workspace. When you later recreate (extract) the files, Freezepointing uses those entries as pointers back to the original history files and to the delta that was the default at the time the freezepoint file was created.
You can also create workspaces from freezepoint files. When you do this, you have the option of extracting the full set of frozen files or a partial set.
Note -
Freezepointing gives you the option of recreating a workspace containing the SCCS histories for all extracted files. Alternatively, you may choose to extract the derived files only; that is, retrieve the default delta using the SCCS get command with no options. In this case, SCCS histories are not recreated and TeamWare does not create a workspace.
Starting Freezepointing
You can start Freezepointing by:
-
Typing twfreeze at a shell command prompt, followed by the ampersand symbol (&)
-
Choosing TeamWare > Freezepointing in the Configuring, Merging, or Versioning window
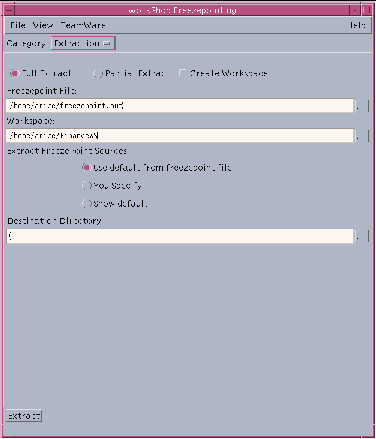
Figure 1-4 Freezepointing Window

Creating and Extracting Freezepoints
The pane below the Control area in the Freezepointing window (see Figure 1-4) is used for both creating and extracting freezepoints. Switch between the Create and Extract panes by choosing the appropriate item from the Category menu. The Create pane is the default and is displayed when you start Freezepointing.
Creating a Freezepoint File
To create a freezepoint file:
-
Select Creation from the Category list box.
-
Type the path name of a freezepoint file in the Freezepoint File text box.
Freezepointing automatically inserts the file name freezepoint.out. Delete it and replace it with a path name of your choosing.
-
Type the path name of the source workspace in the Workspace text box.
This is the workspace that you are "freezepointing."
-
In the Directories and Files text window, compose a list of directories, or files, or both that you wish to freezepoint.
Click Add to open the Add Files dialog box and select files to freezepoint. Shift-click to select more than one file. To select all of the files, type a period (.) in the Name text box. Click Add Files when you have selected all the files you want.
-
Click Create/Update to create the freezepoint.
Extracting a Source Hierarchy
To extract a source hierarchy from a freezepoint file:
-
Select Extraction from the Category list box.
This changes the pane from Creation to Extraction.
-
Type the path name of an existing freezepoint file in the Freezepoint File text box.
-
Type the path name of the destination directory in the Destination Directory text box
This is the directory into which the newly extracted files are placed.
-
Click Extract to execute to extract the freezepoint.
For more information about FreezePointing, see Chapter 15, Preserving Project State With Freezepointing."
- © 2010, Oracle Corporation and/or its affiliates
