Creating a New Workspace
You can create a new workspace by:
-
Making an existing hierarchy of files into a workspace
-
Creating an empty workspace and then populating it with a hierarchy of new directories and files
-
Copying files from a central (parent) workspace to create a child workspace
Creating a Workspace From an Existing Hierarchy of Files
If you have a directory containing the files that you want to make into a workspace, do the following to create a new workspace:
-
Start TeamWare Configuring.
-
Choose File > Create Workspace.
-
In the Workspace Directory text box, enter the path name to the directory that contains the files.
-
Click OK.
TeamWare Configuring creates a workspace in the directory you have specified and automatically creates an icon for it in the Configuring window. You may notice that a new directory called Codemgr_wsdata has been created in your workspace directory. This is a special directory that TeamWare uses to maintain information about the workspace such as access control, notification lists, and transaction history.
-
TeamWare recognizes only files that are under SCCS version control. If you have not already done so, make sure to check in any files in the workspace directory tree that you wish to be included in the workspace by TeamWare.
You may do this by typing sccs create commands at the command line or by using TeamWare Versioning.
Creating an Empty Workspace
To create a new empty workspace:
-
Start TeamWare Configuring.
-
Choose File > Create Workspace.
-
In the Workspace Directory text box, type the name of an existing directory with a new workspace name.
-
Click OK.
The new workspace is populated with Codemgr_wsdata files only.
Creating a Child Workspace
To create a child workspace:
-
Start TeamWare Configuring.
-
If the workspace from which you must obtain your files is not automatically loaded, choose File > Load Workspaces.
-
Select the workspace in the Load Workspaces dialog box and click Load Workspaces.
The parent workspace is loaded and its icon appears in the Configuring window.
-
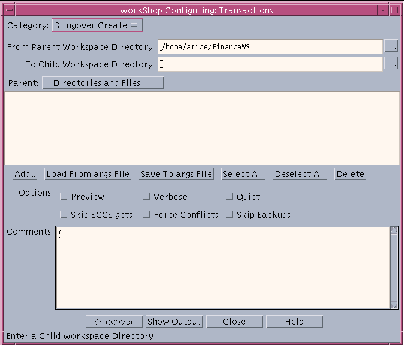
Drag and drop the parent workspace icon onto a vacant space in the Configuring window, or choose Transactions > Bringover > Create, to open the Bringover Create version of the Transactions window (see Figure 1-2).
-
In the Bringover Create Transactions window, type the child workspace path name in the text box labeled: To Child Workspace Directory.
-
In the Directories and Files pane, create the list of directories and files you wish to bring over to your workspace from the parent workspace.
Click Add to open the Add Files dialog box and select files to bring over. Shift-click to select more than one file. To select all of the files, type a period (.) in the Name text box. Click Add Files when you have selected all the files you want.
Note -You can select the Preview option to verify your transaction before you actually transfer any files.
-
Click Bringover in the Transactions window to initiate the Bringover Create transaction.
-
View transaction output in the Transaction Output window.
For more information about the Bringover Create transaction, see "Creating a New Child Workspace (Bringover Create)".
Figure 1-2 Bringover Create Version of Transactions Window

- © 2010, Oracle Corporation and/or its affiliates
