Creating a New Entry
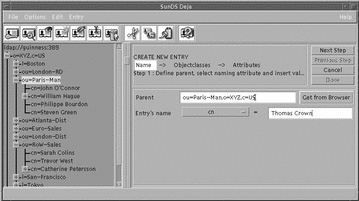
Use Create to add new entries to the directory. Figure 2-4 shows the Deja Create panel. You must have write permission for the parent to which you want to add an entry. See "Logging In" for information. To create a root entry for an empty directory, see "Creating a Root Entry".
Figure 2-4 Deja Create Panel

-
Click on the Create icon or select Create from the Entry menu.
The Create panel is displayed.
There are three steps to creating a directory entry. You must complete each step before you can progress to the next one.
-
Name the entry. See "Naming an Entry".
-
Select object classes for the new entry. See "Selecting Object Classes".
-
Add values to the mandatory and optional attributes for each objectclass. See "Selecting Attributes".
-
-
When you have completed the entry, click Done.
Naming an Entry
For example, we will add an entry for the person John Smith, working in an organization called XYZ based in the United States. You must have write permission for the parent to which you want to add an entry. See "Logging In" for information.
-
Specify the parent of the entry:
-
Type the Distinguished Name (DN) of the Entry's parent in the Parent text field.
For the example, the DN for the entry's parent is o=XYZ,c=US.
-
Alternatively, click once on the parent in the browser window to select it, and click the Get from Browser button.
The Distinguished Name of the selected entry is imported to the Parent text field.
-
-
Select the naming attribute from the option button.
Options depend on the directory schema. For the example, the naming attribute is cn, which stands for common name.
-
Type the Relative Distinguished Name (RDN) of the entry in the Entry Name text field.
For the example the RDN is cn=John Smith.
-
When you are satisfied with the entry name and parent, click the Next Step button to select object classes.
The Select Objectclasses panel is displayed. The DN of the new entry is also displayed. For the example the DN is cn=John Smith,o=XYZ,c=US.
Selecting Object Classes
You can define one or more object classes for your entry. When the selected objectclasses list is complete, click the Next Step button to select attributes.
Note -
If the selected objectclasses do not contain the previously selected naming attribute, a warning message is displayed. You must either specify a different naming attribute by going back to the first step, or add an appropriate object class to the entry.
Adding an Object Class to the Entry
Double click on the object class from the Available Objectclasses list to add the object class to the entry
Or, select an object class from the Available Objectclasses list and click on the right arrow button to add the object class to the entry.
For the example John Smith entry, add the person object class to the entry. Click the Next Button to assign attributes to the entry.
Removing an Object Class From the Entry
Double click on the object class in the Selected Objectclasses list to remove the object class from the entry
Or, select the object class in the Selected Objectclasses list and click on the left arrow button to remove the object class from the entry.
Selecting Attributes
Each object class you have selected has a number of mandatory and optional attributes associated with it. Mandatory attributes are marked with (M), optional attributes with (O). To complete the entry, you must provide values for the mandatory attributes. The names of the mandatory attributes are already listed in the entry definition.
Note -
Deja produces an error message if you try to add an entry to the directory without naming all the mandatory attributes.
For the example entry, the mandatory attributes are cn and sn (common name and surname). Optional attributes for the person object class can include description, see also, telephone number and userpassword.
Some attributes accept multiple values, others can only have one value. This is defined in the schema by the SINGLE-VALUE keyword. If you try to add more than one value to a single-valued attribute, an error message is displayed.
Assigning a Value to an Attribute
-
From the Choose Attribute list, or from the entry definition, select the attribute for which you want to add a value.
For the example, select sn from the Choose Attribute list.
-
Type the value for the attribute in the text field.
Type Smith in the text field.
-
Click Add to add the value of the attribute to the entry definition.
The value appears in the entry definition next to the attribute.
John Smith's entry is now functionally complete, all of the mandatory attributes have been named. However, we will add a couple of optional attributes to make the entry more useful in the directory; telephone number and userpassword. Add the value 123 456 789 for the telephonenumber attribute, and add a user password for the entry. Note that the value for the userpassword attribute is hidden in the entry definition.
To add an additional value for an attribute, repeat steps 1 to 3.
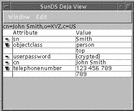
Finally, to complete the entry we will add a second value for the telephonenumber attribute, John Smith's internal extension number -- 789. When you have added the additional value, click on Done to add the entry to the directory. Double click on the entry in the browser to display all of its attributes. See Figure 2-5.
Figure 2-5 Example Entry View Window

When an attribute has more than one value, an arrow is displayed next to the attribute name in the entry definition. Click on the arrow to collapse or expand the attribute definition. See "The View Window" for more information.
Deleting a Value From an Attribute
-
Select the value or the attribute name in the entry definition.
-
Click Delete.
-
If you delete the only value for an optional attribute, the attribute is removed from the entry definition.
-
If you delete the only value for a mandatory attribute, the value is cleared from the entry definition. The attribute stays in the definition.
-
Modifying an Attribute Value
-
Select the value of the attribute you want to modify in the entry definition.
The attribute value appears in the text field.
-
Modify the value and click Modify.
The modified value appears in the entry definition.
Cancel
To cancel a create operation at any time, click Cancel.
The entry definition is cleared from the Create panel.
- © 2010, Oracle Corporation and/or its affiliates
