Chapter 2 Deja -- Standard Operations
Deja is a Java directory editor that provides a secure and simple way to create, modify, delete, search and rename directory entries.
It runs locally or remotely through a fully Java compatible web browser like HotJavaTM, or it runs locally as a stand-alone Java application on a machine with a Java Virtual Machine. If it is running locally as an application, it requires JDK 1.1.5 or compatible versions.
If you try to run Deja through a browser that is not fully Java compatible, Deja may not run correctly. Deja has been tested with the following browsers:
-
Netscape NavigatorTM 4.0.5 running on Windows `95 with AWT 1.1.5. Netscape 4.0.5 does not support Deja's default encryption method -- CRAM-MD5. You must set the STANDARD_SECURITY_AUTHENTICATION token in the Deja.properties file to simple. See "General Parameters" for information.
-
HotJava version 1.0.1 running on Solaris. Before running Deja through HotJava, you must set the hotjava.default.security variable to low in the .hotjava/properties file in your local directory.
Starting Deja
There are four methods for starting Deja:
-
Remotely, through the Sun WebServerTM, which you can download free of charge from http://www.sun.com/webserver
-
Remotely, through any other web server
-
Locally, without a web server, by opening the Deja.html file in a web browser
-
Locally, as a Java application, on a machine with a Java Virtual Machine
To connect to the directory server, Deja requires that the dsservd daemon is running on the server that holds the directory. If the dsservd daemon is not running, Deja will start but is unable to connect. In this case, start dsservd as described in "Starting the dsservd and dswebd Daemons". Then connect to the directory server as described in "Reconnecting Deja to the Directory Server".
Displaying Deja Remotely Through the Sun WebServer
-
Set the documentation root for the Sun WebServer to /opt/SUNWconn/html.
Refer to the Sun WebServer documentation for instructions.
-
Start the Sun WebServer.
Refer to the Sun WebServer documentation for instructions. The Sun WebServer must be running on the same machine as the dsservd daemon.
-
Open the following URL in a Java compatible web browser:
http://hostname/Deja.html
where hostname is the hostname of the machine running the Sun Directory Services and the web server.
Deja is displayed.
Displaying Deja Remotely Through Any Web Server
-
Create a symbolic link from the documentation root directory for your web server to /opt/SUNWconn/html:
prompt% cd docroot_dir
prompt% ln -s /opt/SUNWconn/html sds
where docroot_dir is the documentation root directory for your web server.
The web server must be running on the same machine as the dsservd daemon.
-
Open the following URL in a Java compatible web browser:
http://hostname/sds/Deja.html
where hostname is the hostname of the machine running Sun Directory Services and the web server.
Deja is displayed.
Displaying Deja Locally Without any Web Server
-
On the machine running the directory server daemon, dsservd, open the following URL in a Java compatible web browser:
file:/opt/SUNWconn/html/Deja.html
Deja is displayed. It tries to connect to the directory server specified in the Deja.html file. If it can't connect, an error message is displayed.
Displaying Deja Locally as a Java Application
-
On the machine running the directory server daemon, dsservd, Set the JAVA_HOME environment variable to the installation directory of your Java Virtual Machine (JVM).
-
Type:
prompt% /opt/SUNWconn/bin/deja [ host_name [port_number]]
where:
host_name is the hostname of the directory server. The default is localhost.
port_number is the port number of the directory server. The default is 389.
The client machine needs to have a Java Virtual Machine and JDK version 1.1.5 or a compatible version installed.
Logging In
Directory access rights are defined by a set of access control rules on the directory server. You must be the directory administrator to modify the access control rules. When you login to the directory, your username and password is compared with those stored in the directory. If there is a match, the access rights defined in the access control rules are granted.
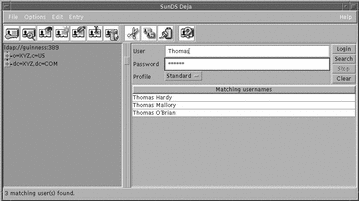
You must have write permission before you can modify the directory contents. You can browse the directory content without logging in. Figure 2-1 shows the Login panel.
Note -
It may be possible to browse the directory content without logging in. This depends on the access control rules on the directory server.
Figure 2-1 Deja Login Panel
-
Click on the Login icon or select Login from the File menu.
-
Type the Distinguished Name (DN) of your entry in the User text field:
-
If you are the directory administrator, type the administrator's name, for example admin.
-
If there is an alias defined for you in the Deja.properties file on the directory server, type the alias name. See "Adding a Login Alias" for information on creating a login alias.
-
If you cannot remember your DN, you can search for it in the directory:
-
-
Type your password in the Password field.
-
Click Login.
Deja checks to see if the Username you typed corresponds to an alias in the Deja.properties file on the directory server. If an alias does not exist, Deja checks to see if the Username you have typed is a valid DN. If it is not, Deja tries to construct a DN from cn=Username and the first naming context it finds. If Deja cannot construct a valid DN using any of these methods, it tries to login using the Username you typed.
Your password is compared to the password stored in the directory. If there is no match the login fails.
-
Select the desired profile (Standard, NIS or RADIUS) from the Profile option button.
The default profile is Standard.
General Operations
Display Options
The Options menu is used to hide or show the toolbar, status bar, or directory browser. The default view has all three display elements shown.
Select an option from the Options menu to change its status.
Deja Properties Panel
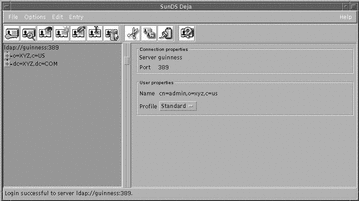
The Deja Properties panel displays information about the selected user profile, and the connection to the directory server. To access the Properties panel:
Select Properties from the File menu.
The Properties panel is displayed, and shows the user properties and connection properties of Deja. See Figure 2-2.
Figure 2-2 Deja Properties Panel
User Properties
Name
If you are not logged into the directory server, Anonymous is displayed. If you have logged in, the login name is displayed.
User Profile
To set the user profile:
Select the profile (Standard, NIS or RADIUS) from the Profile option button in the User Properties window.
The default profile is Standard.
Connection Properties
Server and Port Number
Deja displays information about its connection to the directory server. The default port number that Deja uses to connect to the directory server is 389. The host name and port number can be specified when Deja is started.
-
If Deja is viewed through a browser, the port number that Deja uses to connect to the directory server is specified in the Deja.html file on the directory server. If it is viewed as a local applet the hostname of the directory server is also taken from the Deja.html file. If it is viewed as a remote applet Deja connects to the remote host. See "Starting Deja".
-
If Deja is displayed as an application on the directory server, the hostname and port number can be specified on the command line. See "Displaying Deja Locally as a Java Application".
To connect to a different directory server, or change the port number, from within Deja see "Connecting to Another Directory Server".
Opening and Closing Deja Windows
Opening a New Deja Window
Select New Window from the File menu.
The new window has its own connection to the directory server.
Closing a Deja Window
Select Close from the File menu to close the window.
The Deja window is closed.
Closing all Deja Windows
Select Exit from the File menu.
A confirmation window is displayed. Click Yes to close all Deja windows.
Reconnecting Deja to the Directory Server
If the directory server is disabled for some reason, Deja loses its connection to the directory. Deja does not automatically reconnect to the directory server when it is re-enabled. To reconnect Deja to the directory server:
Select Connect from the File menu.
Deja is reconnected.
Connecting to Another Directory Server
To connect to a different directory server from within Deja:
-
Select Connect To... from the File menu.
The Connect To... dialogue box is displayed. See Figure 2-3.
Figure 2-3 Deja Connect To... Dialogue Box

-
Type the server name and port number in the Connect To... dialog box.
Deja tries to connect to the new directory server. If it is unable to connect, an error message is displayed.
Note -If Deja is running as an applet through a browser, the ability to connect to another server depends on the security level set by the browser.
Refreshing the Browser Window
If directory operations are being performed on the same directory server by another user or the administrator, the browser window is not automatically updated. To refresh the browser window:
-
In the browser window, click on the root entry of the branch you want to refresh.
You can choose to refresh all of the directory by selecting the directory root entry, or to refresh just a branch by clicking on the root entry of the branch.
-
Select Refresh Subtree from the File menu.
All the branches of the directory below the selected entry are collapsed in the browser window. When they are reopened, they are refreshed.
Creating a New Entry
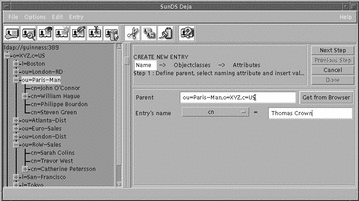
Use Create to add new entries to the directory. Figure 2-4 shows the Deja Create panel. You must have write permission for the parent to which you want to add an entry. See "Logging In" for information. To create a root entry for an empty directory, see "Creating a Root Entry".
Figure 2-4 Deja Create Panel
-
Click on the Create icon or select Create from the Entry menu.
The Create panel is displayed.
There are three steps to creating a directory entry. You must complete each step before you can progress to the next one.
-
Name the entry. See "Naming an Entry".
-
Select object classes for the new entry. See "Selecting Object Classes".
-
Add values to the mandatory and optional attributes for each objectclass. See "Selecting Attributes".
-
-
When you have completed the entry, click Done.
Naming an Entry
For example, we will add an entry for the person John Smith, working in an organization called XYZ based in the United States. You must have write permission for the parent to which you want to add an entry. See "Logging In" for information.
-
Specify the parent of the entry:
-
Type the Distinguished Name (DN) of the Entry's parent in the Parent text field.
For the example, the DN for the entry's parent is o=XYZ,c=US.
-
Alternatively, click once on the parent in the browser window to select it, and click the Get from Browser button.
The Distinguished Name of the selected entry is imported to the Parent text field.
-
-
Select the naming attribute from the option button.
Options depend on the directory schema. For the example, the naming attribute is cn, which stands for common name.
-
Type the Relative Distinguished Name (RDN) of the entry in the Entry Name text field.
For the example the RDN is cn=John Smith.
-
When you are satisfied with the entry name and parent, click the Next Step button to select object classes.
The Select Objectclasses panel is displayed. The DN of the new entry is also displayed. For the example the DN is cn=John Smith,o=XYZ,c=US.
Selecting Object Classes
You can define one or more object classes for your entry. When the selected objectclasses list is complete, click the Next Step button to select attributes.
Note -
If the selected objectclasses do not contain the previously selected naming attribute, a warning message is displayed. You must either specify a different naming attribute by going back to the first step, or add an appropriate object class to the entry.
Adding an Object Class to the Entry
Double click on the object class from the Available Objectclasses list to add the object class to the entry
Or, select an object class from the Available Objectclasses list and click on the right arrow button to add the object class to the entry.
For the example John Smith entry, add the person object class to the entry. Click the Next Button to assign attributes to the entry.
Removing an Object Class From the Entry
Double click on the object class in the Selected Objectclasses list to remove the object class from the entry
Or, select the object class in the Selected Objectclasses list and click on the left arrow button to remove the object class from the entry.
Selecting Attributes
Each object class you have selected has a number of mandatory and optional attributes associated with it. Mandatory attributes are marked with (M), optional attributes with (O). To complete the entry, you must provide values for the mandatory attributes. The names of the mandatory attributes are already listed in the entry definition.
Note -
Deja produces an error message if you try to add an entry to the directory without naming all the mandatory attributes.
For the example entry, the mandatory attributes are cn and sn (common name and surname). Optional attributes for the person object class can include description, see also, telephone number and userpassword.
Some attributes accept multiple values, others can only have one value. This is defined in the schema by the SINGLE-VALUE keyword. If you try to add more than one value to a single-valued attribute, an error message is displayed.
Assigning a Value to an Attribute
-
From the Choose Attribute list, or from the entry definition, select the attribute for which you want to add a value.
For the example, select sn from the Choose Attribute list.
-
Type the value for the attribute in the text field.
Type Smith in the text field.
-
Click Add to add the value of the attribute to the entry definition.
The value appears in the entry definition next to the attribute.
John Smith's entry is now functionally complete, all of the mandatory attributes have been named. However, we will add a couple of optional attributes to make the entry more useful in the directory; telephone number and userpassword. Add the value 123 456 789 for the telephonenumber attribute, and add a user password for the entry. Note that the value for the userpassword attribute is hidden in the entry definition.
To add an additional value for an attribute, repeat steps 1 to 3.
Finally, to complete the entry we will add a second value for the telephonenumber attribute, John Smith's internal extension number -- 789. When you have added the additional value, click on Done to add the entry to the directory. Double click on the entry in the browser to display all of its attributes. See Figure 2-5.
Figure 2-5 Example Entry View Window
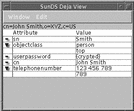
When an attribute has more than one value, an arrow is displayed next to the attribute name in the entry definition. Click on the arrow to collapse or expand the attribute definition. See "The View Window" for more information.
Deleting a Value From an Attribute
-
Select the value or the attribute name in the entry definition.
-
Click Delete.
-
If you delete the only value for an optional attribute, the attribute is removed from the entry definition.
-
If you delete the only value for a mandatory attribute, the value is cleared from the entry definition. The attribute stays in the definition.
-
Modifying an Attribute Value
-
Select the value of the attribute you want to modify in the entry definition.
The attribute value appears in the text field.
-
Modify the value and click Modify.
The modified value appears in the entry definition.
Cancel
To cancel a create operation at any time, click Cancel.
The entry definition is cleared from the Create panel.
Creating a Root Entry
When you are connected to the directory server, the topmost entry in the directory browser window is the Directory Specific Entry (DSE). It is displayed as:
ldap://hostname:port
where hostname is the hostname of the directory server, and port is the port number that Deja has used to connect to the directory server.
If there is no root entry listed below this when you start Deja, you will see an error message that tells you that the database is empty. Before you can add entries to the directory you must create a root entry for the database.
-
Login as administrator for the directory.
See "Logging In".
-
Double click on the Directory Specific Entry in the browser window.
A view panel is displayed showing the attributes of the DSE. This window lists the naming contexts defined for the directory server. See Figure 2-6.
Figure 2-6 Naming Contexts for the Default Directory Specific Entry

You can create a root entry for each naming context defined for the server. By default there are two naming contexts, o=xyz,c=us and dc=xyz,dc=us. To define new naming contexts, see the Sun Directory Services 3.1 Administration Guide.
-
Click on the Create icon or select Create Entry from the Entry menu.
The Create panel is displayed.
-
In the Parent text field, type the Distinguished Name of the naming context for which you want to create a root entry.
For example, to add a root entry for the naming context o=xyz,c=us, type o=xyz,c=us in the Parent text field.
-
Click on Next Step.
Now you must select object classes and assign values to attributes using the same procedure as for any new entry. See "Creating a New Entry".
Deleting an Entry
The delete panel of Deja is used to delete entries from the directory. Figure 2-7 shows the Deja Delete panel.
Figure 2-7 Deja Delete Panel
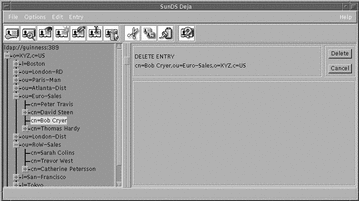
You must have write permission for the entry you want to delete. See "Logging In" for information.
-
Select the entry you want to delete in the browser window.
You can only delete leaf entries. You cannot delete a root entry or a parent that still has children.
-
Click on the Delete icon, or select Delete from the Entry menu.
The Delete panel is displayed.
-
Click on Delete to remove the entry from the directory.
Click on Cancel to clear the delete panel.
 Caution -
 There is no undelete function.
Cut, Copy and Paste
Cutting an Entry
Use Cut to remove an entry from the directory and keep a copy of it on the clipboard. The entry can be pasted from the clipboard into the directory in another location.
You must have write permission for the entry you want to cut. See "Logging In" for information.
-
In the browser, click on the entry you want to cut.
-
Click on the Cut icon, or select Cut from the Edit menu, or press Ctrl-x on the keyboard.
The entry is cut from the directory to the clipboard.
-
You can now paste the entry to a new directory position.
-
If you want to restore the entry to the directory, select Restore from the Edit menu.
The entry is restored to its original position in the directory if possible. If the parent entry no longer exists, or has been renamed, the paste is not possible and an error message is displayed.
Copying an Entry
Use Copy to copy an existing entry from the directory into the clipboard. The entry can then be pasted from the clipboard into the directory in another location.
-
In the browser, click on the entry you want to copy to select it.
-
Click on the Copy icon, or select Copy from the Edit menu, or press Ctrl-c on the keyboard.
The entry is copied from the directory to the clipboard.
-
You can now paste the entry to a new directory position.
Pasting an Entry
After a Cut or Copy operation, use Paste to paste an entry from the clipboard into the directory. You can paste as a child or as a sibling of the selected entry. You must have write permission to paste an entry into the directory. See "Logging In" for information.
After a cut or a copy operation, click on the Paste icon, or select Paste from the Edit menu, or press Ctrl-v on the keyboard.
If you selected a new entry before pasting, the pasted entry appears as a child of the selected entry.
If you did not select a new entry before pasting, the pasted entry appears as the last sibling of the selected entry.
If an entry already exists with the same name as the pasted entry, the new entry is pasted with a number appended to its name.
Pasting an Entry to the Create Panel
After a Cut or Copy operation, you can choose to paste an entry directly to the Create panel. This speeds up the process of creating a number of new, but similar entries.
Pasting an entry to the Create panel works in one of two ways:
-
The paste action removes information from the Create panel before pasting the entry
-
The paste action does not clear data from the Create panel before pasting. This is useful when you want to create an entry that contains the combined characteristics of two or more entries.
The paste method is specified in the Deja.properties file on the directory server. By default, Deja does not clear data from the Create panel before pasting. See "Standard Create Parameters" for information on changing the default paste method.
-
After a cut or a copy operation, click on the Create icon, or select Create from the Entry menu.
-
Select Paste to Create Panel from the Edit menu.
If you are in the first section of the Create panel, the entire entry is pasted into the panel, including the name and naming attribute.
If you are in the Select Object Classes section of the Create Panel (you have already named and selected a naming attribute for the entry) only the object classes and attributes are pasted into the Create panel.
If you are in the Attributes section of the Create panel (you have already named and selected a naming attribute for the entry, and have selected object classes for the entry) only the attributes are pasted into the Create panel.
If you have selected a naming attribute and named your entry, and the pasted objectclasses do not contain the selected naming attribute, you get an error message. You must either change the naming attribute by going back to the first step, or select an object class that contains the pasted naming attribute.
-
Click Done when the entry is complete to add it to the directory.
Restoring an Entry
If you accidentally cut an entry from the directory, you can restore it, provided that you have not performed any subsequent cut or copy operations.
Select Restore from the Edit menu.
The entry on the clipboard is returned to its original location.
Modifying an Entry
Use Modify to change attributes and object classes in directory entries. Figure 2-8 shows the Deja Modify panel.
Figure 2-8 Deja Modify Panel
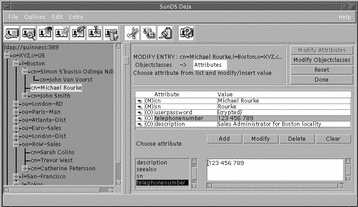
You must have write permission for the entry you want to modify. See "Logging In" for information.
-
In the browser, click on the entry you want to modify.
-
Click on the Modify icon or select Modify from the Entry menu.
The Modify Attributes window is displayed. Click on the Modify Objectclasses button to display the Modify Objectclasses window.
You can modify the following characteristics of an entry:
-
The values for the mandatory and optional attributes for each object class. See "Selecting Attributes".
-
The object classes for the entry. See "Selecting Object Classes".
If you want to change the name of the entry, use the Rename function. See "Renaming an Entry".
-
-
When you have finished the modifications, click Done.
Renaming an Entry
Use Rename to modify the Relative Distinguished Name (RDN) of an entry. Figure 2-9 shows the Deja Rename panel.
Figure 2-9 Deja Rename Panel
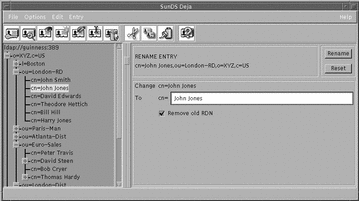
You must have write permission for the entry you want to rename. See "Logging In" for information.
-
Select the entry you want to rename in the browser window.
You can only rename leaf entries. You cannot rename parents that still have children, or the root entry.
-
Click on the Rename icon, or select Rename from the Entry menu.
The rename panel appears. The name of the parent and the Relative Distinguished Name (RDN) of the selected entry are displayed.
-
Type the new RDN of the entry in the To text field.
-
If you want the new RDN to replace the old RDN, check the Remove old RDN check box.
By default the new RDN replaces the old RDN. If the Remove old RDN check box is unchecked, the new RDN is added to the entry as an additional value.
-
Click the Rename button.
Searching for an Entry
Use Search when you want to find an entry in the directory. This function provides search facilities based on up to three criteria. Figure 2-10 shows the Deja Search panel. The available search types are defined in the Deja.properties file on the directory server. For information on modifying the default searches see "Standard Search Parameters". For information on adding a new search see "Adding a New Standard Search".
Figure 2-10 Deja Search Panel
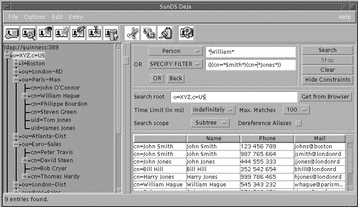
-
Click on the Search icon, or select Search from the Entry menu.
The Search panel is displayed.
-
Select the type of entry you want to search for using the Person option button.
The options in the Person option button are defined in the Deja.properties file on the directory server. See "Standard Search Parameters" for information on defining standard searches.
Default options are:
-
Person
-
Organization
-
Locality
-
Specify Filter
See "Search Filters".
-
-
Type the text string or filter you want to search for in the search text field.
The search can include the wildcard character *.
-
Click Search to start the search.
The search results are displayed in the search results list and the number of entries found is displayed in the status bar. If there are no matches, the search results list is empty and the status bar indicates that no entries were found.
You can refine your search in two ways:
-
Combine two or more searches. See "Combining Searches".
-
Constrain the search. See "Using Search Contraints".
-
-
To stop the search at any time, click the Stop button.
The search is stopped and no results are returned.
-
Click the Clear button to clear the search text field.
Search Filters
Using a search filter is a way of specifying a set of entries, based on the presence of a particular attribute or attribute value. You can combine and or or logical operators in the same search. Use & for and and | for or. Table 2-1 gives some examples of filters.
Table 2-1 Search Filter Examples|
Filter |
Definition |
|---|---|
|
l=London |
locality is "London" |
|
cn=*Rob* |
common name contains "Rob" |
|
(&(cn=Ch*)(cn=*Thomas*)) |
comman name starts with "Ch" and contains "Thomas" |
|
(|(sn=*bert*)(sn=*bort*)) |
surname contains "bert" or "bort" |
|
(&(cn=Rob*)(|(cn=*Green*)(cn=*Jones*)) |
common name starts with "Rob" and contains "Green" or "Jones" |
Combining Searches
You can combine your first search string with up to two other text strings using and or or logical operators. You cannot combine both operators in the same search. For example, you can search for cn=*Robert* and l=Boston and o=xyz, or you can search for cn=*Robert* or l=Boston or o=xyz.
-
Select the type of entry you want to search for using the Person option button.
-
Type the text string you want to search for in the search text field.
-
Click on the And or Or buttons to select the logical operator.
-
Select the entry type for the second text string using the Person option button.
-
Type the second text string in the search text field.
-
If you want to add a third search criterion, click the And or Or button.
-
To remove a search criterion, click the Back button.
-
Click the Clear button to clear all the search text fields.
Using Search Contraints
If you do not set all of the search constraints, the default values are used.
-
Type the Distinguished Name (DN) of the root of the subtree you want to search.
Or, select the root of the subtree you want to search in the browser window and click Get from Browser.
-
Select the search time limit (in ms) from the Time Limit option button.
By default, there is no time limit.
-
Select the maximum number of search results from the Max. Matches option button.
The default maximum number of search matches is 100.
-
Select the scope of the search from the Search Scope option button.
-
One Level searches the entries on the level immediately below the search root.
-
Subtree searches all entries below the search root.
The default scope is subtree.
-
-
If you want to dereference aliases as you search, check the Dereference Aliases check box.
If you choose to dereference aliases as you search, the distinguished name (DN) of an alias entry is translated to the DN of the actual entry. With the dereferencing flag checked, the object referred to by the alias is returned by a search. With the dereferencing flag unchecked, the alias entry is returned by a search.
Search Results List
Search results are displayed in the list below the search criteria.
The RDN, common name, telephone number and email address for each match are displayed.
To view an entry, double-click on the entry's name in the search results list.
The view entry window is displayed.
Viewing an Entry
Use View to look at the attributes defined for an entry in the directory. Figure 2-11 shows Deja View window. You can only open one View window per entry. To refresh a View window after modifying an entry, View the entry again. The original View window is replaced with a new one.
Figure 2-11 Deja View Window
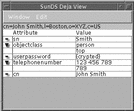
The View Window
There are three ways to display the View window:
-
Double-click on an entry in the browser window
-
Select an entry in the browser window and click on the View icon, or select View from the Entry menu
-
Click on an entry in the search results list
The view window shows the list of attributes and values associated with the selected entry. Each attribute has an icon by the side of it:
|
The attribute has one value. It is also used in the Create or Modify panels when a mandatory attribute has no value. |
|
|
The attribute has more than one value, but only the first is displayed. Click on the arrow to see the other values. |
|
|
The attribute has more than one value and they are all displayed. Click on the arrow to hide all but the first value. |
Closing a View Window
Select Close from the Window menu of the View window, or Double click on the Window menu button.
The View window closes.
Copying an Entry From a View Window
Select Copy from the Edit menu of the View Window.
The entry is copied to the clipboard.
Highlighting an Entry From a View Window
Select Highlight from the Edit menu of the View Window.
The entry is highlighted in Deja's browser window.
- © 2010, Oracle Corporation and/or its affiliates
