Creating a New Entry
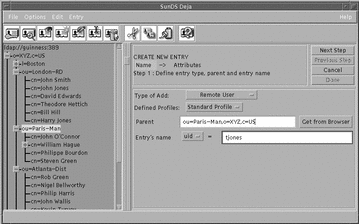
Use Create to add new entries to the RADIUS directory. Figure 4-1 shows the Deja Create panel for RADIUS users.
Figure 4-1 Deja Create Panel for RADIUS Users

-
Click on the Create icon or select Create Entry from the Entry menu.
The Create panel is displayed.
There are two steps to creating a RADIUS directory entry. You must complete each step before you can progress to the next one. Click on Next Step and Previous Step to navigate between the steps.
-
Name the entry. See "Naming an Entry".
-
Assign attributes to the entry and name them. See "Selecting Attributes".
-
-
When you have completed the entry, click Done.
Naming an Entry
-
Select the type of entry you want to add (Remote User or Remote Access Server).
-
If you are adding a Remote User, specify the profile of the new entry (Standard, PPP, SLIP, LOGIN).
Note -The list of RADIUS profiles available in Deja is defined in the Deja.properties file on the directory server. See "RADIUS Profiles" for information on defining RADIUS user profiles.
-
Specify the parent of the entry:
By default, the Parent text field holds the distinguished name of an entry specified in the Deja.properties file on the directory server. To select another parent entry:
-
Type the Distinguished Name of the Entry's parent in the Parent text field
-
Alternatively, click once on the parent in the browser window to select it and click the Get From Browser button next to the Parent text field.
The Distinguished Name of the selected entry is imported into the Parent text field.
-
-
Select the naming attribute for the entry with the option button.
The list of available naming attributes is defined in the Deja.properties file on the directory server. See "RADIUS General Parameters" for information on defining the list of available naming attributes.
-
Type the value for the naming attribute for the entry in the Entry Name text field.
-
When you are satisfied with the entry name and parent, click the Next Step button to assign values to the attributes.
See "Selecting Attributes" for information on selecting attributes for the entry.
Check Data and Reply Data Attributes
The RADIUS add attributes window features four additional buttons:
-
Chk Add -- Select an attribute and type a value for it in the text window. If you click the Chk Add button, the value is added to the entry definition, and the name of the attribute is added to the Radius Check Data optional attribute which matches the grpCheckInfo in the radius.mapping file.
For example, if you select the User ID attribute from the Choose Attribute list and type the value charles in the text window, when you click on Chk Add, the value charles is added to the User ID attribute, and uid is added to the Radius Check Data attribute.
-
Rpl Add -- Select an attribute and type a value for it in the text window. If you click the Rpl Add button, the value is added to the entry definition, and the name of the attribute is added to the Radius Reply Data optional attribute which matches the grpReplyInfo in the radius.mapping file.
-
Chk Del -- Select the value of the attribute you want to delete from the entry definition. If you click the Chk Del button, the value is removed from the entry definition, and the name of the attribute is removed from the Radius Check Data optional attribute which matches the grpCheckInfo in the radius.mapping file.
-
Rpl Del -- Select the value of the attribute you want to delete from the entry definition. If you click the Rpl Del button, the value is removed from the entry definition, and the name of the attribute is removed from the Radius Check Data optional attribute which matches the grpReplyInfo in the radius.mapping file.
The grpCheckInfo attribute, contains a list of attributes that must be checked by the RADIUS server against the information supplied by the remote user. If the grpCheckInfo attribute is not present, or if it does not contain any attributes, then all the attributes in the remote user's entry are checked before access is granted to the user.
The grpReplyInfo attribute, contains a list of attributes returned by the RADIUS server with an access-accept or access-reject response. It can contain connection parameters such as a PPP or SLIP profile.
Cancel
To cancel a create operation at any time, click Cancel.
The entry definition is cleared from the Create panel.
- © 2010, Oracle Corporation and/or its affiliates
