About Managing Policies
You can define the following seven sets of SunLink Server policies:
-
Computer browsing
-
File name mapping
-
NetBIOS
-
Solaris file system security and permissions
-
UPS power failure notification
-
User account mapping
-
SunLink Server Manager security
Note that the instructions in this guide for managing these policies relate to, and affect, only your SunLink Server program--not the Windows NT network itself. You continue to administer Windows NT network policies in the manner and with the tools to which you are accustomed. Windows NT policies that are not covered in this guide include:
-
User password (account)
-
Audit
-
Trust relationships
Computer Browsing
Computer browsing is the process of checking domains, workgroups, and computers to look for shared directories and printers. Networks, domains, workgroups, computers, and shared directories are organized in a tree structure. You choose a network name to display available domains and workgroups, a domain or workgroup name to display available computers, or a computer name to display its shared directories.
A master browser maintains the tree-structure list and updates the backup browsers. Users of network client computers are viewing this list when they look at their Network Neighborhood.
Computer browsing policy in the SunLink Server program involves setting the frequency that the master browser updates its list, the frequency that a backup browser copies the list from the master browser, and the level of browsing event detail that you want to be included in the system log.
File Name Mapping
On Solaris system files and directories, you can have names of up to 255 characters, far greater than the MS-DOS operating system 8.3 standard. And, while Windows NT Workstation and Windows NT Server users will see the long Solaris file name in a SunLink Server directory, users of client computers running Windows for Workgroups--which uses the MS-DOS 8.3 name convention--would not. To ensure access to all Solaris files by all users, the SunLink Server program provides name mapping: each file or directory with a name that does not conform to the MS-DOS 8.3 standard automatically is given a second name that does conform.
Many Microsoft Windows 3.1 and Windows for Workgroups users connecting to the file or directory over the network see the name in the 8.3 format; Windows NT Workstation and Windows NT Server users see the long name. (Note, however, that the SunLink Server program does not generate short names for share names that do not conform to MS-DOS naming standards, but only for files and directories with long names. When naming a share, use the 8.3 standard to avoid potential file name conflicts.)
SunLink Server name mapping also allows applications that do not support long file names to access files with such names. These applications refer to files that have long names by their shorter names.
Note -
If an application that does not support long file names opens a file with a long name and then saves the file, the long name is lost and only the short name remains.
SunLink Server file name mapping is composed of the following three elements:
-
Mixed-case support
-
Mapping Solaris system file names to the 8.3 convention
-
Mapping Solaris system file names containing characters that are unacceptable in Windows NT to names that are acceptable to Windows NT
The challenge of mapping between name spaces is resolved on Solaris systems by concatenating a truncated file name with a pseudo-unique suffix, which is generated dynamically from the i-node number of the Solaris system file.
File Name Mapping Rules
For mapping Solaris system file names to 8.3-type file names, the following default rules apply:
-
Spaces are removed from the name.
-
Periods are removed, except for the last one followed by at least one character.
-
Invalid characters are replaced by underscores (_).
-
The name, not including suffix, is truncated; a tilde (~) separator and a combination of numbers (0 - 9) and letters (A - Z) are appended.
-
The suffix (the characters following the tilde separator) is truncated to three characters.
For example, the file name longfilename.txt and i-node number of 11455, would have a mapped name of long~8u7.txt.
For mapping from Solaris system file names to Windows NT-style file names, the following default rules apply:
-
Invalid characters are replaced by underscores (_).
-
A mapping separator (a tilde by default) and a combination of numbers (0 - 9) and letters (A - Z) are appended to the name, not including the extension.
-
The extension is preserved.
For example, the file name k<l<m.expression and i-node number of 8461 would have a mapped name of k_l_m~6j1.expression.
Considerations for Using Mixed-Case Support
A decision on whether your server should continue to support mixed-case file names--which is the default in the SunLink Server program--should be considered carefully. Mixed-case support allows clients to have access to file names on Solaris systems that contain uppercase characters, but turning off this feature could improve server performance.
It is inadvisable to switch frequently between mixed-case support on the same server. While mixed-case support is enabled, clients can create files with mixed-case names. These files will become unavailable to them as soon as mixed-case support is disabled. If mixed-case support is changed from enabled to not enabled, every existing file name should be made lowercase.
Do not create file names that are case-insensitively identical in the same directory. Although the Solaris system is case-sensitive, SunLink Server mixed-case support causes the server to preserve case but behave in a case-insensitive way, just like Windows NT. Microsoft product users are not aware of the possibility of having case-insensitive similar file names in a directory, because Windows NT does not allow such files. As a result, users may become confused if they access incorrect files or are denied access to files they need.
NetBIOS
NetBIOS, which stands for Network Basic Input/Output System, is a session-layer interface used by applications to communicate. Its logical naming system permits computers' network interfaces to establish connections, and ensures reliable data transfer between computers once the connections exist.
Lana Numbers
LAN Adapter (Lana) numbers are part of the logical naming system established by NetBIOS. SunLink Server software assigns Lana numbers automatically to each network interface, choosing a number that is unique within the particular computer.
One NetBIOS Lana can be configured for each available network interface card. You should plan ahead to choose the particular network interfaces that you want to run NetBIOS Lanas.
WINS Servers
A Windows Internet Name Service (WINS) server is a machine that maintains a database of available network resources and the computers that own them. A computer seeking such a resource "asks" the WINS server to look up the address of the machine that owns the resource.
A network can have no WINS servers, or it can have any number of them. See a fuller discussion of WINS in Chapter 5, Chapter 5, Implementing WINS and Maintaining Databases.
WINS and NetBIOS Modes
By default, SunLink Server software brings up each network interface in Broadcast mode. In this mode, a computer seeking a network service or resource broadcasts a general request to the network, seeking a response from the machine that owns the resource or service. Each computer receiving such a request responds with its address.
This mode has the advantage of not requiring WINS servers, but it generates a lot of network traffic. Broadcast mode does not work across subnets.
WINS servers use the NetBIOS Hybrid mode (h-mode). In this mode, a computer seeking a network service or resource sends that request directly to a specified WINS server, which in turn looks up the address of the machine that owns the resource.
WINS Proxy
WINS proxies are useful in networks comprising several subnets, where some of the computers on those subnets are running in Broadcast mode. A WINS proxy fields local requests for services located on a different subnet, caching network addresses and communicating with the WINS server when necessary.
You can also configure the NetBIOS service to use WINS servers to resolve NetBIOS names by entering the IP address of the primary and secondary WINS servers. You can configure only the primary WINS server, or both. The WINS server addresses can be the IP address of the local SunLink Server system running the WINS service, or another SunLink Server system running the WINS service, or a Windows NT server running the WINS service.
If either primary or secondary WINS servers are configured, you can use the WINS proxy setting to allow this SunLink Server system to provide WINS proxy service to other computers that have not been configured to use WINS servers to resolve NetBIOS names. Be discreet in using this option, as it joins the NetBIOS name spaces for both b-mode and h-mode NetBIOS nodes on the local subnet, and can cause unexpected name conflicts.
NetBIOS Scope
NetBIOS scope is a seldom-used feature that limits the computers that a particular network device can communicate with.
The chief use of scope is in wide area networks (WANs) or other large networks, where it can prevent conflicts caused by two or more network interfaces having the same NetBIOS name.
Consider a network belonging to a shoe manufacturer where two machines, both earmarked for use by Sales personnel, exist on the same subnet.
One machine is used by those selling sneakers, and the other by those selling boots. If both machines had the NetBIOS name "sales," problems would result. However, if one machine is given the scope name "sneakers" and the other "boots," then both machines could retain the NetBIOS name "sales" without any conflict. Note however, that both machines could then only communicate with other machines possessing the same scope.
Solaris File System Security and Permissions
You can control the access that users have to files and directories on SunLink Server computers by securing them through permissions.
Every permission that you set specifies the access that a group, user, or others can have to the directory or file. For example, when you set Read permission for the group called Coworkers on the file MY_IDEAS.DOC, the users in that group can display the file's data and attributes, but they cannot edit the file or delete it.
The SunLink Server program offers the following permissions that you can set on directories and files for users, groups, and others:
-
Read (R) - Allows individuals or groups to see the file or contents of a folder, but not to edit, delete, or execute it.
Note -In the Solaris operating environment, Read permission is far more restrictive than the similarly named permission in the Windows NT environment. In the Windows NT environment, Read permission is advisory only--a user on a Windows NT client machine would still be able to edit a nominally Read-only file. In the Solaris environment--the environment in which all SunLink Server files and directories are stored and managed--a user would be prohibited from editing a Read-only file. You can override the more restrictive Solaris permissions to become fully compatible with Windows NT-style permissions, however. See "How to Set Solaris File System Integration Policies" for instructions.
-
Write (W) - Allows individuals or groups to see and edit the file or contents of a folder.
-
Execute (X) - Allows individuals or groups to run executable programs, but not to see or edit the code itself.
-
Full Access (RWX) - Allows individuals or groups to see, edit, and run any file, directory, or executable program so designated.
-
No Access - Denies all permission (achieved by not setting any of the above permissions).
You establish permissions on files and directories, but the permissions that you establish actually affect the computer users. The Solaris operating environment differentiates among people to whom the permissions apply:
-
User - If you own a Solaris system file or directory, you can assign it access permissions for yourself. For example, to prevent unauthorized users from executing a program, you can assign execute permissions to yourself only.
-
Group - This setting, in the context of the SunLink Server program, is not the same as group permissions in the Solaris operating environment. In the Solaris file system, group permissions grant to other members of your Solaris group access to files and directories that you own. In the SunLink Server environment, however, Windows NT groups--not Solaris groups--are created, and Solaris group permissions have no effect on them.
-
Other - You can assign access permissions to files and directories that you own for all Solaris system users other than yourself and the users in your group. Depending on your needs, you can allow these other users to read or change your files and directories or you can prevent such access. Restricting access to others does not affect your own access to the files and directories.
Standard permissions are combinations of individual permissions that depend on the nature of the files and directories and the makeup of groups. To work effectively with SunLink Server file and directory security, keep the following points about setting permissions in mind:
-
Users cannot use a directory or file unless they have been granted permission to do so or belong to a group that has permission to do so.
-
Permissions are cumulative, except that setting a No Access permission--not indicating Read, Write, or Execute on a file or directory--overrides all other permissions. For example, if the Coworkers group has Write permission for a file while the Finance group has only Read permission, and John is a member of both groups, John will be granted Read and Write permissions. However, if you remove the Finance group's only permission for the file to effectively become No Access, John will not be able to use the file--even though he is a member of a group that has access to it.
-
When you create files and subdirectories in a SunLink Server directory, they inherit permissions from the directory. For example, if you add a file to a directory that allows the Coworkers group Write permission and the Finance group Read permission, the same permissions will apply to the file.
-
The user who creates a file or directory is ordinarily the owner of that file or directory--though you can change that default. The owner can control access to the file or directory by changing the permissions set on it.
-
The easiest way to administer security is to set permissions for groups, not individual users. Typically, a user needs access to many files. If the user is a member of a group that has access to the files, you can terminate the user's access by removing the user from the group rather than by changing the permissions on each of the files. Note that setting permission for an individual user does not override the access granted to the user through groups to which the user belongs.
Note -When you copy SunLink Server files or directories, security permissions set on them are discarded in addition to ownership and auditing information. The files inherit a new set of permissions from the directory into which you have copied them. If the new directory does not specify permissions for files, only a file's owner (the person who copied the file) will have permission to use the file.
In addition to files and directories, shares carry their own permissions in a Windows NT environment. In case of permission conflicts among files, directories, and shares, clients see the most restrictive permissions among the conflicting sets.
Ownership of Files and Directories
Every file and directory has an owner. The owner controls how permissions are set on the file or directory and can grant permissions to others.
When a file or directory is created, the person creating the file or directory automatically becomes its owner. It is expected that administrators will create most files on network servers, such as when they install applications on the server. Therefore, most files on a server will be owned by administrators, except for data files created by users and files in users' home directories.
Ownership can be transferred in the following ways:
-
The current owner can grant an implied ownership ability to other users by setting Write permission on the files or directories for Group or Others. This enables other people to copy the file, and "inherit" ownership of the duplicate.
-
An administrator can take ownership of any file on the computer at any time. For example, if an employee leaves the company suddenly, the administrator can take control of the employee's files, no matter what permissions have been set.
Note -Although an administrator can take ownership, the administrator cannot transfer ownership to others. This restriction keeps the administrator accountable.
The administrator also can take file ownership by using the net perms command. For more information, type net help perms at the SunLink Server command prompt.
In addition to files and directories, computer processes also have an owner. A computer process is initiated whenever an executable program is run, and the process is known to the system by a unique identifier. In the Solaris environment, this is called a Process Identifier, or PID.
Unlike file or directory ownership, however, process "ownership" changes whenever the program is executed. While an executable program--a spreadsheet, for example--is originally owned by the person who installed it on the network, its User and Group PID ownership changes when a person runs it. The spreadsheet process owned by root at installation will now be owned by the user and the user's group at execution. Because this change in process ownership has security implications, the SunLink Server program enables you to regulate it.
File-locking is also an important security concern, particularly in your heterogeneous environment of Windows NT and Solaris. While SunLink Server software accords the same file-locking security on network-based files and directories as Windows NT does, locked files may still be accessible directly from a Solaris computer account. SunLink Server software enables you to preclude that from happening, though it is not set by default as it may degrade overall system performance. If your network includes users who will access files from both Windows NT and Solaris network client machines, you should change this setting to honor Windows NT file-locking from Solaris accounts. See "How to Set Solaris File System Integration Policies".
Note -
During SunLink Server installation, users and groups who will be associated with the SunLink Server program were added to the system's local password and group files. If your site uses a Solaris name service such as NIS or NIS+ in the Solaris environment, you should put the group information into the name service maps. When creating files from a Windows NT Workstation and writing to a directory on the Solaris system, the owner is the user who creates the file and the default group is DOS---. While the user information is, in fact, retrieved from the name service maps, the group information is correctly displayed only if the listing of the file is performed on the SunLink Server system itself (default lookup: files nis). If these files are being viewed from another Solaris system, the group id will not be resolved correctly. By putting the group information into the name service maps, you allow the files to be consistent between the local system files and the maps.
SunLink Server Manager Security
Another security consideration involves users' privileges to administer the SunLink Server program by way of the SunLink Server Manager tool. You can choose settings that affect security on subsequent SunLink Server Manager sessions. Data Integrity uses public key signatures to protect data passed between the server and the client. Authentication takes place behind the scenes and involves rechecking credentials with each transaction. See "How to Secure SunLink Server Manager Transactions".
UPS Power Failure Notification
You can send a power failure message to all Windows NT network users who are connected to a computer by using the Send Message command on the Computer menu in Windows NT Server Manager. For example, you can do this before you disconnect one or more users or before you stop the server service on that computer.
Using SunLink Server Manager, you can warn users of server shutdown because of of power loss when an Uninterruptible Power Supply (UPS) service is available.
For alerts to be sent, the Alerter service must be running on the SunLink Server computer from which the alert is originated (see "How to Start Individual Services"). For client machines to receive the alerts, their Microsoft Windows Messenger service must be running.
User Account Mapping for /etc/passwd Files
You can associate a SunLink Server user account with a Solaris system user account on the Solaris system that is running SunLink Server software. To create this type of association, you use the SunLink Server Manager tool or the mapuname command. (For more information about the mapuname command, type man mapuname at the SunLink Server command prompt.) After you map a SunLink Server user account to a Solaris system user account, any file that the SunLink Server computer user creates will be owned by the Solaris system user account.
Note -
This option is useful only to those sites that use the mapuname command to associate Windows NT and Solaris accounts, and who keep their Solaris accounts in a local /etc/passwd file (i.e., those who do not use NIS or NIS+ name services). If this is the case and you choose this option, then if you use the Windows NT User Manager tool to change the user's Windows NT home directory to a shared path on the SunLink Server system, it edits /etc/passwd so that the user's Solaris account has the same home directory on the server.
Having both SunLink Server and Solaris system user accounts allows your Solaris system files to be owned by your Solaris system user account and to be accessed through your SunLink Server user account. You should map Solaris system user accounts to SunLink Server software users on the Solaris systems where their home directories reside--this is the default, though you can change it.
Assigning Solaris system user accounts to SunLink Server user accounts ensures that Solaris system user accounts are created only when necessary. It also gives administrators complete control over the mapping of SunLink Server user accounts to Solaris system user accounts.
You use the SunLink Server Manager tool to assign Solaris system user accounts automatically to new SunLink Server user accounts. See "How to Edit User Account Mapping Policies". The Solaris system user account name that is assigned to the SunLink Server user account will be the same as or similar to the SunLink Server user account name. Differences can arise in cases of long, duplicate, or special character SunLink Server user account names.
If you were to map a SunLink Server user account to a nonexistent Solaris system user account, or if the Solaris system account for a SunLink Server user is deleted, the SunLink Server user will not have access to any shared resources on the Solaris system. To ensure that the SunLink Server user can continue to access the system, delete the account mapping or re-map the user to another Solaris system user account.
As administrator, you also have the ability to enable or disable users with Solaris accounts from logging on to the Solaris system, and to choose whether to synchronize SunLink Server home directories with users' Solaris home directories.
User Account Management Utilities
SunLink Server software provides a pair of Solaris user account management utilities, called passwd2sam and sam2passwd.
passwd2sam
The passwd2sam user account management utility places user account information that is stored in a Solaris name service--such as FILES, NIS, and NIS+--into the SunLink Server Security Account Manager (SAM) database. If the SunLink Server system is configured as a BDC in an existing Windows NT domain, passwd2sam operations will transfer to the domain's PDC.
Note -
Using this utility does not add users' passwords to the SunLink Server SAM database, because passwords are one-way encrypted; that is, they cannot be decrypted for automatic transfer from one account to the other.
The passwd2sam user account management utility supports three modes of operation:
-
It adds Solaris user accounts into the SunLink Server Security Accounts Manager database. This is the default mode of operation. Solaris user accounts can be added from the running Solaris name service or by a user-specified /etc/passwd formatted input file.
-
It deletes Solaris user accounts from the SunLink Server Security Accounts Manager database. Solaris user accounts are deleted from the SunLink Server program by a user-specified /etc/passwd formatted input file.
-
It finds and disables Windows NT domain user accounts that have been added by passwd2sam and subsequently deleted from a Solaris name service. This mode will find and disable SunLink Server user accounts that have been removed from a Solaris name service.
You must format all input files to passwd2sam as /etc/passwd entries. See the passwd2sam(1) man page for details on invocation options and arguments.
sam2passwd
The other user account management utility provided by SunLink Server software is sam2passwd. The sam2passwd user account management utility records SunLink Server user accounts, and then creates the following /etc/passwd formatted file containing the SunLink Server user accounts:
/var/opt/lanman/dirsync/sam2passwd.passwd
This file contains non-privileged SunLink Server user accounts that you can add to Solaris name service maps or to a local /etc/passwd file (on which you then run the /user/bin/pwconv command).
The sam2passwd utility is provided to assist you in migrating user accounts into your running Solaris name service, but does not actually perform the operation. See the sam2passwd(1) man page for details on invocation options and arguments.
How to Change Computer Browsing Policy
-
Using SunLink Server Manager, log on to, and then open, the SunLink Server system whose browsing properties you want to change.
For instructions, see "How to Log On Using SunLink Server Manager". To make any changes, you must be logged on as root.
-
Double-click Policies.
-
Double-click Computer Browsing.
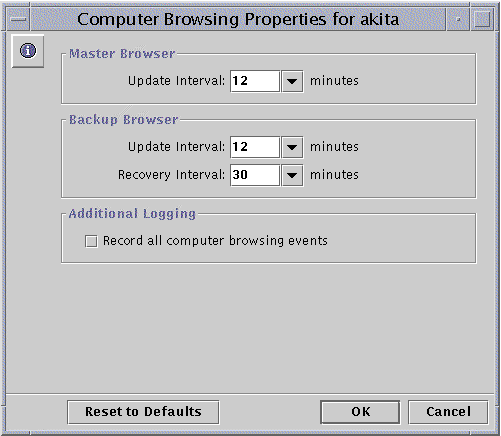
The following screen appears.
-
Using the provided drop-down lists and check box, make any changes to the Master Browser and Backup Browser update and recovery intervals, and list of browsing events that should be included.
Checking "Record all computer browsing events" makes the event list more inclusive than the default.
Note that you must enter a value greater than "0" for both the Master and the Backup browsers' update intervals.
-
Click OK, Cancel, or Reset to Defaults.
If you click OK to make any changes, SunLink Server Manager will automatically stop and then restart your browsing service to make the changes effective.
How to Set Up File Name Mapping
-
Using SunLink Server Manager, log on to, and then open, the SunLink Server system on which you want to set up or edit file name mapping policies.
For instructions, see "How to Log On Using SunLink Server Manager". To make any changes, you must be logged on as root.
-
Double-click Policies.
-
Double-click File Name Mapping.
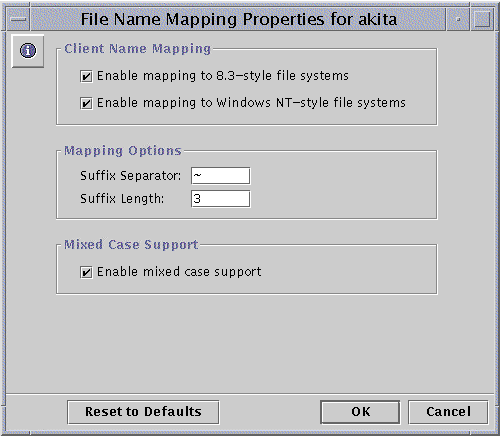
The following screen appears.
-
Create or change file name mapping policies according to the following guidelines:
-
Check "Enable mapping to 8.3-style file systems" if some of your client machines are running Windows for Workgroups.
-
Check "Enable mapping to Windows NT-style file systems" so that Solaris file names with characters that are invalid in Windows NT are changed to "legal" characters.
-
Enter a new value in the Suffix Separator text field if you have reason to change the default; the default separator is a tilde ( ~ ).
-
Enter a new value in the Suffix Length text field if you have reason to change the default from three. This value does not include the separator.
-
Check "Enable mixed-case support" if you want to allow file names to be created with both uppercase and lowercase characters, and you want case to be a factor in finding files. Note that checking this box may degrade performance.
-
-
Click OK, Cancel, or Reset to Defaults.
How to Edit NetBIOS Policy
-
Using SunLink Server Manager, log on to and then open the SunLink Server system on which you want to set NetBIOS policies.
For instructions, see "How to Log On Using SunLink Server Manager". To make any changes, you must be logged on as root.
-
Double-click Policies.
-
Double-click NetBIOS.
The following screen appears.
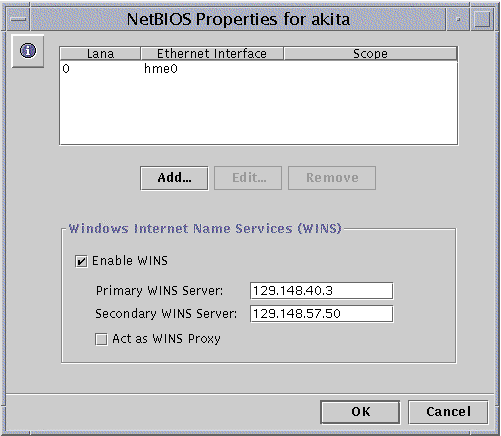
The NetBIOS Properties wizard displays a table of available network devices, their automatically assigned Lana numbers, and their scope (if assigned). The wizard enables you to add, edit, or remove an Ethernet interface Lana entry.
-
In the Ethernet Interface table, click to highlight the name of the device that you want to configure.
For background information on NetBIOS, see "NetBIOS".
-
Choose whether you want to add, edit, or remove an interface and its Lana entry.
-
If you want to add an interface and Lana entry, go on to the next step.
-
If you want to edit an interface and Lana entry, go to Step 7.
-
If you want to remove an interface and Lana entry, go on to Step 8.
-
-
Click Add.
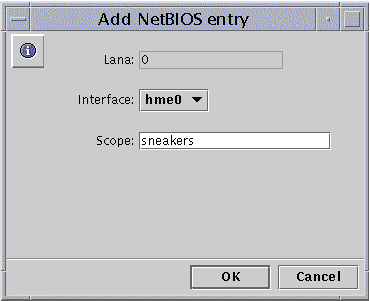
The following screen appears.
-
Click the drop-down Interface list to choose the available interface you want to add.
-
(Optional) In the Scope text field, type the name of the scope that you want the added device to serve.
The scope name can contain a maximum of 63 characters consisting of the uppercase or lowercase letters A-Z, the numerals 0-9, and all standard symbols.
-
Click OK.
-
-
Click Edit.
The following screen appears.
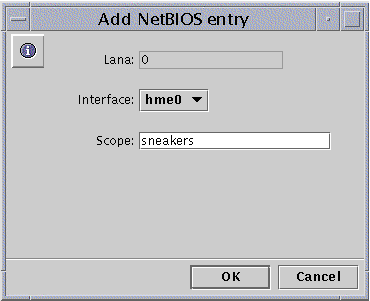
-
Click the drop-down Interface list to assign a different available interface to the local system.
-
(Optional) In the Scope text field, edit or create the name of the scope that you want the edited device to serve.
The scope name can contain a maximum of 63 characters consisting of the uppercase or lowercase letters A-Z, the numerals 0-9, and all standard symbols.
-
Click OK.
-
-
Click Remove.
In the event that you attempt to remove the only interface available for this machine, the following screen will appear.
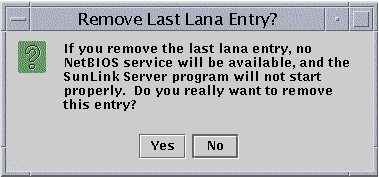
How to Configure WINS
-
Using SunLink Server Manager, log on to and then open the SunLink Server system on which you want to configure the WINS service.
For instructions, see "How to Log On Using SunLink Server Manager". To make any changes, you must be logged on as root.
-
Double-click Policies.
-
Double-click NetBIOS.
The following screen appears.
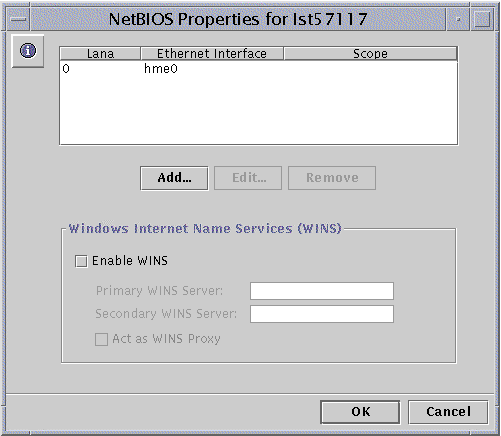
The NetBIOS Properties wizard displays a table of available WINS configuration choices:
-
Choose whether the Windows Internet Name Service (WINS) is enabled.
-
Choose whether the system you are configuring will be a WINS proxy.
-
Identify, by IP address, primary and secondary WINS servers.
-
-
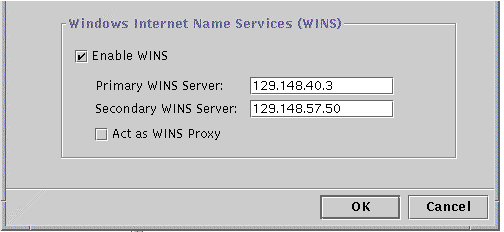
To enable WINS on the local system, click the checkbox next to Enable WINS.
The screen changes to activate three WINS configuration choices:
-
Primary WINS Server
-
Secondary WINS Server
-
WINS Proxy
-
-
In the corresponding text fields, type in the IP addresses for the Primary and, optionally, Secondary WINS servers.
See "WINS Proxy" for a description of primary and secondary WINS servers.
-
Choose whether you want the system to act as a WINS Proxy.
See "WINS Proxy" for a description.
-
Click OK.
The following screen appears, notifying you that the SunLink Server program and the NetBIOS driver must be restarted for changes to take effect:.
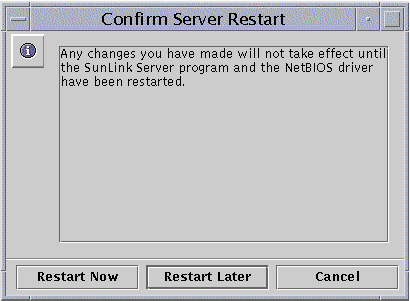
Choose whether to stop and restart the program immediately, restart the program later, or cancel the changes you made.
None of the changes you have designated will become effective until the next time you start the SunLink Server program.
Note -The Enable WINS option does not start the WINS service automatically after the SunLink Server program is restarted. You need to start the service manually by typing net start wins at the system's command line, or by using SunLink Server Manager. For instructions, see "How to Start Individual Services". You can configure the SunLink Server program to start the WINS service automatically, however, by editing the lanman.ini file. See "How to Start the WINS Service Automatically".
How to Start the WINS Service at the Command Line
How to Start the WINS Service Automatically
-
Edit the lanman.ini file to include wins in the srvservices parameter.
See the section "About lanman.ini File Entries" for editing instructions, and "File Parameters" for the location of the srvservices parameter.
How to Set Solaris File System Integration Policies
-
Using SunLink Server Manager, log on to and then open the SunLink Server system on which you want to set Solaris file system integration policies.
For instructions, see "How to Log On Using SunLink Server Manager". To make any changes, you must be logged on as root.
-
Double-click Policies.
-
Double-click Solaris File System Integration.
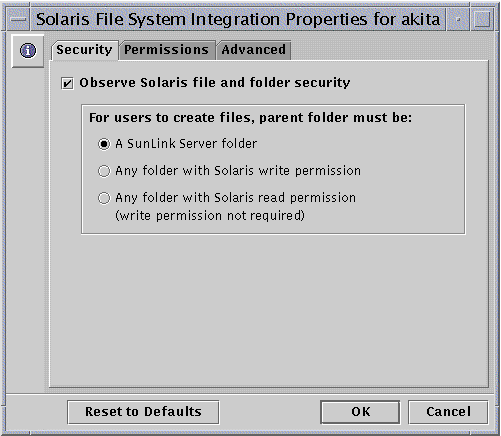
The following screen appears.
-
Set SunLink Server file creation policies according to the following guidelines, using the Security, Permissions, or Advanced tabs:
-
Security - To establish policy for file creation within SunLink Server folders:
-
Ignore Solaris permissions - Leave unchecked the "Observe Solaris file and folder security" option to ignore Solaris permissions. With this option unchecked, Windows NT file and directory permissions are the only permissions that will prevail over file and directory creation and access for reading. SunLink Server software users with appropriate Windows NT permissions can create files within SunLink Server folders.
-
Observe Solaris permissions - Check "Observe Solaris file and folder security" and "A SunLink Server folder" to require users to have Solaris Write permission to create a file within a SunLink Server folder only--it will not affect any other Solaris file system folder. Check "Any folder with Solaris write permission" to ease the restriction, by enabling SunLink Server software users to create files within SunLink Server folders and any other Solaris file system folder. Check "Any folder with Solaris read permission" to specify that only minimal Solaris permissions be in place on any SunLink Server folder or other Solaris folder (in effect, this option grants Write permission to any Solaris operating environment-based folder).
-
-
Permissions - To establish default User, Group, and Other file and folder permissions, check the box next to the permissions that you want to set.
-
Advanced - To cause SunLink Server software to observe Windows NT file locking--thereby preventing users with Solaris accounts from accessing the locked files--check the box under File Locking. (Note that checking this box may slow down performance.)
-
-
Click OK, Cancel, or Reset to Defaults.
How to Use UPS Power Failure Notification
-
Using SunLink Server Manager, log on to, and then open, the SunLink Server system from which you want to send a UPS power failure notice.
For instructions, see "How to Log On Using SunLink Server Manager". To make any changes, you must be logged on as root.
-
Double-click Policies.
-
Double-click UPS Power Failure Notification.
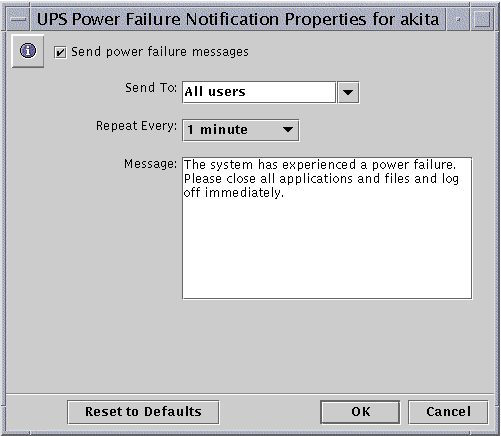
The following screen appears.
-
Check "Send power failure messages."
-
Either select from the drop-down list, or type directly into the text field, the NetBIOS names of all the users or systems that you want to notify.
Select All Users if you want to send the message to everyone.
-
Using the drop-down list, designate how often you want the notification to be repeated.
-
In the Message text field, type the message that you want to send.
-
Click OK, Cancel, or Reset to Defaults.
How to Edit User Account Mapping Policies
-
Using SunLink Server Manager, log on to, and then open, the SunLink Server system for which you want to establish or edit user account mapping policies.
For instructions, see "How to Log On Using SunLink Server Manager". To make any changes, you must be logged on as root.
-
Double-click Policies.
-
Double-click User Account Mapping.
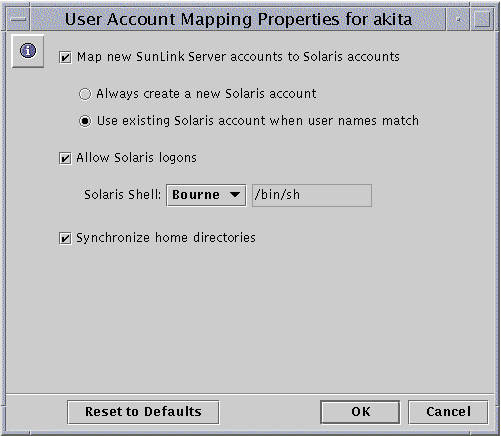
The following screen appears.
-
Establish or edit user account mapping policies according to the following guidelines (see "User Account Mapping for /etc/passwd Files" for background information on these policies):
-
Check "Map new SunLink Server accounts to Solaris accounts" to create a unique Solaris account for a user simultaneously with the creation of his or her new account in the Windows NT domain served by the SunLink Server system. If you have checked this option, you then have other options, described in the remainder of this list.
-
Choose the option of always creating a new Solaris account for the user, or using a Solaris account that exists for the user. Note that a Solaris account exists independently of both Windows NT and SunLink Server systems.
Note -Checking the "Always create a new Solaris account" option will cause the system to create a new Solaris account by way of a local /etc/passwd file only. If your site uses a Solaris name service such as NIS or NIS+, do not check this option.
-
Choose whether to permit a user with a Solaris account to use that account independently of NT and SunLink Server software, by checking "Allow Solaris logons" or leaving it unchecked. If you choose to permit Solaris logons, use the "Solaris shell" drop-down list to choose a command shell, or choose Other and enter the shell name in the text field.
-
Choose "Synchronize Home directories" for automatic synchronization of SunLink Server home directories with Solaris home directories. (See the following note.)
Note -The "Synchronize Home directories" option is useful only to those sites that use the mapuname command to associate Windows NT and Solaris accounts, and who keep their Solaris accounts in a local /etc/passwd file (that is, those who do not use NIS or NIS+ name services). If this is the case and you choose this option, then if you use the Windows NT User Manager tool to change the user's Windows NT home directory to a shared path on the SunLink Server system, it edits /etc/passwd so that the user's Solaris account has the same home directory on the server.
-
-
Click OK, Cancel, or Reset to Defaults.
How to Secure SunLink Server Manager Transactions
-
Using SunLink Server Manager, log on to, and then open, the SunLink Server system for which you want to establish SunLink Server Manager security policies.
For instructions, see "How to Log On Using SunLink Server Manager". To make any changes, you must be logged on as root.
-
Double-click Policies.
-
Double-click SunLink Server Manager Security.
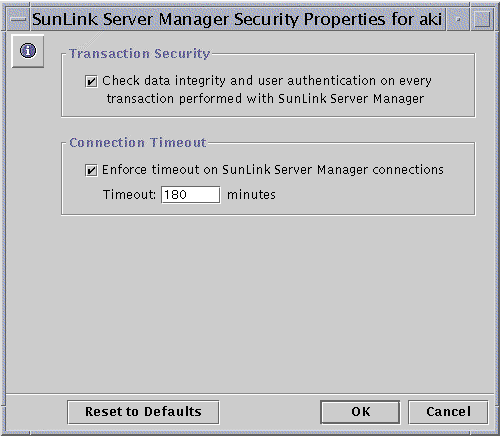
The following screen appears.
-
Do one or both of the following:
-
Check the Transaction Security box to require user authentication for SunLink Server Manager transactions and to invoke public key signatures to protect data that is passed between the server and clients.
-
Click the Connection Timeout box to specify a period of time after which SunLink Server Manager connections expire. Specify the time period in the provided text field.
-
-
Click OK, Cancel, or Reset to Defaults.
- © 2010, Oracle Corporation and/or its affiliates
