User Account Management Utilities
SunLink Server software provides a pair of Solaris user account management utilities, called passwd2sam and sam2passwd.
passwd2sam
The passwd2sam user account management utility places user account information that is stored in a Solaris name service--such as FILES, NIS, and NIS+--into the SunLink Server Security Account Manager (SAM) database. If the SunLink Server system is configured as a BDC in an existing Windows NT domain, passwd2sam operations will transfer to the domain's PDC.
Note -
Using this utility does not add users' passwords to the SunLink Server SAM database, because passwords are one-way encrypted; that is, they cannot be decrypted for automatic transfer from one account to the other.
The passwd2sam user account management utility supports three modes of operation:
-
It adds Solaris user accounts into the SunLink Server Security Accounts Manager database. This is the default mode of operation. Solaris user accounts can be added from the running Solaris name service or by a user-specified /etc/passwd formatted input file.
-
It deletes Solaris user accounts from the SunLink Server Security Accounts Manager database. Solaris user accounts are deleted from the SunLink Server program by a user-specified /etc/passwd formatted input file.
-
It finds and disables Windows NT domain user accounts that have been added by passwd2sam and subsequently deleted from a Solaris name service. This mode will find and disable SunLink Server user accounts that have been removed from a Solaris name service.
You must format all input files to passwd2sam as /etc/passwd entries. See the passwd2sam(1) man page for details on invocation options and arguments.
sam2passwd
The other user account management utility provided by SunLink Server software is sam2passwd. The sam2passwd user account management utility records SunLink Server user accounts, and then creates the following /etc/passwd formatted file containing the SunLink Server user accounts:
/var/opt/lanman/dirsync/sam2passwd.passwd
This file contains non-privileged SunLink Server user accounts that you can add to Solaris name service maps or to a local /etc/passwd file (on which you then run the /user/bin/pwconv command).
The sam2passwd utility is provided to assist you in migrating user accounts into your running Solaris name service, but does not actually perform the operation. See the sam2passwd(1) man page for details on invocation options and arguments.
How to Change Computer Browsing Policy
-
Using SunLink Server Manager, log on to, and then open, the SunLink Server system whose browsing properties you want to change.
For instructions, see "How to Log On Using SunLink Server Manager". To make any changes, you must be logged on as root.
-
Double-click Policies.
-
Double-click Computer Browsing.
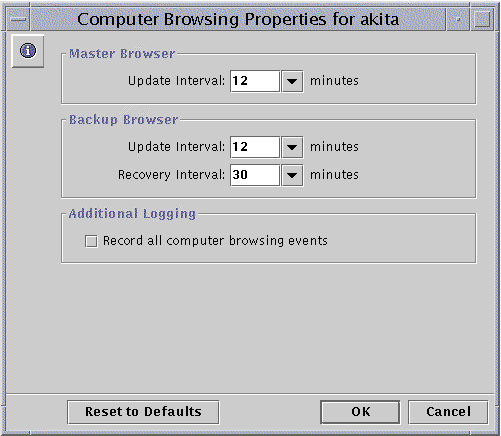
The following screen appears.
-
Using the provided drop-down lists and check box, make any changes to the Master Browser and Backup Browser update and recovery intervals, and list of browsing events that should be included.
Checking "Record all computer browsing events" makes the event list more inclusive than the default.
Note that you must enter a value greater than "0" for both the Master and the Backup browsers' update intervals.
-
Click OK, Cancel, or Reset to Defaults.
If you click OK to make any changes, SunLink Server Manager will automatically stop and then restart your browsing service to make the changes effective.
How to Set Up File Name Mapping
-
Using SunLink Server Manager, log on to, and then open, the SunLink Server system on which you want to set up or edit file name mapping policies.
For instructions, see "How to Log On Using SunLink Server Manager". To make any changes, you must be logged on as root.
-
Double-click Policies.
-
Double-click File Name Mapping.
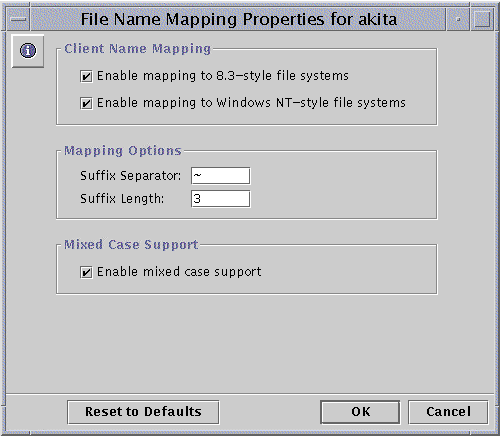
The following screen appears.
-
Create or change file name mapping policies according to the following guidelines:
-
Check "Enable mapping to 8.3-style file systems" if some of your client machines are running Windows for Workgroups.
-
Check "Enable mapping to Windows NT-style file systems" so that Solaris file names with characters that are invalid in Windows NT are changed to "legal" characters.
-
Enter a new value in the Suffix Separator text field if you have reason to change the default; the default separator is a tilde ( ~ ).
-
Enter a new value in the Suffix Length text field if you have reason to change the default from three. This value does not include the separator.
-
Check "Enable mixed-case support" if you want to allow file names to be created with both uppercase and lowercase characters, and you want case to be a factor in finding files. Note that checking this box may degrade performance.
-
-
Click OK, Cancel, or Reset to Defaults.
How to Edit NetBIOS Policy
-
Using SunLink Server Manager, log on to and then open the SunLink Server system on which you want to set NetBIOS policies.
For instructions, see "How to Log On Using SunLink Server Manager". To make any changes, you must be logged on as root.
-
Double-click Policies.
-
Double-click NetBIOS.
The following screen appears.
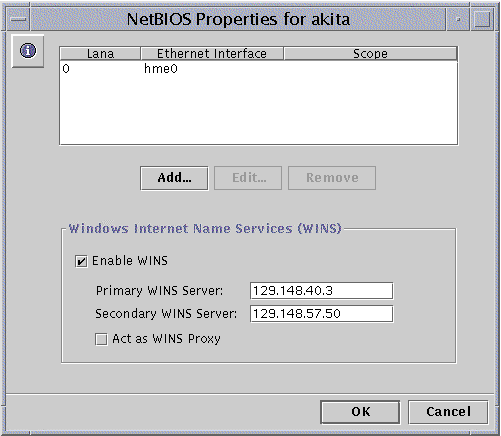
The NetBIOS Properties wizard displays a table of available network devices, their automatically assigned Lana numbers, and their scope (if assigned). The wizard enables you to add, edit, or remove an Ethernet interface Lana entry.
-
In the Ethernet Interface table, click to highlight the name of the device that you want to configure.
For background information on NetBIOS, see "NetBIOS".
-
Choose whether you want to add, edit, or remove an interface and its Lana entry.
-
If you want to add an interface and Lana entry, go on to the next step.
-
If you want to edit an interface and Lana entry, go to Step 7.
-
If you want to remove an interface and Lana entry, go on to Step 8.
-
-
Click Add.
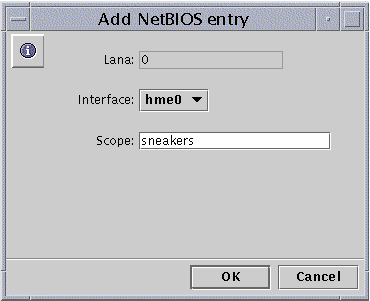
The following screen appears.
-
Click the drop-down Interface list to choose the available interface you want to add.
-
(Optional) In the Scope text field, type the name of the scope that you want the added device to serve.
The scope name can contain a maximum of 63 characters consisting of the uppercase or lowercase letters A-Z, the numerals 0-9, and all standard symbols.
-
Click OK.
-
-
Click Edit.
The following screen appears.
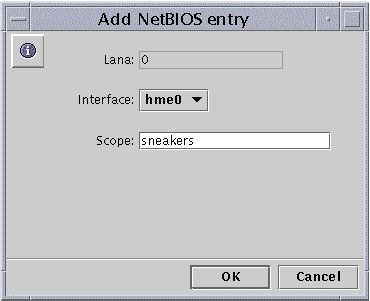
-
Click the drop-down Interface list to assign a different available interface to the local system.
-
(Optional) In the Scope text field, edit or create the name of the scope that you want the edited device to serve.
The scope name can contain a maximum of 63 characters consisting of the uppercase or lowercase letters A-Z, the numerals 0-9, and all standard symbols.
-
Click OK.
-
-
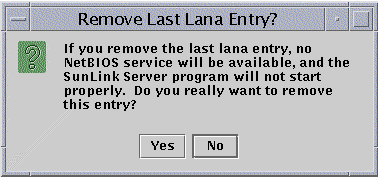
Click Remove.
In the event that you attempt to remove the only interface available for this machine, the following screen will appear.
How to Configure WINS
-
Using SunLink Server Manager, log on to and then open the SunLink Server system on which you want to configure the WINS service.
For instructions, see "How to Log On Using SunLink Server Manager". To make any changes, you must be logged on as root.
-
Double-click Policies.
-
Double-click NetBIOS.
The following screen appears.
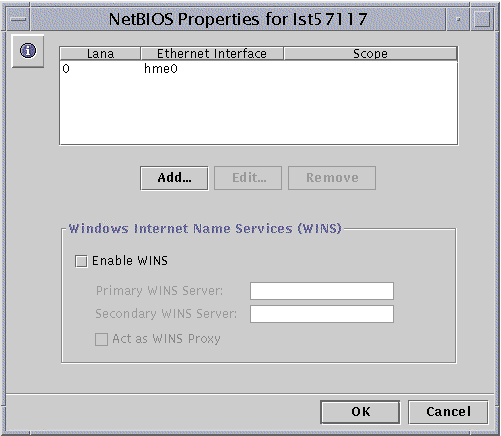
The NetBIOS Properties wizard displays a table of available WINS configuration choices:
-
Choose whether the Windows Internet Name Service (WINS) is enabled.
-
Choose whether the system you are configuring will be a WINS proxy.
-
Identify, by IP address, primary and secondary WINS servers.
-
-
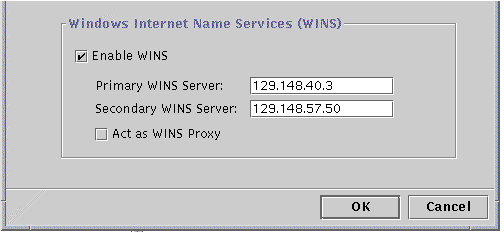
To enable WINS on the local system, click the checkbox next to Enable WINS.
The screen changes to activate three WINS configuration choices:
-
Primary WINS Server
-
Secondary WINS Server
-
WINS Proxy
-
-
In the corresponding text fields, type in the IP addresses for the Primary and, optionally, Secondary WINS servers.
See "WINS Proxy" for a description of primary and secondary WINS servers.
-
Choose whether you want the system to act as a WINS Proxy.
See "WINS Proxy" for a description.
-
Click OK.
The following screen appears, notifying you that the SunLink Server program and the NetBIOS driver must be restarted for changes to take effect:.
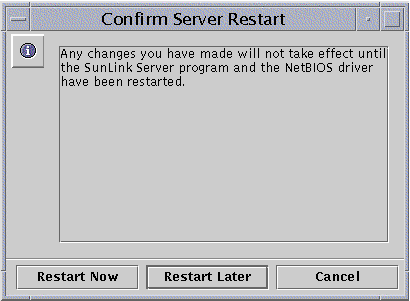
Choose whether to stop and restart the program immediately, restart the program later, or cancel the changes you made.
None of the changes you have designated will become effective until the next time you start the SunLink Server program.
Note -The Enable WINS option does not start the WINS service automatically after the SunLink Server program is restarted. You need to start the service manually by typing net start wins at the system's command line, or by using SunLink Server Manager. For instructions, see "How to Start Individual Services". You can configure the SunLink Server program to start the WINS service automatically, however, by editing the lanman.ini file. See "How to Start the WINS Service Automatically".
How to Start the WINS Service at the Command Line
How to Start the WINS Service Automatically
-
Edit the lanman.ini file to include wins in the srvservices parameter.
See the section "About lanman.ini File Entries" for editing instructions, and "File Parameters" for the location of the srvservices parameter.
How to Set Solaris File System Integration Policies
-
Using SunLink Server Manager, log on to and then open the SunLink Server system on which you want to set Solaris file system integration policies.
For instructions, see "How to Log On Using SunLink Server Manager". To make any changes, you must be logged on as root.
-
Double-click Policies.
-
Double-click Solaris File System Integration.
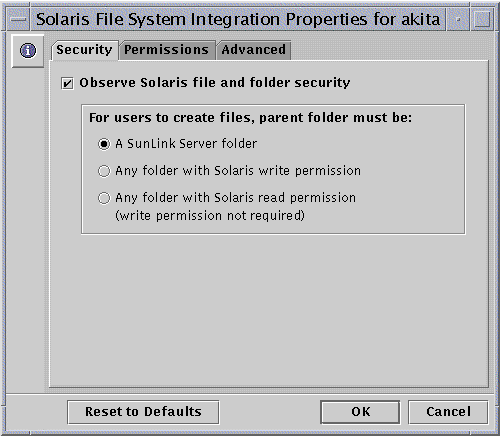
The following screen appears.
-
Set SunLink Server file creation policies according to the following guidelines, using the Security, Permissions, or Advanced tabs:
-
Security - To establish policy for file creation within SunLink Server folders:
-
Ignore Solaris permissions - Leave unchecked the "Observe Solaris file and folder security" option to ignore Solaris permissions. With this option unchecked, Windows NT file and directory permissions are the only permissions that will prevail over file and directory creation and access for reading. SunLink Server software users with appropriate Windows NT permissions can create files within SunLink Server folders.
-
Observe Solaris permissions - Check "Observe Solaris file and folder security" and "A SunLink Server folder" to require users to have Solaris Write permission to create a file within a SunLink Server folder only--it will not affect any other Solaris file system folder. Check "Any folder with Solaris write permission" to ease the restriction, by enabling SunLink Server software users to create files within SunLink Server folders and any other Solaris file system folder. Check "Any folder with Solaris read permission" to specify that only minimal Solaris permissions be in place on any SunLink Server folder or other Solaris folder (in effect, this option grants Write permission to any Solaris operating environment-based folder).
-
-
Permissions - To establish default User, Group, and Other file and folder permissions, check the box next to the permissions that you want to set.
-
Advanced - To cause SunLink Server software to observe Windows NT file locking--thereby preventing users with Solaris accounts from accessing the locked files--check the box under File Locking. (Note that checking this box may slow down performance.)
-
-
Click OK, Cancel, or Reset to Defaults.
How to Use UPS Power Failure Notification
-
Using SunLink Server Manager, log on to, and then open, the SunLink Server system from which you want to send a UPS power failure notice.
For instructions, see "How to Log On Using SunLink Server Manager". To make any changes, you must be logged on as root.
-
Double-click Policies.
-
Double-click UPS Power Failure Notification.
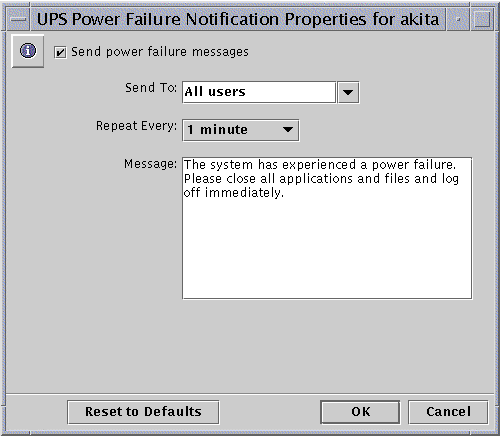
The following screen appears.
-
Check "Send power failure messages."
-
Either select from the drop-down list, or type directly into the text field, the NetBIOS names of all the users or systems that you want to notify.
Select All Users if you want to send the message to everyone.
-
Using the drop-down list, designate how often you want the notification to be repeated.
-
In the Message text field, type the message that you want to send.
-
Click OK, Cancel, or Reset to Defaults.
How to Edit User Account Mapping Policies
-
Using SunLink Server Manager, log on to, and then open, the SunLink Server system for which you want to establish or edit user account mapping policies.
For instructions, see "How to Log On Using SunLink Server Manager". To make any changes, you must be logged on as root.
-
Double-click Policies.
-
Double-click User Account Mapping.
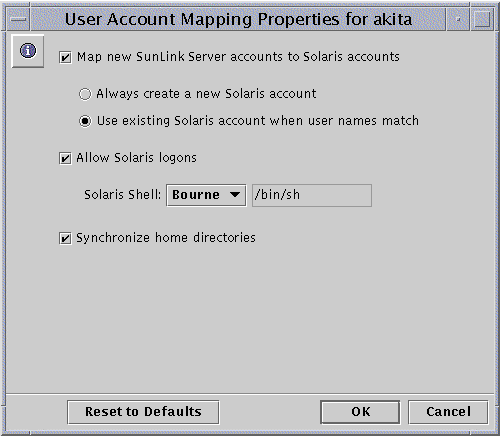
The following screen appears.
-
Establish or edit user account mapping policies according to the following guidelines (see "User Account Mapping for /etc/passwd Files" for background information on these policies):
-
Check "Map new SunLink Server accounts to Solaris accounts" to create a unique Solaris account for a user simultaneously with the creation of his or her new account in the Windows NT domain served by the SunLink Server system. If you have checked this option, you then have other options, described in the remainder of this list.
-
Choose the option of always creating a new Solaris account for the user, or using a Solaris account that exists for the user. Note that a Solaris account exists independently of both Windows NT and SunLink Server systems.
Note -Checking the "Always create a new Solaris account" option will cause the system to create a new Solaris account by way of a local /etc/passwd file only. If your site uses a Solaris name service such as NIS or NIS+, do not check this option.
-
Choose whether to permit a user with a Solaris account to use that account independently of NT and SunLink Server software, by checking "Allow Solaris logons" or leaving it unchecked. If you choose to permit Solaris logons, use the "Solaris shell" drop-down list to choose a command shell, or choose Other and enter the shell name in the text field.
-
Choose "Synchronize Home directories" for automatic synchronization of SunLink Server home directories with Solaris home directories. (See the following note.)
Note -The "Synchronize Home directories" option is useful only to those sites that use the mapuname command to associate Windows NT and Solaris accounts, and who keep their Solaris accounts in a local /etc/passwd file (that is, those who do not use NIS or NIS+ name services). If this is the case and you choose this option, then if you use the Windows NT User Manager tool to change the user's Windows NT home directory to a shared path on the SunLink Server system, it edits /etc/passwd so that the user's Solaris account has the same home directory on the server.
-
-
Click OK, Cancel, or Reset to Defaults.
How to Secure SunLink Server Manager Transactions
-
Using SunLink Server Manager, log on to, and then open, the SunLink Server system for which you want to establish SunLink Server Manager security policies.
For instructions, see "How to Log On Using SunLink Server Manager". To make any changes, you must be logged on as root.
-
Double-click Policies.
-
Double-click SunLink Server Manager Security.
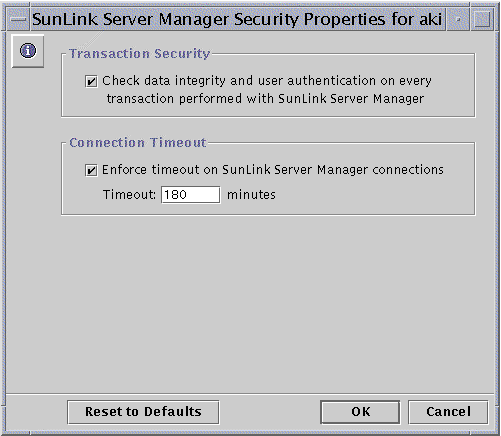
The following screen appears.
-
Do one or both of the following:
-
Check the Transaction Security box to require user authentication for SunLink Server Manager transactions and to invoke public key signatures to protect data that is passed between the server and clients.
-
Click the Connection Timeout box to specify a period of time after which SunLink Server Manager connections expire. Specify the time period in the provided text field.
-
-
Click OK, Cancel, or Reset to Defaults.
- © 2010, Oracle Corporation and/or its affiliates
