| Sun XV-500 Graphics Accelerator Installation Guide |
| Sun XV-500 Graphics Accelerator Installation Guide |
| C H A P T E R 3 |
|
Installing the Sun XVR-500 Graphics Accelerator Hardware |
This chapter provides Sun XVR-500 graphics accelerator hardware installation information.
Refer to the Solaris Handbook for Sun Peripherals that corresponds to your operating environment. The handbook describes how to shut down the system safely before installing any internal boards and before rebooting your system after installation.
TABLE 3-1 shows the maximum number of Sun XVR-500 graphics accelerators supported in Sun systems. See Chapter 4 for information on using multiple displays.
Refer to the following hardware documentation provided with your Sun system for detailed instructions on installing Sun PCI bus graphics boards:
Access this documentation at: http://www.sun.com/documentation
|
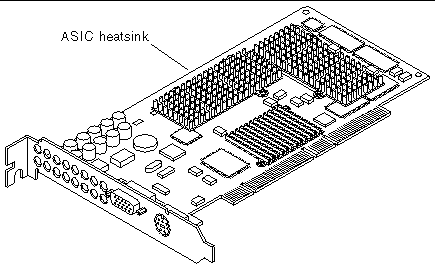
Note - The Sun XVR-500 graphics accelerator contains an ASIC heatsink (FIGURE 3-1) that you may notice to have a spring motion. This is designed to help protect the ASIC. |
The Sun XVR-500 graphics accelerator connects into the 66-Mhz or 33-Mhz PCI connector on the Sun Blade 1000 and 2000 motherboard. The 33-Mhz PCI connectors are the three slots located closest to the CPU module. The PCI slots are labelled on the Sun Blade 1000 and 2000 backpanel. The Sun Blade 1000 and 2000 systems support up to four Sun XVR-500 graphics accelerators.
1. Shut down your system and attach the antistatic wrist strap.
2. Remove the Sun Blade 1000 or 2000 access panel and lay the system on its side.
3. Position the Sun XVR-500 graphics accelerator in the chassis (FIGURE 3-2).
4. Guide the graphics board bracket tab into the chassis backpanel opening.
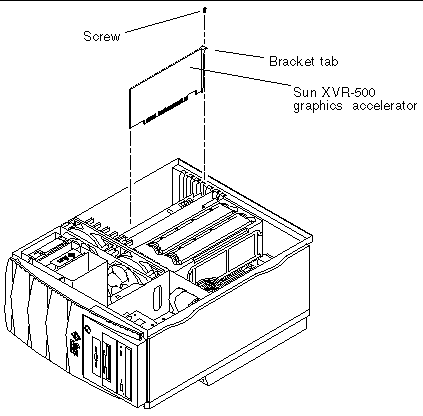
5. Holding the two upper corners of the graphics board, push the board straight down into the connector until the board is fully seated.
6. Replace the Phillips screw securing the graphics board bracket tab to the system chassis.
7. Replace the side access cover.
To run more than one frame buffer, you must modify your /etc/dt/config/Xservers file. The Sun XVR-500 graphics accelerator device is identified as ifbx (for example, ifb0 and ifb1 for two Sun XVR-500 graphics accelerator devices). To modify the file:
1. Become superuser and open the /etc/dt/config/Xservers file.
# cd /etc/dt/config # vi Xservers |
If the /etc/dt/config/Xservers file does not exist, create the /etc/dt/config directory and copy the Xservers file from /usr/dt/config/Xservers to /etc/dt/config.
# mkdir -p /etc/dt/config # cp /usr/dt/config/Xservers /etc/dt/config # cd /etc/dt/config # vi Xservers |
2. Modify the file by adding the device locations for the applicable frame buffers being used.
The following example shows the Xservers configuration file modified for one
Sun Creator board and two Sun XVR-500 graphics accelerators:
:0 Local local_uid@console root /usr/openwin/bin/Xsun -dev /dev/fbs/ffb0 -dev /dev/fbs/ifb1 -dev /dev/fbs/ifb0 |
For most installations, the Sun XVR-500 graphics accelerator automatically configures itself to the proper screen resolution and refresh rate for your monitor. If a Sun monitor, however, is not connected to the Sun XVR-500 graphics accelerator, the monitor may have the wrong screen resolution. To change the screen resolution, use the fbconfig utility.
| Sun XV-500 Graphics Accelerator Installation Guide | 816-3028-11 |
Copyright © 2002, Sun Microsystems, Inc. All rights reserved.