| Previous Contents Index DocHome Next |
| Application Builder 6.0 iPlanet Application Builder User's Guide |
Chapter 2 Setting Application Builder Options
This chapter describes how to set and change the iPlanet Application Builder options.The following topics are described in this chapter:
About iPlanet Application Builder Options
About iPlanet Application Builder Options
In iPlanet Application Builder, you can set options to customize your work environment. Options for the project itself are found under the Project menu on the Project Options dialog box. Project options include the ability to specify which HTML page serves as your project's start page during testing and which files will serve as the base classes in your project.You can also set options for your development environment. Options for the development environment are found under the Tools menu on the Development Options dialog box. Examples of development options include which external code editor to use with iPlanet Application Builder, if any, and which web browser to use for viewing HTML pages.
In addition, iPlanet Application Builder also allows you to set runtime options, which affect the runtime characteristics of the iPlanet Application Server used to run your application. Runtime options are found under the Tools menu on the Runtime Options dialog box. Typically, you do not need to change these settings often. Changes may be necessary, for example, if any IP addresses change or if you need to relocate files to a different directory.
Setting Project Options
iPlanet Application Builder allows you to perform the following tasks by pulling down the Project menu, then choosing Project Options:
Setting the Start Page
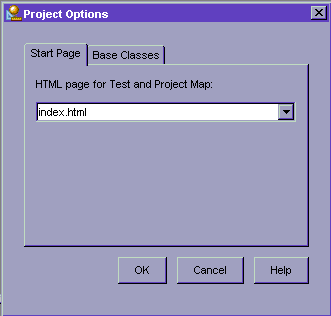
Setting the Start Page
iPlanet Application Builder allows you to test a project before deploying it. Each time you successfully test your project, iPlanet Application Builder launches your application from a specified start page. If your project includes an index.html page, it is automatically designated the start page until you specify otherwise. You may want to specify a start page other than index.html if, for example, you want to test only a portion of your project. The page you specify applies only to testing. For more information, see Testing Applications in the chapter titled "Compiling, Testing, and Debugging Applications."To set the start page, click the Start Page tab, then choose an HTML page as shown in the following figure:
Setting Base Classes
The Base Classes tab enables you to specify files other than those iPlanet Application Builder creates by default to serve as the base classes of your application.A base servlet class enables you to reduce redundant coding by centralizing application functionality and letting other servlets inherit from it.
You may want to specify several different Java files to serve as base servlets in your project if, for example, multiple members of a team are simultaneously working on a iPlanet Application Builder project.
To specify which file serves as the base servlet class for your project, click the Base Classes tab, then choose a file from the Base Servlets list, which identifies the classes that you can use as a base servlet for your project.
Setting Development Options
You can establish customized settings for the following features:
Startup behavior for iPlanet Application Builder
You can customize these settings by pulling down the Tools menu, then choosing Development Options.Standard or enhanced code generation
Setting Startup Options
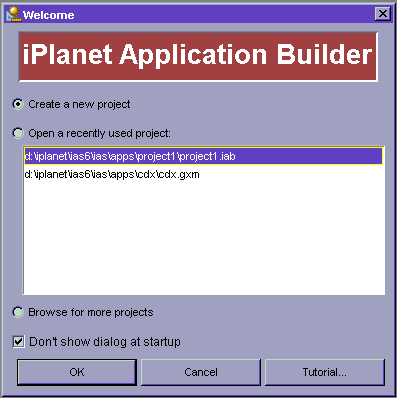
The Startup tab enables you to specify how iPlanet Application Builder behaves when it is launched. This tab is particularly useful if, upon opening iPlanet Application Builder, you select the "Don't show dialog at startup" checkbox on the Welcome dialog box:
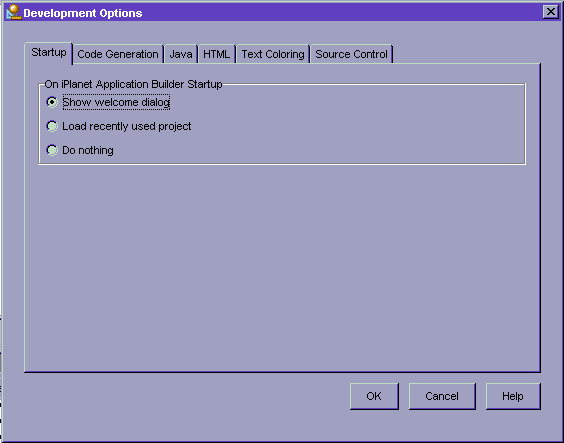
If you want the Welcome dialog box to appear next time you start iPlanet Application Builder, click the Startup tab in Development Options, then select the appropriate option button as shown in the following figure:
If you choose "Don't show dialog at startup," iPlanet Application Builder changes the Startup development option to "Load most recently used project," which automatically loads the last project. If you do not want either option, you can choose "Do nothing."
Setting Code Generation Options
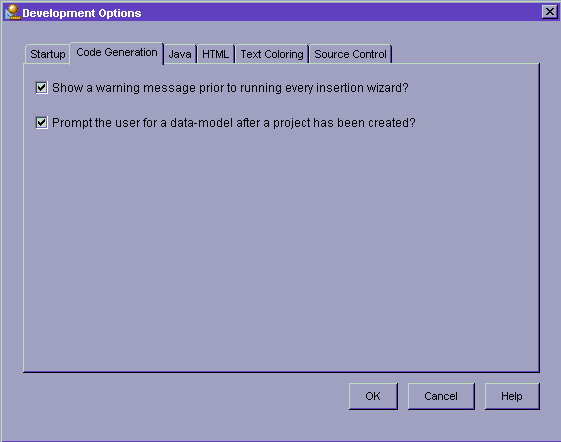
The Code Generation tab allows you to specify the kind of code that iAB generates and to specify other options related to code generation. To set Code Generation options, click the Code Generation tab as shown in the following figure:
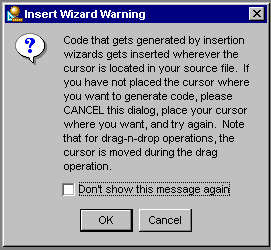
Check "Show a warning message prior to every running insertion wizard?" if you want to be reminded to set the cursor where code will be generated. If checked, the following message will appear each time you insert code using a wizard:
You can uncheck the Code Generation option or check the "Don't show this message again" box in the warning dialog box itself, which also unchecks the Code Generation option.
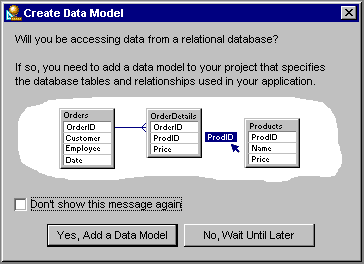
Check "Prompt the user for a data model after a project has been created?" if you want to be reminded to create a data model whenever you create a project. If checked, the following message will appear each time you choose New Project from the File menu:
You can uncheck the Code Generation option or check the "Don't show this message again" box in the warning dialog box itself, which also unchecks the Code Generation option.
Setting Java Compiler Options
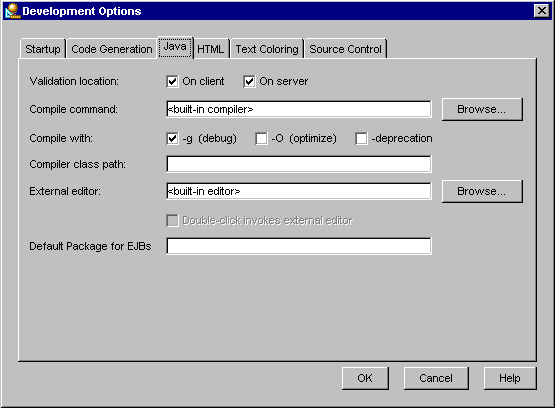
The Java tab allows you to customize the behavior of the Java compiler. For instance, you may specify an external compiler and set compiler options. To set Java compiler options, click the Java tab as shown in the following figure:
If you specify an external compiler on the Java tab, iPlanet Application Builder uses the specified compiler rather than the built-in compiler.
If you specify an external Java editor, but do not select the "Double-click invokes external editor" checkbox, iPlanet Application Builder continues to launch its built-in editor. You can opt to open Java files with your external editor by choosing the Open With option found under the Edit menu or by enabling the Double-click Invokes External Editor checkbox on the Java tab.
Setting HTML Options
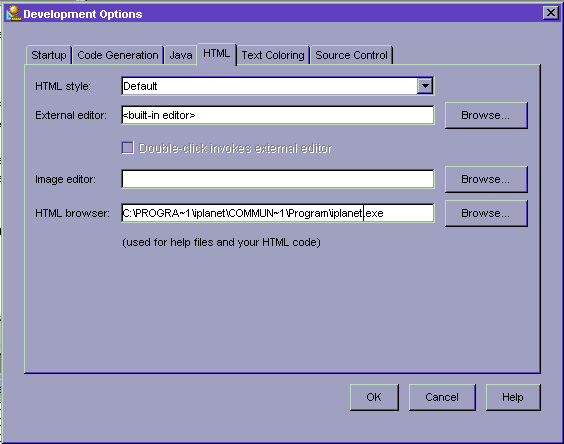
The HTML tab enables you to specify which HTML style to use in your project pages and JavaServer Pages (JSPs). You can also specify which external editor to use to create HTML pages, which image editor to use to modify images, and which HTML browser to use to view HTML pages and JSPs. To set HTML options, click the HTML tab:
Each HTML style has its own set of colors and font styles. The HTML style you choose defines the appearance of the HTML pages and JSPs in your project. For more information about HTML pages and JavaServer Pages, see in "Creating Presentation Layout."
If you specify an external image editor on the HTML tab, iPlanet Application Builder launches that application each time you open an image file. If you specify an external HTML editor, but do not select the "Double-click invokes external editor" checkbox, iPlanet Application Builder continues to launch its built-in editor. You can opt to open HTML files with your external editor by choosing the Open With option found under the Edit menu or by enabling the Double-click Invokes External Editor checkbox on the HTML tab.
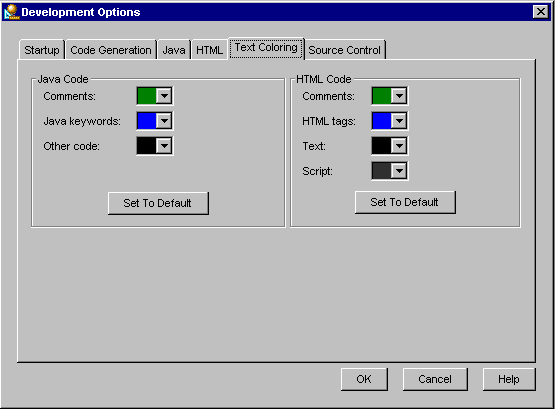
Setting Text Colors
The Text Coloring tab enables you to customize the color of the code appearing in an editor window. For instance, you may specify that Java keywords within your code appear in red text. These options apply only to editors built in to iPlanet Application Builder.To set text coloring options, click the Text Coloring tab to display the following dialog box:
Click Help for detailed information about each text coloring option.
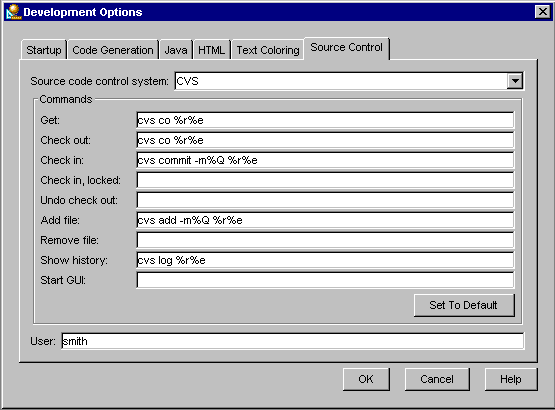
Setting Source Control Options
The Source Control tab enables you to specify the external source control program and associated commands. For detailed information on source code control, see "Working with Source Control." To set source control options, click the Source Control tab.
You can choose your Source code control system from the drop-down list and make changes to the commands. If you click on Set To Default, the default values you specified to commands will be replaced by the original values that were set when you installed iPlanet Application Builder.
Setting Runtime Options
iPlanet Application Builder enables you to perform the following tasks associated with the runtime characteristics of the iPlanet Application Server used to run your application:
Changing the Product Key
You can perform these tasks by pulling down the Tools menu, then choosing Runtime Options.
Changing the Product Key
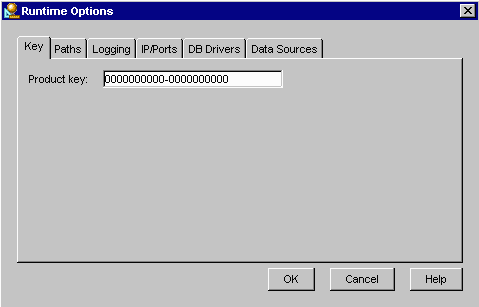
Every purchase of iPlanet Application Builder comes with a unique license number called a product key. If you are evaluating iPlanet Application Builder for purchase, you use an evaluation key—a temporary product key that expires after a certain time.After the evaluation key expires, you can no longer start the runtime server. To prevent this from happening, you must purchase iPlanet Application Builder and enter the new, nonexpiring product key.
Instead of re-installing iPlanet Application Builder and supplying the new product key during installation, you can change the product key in your current installation. To do so, pull down the Tools menu. Choose Runtime Options and enter the product key in the Product Key field.
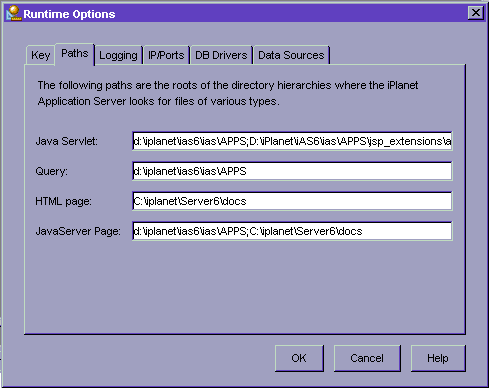
Changing File Pathnames
When a web application is called on to display a page or to execute code, the application looks in particular directories for the files it needs. These file path names are set by the user who installs iPlanet Application Builder. However, if the file system has been reorganized, you may need to change the path names.To change file path names, click the Paths tab to display the following dialog box:
On this tab, you may replace or append existing text. If you specify multiple path names in one text field, directories are searched in order, starting from the left. Use a semicolon as a separator between path names.
To enable the application server to access the HTML directory for its JSP engine, you should include the HTML page directory path name in the JSP text field.
Setting Options for Message Logging
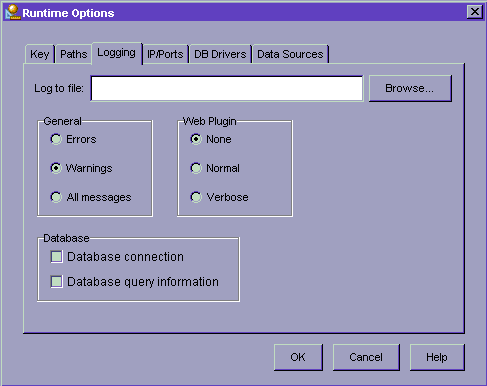
iPlanet Application Server logs the messages generated by application-level and system-level services. These messages describe events that occur while a service is running. You may want to change the amount and type of information that the iPlanet Application Server logs. For example, you can increase the amount of message logging to help diagnose problems; increased logging provides more information about errors and warnings. On the other hand, you can decrease the amount of message logging to use less disk space and increase server speed.To change the amount and type of information logged, click the Logging Tab:
The Logging tab in iPlanet Application Builder allows you to specify the names of the log files and preferences for the kind and amount of information written to these files.
If you specify a file name for Log To File, a log file is created for the Java server port and the kxs server port. You can determine the port numbers associated with these ports by clicking on the IP/Ports tab. iPlanet Application Builder appends the name of the port to the log file name. For example, if you specify iabr.log as the filename and your ports are 10818 and 10819, respectively, iPlanet Application Builder creates log files with the names iabr.log.10818 and iabr.log.10819.
If you do not specify an absolute path, the files relative to the directory in which you started iAB; for example, if you start iAB from the desktop, the directory is <iab_root>\iab60\bin. If you specify an absolute path, all directories in the path must already exist; they are not created for you. If you do not specify a file name for Log To File, these files are not created.
In addition to the iAB logs, iAS provides additional logs that are manipulated from the iAS Administrator. For more information, see the iAS Administration and Deployment Guide.
The Logging types specify the information you want to log. Logging types are described briefly in the following table:
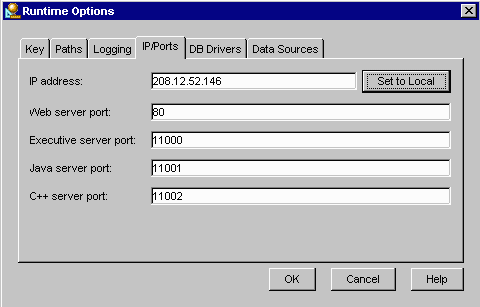
Setting Server IDs
When you install iPlanet Application Builder, you either supply addresses or accept default values for the following in the runtime environment:Three of these values, Executive server port, Javaserver port, and C++ server port, correspond to iPlanet Application Server's internal servers. The remaining values, web server port and IP address, correspond to the web server you use with iPlanet Application Builder and the IP address of your local machine, respectively.
If any of these values change, you must update iPlanet Application Builder to match the new values. Instead of re-installing iPlanet Application Builder each time a setting changes, you can change server IDs by clicking the IP/Ports tab as shown in the previous figure. The values are not necessarily dependent on each other; in other words, you may change one value without changing other values.
If you want to update your IP address, click Set to Local; your machine's current address automatically appears in the IP address field.
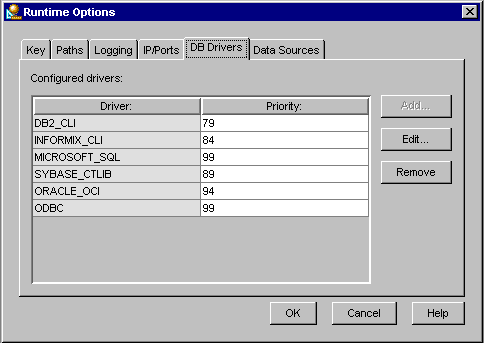
Configuring Database Drivers
When you install iPlanet Application Builder, you specify the drivers that enable connectivity to a backend database. If you need to add, remove, or change database connectivity after installing iPlanet Application Builder, click the DB Drivers tab as shown in the following figure:
You can use the Add, Edit, or Remove buttons as needed to modify database connectivity settings. Click Help for detailed information about each option.
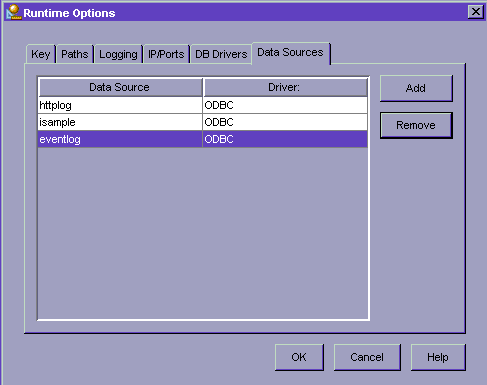
Configuring Data Sources
A data source is a logical definition of a backend connection. Whenever you need to add, remove, or modify your database connectivity, you must configure the data sources. To do so, click the Data Sources tab as shown in the following figure:
You can add or remove a data source as needed. To edit the name of a data source, you can type directly in the Data Source text field. To change driver information, use the Driver drop-down list.
Customizing the Palette
The palette is made up of palette pages that can be accessed by tabs at the bottom of the window. The HTML, Form, JSP, and RDBM tabs on the palette are locked, which means that you cannot delete them or remove any components from them. You can create new, unlocked pages using the methods described in the following table.
Previous Contents Index DocHome Next
Copyright © 2000 Sun Microsystems, Inc. Some preexisting portions Copyright © 2000 Netscape Communications Corp. All rights reserved.
Last Updated April 28, 2000