Chapter 3
Filling the Database
- Controlling Where the Robot Goes
- Controlling What the Robot Gets
NOTE: If you are upgrading from Netscape Catalog Server 1.0, you will probably want to migrate your existing Catalog Server configuration and content to the Compass Server. The migration process is explained in Migrating from Catalog Server 1.0.As administrator, you have a great deal of control over where your robots go to locate resources and what they do when they get there. The Server Manager provides two separate areas for configuring robots: one for setting operational parameters and the other for defining robot rules.
About Robots
Compass Servers use robots to find and report on the resources in their domains. A robot is a small program that does two things:- Extracts and follows links to resources (also called enumeration or crawling)
- Describes those resources and puts the descriptions in the database (also called generation or indexing)
- You define when the robot runs (described in Controlling the Robot) and how aggressively it searches (described in Configuring Crawling Settings).
- You define the site s the robot visits to start looking for resources. This is described in Controlling Where the Robot Goes.
- You determine what types of resources the robot indexes by defining filters, as described in Controlling What the Robot Gets.
- Once the robot locates resources you of the right types on the sites you define, you also determine the kind of entry it creates for the database, as explained in Controlling What the Robot Generates.
- After all those, you need to be able to ensure that the robot has done what you wanted. The Compass Server provides several tools for that, as explained in Checking Database Contents.
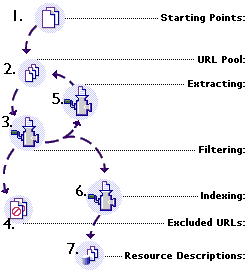
- Everything starts with a list of starting points. These are the URLs you want the robot to visit each time it starts a new run.
- When you start the robot, it copies the list of starting points (1) into the URL pool. This is a list of URLs that the robot will check out. Later, as the robot visits sites and retrieves pages, it discovers links to other resources, which it adds to the URL pool for further investigation. The robot continues processing until the URL pool is empty, at which point it becomes idle.
- For each URL in the URL pool (2), the robot applies a set of filters. The basic question it asks about each one is "Should I process this further?" If the answer is "no," it places the URL in the excluded URLs (4). Before applying filters, the robot checks to make sure it hasn't already processed the URL. Even if the robot encounters numerous links to the same page, it will process it at most once, preventing duplicate entries in the database.
- The extracting (or enumeration) phase is where the robot examines each resource for references to other resources it should check out. For example, while processing a web page, it finds all the hyperlinks and adds them to the link pool (2) for further processing.
- The indexing phase is where the robot actually creates a resource description for each filtered URL and places the resource description in the database (7).
- The database holds the resource descriptions for all the resources that make it through the filters (3) into the indexing phase (6). Using the Compass Server, network users can query the database to produce lists of resources that match their search criteria.
There are two kinds of tests the robot applies to each URL: site definitions
and filters. A site definition determines whether the URL is part of a site that
should be included in the database. This is how you limit the database to
specific servers, groups of servers, or domains (such as entire companies or
organizations). A filter determines whether the URL represents a type of
resource you want to include in the database. You can choose, for example,
to include text files, but exclude spreadsheets or binary files.
If a URL passes both the site definitions and the filters, the robot queues it
up for two further kinds of processing: extracting (5) and indexing (6).
About Extraction
Extraction is the process of discovering or locating resources to be included in the database. The robot starts with a list of locations called its starting points (in the form of standard URLs) from which to start looking for resources. The robot iterates through this list of URLs, looking at each resource it retrieves for references to other resources. Every time it finds a URL in a resource, it adds it to the list of URLs to examine. The result is a dynamic list of URLs called the URL pool.Depending on the nature of each URL provided, the robot might either generate a resource description (if the URL denotes a resource of a type it should index) or track down links to other resources. The robot carries a database of the URLs already enumerated and checksum data on those URLs so that it can skip resources already enumerated. This prevents recursive or infinite looping. The goal of the extraction process is to discover all the resources in the sites specified by the initial URL list and to filter out references to unwanted items. Extraction is explained in more detail in Controlling Where the Robot Goes.
About Indexing
Indexing is the phase in which the robot takes all the information it has gathered on a resource and turns it into a resource description for inclusion in the Compass Server database. This mostly involves putting information in the proper fields, as defined by the database schema, and also generating some of the fields, such as the creation date, keywords, partial text, and so on.
You can customize some aspects of resource-description generation, as described in Controlling What the Robot Generates. There is also a great deal more detail on indexing in the Netscape Compass Server Programmer's Guide.
Starting, Stopping, and State
In many instances, you'll want to keep the robot running continuously, so that as it encounters new documents published on the net, it can enumerate those resources, generate new resource descriptions, and update the database. It is entirely possible, however, that there will be times that you don't want to run the robot, either because of the load on the server or because of the load the robot can place on other servers.
As the robot runs, it maintains a great deal of information about its current state: which sites it has visited, where it has yet to go, and various other status data. You can stop and restart the robot at will, either manually or by automated schedule, and it will resume where it left off because it maintains state information. This enables you, for example, to only run the robot at night, even if it takes several nights to complete a single robot run.
You can also specify that you want the robot to start fresh. That is, you can delete its state information, causing it to start its next run from the beginning, by enumerating from its starting points.
It is also possible to manually pause and resume the robot. That is, while the robot process is running, you can freeze its activity, saving its exact state, and resume immediately. When paused, the robot finishes processing any URLs it is already working on, but will not process URLs waiting in the URL pool until it resumes. This is a more efficient way to create a short break in robot activity, as long as you don't need to shut the robot down entirely.
You can manually purge the robot's state information, causing it to start the next time from its starting points again. This is called a fresh start.
Controlling the Robot
The Compass Server robot can be a continuously running process, much like a server in that at any time it is running, it can accept commands and act on them. The most important commands are those that provide the robot with the addresses of sites to visit to look for and describe resources, but there are also commands for such tasks as starting and stopping the robot, retrieving its current status, and so on.
As administrator, you have complete control over both what your robot does (configuring) and when it does it (controlling). After the initial setup, most of your robot operation will probably be automated, but you always have the option to control your robot manually.
The central location for controlling robots is the Robot Overview form. This is the default form when you choose the Robot button in the Server Manager.
About the Robot Overview
The Robot Overview has two main parts: a set of Control Buttons across the top and a Control Panel below.
Control Buttons: These provide access to the basic control functions for the robot. They let you quickly start, stop, pause, or restart your robot. Depending on the robot's current state, you'll see different buttons. For example, if the robot is not running, there will be a Start button. If it is already running, you will have buttons to stop or pause the robot. Control Panel: This panel, below the Control Buttons, shows the relationship between various parts of the robot. As the robot runs, the panel updates to show the current status of the various parts. You can also use the diagram as a set of shortcuts to the administration forms for the different parts of the robot. Just click part of the diagram to open the appropriate form. Using the Robot Overview form, you can perform the following tasks:
The Robot Overview form provides a useful central location for your work with the robot. From it, you can see most useful status numbers and also get direct access to almost every other robot administration form.Starting the Robot
In most cases, you'll probably leave the robot running whenever the Compass Server is running. This allows it to enumerate new resources at any time. However, you'll also need to start the robot fresh periodically, causing it to revisit its starting points and refresh the existing resource descriptions. You can start the robot either automatically on a periodic schedule or manually when you want to update your database. Starting the robot automatically is explained in Scheduling the Robot.Before you start the robot, determine whether you want a fresh start or a restart:
Starting the Robot Manually
Although many Compass Server installations will be automatic, running their robots on a periodic schedule, there might be times when you want to start the robot manually. Such times might include instances when you add a great number of resources to a web site (or entire new web sites to the database), rendering the current database out-of-date.
To start the robot manually, click Start.
The control panel updates every 30 seconds to show the current status of the robot. You can change this interval through the Administration Preferences on the Compass Settings form.
Pausing and Resuming the Robot
When the robot is running, you can pause it for a brief period. While paused, the robot process is still running, but it will not interact with other systems. That is, it will not further enumerate or generate until told to resume.
The paused robot consumes very few system resources, making it an appropriate short-term solution to CPU load problems on the Compass Server host system.
The pause and resume functions are available from the Robot Overview form.
- To pause the robot, click Pause.
- To resume robot activity, click Resume.
Stopping the Robot
In some circumstances, you might need to stop the robot while it is running. For example, the robot might be using too many system resources, slowing user access. Or you might have detected a problem in your site definitions or content filters that you want to correct. Stopping releases all resources currently used by the robot. Pausing has much the same result, releasing most CPU resources, but stopping also releases memory allocated to the robot. Click the Stop button to stop the robot. The robot will attempt an orderly shutdown, but will maintain state information in case you want to restart from the current state. If you do not want to restart the current robot run, you need to click Fresh Start to delete the robot's state information before starting.Checking Robot Status
While the robot is running, you can get a certain amount of information from the Robot Overview's control panel. If you want greater detail, you can also choose among several kinds of up-to-the-second reports from the robot on various aspects of its activity, as described in Getting Detailed Status.
Controlling Where the Robot Goes
The function of the Compass Server robot is to find resources and determine whether (and how) to add descriptions of those resources to the database. The determination of which servers to visit and what parts of those servers to index is called site definition.
Defining the sites for the Compass Server is one of the most important jobs of the server administrator. You need to be sure you send the robot to all the servers it needs to index, but you also need to exclude extraneous sites that can bloat the database and make it hard to find the correct information.
The site definition process is essentially one of filtering. That is, by applying rules set out by the administrator, the robot determines whether to include or exclude a particular resource. Before you run the robot for the first time, or after you change its site definitions or other parameters, you should check to ensure that it is locating the resources you want and only the ones you want.
Site definitions control whether the robot will actually visit a given server, based on its URL. You can allow or disallow visits to specific servers, groups of servers, or parts of servers. You can also determine whether to index a particular document within a site based on its content, such as its MIME type.
These are the specific tasks involved in controlling where your robot goes:
Defining Sites
When the robot processes each URL in its link pool, it first passes the URL through a series of site definition to determine whether the database should include resources from that site.
Site definitions are rules that tell the robot whether to extract links from resources and/or generate descriptions of resources from specific servers, groups of servers, or domains. You can use site definitions to limit the range of your robot by restricting which links it follows from the resources it discovers. A site definition has five parts:
- A nickname you can use to refer to the site definition
- A definition of which server, group of servers, or domain make up the site
- A list of URLs that are starting points for the site
- A set of filters that define what kinds of resources to allow or deny from the site
- Additional information about the site in the form of a comment
These are the specific tasks involving site definitions:
Managing Site Definitions
The Compass Server maintains a list of all its site definitions. Through this list, you can manage the definitions of all sites, including editing their specific parameters, turning individual sites on or off, and creating and deleting site definitions.
Site definitions are explained in Defining Sites.
Each line on the Manage Sites form represents one of the possible site definitions the robot can use. For each site, you can do the following:
- Click the nickname to open the Edit Site Definition form for that site. You can then edit the site definition, as described in Editing Site Definitions.
Creating Site Definitions
When you add sites to your database, you probably need to create site definitions for them. The exception to this is if you have already defined a domain that includes the new site. Site definitions are explained in Defining Sites. To create a new site definition, do the following:- Choose what kind of site you are defining. The pop-up menu gives you two choices.
- Type the URL or a suffix string defining a domain in the text box.
Editing Site Definitions
The Edit Site Definition form allows you to change any aspect of an existing site definition or create an entirely new one. Site definitions are explained in Defining Sites. The process differs slightly for site definitions that cover one or more specific web servers and for entire domains. Other than specifying the site, however, the filter editors for servers and domains are identical. These are the elements you define for each site filter:- Server Group or Domain--Depending on whether this filter defines a number of specific servers or an entire domain, the next part of the editor form varies, as described in the following table
: - Starting Points--You can define one or more addresses to use as starting points for the site. Each starting point has the parts listed in the following table.
- Filter Definition--These are filters that allow or disallow the indexing of specific kinds of files at the site you've defined. The order in which the filters appear is the order in which they are applied.
- Advanced--This is additional information that describes the site and how to index it.
Item Description Comment This is a text field that describes the site to you. It is not used by the robot.
Using the buttons below the list of hostnames or domain suffixes, you can
add another hostname or domain suffix. You can remove an existing
hostname or domain suffix by clicking the trashcan icon next to its name.
The site definition editor automatically checks with a DNS server to ensure
that it understands any aliases used by these sites. It also performs a check
for virtual hosts on the server. These are both explained in more detail in
Probing for Site Information.
You can perform any of the actions defined in the following table.
Be sure to set the final rule correctly. It should be a "catch all" that applies
to all files that did not match any of the preceding rules.
Testing Site Definitions
You can perform a partial test of your site definitions by using the Robot Rules Simulator. It is only a partial test because it only checks the URL, DNS translations (including Smart Host Heuristics), and site redirections, but not the contents of the document specified by the URL, so it cannot detect duplications, MIME types, network errors, permissions, and so on.
To test your site definitions, do the following:
The simulator shows all the defined starting points.
- Type any other URLs you want to test, only one per line.
- Click OK to test the listed URLs.
The simulator indicates whether each URL would be accepted or rejected
by the current site definitions, and lists the reasons.
Limiting Robot Discovery
As the robot visits sites and discovers links to other resources, it could conceivably end up following huge numbers of links a great "distance" from its original starting points. You can limit these wanderings by limiting the number of links the robot will extract from any one resource. By default, the robot restricts itself to no more than 1,024 links from any one document. To change the limits on links extracted from each resource, do the following:
Probing for Site Information
When adding new sites, it can be difficult to anticipate some of the difficulties that might arise, such as nonstandard DNS aliases, virtual servers, and server redirections. The Compass Server provides a tool that seeks out such information for you. In most cases, the Site Definition Editor takes these factors into account automatically, but the Site Probe enables you to override or augment these adjustments as needed.
To probe for site information, do the following:
- Type the URL for the site you want to probe in the text box.
- Check Show Advanced DNS Information if you want detailed technical information in addition to the regular probe.
Checking this option sends the output of the
gethostbyname() DNS
lookup directly to the form, so you can see the data on which the probe
bases its checks.
Controlling What the Robot Gets
There are times when the robot can determine that you don't want to index a resource based on its content, sometimes without even having to retrieve it. The robot does this filtering in conjunction with its site definition, using filters.This section contains several topics related to content types and filters:
Understanding Filters
The robot has a set of filters you can choose to apply to any of the sites you define. In addition to the standard filters supplied with the Compass Server, you can define your own filters and make them available to use on any site. A filter consists of two parts: A typical filter covers some identifiable type of resource content, and its rules define that kind of resource. For example, you might want to define a simple filter that would enable you to exclude programming source code from your database. You would define a rule with a nickname such as "Source Code," and provide it with rules that identify files that contain source code. Those rules would check a resource's URL or pathname, looking for the extensions.c, .cpp, and .h.
You would then apply the filter to various site definitions, having them exclude resources that match the filter called "Source Code."
Managing Filters
To see a list of all the filters available to your robot, use the Manage Filters form.
The Manage Filters form shows all the defined filters and indicates which site definitions, if any, use each one. If the designation "New Site default" follows the name of the filter, it means the filter is enabled by default in newly created site definitions.
From the overview form, you can globally enable or disable any of the filters or delete them entirely. Disabling a filter means that all site definitions ignore that filter. Enabling the filter means that the site definitions that use the filter rule do apply it.
You can also create a new filter by clicking New Filter. You can also delete a filter by clicking the delete icon to the right of it.
Creating a New Filter
There are two ways to create a new filter:
- In the Server Manager, choose Robot|New Filter.
- If you're on the Manage Filters page, click the New Filter button.
Editing Filters
The Edit Filter Definition allows you to create or change any of the rules used to allow or deny various kinds of resources. Site definitions can use any or all of the filters currently defined.To edit a filter, do the following:
These are the elements you can edit in the filter rules editor:- Advanced--These are extra elements you can define for each filter rule.
Filtering Files: An Example
In order to understand how the matching works in filter rules, it's probably easiest to look at a concrete example. Here is the URL for the online version of the Release Notes for Netscape Compass Server:http://home.netscape.com:80/eng/server/compass/3.0/relnotes.htmlThe filter rule can match five different aspects of the URL in five different ways. These are the five parts:
And here are some examples of true matches:
| Method | True match in this example |
|---|---|
| is | protocol is http |
| contains | hostname contains netscape |
| begins with | MIME type begins with text |
| ends with | pathname ends with .html |
| regular expression |
Adding New Conversion Types
As delivered, Netscape Compass Server provides the ability to convert a number of common file formats into HTML that the robot can use to generate a resource description for the document. Conversions from formats other than HTML are performed by filter programs provided by third party vendors or written by you.
Supported Conversions
These are the standard formats supported in this version.
Adding and Removing Conversions
If you want to index resources based on file formats other than those supported by the Compass Server's default conversions, you can add your own conversion programs (or supplement those already provided).
Note that if you create new conversions, you will probably also need to define new filters to tell the robot that these new document types are usable. Creating new filters is explained in Creating a New Filter.
Choosing Conversion Modules
The Indexing Settings form includes a list of all installed document convertors. You can choose which, if any, of these conversions you want the robot to use by checking items in the list. These and other indexing settings are explained in Setting Indexing Preferences.
Installing Conversion Modules
If you need to support file formats other than the standard ones, you can purchase additional conversion modules. Once you acquire a new module, place it in the Compass Server bin directory, located under the server root directory:
<NS_HOME>/bin/compass/bin/
Your robots automatically detect the additional conversions and use them as needed.
Similarly, you can remove existing modules if you no longer want your robots to perform a specific conversion.
Writing Custom Conversions
If you need to index resources stored in file formats not supported by the supplied conversion modules, you can write your own conversion routines and incorporate them into the robots through the robot plug-in API. This programming is outside the scope of this guide, but is explained in the Netscape Compass Server Programmer's Guide.
Scheduling the Robot
Most of the time, you will want to update your Compass Server database automatically, so you can set up your robot to start on a periodic schedule. For example, you might run your robot once a week or every night, depending on how current your information needs to be and how frequently documents change at your site.
If you need to update the database between the scheduled robot runs, you can either run the robot manually or submit resource descriptions manually.
From the Schedule Task form you can to choose days and times to automatically start or stop the robot. The form indicates whether there is a currently active schedule. If there is, you can either change the schedule or deactivate it. If there is no active schedule, you can create one.
To create an active schedule, follow the directions in Scheduling Tasks.
To change the existing schedule, follow the directions for activating a schedule. When you activate the changed schedule, it will replace the previous one.
Tips on Robot Scheduling
Before scheduling your robot to run automatically, you should run it at least once manually, as described in Starting the Robot Manually. You should only start the robot automatically after you know it works properly.
Similarly, if your robot is going to run unattended for an extended period, such as when you are on vacation, you should ensure that it works correctly and that the contact information puts remote sites in touch with someone who can remedy any problems.
If you plan to run the robot continuously, we also suggest that you stop and restart it at least once per day. This gives the robot a chance to release resources and reinitialize itself, providing a kind of "sanity check" for the ongoing operation.
Using Completion Scripts
When the robot finishes processing all the URLs from all its sites, it can run a script (called a completion script) that you choose. For Unix systems, the script is a shell script. For Windows NT systems, it is a batch file.
The most common thing you'll probably want to automate at robot completion is the My Compass profiler, to update user newsletters to reflect newly found resources.
Completion scripts all reside in the bin/compass/admin/bin directory under the server root directory. You choose which script will run in the Completion Actions settings.
Writing completion scripts is explained in the Netscape Compass Server Programmer's Guide.
Controlling What the Robot Generates
For each resource that passes through the robot's filters (as described in Controlling Where the Robot Goes and Controlling What the Robot Gets), the robot generates a resource description that it places in the Compass Server database. You can control the way the robot generates its resource descriptions in two ways:
The choices you make in setting up the generation of resource descriptions determine what users will see when they search the Compass Server database. For example, you can choose to index the full text of each document or only some fixed portion of the beginning of the document.
In addition, by creating effective classification rules, you can make it easier for users to locate what they want in the Compass Server by browsing in categories.
Setting Indexing Preferences
There are several common options you can set that control the way the robot generates resource descriptions. The Indexing Settings form allows you to set those options in one place.
You can set the following indexing preferences:
To set indexing preferences, do the following:
Setting Classification Rules
One very useful feature of Netscape Compass Server is its ability to assign resources to categories, allowing users to browse through the hierarchy of categories to pinpoint the items they want. In order for this to work, you must set up rules to assign resources to categories. These rules are called classification rules. If you do not define your classification rules properly, users will not be able to locate resources by browsing in categories. You need to avoid categorizing resources incorrectly, but you also should avoid failing to categorize documents at all. Documents can be assigned to multiple categories, up to a maximum number defined in the Compass Server settings. This setting is explained in Database Options.
About Classification Rules
Classification rules are simpler than filter rules because they don't involve any flow-control decisions. All you need to do in classification rules is determine what criteria to use to assign specific categories to a resource as part of its resource description. A classification rule is a simple conditional statement, taking the form "if <some condition> is true, assign the resource to <a category>."
The following table explains the available elements for conditions.
- hostname is home.netscape.com:80
- protocol regular expression http[s]*
As with site definitions, classification rules proceed in order. Because there is no acceptance or rejection, the robot tests all resources against all the rules. If a resource matches more than one rule, it is assigned to multiple categories, up to the maximum number defined in the Database Options settings for the server.
Your goal should be to have each resource assigned to at least one category. In practice, that is probably not possible, but you should avoid having large numbers of unassigned resources.
Editing Classification Rules
The classification rules editor is a Java applet that runs in its own window. The window contains an editable list of classification rules and a group of fields for editing the selected rule.
To edit classification rules, do the following:
- Click Enable Java Applet to activate the editor applet.
- Add, delete, or modify classification rules.
- To add a new classification rule, click New. This adds a new rule to the end of the list, which you can then modify.
- To delete a classification rule, click the rule to select it, then click Delete.
- To modify a classification rule, click the rule to select it, then use the pull-down menus and text box at the bottom to make changes.
WARNING: Choosing another administration form while the Classification Rules Editor is open will close the editor without saving changes.
Handling Unassigned Resources
In some cases, resources will pass through the entire set of classification rules with no category assigned. As the administrator, you need to check these unassigned resources to see if you need additional classification rules or gathering rules. For example, if over 100 resources are not assigned to any category, you might need to add classification rules for these resources. If the robot finds resources that you do not want to index, you need to add site definitions or content filters to prevent the robot from generating descriptions for these resources. After you run the robot, you should check the list of the unassigned resources, as described in Assigning Categories Manually. Use the list as feedback for setting up additional classification rules and gathering rules.
Checking Database Contents
There are a number of ways you can check to see that your Compass Server and its robot produce the results you want. Through the Server Manager, you can get information about the database of resource descriptions and read the log files produced by server processes. In addition, there are some maintenance and repair tasks you can schedule.
This section explains the following topics:
Checking Starting Points
The robot's starting points are a persistent list of URLs that the robot uses as the initial contents of the URL pool for resource enumeration every time it starts. That is, when you start the robot, it copies its list of starting points into the link pool and begins enumerating resources by going through that list, discovering linked resources as it goes.
Part of the definition of every site is a list of one or more starting points for that site. Cumulatively, all the starting points for all the robot's sites make up the list of starting points for the robot.
Because these starting points are distributed across the definitions of different sites, it can be difficult for you to track the combined list. The Server Manager therefore provides a report of all the starting points in all the defined sites. You can access this list at any time, regardless of whether the robot is currently running.
The list of starting points includes links to the site definition that includes each starting point, allowing you easy access to the site definition editor so you can make any necessary changes.
Checking Log Files
Each process that runs in a Compass Server system creates a log file. You can view each log file separately. There are also log files dealing with access and security, which are explained in the Managing Netscape Servers, along with a discussion of how to work with and analyze log files.
Log files are very useful tools for debugging your Compass Server setup, but they can also become very large. You can control the level of robot logging by changing parameters in the robot's Speed and Logfile Settings. You can also automate the process of archiving and deleting log files, as discussed in Archiving Log Files.
Checking Excluded URLs
The best way to make sure your robot is doing what you want is to look through the list of URLs it did not incorporate into the database. The Excluded URLs form provides a summary of all the URLs the robot rejected, grouped according to the reasons for rejection.
The Excluded URLs form analyzes the contents of the filter log file, grouping and sorting the URLs rejected by the robot to make it easier for you to determine whether the robot is systematically excluding documents you want to include.
To view a report of excluded URLs, do the following:
- Choose which robot run you want to examine. The pop-up menu shows all available robot runs, with the most recent one being the default choice.
- Click one of the reasons in the summary report.
When you choose one of the robot runs, the Server Manager generates a
summary report, listing the reasons for exclusion and the number of
resources excluded for each reason.
The Server Manager generates a report in the frame below the summary. At
the top of the report is an explanation of the reason for the exclusions,
followed by a list of the URLs.
Archiving Excluded URLs Reports
When you are no longer actively using Excluded URLs reports, you can archive them. Archiving the report moves the filter.log file that contains the report to a subdirectory called archive below the standard logs directory.
Archiving does not remove the files. You need to do that manually.
To archive an Excluded URLs report, do the following:
Configuring Crawling Settings
There are a number of operational parameters for the robot you can configure through the Server Manager. These parameters control such items as how often the robot accesses each server, and how much memory it can use. The Crawling Settings form contains controls for all the operating parameters of your robot. These settings come in seven groups:
All these robot parameters are written into the configuration file process.conf. You can edit the file directly with a text editor if you want, but the Server Manager provides a complete interface.
Speed
The robot's speed settings control the load on your processor, the load on your network connections, and the burden placed on sites the robot indexes. You should configure these settings so that you optimize the use of your own resources, but without placing undo strain on other systems. You can also vary the settings depending on whether the robot runs at times when users will be querying your system heavily.
Completion Actions
When the robot finishes processing all its sites and all URLs it discovers at those sites, it reaches a state called completion. You can configure several options for what the robot should do at that point.
By default, the robot goes idle after completing processing, without running any script commands. You can change either of those options, as described in the following table.
Logfile Settings
You can control the amount of information the robot writes to its log files through the Logfile settings. Keep in mind that the robot's log files can become quite large, so you should only generate the information you will actually use, and you should rotate the files as often as practical.
These are the log file settings:
As a rule, you should only have the robot log as much data as you will need. At the highest level of detail, the robot log can become huge in a very short period. Once you have your site definitions and filters working to your satisfaction, you should reduce the level of logging to reduce the amount of disk space required for the robot.
Standards Compliance
There are a number of Internet standards governing the behavior of robots. If you send your robot outside your local network, you should ensure that your robot obeys these protocols. However, when indexing an internal network, you might find it useful to bypass some of the external protections.
These are the standards-compliance settings:
Authentication Parameters
Authentication enables a site to restrict access by user name and password. You can set up your robots to provide a user name and password to the web servers they visit. This enables the robot to index resources at sites that require authentication by "impersonating" an authorized user.
These are the authentication parameters for the robot:
Proxying
Proxy servers are used to allow applications inside a security firewall to access resources outside the firewall. Most Compass Server installations will not need to use proxies. If you are running your robot on an internal network behind a firewall, you need to get the names and associated port numbers for the proxy server for each network service from your system administrator.
If possible, you should try to set up the robot so that it doesn't need to run through proxy servers. Running a robot through a proxy server can damage the proxy service by causing it to load too many items into its cache.
Advanced Settings
You can use the advanced settings to fine-tune the performance and behavior of your Compass Server robot.
These are the advanced setting parameters:
Troubleshooting the Robot
When you run the robot, especially for the first time after making significant changes, it is important that you be able to track down and fix problems that might occur. This section details the most common kinds of robot problems, how to find them, and how to deal with them.
The first place to look for information is almost always the Excluded URLs
report (Reports|Excluded URLs).
Here are the most common robot problems covered here:
Getting Detailed Status
When the robot is running, you can see a summary of its activity on the Robot Overview form, as described in Checking Robot Status. When troubleshooting, you might need more detailed information, which you can get from a number of specialized robot reports.To access detailed robot status information, do the following:
- Choose a report from the pull-down menu. The table below explains each report briefly.
- Click Refresh to update the same report or repeat step 1 to generate a different one.
Getting Summary Status
You can generate a summary report that includes much of the important information from the various detailed status reports, but more detail than the terse summary on the Robot Overview form.
To generate an executive summary of the current robot run, do the following:
- Make sure the robot is running.
- Click Generate Report to create a current report.
If there is already a report, click Refresh to update it.
No Resources Indexed
By far the most common problem, especially with newly created robots, is that when you start it running, it immediately goes idle, not having produced any results. There are several possible causes for this happening, including the following: The most helpful tool for locating problems with sites that don't generate resource descriptions is the Excluded URLs report. For every URL passed to the robot that does not generate a resource description, there is an entry that should explain the reason. Using this report is explained in Checking Excluded URLs.
No Sites Defined
When you first install the Compass Server, you have the opportunity to specify one or more sites you want the robot to index. If you did not specify any sites, you need to do so before running the robot. This is explained in Creating Site Definitions.
You can tell whether you have sites defined by opening the Robot Overview form (choose Robot|Overview). The first piece of information to the right of the system diagram indicates the number of starting points you have defined for the robot. It is also possible that you have sites defined, but the starting points for the sites contain typographical errors or invalid URLs. Generating a list of all your starting points is explained in Checking Starting Points.
Server or Network Errors
If you have defined sites for the robot to index, but running the robot still produces no resource descriptions in the database, you should check to make sure there are no server or network errors. The most likely place for these to appear is in the error log, but you can also find information in the Excluded URLs report.
The most likely problems in this area are that the server was unreachable (due to being down), the address given for the server was incorrect (typographical error, perhaps), or the server denied access to the resource (a password might be required).
To narrow down the problem, try using the ping utility to see whether the server is reachable at all. If the server is running, try to access the URL with your web client.
DNS Aliasing Errors
A common indexing problem in the complex world of network addressing is that resources often aren't where they appear to be. In particular, many web servers use DNS aliases so that they appear to the world as, say, www.netscape.com, when in fact the server's name is something else.
Very busy web sites often have a number of servers that alternately respond to a common address. In the most common case, a group of servers all answer to the name www.somedomain.com, when their real names are www1.somedomain.com, www2.somedomain.com, and so on. The Compass Server robot has a built-in mechanism to handle this common case, called Smart Host Heuristics. If you encounter problems with sites that alias a number of servers to the same hostname, make sure your robot has Smart Host Heuristics turned on, as explained in Advanced Settings.
The Site Definition Editor form includes a button labeled "Verify Names" that checks entered names against a DNS server.
Server Redirection Errors
A problem that often looks similar to DNS Aliasing Errors is caused by server redirection. That is, clients access a certain URL, but the server for that URL redirects the request to either another part of the server or to another server entirely.
Problems can arise when such a redirection sends the robot to a host that is not defined as being part of one of its sites. You can often solve this by either defining an additional site that includes the redirection site or by indexing the redirection site instead of the original site.
One source of help on redirection is the site probe, described in Probing for Site Information. You can also use the robot rules simulator to check for redirection problems. The simulator is explained in Testing Site Definitions.
Too Many or Too Few Resources
When you first define a site, you may find that the robot generates either many more or many fewer resource descriptions than you expected. You can usually solve this with some fine adjustments.
NOTE: This does not include the special case of returning no resource descriptions, which is covered in the preceding section.
Not Extracting Enough URLs
The most important factor in determining how many resource descriptions the robot generates is the number of resources it actually locates. That might seem obvious, but there are ways to either increase or decrease the number of resources it sees that can have surprisingly large effects. The best control over the number of resources a robot finds is the depth of its search. That is, by limiting the number of links it can follow from its starting point, you can effectively restrict the robot from delving too deeply into the structure of a site.Robot Excluded from Sites
If the robot seems to work in general, but does not generate resource descriptions for specific sites, there are at least two common explanations. RDM Servers: Normally, when the robot visits a site that already generates its own resource descriptions, such as another Compass Server or a Netscape Enterprise Server using the AutoCatalog feature, it skips crawling that site, noting in its log file that it found an RDM server. You can use this list of RDM servers to create import agents to import the existing resource descriptions from that site, as explained in Importing Resource Descriptions. If you want to send the robot to index that site anyway, you can tell the robot not to check for RDM servers, as explained in Standards Compliance.
Exclusion by robots.txt:
Some sites restrict robot access to their servers based on the user agent of the robot. This is done through a file called robots.txt. The robots.txt protocol is explained in Controlling Robot Access.
In general, it is best to observe the wishes of the site manager and stay out of restricted areas. In some cases, however, it might be appropriate to circumvent the robots.txt exclusion, such as indexing a private internal site.
To get around a robots.txt exclusion, you can either change the user agent for the robot or tell the robot not to check robots.txt at all. Both of these are explained in Standards Compliance.
Resources Not Assigned to Categories
If your resources are not being categorized, you probably need to refine your classification rules, which assign resources to categories. For an immediate workaround, you can use the RD Editor to assign categories for resources otherwise unclassified. After you adjust your classification rules, subsequent robot runs should classify resources correctly.
New Sites Added
Probably the most common reason for resources not being classified is that the site was added after the rules were defined, so no rule applies to those particular resources. For example, if you classify resources based on the name of the server they come from, a newly added server will probably not have a corresponding rule. Adding the appropriate rule for the new site should cause the robot to classify the resources from the server correctly in the future.
Incorrect Aliases
Another cause for resources not having categories assigned is DNS aliasing. If you write a rule for a server using an alias name, you need to make sure the robot uses that same alias for the resources from that server.
You can check which alias the robot uses for a server by using the robot rules simulator, described in Testing Site Definitions.
Performance Problems
There are a number of problems that fall into the category of performance problems. In general, they involve the robot running either too slowly or too quickly.
The determination of what constitutes a performance problem is largely subjective. You need to determine what are the acceptable parameters for operating your system.
Slow Robot
A robot that runs too slowly can be an annoyance. In general, it means that the robot does not generate resource descriptions quickly enough to keep the database up-to-date for your users. You can gauge the speed of your robot as it runs by tracking the rates shown on the Robot Overview form.
The following table suggests some common approaches to speeding up the Compass Server robot.
Fast Robot
A robot that runs quickly is not a problem in itself, unless it takes up so many system resources that it gets in the way of user searches. More often, a robot can cause trouble by sending too many "hits" to a single server in a short period of time.
Most often, this kind of problem comes to light when a server administrator sees a large number of hits in an access log from the robot, which includes an email address in its User Agent string. The administrator can then contact you to ask you to hold back your robot, in which case you can increase the Server Delay parameter. The administrator might also exclude your robot from any access, using the robots.txt exclusion file explained in Controlling Robot Access.
[Contents] [Previous] [Next] [Index]
Last Updated: 02/12/98 13:33:35
Any sample code included above is provided for your use on an "AS IS" basis, under the Netscape License Agreement - Terms of Use