To begin defining a role or group, follow these steps:
From the Insert menu, choose Group & Role.
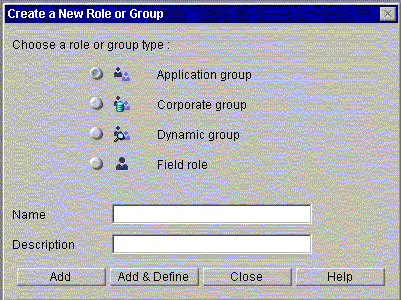
In the Create a New Role or Group dialog box, choose the type of role and fill in the fields.
See "The Create a New Role or Group Dialog Box" on page 115 for details.
Click either the Add button or the "Add & Define" button.
If you clicked Add & Define, fill in the fields of the next dialog box that appears.
When you close the dialog box, your changes are saved automatically.
The Create a New Role or Group Dialog Box
To supply basic information about the role or group you want to create, enter this information in the "Create a New Role or Group" dialog box, as shown in Figure 5.1.
Figure 5.1 The Create a New Role or Group dialog box
Types of Groups and Roles
There are four different types of groups and roles you can create:
Application group.
A group defined in a particular application that points to user data in the corporate user directory. The group information is stored in the configuration directory, and the user information is stored in the corporate user directory. Because these groups are stored in the configuration directory, you do not need to have write access to the corporate user directory to create one. The context of this group is the application. Therefore, this group cannot be used by other applications.
Corporate group.
A group that points to a group defined for the corporation in the corporate user directory. The application's corporate group is exactly the same as the group in the corporate user directory; when the group in the corporate user directory is updated, the corporate group automatically uses those changes. Using corporate groups you can leverage the groups already defined in the corporate user directory. The context of this group is in the corporation; it can be used for many things besides applications.
Dynamic group.
This group uses a filter to list members in the corporate user directory that match the attributes in the search filter. Unlike a corporate group, which is already defined as a group in the corporate user directory, the dynamic group uses corporate user directory information to create a group dynamically. This group is defined in the context of the corporation (it changes based on changes in the corporate user directory) but it also is used only for the application.
Field role.
A role represented as a data field. The value of the field varies by process instance, so the role's context is the particular process instance. For example, the creator role (the person who starts a particular process instance) is a field role. The field role can only be one user; you cannot use a field role to assign an activity to a group. Because it's related to a datafield, you cannot create a Field Role if your application has been deployed for testing or production.
Name.
Enter the name of the role or group. This field cannot contain the following characters: quotation marks ("), commas (,), plus signs (+), and semicolons (;). If you are creating a field role, the name cannot be more than 18 characters long, because the name is also used as the name of the field.
Description.
An optional longer description of the role or group.
Adding a New Group or Role
To add a new group or role, click either the Add button or the "Add & Define" button.
Use the Add button to add several items in succession, without defining their properties. Each item will be added to the application tree view, but the "Create a New Role or Group" dialog box will remain open so that you can add subsequent items. After adding the desired items, you can define them by double-clicking them in the application tree view.
Use the "Add & Define" button to add an item and then immediately define it. Each item is added to the application tree view, but then a new dialog box appears, depending on the kind of group or role you are adding. One of the following dialog boxes will appear:
The Application Group Dialog Box
The Application Group dialog box, shown in Figure 5.2, is where you identify which users are assigned to an application group. For example, if you are designing a time-off request application and have a role for HR approval, you could create an application group with the names of everyone in HR who is allowed to approve a time-off request.
Figure 5.2 The Application Group dialog box with Browse tab
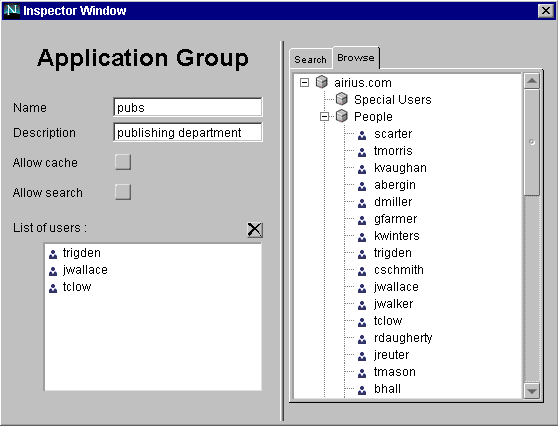
The dialog box contains the following fields, which contain the values you entered in the Create a New Role or Group dialog box:
Name.
The name of the group.
Description.
The group's description.
Allow cache.
If checked, allows group information to be cached. You must also set the User Cache Policy property for the application to All or Members to enable caching. See "Setting Application Properties" on page 65 for more information.
Allow search.
If checked, allows users in this group to search. If you do not make the group searchable, members of the group will not be able to use the search functionality to check the status of process instances or to find process instances related to specific criteria. They can still use the global search, though. See Chapter 9, "Setting Up Searching," for more information.
List of users.
The list of people that are part of this group. This list displays the user RDNs (relative distinguished name) as stored in the corporate user directory. You can add users to the List of Users from the corporate user directory list in the right pane. You can use the Search tab in the right pane to find users, or user the Browse tab to find them.
Note. If no users are appearing in your Browse tab or when you search, make sure
you have set a corporate user directory in the application's properties.
To see users in the Browse tab, expand the directory and groups by clicking the expansion icons (plus signs). The first time you click the icons the data loads from the corporate user directory. After that, a single click reloads cached data. To reload the information from the corporate user directory, double-click the directory and groups.
If you use the Browse tab, drag the users to the List of Users.
If you use the Search tab, use the buttons at the bottom of the right pane to add users to the List of Users. There are also Select All and Deselect All buttons.
To delete a user from the list of users, select the user name in the List of Users area and click the "X" box above the list.
To use the Search tab to quickly find and add users based on a wildcard pattern, follow these steps:
Click the Search tab, which is shown in Figure 5.3.
Figure 5.3 The Application Group dialog box with Search tab
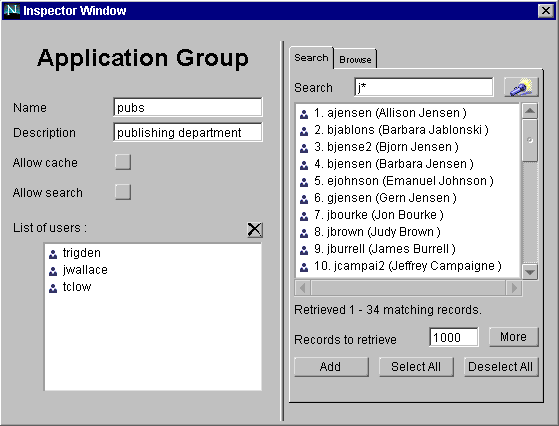
Enter a search pattern (such as j* or *jan*).
This pattern can be for any part of the user's name, such as first name, last
name, or user ID.
Click the Search icon to get a list of all users that match the pattern.
By default, the list displayed is sorted by user RDN (relative distinguished
name). You can specify the sort order in the preferences.ini file,
which is located in the builder folder. Add the following line to the file:
sortAttribute = attribute
where attribute is any LDAP attribute, such as cn or uid, that you want to
appear first in each line of the list. For instance, if you entered
sortAttribute = cn, the common name appears first in each line
displayed.
The search returns the number of records specified in the "Records to
retrieve" box. By default, the amount of records retrieved is 1000. You can
modify this default in the preferences.ini file; add the following line
to the file:
defaultSearchSize = number
where number is the amount of records you want displayed by default.
Select one or more users from the list.
To select multiple users, highlight a user and without releasing the mouse
button brag to the last user you want to add, then release.
Click Add.
The Corporate Group Dialog Box
The Corporate Group dialog box, shown in Figure 5.4, is where you identify a corporate user directory group or set of groups as a group in your application. For example, if you want to have a group called "HR" that consists of all employees in the HR department, and a group like that already exists in the corporate user directory, you can create your group quickly by using the corporate group. Because it is tied to the corporate group, any changes made to the group in the corporate user directory are reflected in the application. Also, since the corporate groups are defined outside of applications, you can use the same group easily for multiple applications.
However, you cannot add or delete users from a corporate group in your application. You must use the corporate group exactly as it is set up in the corporate user directory. To manage your corporate directory, use the administration features of your Directory Server.
Figure 5.4 The Corporate Group dialog box with Browse tab
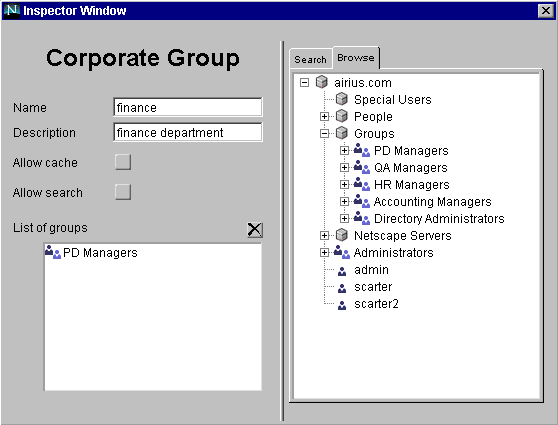
The dialog box contains the following fields:
Name.
The name of the group.
Description.
The group's description.
Allow cache.
If checked, allows group information to be cached. You must also set the User Cache Policy property for the application to All or Members to enable caching. See "Setting Application Properties" on page 65 for more information.
Allow search.
If checked, allows users in this group to search. If you do not make the group searchable, members of the group will not be able to use the search functionality to check the status of process instances or to find process instances related to specific criteria. They can still use the global search, though. See Chapter 9, "Setting Up Searching," for more information.
List of groups.
The list of groups that are part of this group. You can add a group or groups from the corporate user directory list in the right pane to the List of Groups. You can use the Search tab in the right pane to find groups, or use the Browse tab to find them.
Note. If no users are appearing in your Browse tab or when you search, make sure
you have set a corporate user directory in the application's properties.
To see users in the Browse tab, expand the directory and groups by clicking the expansion icons (plus signs). The first time you click the icons the data loads from the corporate user directory. After that, a single click reloads cached data. To reload the information from the corporate user directory, double-click the directory and groups.
If you use the Browse tab, drag the groups to the List of Groups.
If you use the Search tab, use the buttons at the bottom of the right pane to add groups to the List of groups. There are also Select All and Deselect All buttons.
To delete a group from the List of groups, select the user name and click the "X" box above the List of groups area.
You can use the Search tab to quickly find and add groups based on a wildcard pattern. To do this:
Click the Search tab, which is shown in Figure 5.5.
Figure 5.5 The Corporate Group dialog box with Search tab
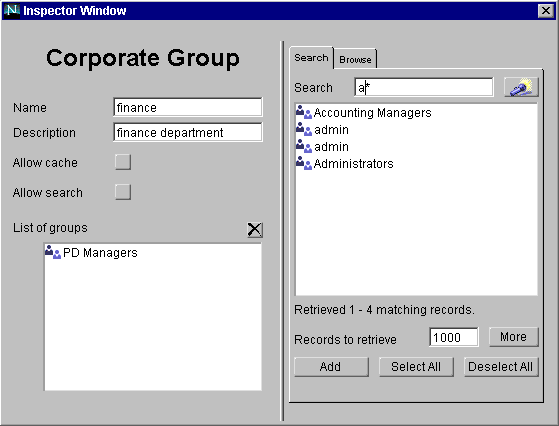
Enter a search pattern (such as a* or *adm*).
Click the Search icon to get a list of all users that match the pattern.
By default, the list displayed is sorted by user RDN (relative distinguished
name). You can specify the sort order in the preferences.ini file,
which is located in the builder folder. Add the following line to the file:
sortAttribute = attribute
where attribute is any LDAP attribute, such as cn or uid, that you want to
appear first in each line of the list. For instance, if you entered
sortAttribute = cn, the common name appears first in each line
displayed.
The search returns the number of records specified in the "Records to
retrieve" box. By default, the amount of records retrieved is 1000. You can
modify this default in the preferences.ini file; add the following line
to the file:
defaultSearchSize = number
where number is an integer number of records you want displayed by
default.
Select one or more groups from the list.
To select multiple users, highlight a user and without releasing the mouse
button brag to the last user you want to add, then release.
Click Add.
The Dynamic Group Dialog Box
The Dynamic Group dialog box, shown in Figure 5.6, is where you define groups that are created dynamically. The application searches the corporate user directory using an LDAP filter, letting you take advantage of attributes in the corporate user directory.
Figure 5.6 The Dynamic Group dialog box
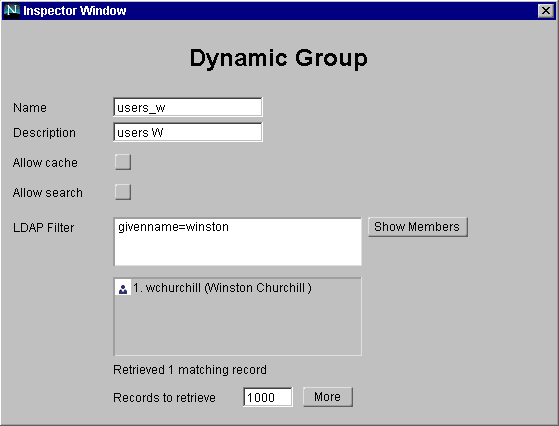
The dialog box contains the following fields:
Name.
The name of the group.
Description.
The group's description.
Allow cache.
If checked, allows group information to be cached. You must also set the User Cache Policy property for the application to All or Members to enable caching. See "Setting Application Properties" on page 65 for more information.
Allow search.
If checked, allows users in this group to search. If you do not make the group searchable, members of the group will not be able to use the search functionality to check the status of process instances or to find process instances related to specific criteria. They can still use the global search, though. See Chapter 9, "Setting Up Searching," for more information.
LDAP Filter.
Enter an LDAP filter and click Show Members to see a list of matches. You do not need to use the Show Members button, but it shows you what your filter fins. Process Builder does not check that the filter you enter is valid. If, after entering the filter string, nothing appears when you click Show Members, either your filter is invalid or it is a valid filter but there are no results that meet the criteria.
A search filter lets you search for an attribute in the corporate user directory. Here are a few sample searches you might use in this field:
For more information on LDAP filters, see the Netscape Directory Server Administrator's Guide.
Records to retrieve.
The search returns the number of records specified in the "Records to retrieve" box. To obtain the next specified number of records, you click the More button. By default, the amount of records to retrieve is 1000. You can modify this default in the preferences.ini file, which is located in the builder folder. To modify this value, add this line to the file:
defaultSearchSize = number
where number is the amount of records you want displayed by default.
The Field Role Dialog Box
A field role is a role represented as a data field. For a particular process instance, the application uses the value in the data field to determine the user associated with the field role. When you create a field role, Process Builder automatically creates a data field to store the user role.
A field role can be used in an application in either of two ways:
Figure 5.7 shows the Field Role dialog box:
Figure 5.7 The Field Role dialog box
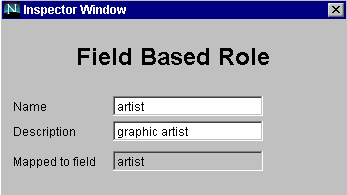
The dialog box contains the following fields:
Name.
The name of the role. This name also becomes the name of the mapped field. The value of this property must be unique among the groups, roles, and data fields that are defined within a given application.
The name can contain only alphanumeric characters with no spaces. It cannot be longer than 18 characters. It's best to use all lower case, and use the underscore character (_) as a separator. Also, do not use a name that is a reserved SQL keyword (for example, select, integer, etc.), or the LiveWire reserved words project, request, server, and client.
Description.
The role's description.
Mapped to field.
The database field to which you are mapping this role. This field is created automatically, and has the same name as the role. It has the class ID TextField.