Previous Next Contents Index


Chapter 3 Creating an Application

This chapter takes you through the process of creating a new application. First it outlines the process.

This chapter includes these sections:


Application Creation Overview
After planning your process application, you're ready to create it. Here are the main steps:

  1. Get information from the PAE administrator.
  2. See "Getting Information from the Administrator" on page 63 for more information.

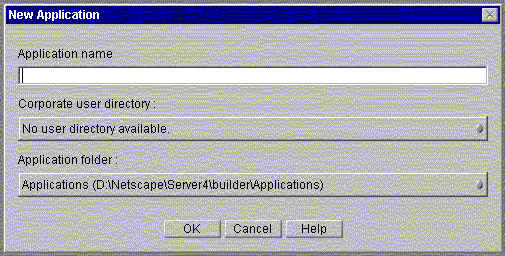
  3. Launch Process Builder and create a new application.
  4. See "Creating a New Application" on page 63 for more information.

  5. Design a process map, including all activities that users need to perform.
  6. See Chapter 4, "Designing a Process Map," for more information.

  7. Define the groups and user roles for process steps participants and non-participants (observers).
  8. See Chapter 5, "Defining Groups and Roles," for more information.

  9. Define the assignees for a step.
  10. See "Setting Activity Assignments" on page 81 for more information.

  11. Define the data fields, and set up the file attachments you need.
  12. See Chapter 6, "Defining Data Fields," for more information.

  13. Design the forms to display the appropriate data fields and to attach the necessary files.
  14. See Chapter 7, "Designing Forms," for more information.

  15. Set the form access, thereby associating the form with the appropriate step and with the appropriate participants for that step.
  16. See Chapter 7, "Designing Forms," for more information.

  17. Decide which users, if any, are allowed to perform searches. Also decide which fields are searchable.
  18. See Chapter 9, "Setting Up Searching," for more information.


Getting Information from the Administrator
In order to successfully develop and deploy an application, you need to work with the PAE administrator to set certain values for the application. In general, information dealing with clusters, the Enterprise Server, and the database may be set by your administrator. For example you may need to work with your administrator to set appropriate values for the following fields:

For more information on these values, see "Setting Application Properties" on page 65, "Setting Up the Content Store" on page 156, "Default Groups and Roles" on page 113, and "The Deploy Application Dialog Box" on page 206.


Creating a New Application
Since each process is handled by its own application, the first thing you need to do after planning the process is to create a new PAE application for it.

To create a new application, follow these steps:

  1. Launch Process Builder.
  2. In the Select an Application dialog box, click New Application.
  3. Fill out the dialog box fields.
  4. See "The New Application Dialog Box" on page 64 for details.

  5. Click OK. This displays a default set of empty resource folders and a blank process map.
  6. See Chapter 4, "Designing a Process Map" for details.

  7. Set the application's properties in the Inspector window.
The New Application Dialog Box
The New Application dialog box (see Figure 3.1) is where you enter the name and location of a new application. The location you enter here is the location on your local system. Typically you have a "working" copy of the application on your local system. Once you deploy an application, you generally use the deployed application as the basis of any modifications you want to make.

Figure 3.1    The New Application dialog box

Application name. Enter a name for your application.The field is required. It can contain only the following characters: A to Z; a to z; 0 to 9 and _ (underscore). All other characters are not allowed.

Corporate user directory. This directory contains all valid users and groups for the corporation, and is the source of the user information you need in order to set up user groups and roles for the application. The available directories that appear in the drop-down list are defined in the preferences.ini file.

Application folder. This is the full physical path to where you want to save this application on your local machine. By default the path is the main applications folder on your local machine, NAS_Root/builder/Applications. The following folders are available from the drop-down list:

Setting Application Properties
The application has properties that you need to set. These properties affect the application as a whole.

To set the application properties:

  1. Double-click the application's name at the top of the application tree view or select the application's name and click the Inspector icon, or right-click the application's name and choose Properties.
  2. Fill in the fields.
  3. See "The Application Properties Dialog Box" on page 66.

  4. When you're done, close the window by clicking the close box.
  5. The changes you make are saved automatically.

The Application Properties Dialog Box
The Application Properties dialog box (see Figure 3.2) includes the properties you set for the application as a whole. Note that you cannot change fields that are grayed out. The fields that are grayed out vary depending on whether you deployed your application in the Development or Production stage. For more information on deployment, see Chapter 10, "Deploying an Application."

Figure 3.2    The Application Properties dialog box

Name. The name of the application that appears in the list of applications. This field is required.

Description. A longer description of the application. This description appears in Process Express. The user has to have enough information between the Display Name and the Description to identify the application they want from a list of applications, so it's important to make these two fields descriptive.

Display Name. The longer, more descriptive name displayed by Process Express. If you are updating an existing application by saving it with a new application name, you can still keep the same Display Name, so that the name users see can be the same from version to version of the application.

Application Unique ID. An internal unique ID generated automatically to track each application. This ID identifies the application, and differentiates applications with the same name. If you do a "Save As" on an application, you can save the application using the same name, but the unique ID will be different. If you attempt to deploy an application that has the same name as an existing deployed application, but a different unique ID, you are prevented from deploying.

Priority Field. To set up your application so that process instances can be prioritized, use this property. First you need to create a data field of class ID Select List to represent the priority. The field must have the value of an integer between 1 and 5 (1 is the highest priority; 5 is the lowest). Next you choose this field to be your priority field using this property. Then you put the priority field in a form so that the person responsible for prioritizing work items can select a priority value for the application's work items. If you do not use it, all process instances have a priority of 3 (normal). The behavior of your application is not affected by the value of this field.

Title Field. The data field that contains the title of a process instance. This field is required. This field appears in Process Express as the title of the process instance, so you need to set this property to a field that has a value that describes the process instance and that end users will find helpful. This field will also be the title of any email notifications sent. It is often best to create a special field to be the title field. The field must already exist before you can fill it in here. This field is required.

Corporate Directory. The corporate LDAP directory this application uses for user and group information. A pop-up window lets you choose a directory, either based on a cluster or by name. The listed directories are derived from the corporate user directory values in your preferences.ini file. The directory you choose must be the same as the directory of the cluster to which you will deploy the application. If you choose the directory based on a cluster, your directory will be up-to-date, even if the administrator changes the directory for the cluster. However, if the administrator changes the directory for the cluster, you have to make sure your users and groups correspond in both directories.


Using Sample Applications
PAE ships with sample applications that demonstrate how to build applications, as well as showing the kinds of tasks you can perform in an application. The available samples are listed in Table 3.1.

Table 3.1 Sample Applications
Application
Description
DataSheet
Creates a product data sheet, including setting pricing and getting signed approval by two levels of management. For more information, see Chapter 11, "The Data Sheet Application."
OfficeSetup
Sets up an office for a new employee, including assigning an office space, ordering a computer, and installing the phone and computer. For more information, see Chapter 12, "The Office Setup Application."
LoanMgmt
Submits an application for a loan, including launching a subprocess (CreditHistory) to check the applicant's credit history. For more information, see Chapter 13, "The Loan Management and Credit History Applications."
CreditHistory
Checks a loan applicant's previous credit history with the company. Used as a subprocess by the LoanMgmt application. For more information, see Chapter 13, "The Loan Management and Credit History Applications."
ClaimProcess
Submits an insurance claim, including checking policy details from a flat file, and going through the approval process at the insurance company. For more information, see Chapter 14, "The Insurance Claim Processing Application."
HelloWorld
Demonstrates how to use a custom activity in an application. The custom activity displays a greeting based on the language specified for the greeting. For more information, see Chapter 17, "Writing Custom Activities."
TimeOffRequest
Submits an employee's request for time off for approval by the manager and by human resources (HR).

You can use these applications as models for your own application. To base an application on one of these existing applications, use Save As and make sure your new application has a unique name and a unique database table.

After configuring a sample application, you can deploy it in development mode to your own cluster. In this way, you can see how applications are managed in Process Administrator. You can also see how end users run them in Process Express.

Applications and the Corporate Directory
When you install PAE, the default installation uses the same Directory Server for both the configuration directory and the corporate user directory. This user directory contains a small set of sample users, along with users defined as administrative users during the PAE installation. For example, if you define admin as the administrative user, the installer adds this to the sample set of users in the directory.

If you do a default installation, using the admin user, you can easily set up the sample applications to deploy.

If you do a custom install or otherwise change your configuration, you may need to make adjustments to the samples before you can deploy them. For example, if you defined a different user directory (such as your company's own corporate directory) or if you want to use other users, you must adjust the sample applications.

Most of the sample applications define admin as their default user. If you use your company's corporate directory, then you must do either of the following before deploying the sample applications:

If you change your corporate directory after your cluster has been created, there are several changes that you and the server administrator must make before you can deploy applications with the new directory. For information on changing your user directory, see the Administrator's Guide.

Setting Your Corporate Directory
Before you can add or change the default users for the sample applications, you must define a corporate directory for each application. Otherwise, you cannot browse or search the directory of users. To define a directory, perform the following steps:

  1. Open the application.
  2. In the application tree view, highlight the name of the application, right-click, and choose Properties.
  3. Click the right arrow in the Corporate Directory property field. A selection dialog box appears for the corporate user directory.
  4. Choose whether to set the directory based on the cluster or not.
  5. Click OK.

Deleting an Application
You can delete applications only when they are stored on your local machine. To delete an application, perform the following steps:

  1. In the Select an Application window, select an application.
  2. If this window is not open, you can open it as follows. From the Application menu, choose Delete.

  3. In the Select an Application window, click the Delete button.
  4. A confirmation dialog box appears.

  5. Click Yes to delete the application.
 

Copyright © 1999 Netscape Communications Corp. All rights reserved.