| Chapter 3- |
|
Getting Started |
This chapter describes how to start the CST console when CST is installed in a stand-alone mode and through Sun Management Center. It contains the following sections:
Depending on how CST 3.5 is installed in the customer's environment:- as a standalone or as part of a Sun Management Center 3.0 framework, the CST console is invoked differently.
Prior to starting the CST user interface, the user must ensure the login username is added to the appropriate CST group by the system administrator for CST for that site. Refer to the CST Administration chapter , for details. Depending on the group to which the username is added, the user will have specific `READ' or `READ & WRITE' privileges through the user interface.
CST 3.5 installed as a stand-alone application uses the CST applet for the user interface. Follow these steps to start the CST applet from your Internet browser.
1. To view the CST 3.5 applet you need Netscape Navigator, version 4 or higher, or compatible browser version that supports the Java2 plug-in. If Java2 plug-in is not installed on the system, the plug-in can be downloaded and installed from www.netscape.com. Systems running Solaris 8 or higher have Java 2 pre-installed.
2. Invoke the applet by typing the following URL in your browser:
http://<serverhost.domain>/cstj2.html
OR, when your browser is Netscape:
http://<serverhost.domain>/cst.html
<middlewarename.domain> refers to the name of the middleware server that has an http daemon running and where the CST repository is maintained.
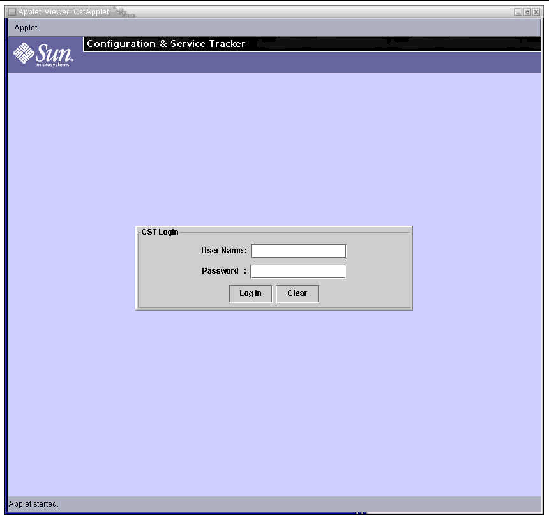
A CST login window displays as shown in FIGURE 3-1.

3. Type the username and password and click the LOG IN button.
4. If the login procedure is successful, you see the CST applet's main window displayed on the browser. The applet displays the hierarchy of the systems monitored on the left side and a history of events of the repository server with other details on the right side.
5. For further details and use of the applet, please refer to the CST Features and Functions chapter.
|
Note - Depending on the group you belong to, cstadmin or cstops, you will have either READ and WRITE or READ ONLY privileges in the user interface, For information about levels of user access based on group rights, refer to the CST Administration chapter. |
CST 3.5 includes a Log Out function to enhance security of your tracked data.

1. Click on the LOG OUT button in the top bar of the screen.
2. Click on the EXIT selection to log out, close the CST session.
Below is a brief outline of the procedures needed to start the CST application through Sun Management Center. It is important to perform these procedures in the order listed. Detailed, step-by-step instructions follow in To Start the Sun Management Center Console.

1. Start the Sun Management Center server and agent. For details, see the Sun Management Center 3.0 Software User's Guide.
2. Start the Sun Management Center console.
3. If this is the first time you are using CST to view a monitored system, create an icon for that system on the Sun Management Center main console.
4. Start the CST console from Sun Management Center.
1. Start the Sun Management Center console. Type:
% /opt/SUNWsymon/sbin/es-start -c
|
Note - You do not have to be superuser to start the Sun Management Center console. |
The Sun Management Center login panel displays.
2. Log into Sun Management Center.
Supply the following information:
For further details on Sun Management Center access policies, refer to the Sun Management Center 3.0 Software User's Guide.
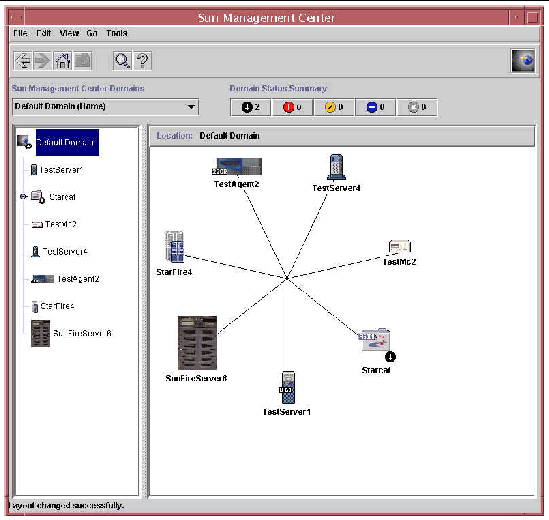
The Sun Management Center main console window displays, as shown in FIGURE 3-5.
Now that the Sun Management Center console is running, create an object, or icon, for the system you want to view. The next procedure describes how to enter information about a system so it is viewable through a Sun Management Center icon.
|
Note - You only have to perform this procedure the first time you want to view a system in Sun Management Center. |
To display a system's information in the CST console, you must first give that system an icon in Sun Management Center.
1. From the Edit tab on the Sun Management Center tool bar, click on Create an Object
 [ D ]
[ D ]
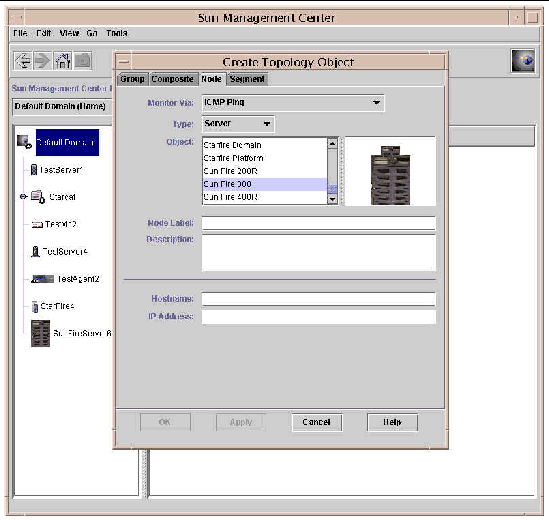
The Create Topology Object window displays.
2. Select the Node tab at the top of the window.
The Node Label and Description fields are optional. The Node Label that you enter appears in the Sun Management Center console as the label for the host. If you leave the Node Label blank, the hostname displays in place of that label.
3. Enter the hostname, the IP address, or both, of the system you want to view.
4. Enter the port number of the Sun Management Center agent system.
This must be the same port number as the SNMP number entered when installing the Sun Management Center agent. To obtain this port number, refer to the file /var/opt/SUNWsymon/cfg/domain-config.x.
An icon of the object is created in the Sun Management Center console window.
To expand or collapse the Hierarchical View for each element, double-click the icon to the left of the element in the left half of the Sun Management Center console.
These are only the basic steps for creating an object. For full details, refer to the Sun Management Center 3.0 Software User's Guide.
Follow these steps when creating a node for a multi-domain system to be monitored by CST 3.5.
1. From the Edit tab on the Sun Management Center toolbar, click on Create an Object.
The Create Topology Object window displays.
2. Select the Composite tab at the top of the window.
3. In the Object menu, select the Starfire option.
4. Enter the label, SSP hostname, the IP address, and port number for this composite node.
Sun Management Center retrieves the information about all domains automatically, and gives each domain an icon. Your final view contains one platform icon, one SSP icon, and one icon for each domain.
For further information about multi-domain configurations in Sun Management Center, refer to the appropriate document for your system: Sun Management Center 3.0 Supplement for Starfire Servers, Sun Management Center 3.0 Supplement for Sun Fire 15K/12K Systems, Sun Management Center 3.0 Supplement for Sun Fire 6800, 4810, 4800, and 3800 Systems. All of these documents are available at: http://docs.sun.com/db/coll/810.1.
|
Note - If you want to monitor a system which is not managed by Sun Management Center, CST can also view ICMP ping nodes. |
Once Sun Management Center is running on your system, start the CST console.

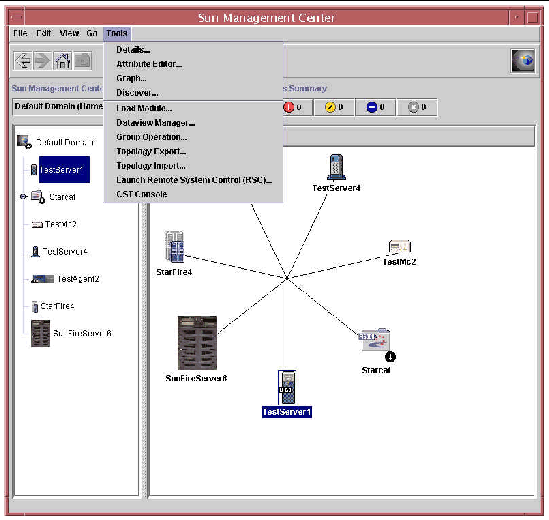
1. Click on the Tools menu in the Sun Management Center console.
2. Select the CST Console option. See FIGURE 3-5.
The CST Console displays as a separate GUI window.
3. In the Sun Management Center console, click on the icon of the system you want to view.
The CST console displays the history and information for that system. In the case of multi-domain systems, different information is displayed for each type of icon:
4. For additional details and usage of the CST user interface, refer to the CST Features and Functions chapter.
5. To skip the registration process, click the Register Later button to proceed to the functional part of the CST user interface.
|
Note - Depending on the group you belong to, cstadmin or cstops, you will have either READ and WRITE or READ ONLY privileges in the user interface, For information about levels of user access based on group rights, refer to the CST Administration chapter. |
Copyright © 2003, Sun Microsystems, Inc. All rights reserved.