| C H A P T E R 2 |
|
Sun Shared Visualization 1.1 Client Installation |
This chapter describes installation and configuration information for the Sun Shared Visualization 1.1 client. Topics include:
| Note - Unless stated otherwise, the majority of examples provided in this chapter are for the Solaris 10 Operating System. |
This section describes how to install the Sun Shared Visualization 1.1 software onto your client and how to remove the software.
If you are using Sun Grid Engine, your client mounts that software from your grid’s NFS server. You do not need to install a copy on the client. Therefore, the product’s optional software (listed in TABLE 2-1) is not required on the client.
The Sun Ray plug-in (Solaris package SUNWvglsr or Linux RPM VirtualGL-SunRay) is installed by default. Though not harmful, this plug-in is not needed on any clients. For instructions to remove the plug-in after installation, see To Remove the Sun Ray Plug-In.
|
1. Take one of the following actions, depending on your installation media:
2. Install the software from a download directory.
a. As superuser, change to that directory and extract the zip file.
where 1.1 is 1.1.1 in the 1.1.1 release, and package depends on the download, solaris or linux. The directory structure is created and the files are extracted.
b. Change to the installation script directory:
c. Continue to Step 4.
3. Install the software from the CD-ROM.
a. As superuser, insert the Sun Shared Visualization 1.1 CD-ROM into an optical drive that is connected to your system.
If your system automatically mounts the disc, continue to Step b.
If your system does not automatically mount the disk, mount it with the following commands:
where 1.1 is 1.1.1 in the 1.1.1 release, and device is:
If you are installing the Sun Shared Visualization 1.1 software from a CD-ROM onto a Linux host, you might see the following error:
This error might occur if you use the automounter with default options, or if you have noexec in the CD-ROM mount entry of the /etc/fstab file.
To prevent this error, change the noexec option to exec, or mount the CD-ROM manually using the exec option.
b. Change to the installation directory:
where the cdrom-path depends on your environment. The following are common names that are available in each environment, but the name on your system might vary:
If you used the mkdir command in Step a in any environment, you can change to the installation directory with this command:
c. Continue to Step 4.
4. Run the installation script:
Sun Microsystems, Inc. ("Sun") ENTITLEMENT for SOFTWARE Licensee/Company: Entity receiving Software. Effective Date: Date of delivery of the Software to You. .... |
The script displays the licensing agreement, and asks:
5. To proceed with software installation, type y.
After agreement, the script begins installation:
This program installs the software for the Sun Shared Visualization 1.1 Copyright 2007 Sun Microsystems, Inc. All rights reserved. Use is subject to license terms. |
The script checks for a newer version of the Sun Shared Visualization 1.1 software. If the script finds one, the script displays:
This system has a higher version of Sun Shared Visualization software than is available in this Release. Sun Shared Visualization software from this release will not be installed. |
Otherwise, the script begins adding packages and asks you about optional software:
The details of this question will vary, depending on your operating system.
The optional software is needed only on servers. See Software Components That Are Not Needed on a Client. The script informs you:
7. Press the Return key to continue installation.
The script begins installing required patches and packages:
The script informs you how to remove the software, and where a log file of the installation is located:
The log file is named with a date and time stamp. In this example, December 22, 2007 at 9:52 am.
vglconnect uses the secure shell (ssh), which may not be installed on older Solaris releases. If your need to use Sun Shared Visualization on a Solaris host without ssh, you need to install ssh, for example, from http://www.sunfreeware.com/openssh8.html or http://www.sunfreeware.com/openssh9.html
|
The Solaris package SUNWvglsr and the Linux RPM VirtualGL-SunRay are server support for Sun Ray clients. This plug-in is not needed on a client, though it is installed by the installation script on a Solaris or Linux host. See Software Components That Are Not Needed on a Client. When the installation script is completed, you can leave the plug-in installed or you can remove it.
|
You might need to remove the Sun Shared Visualization 1.1 software in the future.
1. As superuser, run the removal script.
a. Mount the CD-ROM as in Step a
b. Then cd onto the CD-ROM as in Step b.
c. Then type one of the following commands:
The script starts and identifies the software packages that are to be removed.
All required software for the Sun Shared Visualization Software software will be REMOVED. The following packages will be removed: SUNWvglsr SUNWvgl SUNWtvnc SUNWvrpt |
To cancel removal of this software, press ’q’ followed by a Return. **OR** Press Return key to begin package removal: |
2. Press the Return key to begin package removal.
Pressing the Q key and the Return key aborts the script.
The script does a search for the installed packages and displays the progress.
The script concludes and tells you where a log file of the removal is located.
The log file is named with a date stamp. In this example, December 22, 2007.
As explained in Chapter 1 (especially through FIGURE 1-3 and FIGURE 1-5), Sun Shared Visualization software offers two alternative image transport techniques, VirtualGL Image Transport and TurboVNC (using X11 Image Transport). On a Macintosh client, you can install software for either or both forms of image transport.
The Sun Shared Visualization 1.1 CD-ROM did not include the Macintosh installation files (with names including the .dmg extension), but the 1.1.1 release does. This installation software is also available for download. Software for VirtualGL and TurboVNC are downloaded together. You can choose to install either or both.
|
1. Select the software download option starting from this page:
http://www.sun.com/servers/cr/visualization/get_it.jsp
Follow instructions at this site for downloading Sun Shared Visualization software and documentation.
2. Open the Mac OS X download file.
If the file does not unzip automatially, double-click on the .zip file.
Your desktop should now have two .dmg files:
The version number indicates the release of TurboVNC or VirtualGL software.
|
Installing the VirtualGL package on an x86 Apple Macintosh system enables that machine to act as a VGL Image Transport client.
1. Install the X11 application if it isn’t already present on the Macintosh system.
X11 is available on the Mac OS X installation media in the Optional Installs package.
2. Uninstall Applications/VirtualGL if a different version is already present on the Macintosh system.
3. On the Mac OS X desktop, double-click the VirtualGL disk image.
The VirtualGL disk image is named VirtualGL-version.dmg.
4. Open VirtualGL-version.pkg inside the disk image.
Follow any on-screen instructions to install the Mac OS X client. This client-only Mac OS X package will install files in the same locations as files installed by the Linux RPM.
|
Installing the TurboVNC package on an x86 Apple Macintosh system enables that system to start an optomized TurboVNC viewer. VirtualGL can be installed on the same system, but this viewer doesn’t make use of the VirtualGL Mac OS X client. Instead, the graphics server will run VirtualGL and use X11 Image Transport to provide images to the TurboVNC server session (X proxy). The TurboVNC session transports the images to one or more clients, which display the images with the TurboVNC verwer or the Web VNC viewer.
1. Uninstall Application/TurboVNC if a different version is already present on the Macintosh system.
2. On the Mac OS X desktop, double-click the TurboVNC disk image.
The TurboVNC disk image is named TurboVNC-version.dmg.
3. Open TurboVNC-version.pkg inside the disk image.
Follow any on-screen instructions to install the Mac OS X client. This client-only Mac OS X package will install files in the same locations as files installed by the Linux RPM.
You might need to remove the Sun Shared Visualization 1.1 software in the future.
|
If your Macintosh system already has a package removal function, use that function to remove the Sun Shared Visualization 1.1 software in the future. Otherwise, perform this procedure.
1. Download and install the latest version of OSXPM from http://www.osxgnu.org.
3. Click the Delete Package button.
4. Find and highlight any of these package names in the list of packages:
Enter your password, if prompted to do so.
As explained in Chapter 1 (especially through FIGURE 1-3 and FIGURE 1-5), Sun Shared Visualization software offers two alternative image transport techniques, VirtualGL Image Transport and TurboVNC (using X11 Image Transport):
Determine if you need to obtain Exceed and install VirtualGL, install TurboVNC, or both.
The self-expanding .exe installers are on the CD-ROM in the SharedVisualization_1.1*/Windows directory. (The same directory is available after unzipping the SharedVisualization_1.1*_windows.zip download file.)
|
Installing the TurboVNC package on a Windows machine enables the machine to start a TurboVNC viewer. You do not need to install VirtualGL on the Windows client. VirtualGL will run on the graphics server, and will use its X11 Image Transport to provide images to the TurboVNC server session (X proxy). TurboVNC transports the images to one or more clients, to be displayed by the TurboVNC viewer or the Web VNC viewer.
1. Locate the TurboVNC installer, TurboVNC.exe.
2. Run the TurboVNC installer, typically by double-clicking its icon.
The only configuration option for installation is the directory in which you want the files to be installed.
Installing the VirtualGL package on a Windows machine enables the machine to act as a VGL Image Transport client, along with Exceed or Exceed 3D. You do not need to install VirtualGL or Exceed on the Windows client machine if only TurboVNC clients will be used.
1. Locate the VirtualGL installer, VirtualGL.exe.
2. Run the VirtualGL installer, typically by double-clicking its icon.
The only configuration option for installation is the directory in which you want the files to be installed.
1. Install Exceed or Exceed 3D, if the software isn’t already installed.
See the Exceed documentation for instructions.
2. Install patches for Exceed or Exceed 3D, if the patches aren’t already installed.
If your Windows client is using Exceed 2008 to support VirtualGL, you can optimize performance (as much as a 20 percent gain) by enabling the MIT Shared Memory Extension (MIT-SHM extension).
Obtain and install the latest Exceed 2008 Service Pack, including xlib patch xlib.dll v13.0.1.235 (or higher) for Exceed 2008. Patches are available to those with a Hummingbird support account from the Hummingbird support site:
The Sun Shared Visualization 1.1.1 Release Notes might contain more recent information about patches for this product.
3. Add the Exceed software path to your system PATH environment variable.
See the Exceed documentation for instructions, if its path has not already been added.
|
|
a. Right-click on the Exceed taskbar icon.
b. Select Tools, then Configuration.
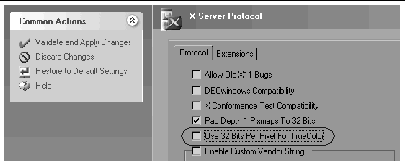
2. Open the X Server Protocol applet in XConfig.
| Note - If you are using the Classic View mode of XConfig, open the Protocol applet instead. |
3. In the X Server Protocol applet, select the Protocol tab and ensure that the Use 32 Bits Per Pixel For True Color box is unchecked.

4. Click Validate and Apply Changes.
| Note - If XConfig asks whether you want to perform a server reset, click Yes. |
5. Proceed to To Disable the Backing Store.
a. Right-click on the Exceed taskbar icon.
b. Select Tools, then Configuration.
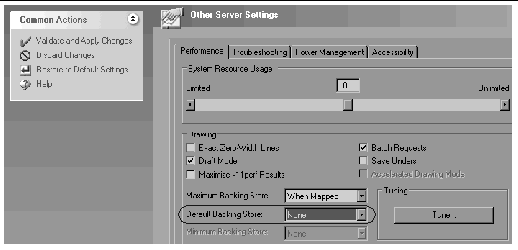
2. Open the Other Server Settings applet in XConfig.
| Note - If you are using the Classic View mode of XConfig, open the Performance applet instead. |
3. Select the Performance tab and ensure that Default Backing Store is set to None.

4. Click Validate and Apply Changes.
| Note - If XConfig asks whether you want to perform a server reset, click Yes. |
VirtualGL can use the MIT-SHM extension in the Exceed software to accelerate image drawing on Windows clients. By using this extension, the overall performance of the VirtualGL pipeline can be improved by as much as 20%. However, Exceed 2008 requires a patch to enable its MIT-SHM extension to work with VirtualGL. See the Sun Shared Visualization 1.1.1 Release Notes for details.
a. Right-click on the Exceed taskbar icon.
b. Select Tools, then Configuration.
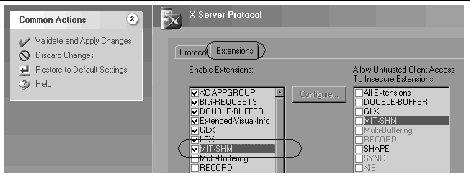
2. Open the X Server Protocol applet in XConfig.
| Note - If you are using the Classic View mode of XConfig, open the Protocol applet instead. |
3. In the X Server Protocol applet, select the Extensions tab and ensure that MIT-SHM is checked.

4. Click Validate and Apply Changes.
| Note - If XConfig asks whether you want to perform a server reset, click Yes. |
You might need to remove the Sun Shared Visualization 1.1 software in the future.
|
|
Copyright © 2008 Sun Microsystems, Inc. All Rights Reserved.