| Sun Shared Visualization 1.1 Software Client Administration Guide |
| C H A P T E R 3 |
|
Manually Using the Sun Shared Visualization 1.1 Software |
Topics discussed in this chapter include:
If you know which host is your graphics server, you can start the Sun Shared Visualization 1.1 server manually. You will either need to know which graphics device or X server on that host will be used, or you will use the server’s default.
| Note - VirtualGL’s default is used if neither the vglrun -d option is used nor the VGL_DISPLAY environment variable is set on the graphics server when vglrun is invoked. For more on VGL_DISPLAY, see VirtualGL Options and Environment Variables. |
The procedures in this chapter assume that the graphics server already has Sun Shared Visualization 1.1 software installed and configured as described in Chapter 3 and Chapter 4 of the Sun Shared Visualization 1.1 Server Administration Guide. When the server is configured that way, access to the graphics accelerator device (and to the server’s X server, if necessary) is granted either to all users or to the vglusers group. In the latter case, you need to verify that the administrator has added your login to that group.
Instructions for use of VirtualGL can vary, depending on:
In this chapter, use of VirtualGL’s Sun Ray Image Transport and VGL Image Transport is described first, followed by information on using TurboVNC.
While this chapter describes manual starting of the Sun Shared Visualization 1.1 software, self-selection of a graphics device in a shared environment is not advised, as other users might be using or about to use that device. If you select a device that others are using, any process sharing the device could exhaust resources (for example, memory on the graphics accelerator). This exhaustion would cause that process to quit or all processes sharing the device to become unreasonably slow. Therefore, sites might prefer to let Sun Grid Engine perform the allocation, as described in the Sun Shared Visualization 1.1 Software Server Administration Guide, 820-3256. Chapter 4 describes using Shared Visualization software with Sun Grid Engine.
There are two components to be started for remote visualization using VirtualGL’s VGL or Sun Ray Image Transports:
The following sections describe use of VirtualGL for Sun Ray, UNIX (Solaris, Linux, or Mac OS X) clients, and Windows clients. When the graphics application starts to use OpenGL on the server, VirtualGL connects to the VirtualGL client (or Sun Ray) and starts streaming compressed image sequences to the client. This mode is not recommended for use on low-bandwidth or high-latency networks.
| Note - To use TurboVNC, which is better for low-bandwidth or high-latency networks, see Manually Using TurboVNC. |
Within a session to the graphics server, you start your application under control of vglrun. The command’s syntax is:
On a Linux graphics server, vglrun is also in /usr/bin, which is included in your path. On a Solaris graphics server, you can add /opt/VirtualGL/bin to your path. In these cases, you can type vglrun without specifying its path. The syntax is therefore:
You can provide vglrun options prior to the name of the graphics application, and options for the application afterward. For example, vglrun options can improve image quality at the expense of performance and network bandwidth. See VirtualGL Reference for vglrun options.
Before attempting a more complex graphics application, you might want to verify that VirtualGL can communicate with your client. To verify communication efficiently, first run a simple application, such as /opt/VirtualGL/bin/glxspheres.
If your client is a Sun Ray thin client, the VirtualGL Sun Ray plug-in will use the Sun Ray image transport. That is, the plug-in will compress images for Sun Ray and send these images directly to the Sun Ray DTU for Sun Ray client hardware decompression and display. The Sun Ray environment does not use VirtualGL client software (vglclient).
There are two cases for using the Sun Shared Visualization 1.1 software from a Sun Ray client, depending on whether the graphics server is also your Sun Ray server.
|
1. Open a new terminal window that will be dedicated to the graphics server session.
2. In the same terminal window, open a Secure Shell (SSH®) session into the graphics server with the ssh command:
Replace user with your user account name on the graphics server. If your account name is the same on the current host as on the graphics server, then the user@ can be omitted. Replace graphics-server with the hostname (or IP address) of your graphics server.
3. Within the ssh session, start a graphics application using vglrun:
The VirtualGL Sun Ray Image Transport will be used. ssh will set your DISPLAY environment variable for you to the graphics-server end of an X tunnel. The result is that the X command stream is encrypted and routed to your Sun Ray server. However, VirtualGL detects this situation and transmits images directly to your Sun Ray DTU.
|
 In any terminal window, start any graphics application using vglrun:
The VirtualGL Sun Ray Image Transport will be used.
This section describes using VirtualGL’s VGL Image Transport from Solaris, Linux, Mac OS X, and Windows clients. Use this mode on local-area networks. Procedures in this section assume you are already logged into the client.
This section has slight variations based on your security choice:
Also, in this case, vglconnect will make two ssh connections into the server (the first to find an open port on the server and the second to create the secure image tunnels and open the Secure Shell). If you are not using an ssh agent to create password-less logins, then this mode will require you to enter your password twice.
Before each use, start by deciding which security choice you will use.
|
1. Start the client’s X server and log into the client.
On a Mac OS X client, start the X11 application that was installed in Applications/Utilities/X11.
2. Open a new terminal window that will be dedicated to the graphics server session.
On a Mac OS X client, you might need to start an X terminal window (xterm) with the Command-N key combination within the Mac OS X X11 application.
3. In the same terminal window, open a Secure Shell session into the graphics server using vglconnect:
Your vglconnect-option value depends on your security choice:
You can use vglconnect -s to create multilayered ssh tunnels. For instance, if the VirtualGL server is not directly accessible from the Internet, you can use vglconnect -s to connect to a gateway server, then use vglconnect -s again on the gateway server to connect to the VirtualGL server. Both the X11 and the VGL image traffic will be forwarded from the VirtualGL server through the gateway and to the client.
Replace user with your user account name on the graphics server. If your account name is the same on the current host as on the graphics server, then the user@ can be omitted. Replace graphics-server with the hostname (or IP address) of that graphics server.
4. Within the ssh session, start any graphics application using vglrun:
Your vglrun-options value depends in part on your security choice:
Replace graphics-program
No action is required on the client as long as the SSL port traffic is not blocked by the client’s firewall. By default, the client automatically accepts SSL or unencrypted connections.
A PC running Windows can be a client with Exceed 2006 or newer. For applications that use stereographic or transparent overlays, Exceed 3D is required on the client. The client desktop must be configured to display true color (24-bit pixels).
Instructions for installing and configuring VirtualGL on Windows are in Installation on a Windows Client, or the VirtualGL User’s Guide. See Related Documentation. Ensure that Exceed has been configured.
This section describes using VirtualGL’s VGL Image Transport from a Windows client. This mode is not recommended for use on low-bandwidth or high-latency networks. Those networks require the Exceed (or Exceed 3D) X server to be installed on the Windows client.
1. Start Exceed if it isn’t already started.
Hover the mouse pointer over the Exceed taskbar icon and note the Exceed display number (for example, Exceed 0.0 Multiwindow Mode.)
2. Open a new command prompt window and set the DISPLAY environment variable.
Replace :0.0 with the Exceed display number.
If you only ever plan to use one Exceed session at a time, then you can set the DISPLAY environment variable in your global user environment (found in Control Panel->System->Advanced->Environment Variables).
3. In that same command window, open a Secure Shell session into the graphics server using vglconnect:
C> cd /d "c:\program files\virtualgl-version-build" C> vglconnect [vglconnect-option] user@graphics-server |
Your vglconnect-option value depends on your security choice:
vglconnect -s can be used to create multilayered ssh tunnels. For instance, if the VirtualGL server is not directly accessible from the Internet, you can use vglconnect -s to connect to a gateway server, then use vglconnect -s again on the gateway server to connect to the VirtualGL server. Both the X11 and the VGL image traffic will be forwarded from the VirtualGL server through the gateway and to the client.
Replace user with your user account name on the graphics server. Replace graphics-server with the hostname (or IP address) of that graphics server.
4. Within the ssh session, start a graphics application using vglrun:
Your vglrun-options value depends in part on your security choice:
Replace graphics-program
No action is required on the client as long as the SSL port traffic is not blocked by the client’s firewall. By default, the client automatically accepts SSL or unencrypted connections.
When using the VGL Image Transport, vglconnect starts a vglclient daemon that awaits connections from VirtualGL applications (started with vglrun) from remote graphics servers. The VirtualGL client uses negligible resources until a server process connects to the client.
vglconnect prints messages identifying the ports used:
If vglconnect is used more than once from the same client (for example, to connect to a different graphics server), it might tell you that vglclient is already running on this X display:
This output is fine. vglclient is designed to stay active in the background and available for subsequent connection from any number of remote applications.
vglrun marks its innocuous messages with NOTICE. If the VGL_CLIENT environment variable is not set, but ssh environment variables are set, VirtualGL will set VGL_CLIENT from the ssh variables, and print this message to remind you, in case you intended to do something else:
[VGL] NOTICE: Automatically setting VGL_CLIENT environment variable to [VGL] 100.200.30.44, the IP address of your SSh client. |
This section provides a starting point for analyzing problems with the use of VirtualGL’s VGL Image Transport.
|
You can verify the ability of an application on the graphics server to access your client’s X server.
The appearance of the xclock application verifies access.
If a vglclient had been running on this client but is no longer running and active, you might see this server message:
This message indicates that the vglrun process could not communicate with the vglclient process on the client. Sometimes additional messages follow, such as:
When your server’s VirtualGL cannot connect to your vglclient, follow these steps on your client:
1. Run vglclient -kill to make sure that there aren’t any vglclient processes running.
This action might print the process ID of a vglclient process being terminated.
2. Restart the vglclient by using vglconnect with the -force option.
If your application (or a specific sequence of actions) repeatedly causes vglclient to crash, file a bug report.
If TurboVNC or a web browser is used for the client, this section provides detailed information. This method is well suited for a slow or high-latency network (for example, the Internet) but also performs well on a faster network, such as a LAN. TurboVNC also enables multiple clients to share graphics applications, aiding in collaboration.
On a Solaris or Linux host, you can read the TurboVNC man pages with a command such as:
You can read additional related man pages by substituting the following for vncserver:
On a Mac OS X host, the only man page is for vncviewer.
| Note - For Windows, after installing TurboVNC, use the embedded help feature. The icon for help is a question mark in the upper-right corner of the TurboVNC viewer window. |
There are two components to be started:
Some users can use the TurboVNC vncviewer client while others sharing the same VNC session use the Java based Web VNC viewer.
To run your application within a TurboVNC session hosted on the graphics server, you use these six steps:
1. Set TurboVNC’s password using vncpasswd.
| Note - Do this step upon the initial execution. The step does not need to be repeated for later runnings. |
2. Access the graphics server.
3. Start a TurboVNC session on the graphics server.
4. Start a TurboVNC viewer on your client (host). Additional viewers can be started by collaborators. This step is dependent on which TurboVNC viewer is used.
5. Start your application within the TurboVNC session on the graphics server. Invoke the application using vglrun, so the application is under the control of VirtualGL.
6. Eventually, terminate the TurboVNC server session (and all clients).
These steps differ slightly depending on whether you choose to use the vncserver command or the RUN.vncserver script, which is part of the optional Sun Grid Engine Additions. RUN.vncserver might be easiest, but requires the same home directory to be shared by the client host and the graphics server.
The procedures to follow for either choice are listed in TABLE 3-1. The third and fourth procedures in each sequence are different.
|
To Start a TurboVNC Viewer and Connect to Your TurboVNC Session |
||
The following sections detail the six steps for manually using the Sun Shared Visualization 1.1 software with the vncserver command.
|
Before running the TurboVNC server for the first time, you should select a TurboVNC password, which may differ from your login password.
client% /opt/TurboVNC/bin/vncpasswd Using password file /home/susieq/.vnc/passwd Password: Verify: Would you like to enter a view-only password (y/n)? n |
If /opt/TurboVNC/bin is in your $PATH, then you can start vncpasswd. The view-only password is an alternate password to be given to a collaborator you want to enable to join your TurboVNC session. This collaborator can only view your session, not move the mouse, nor enter keyboard or mouse events. The TurboVNC password (and any view-only password) will be used by all sessions started by this user using the same $HOME directory. The password can be changed before any session.
|
Take one of the following actions:
Open a new terminal window. Within the window, use ssh to access the graphics server:
client% ssh user@my-server Password: Last login: Wed May 12 13:33:52 2006 from client Sun Microsystems Inc. SunOS 5.10 Generic January 2005 |
Open a command prompt window. Within the window, use putty to access the graphics server:
C> "c:\program files\turbovnc\putty" user@graphics-server Password: Last login: Wed May 12 13:33:52 2006 from client Sun Microsystems Inc. SunOS 5.10 Generic January 2005 |
Replace user with your user account name on the graphics server. Replace graphics-server with the hostname (or IP address) of that graphics server.
The DISPLAY environment variable on the graphics server shell is irrelevant to the TurboVNC session you are about to establish. The TurboVNC server session is itself an X server. Within the TurboVNC session all windows have a DISPLAY value starting with my-server.
|
Start the TurboVNC server session on the graphics server host using the vncserver script.
If the graphics server is running Solaris software, the initial invocation looks like the following with Shared Visualization release 1.1.1:
If you add/opt/TurboVNC/bin to your $PATH, you can start vncviewer without typing the path.
You can specify a size (in pixels) for the vncserver’s created desktop using its -geometry w x h option. If the size is too small, applications might not fit. But if the size is too large, you are not able to display all of the desktop at once on your client, so you will get scroll bars.
The terminal window shell displays the vncserver’s output. The key line of output displays the TurboVNC display name (and is set off by blank lines). Note the server name (my_server in this example) and X display number (1 here). You can think of the values, separated by the colon, as the display name, such as my_server:1 in this example.
The ssh session to the graphics server can now be exited, if desired. However, you might want to use this session as a reminder to eventually kill the VNC server session.
|
This procedure differs, based on which TurboVNC viewer you use on your client:
Once your TurboVNC viewer is connected to your TurboVNC session, within this TurboVNC X session you can create multiple terminals (shell windows) and start graphics applications.
1. Decide which VNC viewer you will use.
2. Connect your web browser to your TurboVNC session.
In your web browser, type the URL containing the server name and the port number, which is 5800 + the display number noted previously.
For the previous example (my_server:1, where the display number is 1), the URL is http://my_server:5801. The web server displays a separate TurboVNC Java applet window. This window enables you to set options. (You also can change options using the Options button at the top of the TurboVNC session window.) This window will prompt you for the TurboVNC password before it enables you to view the TurboVNC session.
After the viewer is enabled, continue with the next procedure, To Start a Graphics Application Within a TurboVNC Session.
3. Locate your TurboVNC server session’s display name.
This display name is the graphics server name and the X display number, separated by a colon. (The name my_server:1 is used in the examples in this procedure.)
This name is available when you start your TurboVNC session.
You will include this display name as an option to the TurboVNC viewer, so the viewer can connect to your TurboVNC session.
4. Start a TurboVNC viewer connected to your TurboVNC session.
VNC offers a client program specifically for use on the client host as a remote TurboVNC viewer, which can offer better window system integration and much better performance than the web browser technique.
On a Solaris, Linux, or Mac OS X client, the TurboVNC viewer (vncviewer) is in /opt/TurboVNC/bin/. If you add this directory to your $PATH variable, you can start vncviewer without typing the path.
If you do not put your graphics server’s VNC display name on the vncviewer command line, a small vncviewer window will prompt for it. Enter the display name and press the Return key.
The TurboVNC viewer prompts you for your TurboVNC password and then enables you to view the TurboVNC session.
a. Select a connection profile in the dialog.
FIGURE 3-1 TurboVNC Connection Dialog on a Windows Client
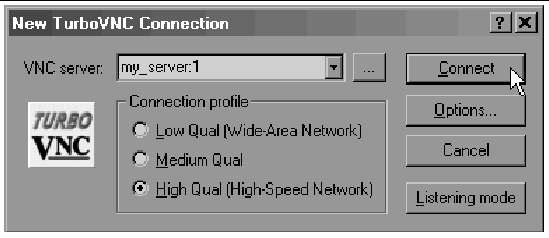
b. When prompted, enter your password and click OK.
For more information on connection profiles, which enable you to establish settings that balance quality and performance, see TurboVNC Image Encoding Protocols and Dynamic Quality/Performance Tradeoff.
A TurboVNC session window appears on your client host. This client window views the TurboVNC X server on the TurboVNC server host. Within this TurboVNC session, you can launch X Windows applications that will run on the server host.
|
Within the TurboVNC session, you might type commands to the graphics server’s shell windows normally. However, when you are ready to run a graphics application, you must use VirtualGL’s vglrun command. vglrun interposes between the application and the GLX library so vglrun can read completed images from the graphics accelerator and pass the images to the TurboVNC server session. The vglrun command can be in your $PATH. Otherwise, you need to use a full path to the vglrun command.
VirtualGL avoids compressing the graphics images VirtualGL gives to the TurboVNC session on the same host. TurboVNC compresses images it sends to its viewer. TurboVNC also sends images to clients only as fast as the client can display the images. Therefore, the VNC session does not necessarily send every updated frame to every client.
Use a vglrun command to start your graphics application.
For example, enter this command from within a terminal window in the TurboVNC session:
If you attempt to run an OpenGL application from within your TurboVNC session without remembering to use vglrun (but with $DISPLAY directing the application to your TurboVNC session), you might get an error message such as:
|
Do not forget to save your work and terminate the TurboVNC session when you are done with it.
Exiting the viewer by quitting your web browser, leaving the TurboVNC page, or exiting the vglviewer does not terminate the TurboVNC server session. When you have saved your work, you must cause the TurboVNC session and all TurboVNC foreground processes to exit.
Take one of the following actions:
When the TurboVNC server session exits, vglviewer exits, and a web browser viewer prompts for a session password.
To list the X display numbers and process IDs of all TurboVNC server sessions that are currently running under your user account on this system, type:
Even without submitting a job to Sun Grid Engine, the RUN.vncserver script that is an optional part of Shared Visualization 1.1 server installation can help start the TurboVNC server session. This script is available to clients that have mounted the Sun Grid Engine installation from the grid’s NFS server.
This process is nearly identical to the process described in Manually Using the vncserver Command. However, a file holds the TurboVNC session’s DISPLAY value, relieving the user of this burden. Because the file is under the user’s $HOME, it also has these two disadvantages:
The first two procedures in the sequence are the same whether you are using the vncserver command or the RUN.vncserver script:
When you use the RUN.vncserver script, the third and fourth procedures in the sequence are different and easier:
The final two procedures are the same in both cases:
The procedures included in this section are the two that are different when you use RUN.vncserver.
|
| Note - This section substitutes for To Start the TurboVNC Server Session. |
1. Type the RUN.vncserver command:
The output and any errors from the RUN.vncserver script is in $HOME/vncserver.log. If your personal configuration files, such as $HOME/.profile or $HOME/.cshrc do not override the $PATH or csh $path established by the RUN.vncserver script, then vglrun (used to start a graphics application) is in your $PATH.
2. Add the configuration files to the $PATH the files receive, rather than replacing that path.
Your grid can have a different script for this purpose, specific to your environment.
| Note - The files written by the RUN.vncserver script are in your $HOME on the execution host (graphics server), if that differs from your $HOME on your client (host). |
After starting the VNC server session, the ssh session to the graphics server can now be exited, if desired. However, you might want to use this session as a reminder to eventually exit the VNC session.
|
| Note - This section substitutes for To Start a TurboVNC Viewer and Connect to Your TurboVNC Session. |
This step depends on your TurboVNC viewer. Either viewer should be convenient, as long as the graphics server host and the client host share the same $HOME directory.
Connect your web browser to your TurboVNC session.
The RUN.vncserver script creates files in your $HOME directory starting with vnc_. The file $HOME/vnc_url should redirect your browser to the execution server and port number for your TurboVNC session. If your web browser expands $HOME, you could simply enter (or select a bookmark for) $HOME/vnc_url or file://$HOME/vnc_url. If neither of these methods work, you can expand $HOME yourself and type file:// and your home directory followed by /vnc_url (for example, file:///home/susieq/vnc_url). This action redirects your browser to the URL contained in your vnc_url file.
| Note - The files written by the RUN.vncserver script are in your $HOME on the execution host (graphics server), if that $HOME differs from your $HOME on your client (host). |
You can also view your $HOME/vnc_url file and use your browser to view the URL contained in that file (for example, http://my_server:5802).
The web page prompts you for the TurboVNC password and then enables you to view the TurboVNC session. Within this TurboVNC X session, you can create multiple terminals (shell windows) and start graphics applications. See To Start a Graphics Application Within a TurboVNC Session.
Start a TurboVNC viewer connected to your RUN.vncserver session.
The script saves the graphics server name and port number in the file $HOME/vnc_server in a format useful to the TurboVNC viewer. You can start the TurboVNC viewer on your client (host) by appending
‘cat $HOME/vnc_server‘ as an option to your vncviewer starting. If your client is running Linux, your command might be:
You can make a shell alias for this command.
Normally, the connection between the TurboVNC server session and the TurboVNC viewer is completely unencrypted, but securing that connection can be easily accomplished by using the port forwarding feature of Secure Shell (ssh).
|
1. Start a TurboVNC session on the server.
2. Open a new ssh connection into the server with one of the following command lines:
In either case, replace user with your user account name on the graphics server. Replace graphics-server with the hostname (or IP address) of that graphics server.
Replace 5900+n with the sum of 5900 and the X display number of the TurboVNC server session to which you want to connect.
For instance, if you want to connect to display :1 on server my_server using user account my_user, you type:
3. Start the TurboVNC viewer and point it to localhost:n (localhost:1 in the preceding example).
For LAN connections and other high-speed networks, tunneling the TurboVNC connection over ssh will reduce performance by as much as 20 to 40 percent. But for connections such as wide-area networks and broadband, there is little or no performance penalty for using ssh tunneling with TurboVNC.
This section describes controlling and measuring VirtualGL performance. Additional information is in Appendix A and Appendix B.
By default, VirtualGL discards frames when it is already busy sending a frame. This behavior, called spoiling, allows the most recent frame to appear sooner at the client. The most recent frame need not wait behind older frames. However, this behavior means that the application and graphics accelerator spend time producing frames that will be discarded. The -spoil option to vglrun disables spoiling. This behavior forces every distinct frame that is produced by the application to be transported to the client and displayed. Therefore, this behavior slows the application to the speed at which the frames can be compressed, transmitted, decompressed, and displayed. In this way, the application’s stated performance matches the client’s results.
The vglrun +profile option outputs (typically, to the vglconnect log file) lines that show its performance for compression, transmission, decompression, display, and overall (total) performance in frames per second (fps) and megapixels per second.
For example, an application with spoiling enabled might produce 60 frames per second, of which 10 are displayed for the user. The application reports that its performance is 60 frames per second. However, the vglrun profile output shows a total of only 10 fps.
If you rerun vglrun with -spoil, the application’s performance will match the profile performance of vglrun. Because resources are not spent producing discarded frames, more than 10 fps might now reach the client (depending on where the bottleneck was). This example might now produce, transmit, and display to the client 20 fps.
TurboVNC also spoils frames, but its behavior cannot be controlled by VirtualGL options or environment variables. Each VNC client pulls a frame from the server when it is ready, rather than the server pushing images to the clients when the image has been updated by an application.
TurboVNC supports both static and dynamic controls over quality and performance tradeoffs. See TurboVNC Image Encoding Protocols and Dynamic Quality/Performance Tradeoff.
| Sun Shared Visualization 1.1 Software Client Administration Guide | 820-3257-13 |
Copyright © 2008 Sun Microsystems, Inc. All Rights Reserved.
 To Use VirtualGL From a Sun Ray Client When the Sun Ray Server and the Graphics Server