Chapter 3 Customizing Project WebSynergy
This chapter describes some simple customization tasks; most of which can be done from the user interface of WebSynergy. For accomplishing more serious changes to the product configuration, you need to make changes to the portal-ext.properties file. A simple example for making changes to the portal-ext.properties file, see Localization. For details of properties in the portal-ext.properties file, refer The portal-ext.properties File.
Branding and Site Identity
To be done.
 To change the Banner Logo
-
Login to Project WebSynergy as admin user.
-
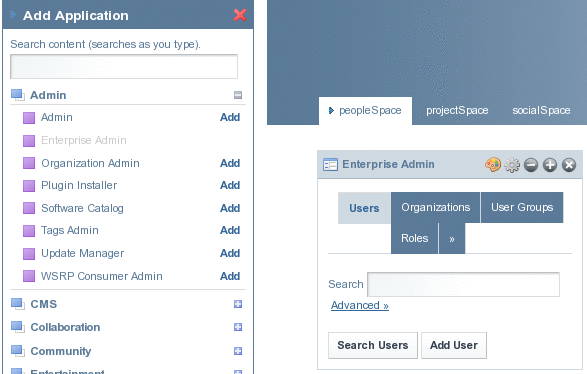
Click Add Applications and expand the Admin folder.
-
Click Add against the Enterprise Admin portlet.
The Enterprise Admin portlet is added to your page
Figure 3–1 Enterprise Admin portlet
-
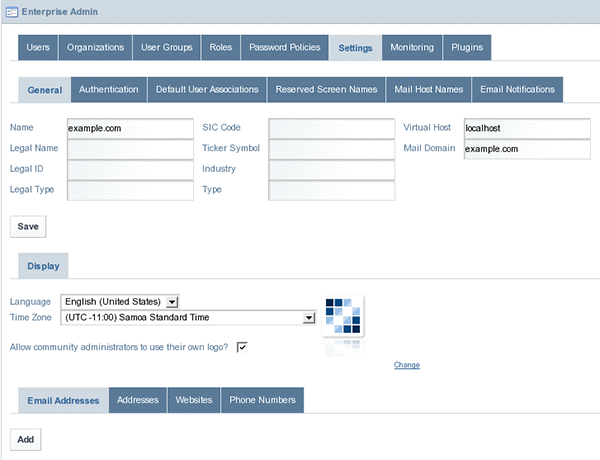
Maximize the portlet, and click on the Settings tab.
Figure 3–2 Settings page
-
Click on the Change link. You are prompted to browse and select a new banner logo.
 To change the Address Bar and Browser tab Icons
-
Navigate to the directory which contains the WebSynergy installation.
-
From the directory containing the WebSynergy installation, navigate to
/glassfish/domains/domain1/applications/j2ee-modules/websynergy/html/themes/classic/images.
-
Change the liferay.ico image.
-
Clear the browser cache and reload the page.
Friendly URLs
To be done.
 To change the Friendly URL of a Page
-
Login to Project WebSynergy as admin user.
-
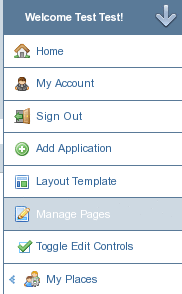
Click on Manage Pages from the welcome menu.
Figure 3–3 Welcome menu – Manage Pages
You can see all the pages on the left hand side under the Guest (Test Test).
Figure 3–4 Manage Pages page
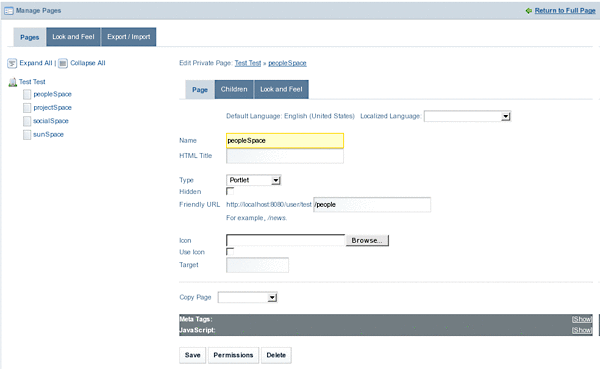
Friendly URL for the PeopleSpace page is http://localhost:8080/user/test/people. This means, you can directly access the PeopleSpace page by typing the URL http://localhost:8080/user/test/people, as seen in the below figure.
Figure 3–5 Friendly URL for the page
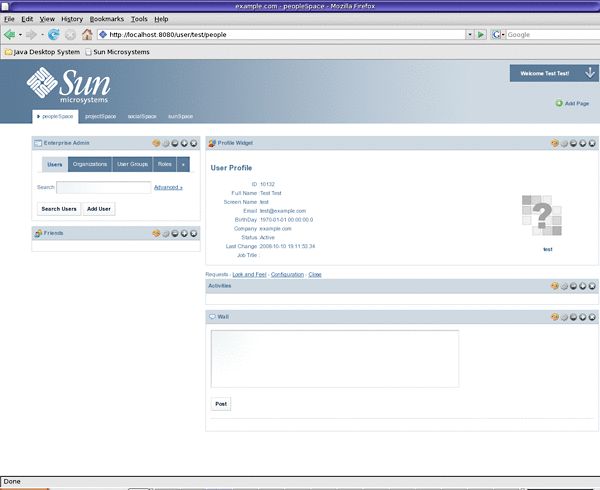
You can note the at value in the Friendly URL field looks as below:
Figure 3–6 Friendly URL field

-
Change the value of the Friendly URL to the value you like.
In our example, we change it from people to friendly_url.
Figure 3–7 Friendly URL field with new Friendly URL

-
Click Save.
A message saying that the page is not found appears. For the changed URL to take effect, logout and login back to WebSynergy.
-
Now you can view the Friendly URL.
The changed Friendly URL for the PeopleSpace page is http://localhost:8080/user/test/friendly_url.
Figure 3–8 New Friendly URL

Site Layout and Navigation
Layout Templates are ways of choosing how your portlets will be arranged on a page. They make up the body of your page, the large area where you drag and drop your portlets to create your pages. WebSynergy comes with several built-in layout templates, but if you have a complex page layout (especially for your home page), you may wish to create a custom layout template of your own. You can refer to the development document in Liferay Documentation for the procedure to create a custom Layout Template.
 To change the Site Layout
-
Login to Project WebSynergy as Admin user.
-
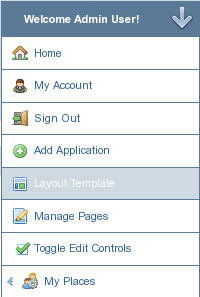
Click on Layout Template from the Welcome menu.
Figure 3–9 Welcome menu – Layout Template
-
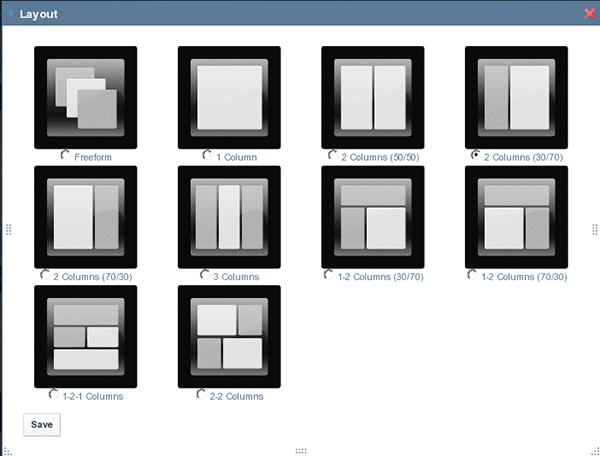
The Layout page appears.
Figure 3–10 Layout Templates
-
Select the Layout you want to use and click Save.
 To create a new Layout
Changing the Page Theme
Themes are hot deployable plugins which can completely transform the look and feel of the portal. Most organizations have their own look and feel standards which go across all of the web sites and web applications in the infrastructure. WebSynergy makes it possible for a site designer to create a theme plugin which can then be installed, allowing for the complete transformation of the portal to whatever look and feel is needed. You can refer to the development document in Liferay Documentation for the procedure to create a custom theme.
 To Change the Page Theme
-
Login to Project WebSynergy.
Any user can change themes, but only the admin user has access to all available themes, and has the privilege to install more themes.
-
Choose Manage Pages from the welcome menu.
-
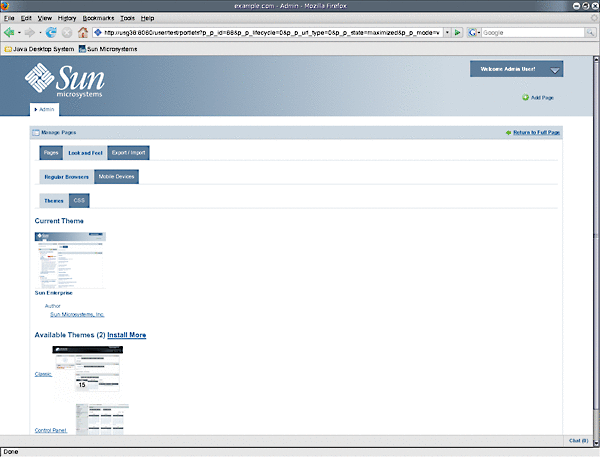
Click on the Look and Feel tab.
The Current Theme for the page and all the available themes are displayed.
Figure 3–11 Page Theme
-
To change the theme, click on a theme from Available Themes.
The theme is applied to your page.
Using Bundled WebSynergy Portlets
To be done.
 To use Bundled WebSynergy Portlets
-
Login to Project WebSynergy as Admin user.
-
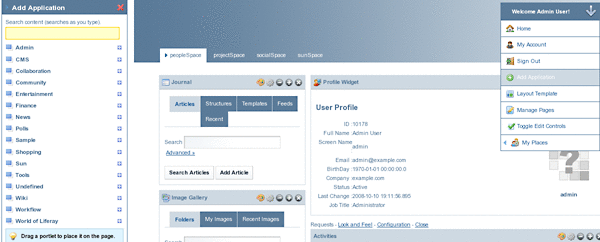
Click on Add Applications from the welcome menu.
Figure 3–12 Bundled WebSynergy Portlets
-
Add the required portlet to your page.
Customizing the Look and Feel and Configuration of a Portlet
You can change the display name of a portlet and also its look and feel.
Changing the Name of a Portlet
You can change the display name of a portlet simply by clicking on the name of the portlet.
 To Change the Name of a Portlet which is on a Private
Page
-
Login to Project WebSynergy as any user of your choice.
In this example, login as Paul Tester.
-
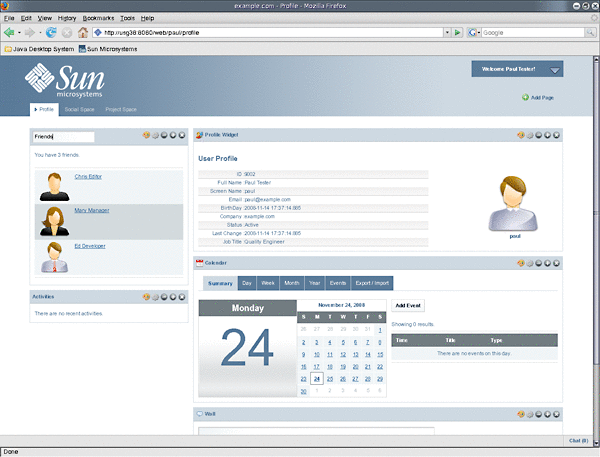
Click on the name of a portlet.
For example, click on the name of the Friends portlet.
Figure 3–13 Changing the display name of a portlet
-
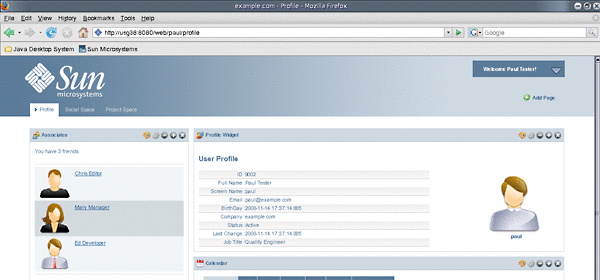
Edit the display name.
In this example change the name of the portlet to Associates.
Figure 3–14 Changed display name
 To Change the Name of a Portlet which is on a Public
Page
To change the name of a portlet which is on the public page of a user, you need to login as the user and navigate to the public page of the user from My Places on the welcome menu.
-
Login to Project WebSynergy as any user of your choice.
-
Navigate to a public page of the user by selecting My Places on the welcome menu.
-
Click on the name of a portlet, and edit and change the name.
Customizing the Look and Feel and Configuration of a Portlet
The Look and Feel and Configuration buttons on a portlet can be used to customize the portlet.
Figure 3–15 Look and Feel and Configuration buttons on a portlet

The Look and Feel Button
A window pops-up on clicking the Look and Feel button. The window provides options to customize the look and feel of the portlet.
Figure 3–16 Customizing the Look and Feel
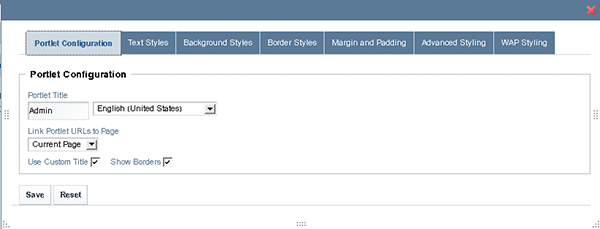
The window has tabs for Portlet Configuration, Text Styles, Background Styles, Border Styles, Margin and Padding, Advanced Styling, and WAP Styling.
Portlet Configuration tab
If you enable the Use Custom Title option, you can change the value in the Portlet Title field. When you click Save, the new title for the portlet takes effect. The Show Borders option can be used to enable or disable the display of borders.
Text Styles tab
Using this tab, you can change the default settings for text such as, font, size, color, alignment, bold, and italic.
Background Styles tab
Using this tab, you can change the default background color for the portlet.
Border Styles tab
Using this tab, you can change the border styles for the portlet. You can change the default settings for the Border Width, Border Style, and Border Color. You can set different width, style, and colors for different borders by disabling the Same for All option.
Margin and Padding tab
Using this tab, you can change the default margin and padding settings. It may not be generally advisable to change the default margin and padding settings.
Advanced Styling tab
Using this tab, you can define CSS rules for the portlet and all similar portlets.
WAP Styling tab
Using this tab, you can define the styling for mobile handsets.
The Configuration Button
A window pops-up on clicking the Customization button. From this window, you can configure permissions for the portlet, can export/import the portlet data, and can enable sharing on the portlet/widget.
For a detailed use case on the Configuration button to enable sharing of portlets, see Enabling Sharing of a Portlet
Localization
WebSynergy is localized out-of-box in 22 languages , out of which Sun provides localization support for Japanese (ja) and Simplified Chinese (zh_CN). Remaining languages are community driven.
Setting User Prefered Language in WebSynergy
User can use WebSynergy in their preferred language from any of the languages supported by it. This section describes how users can change their preferred language.
 To set User Language
-
Login to WebSynergy as admin user.
-
Click 'My Account' from the welcome dock, it takes you to the Control Panel.
-
Click on the 'Display Settings' link under Miscellaneous in the right menu.
-
Select a language from the Language drop down.
-
Click Save.
User interface changes to the language selected. You can repeat the above steps to change the language again in the feature.
Note –You can use the same page to change the time zone and the greeting message.
Adding a new Language Support
You can add localization support for a language which is not supported by WebSynergy by default. This section provides details on how you can add localization support for a new language.
 To add new Language Support
The WebSynergy evaluation bundle has a portal-ext.properties file in the GlassFish install-dir/domains/domain1/applications/j2ee-modules/websynergy/WEB-INF/classes. When you are using a WebSynergy bundle which is not including samples, you have to create a portal-ext.properties file. This task describes the process to create a portal-ext.properties file, and making changes to it to support localization.
-
Create a temporary folder. In this example, name the folder as test.
Equivalent step in the command prompt or in the terminal window of a UNIX like OS:
mkdir /tmp/test
-
Copy portal-impl.jar to the temp folder.
portal-impl.jar contains language resource bundles for WebSynergy. This jar file is located under the GlassFish install-dir/domains/domain1/application/j2ee-modules/websynergy/WEB-INF/lib/ directory.
Equivalent step in the command prompt or in the terminal window of a UNIX like OS:
cp GlassFish install-dir/domains/domain1/application/j2ee-modules/websynergy/WEB-INF/lib/portal-impl.jar /tmp/test
-
Change directory to temp.
Equivalent step in the command prompt or in the terminal window of SOLARIS or any UNIX like OS:
cd /tmp/test
-
Extract the portal-impl.jar file.
Equivalent step in the command prompt or in the terminal window of a UNIX like OS:
jar -xvf portal-impl.jar
After unjar it will have portal.properties file in the same directory.
-
Open portal.properties and copy the locales property from the Languages and Time Zones section.
-
if portal-ext.properties does exits in WebSynergy then paste the locales property into it. Otherwise, create a text file (using any text editor) and name it as portal-ext.properties, and paste the locales property into it.
Default location of portal-ext.properties is GlassFish install-dir/domains/domain1/applications/j2ee-modules/websynergy/WEB-INF/classes/portal-ext.properties.
-
Modify the locales to add the new locale at the end. Add new locale in the format of “LanguageCode_CountryCode”.
See the following links to find language and country codes:
-
See, http://ftp.ics.uci.edu/pub/ietf/http/related/iso639.txt for language codes.
-
See, http://userpage.chemie.fu-berlin.de/diverse/doc/ISO_3166.html for country codes.
For example, if you are adding support for Hindi, you need to add hi_IN at the end of locales property as shown below:
locales=ar_SA,ca_AD,ca_ES,zh_CN,zh_TW,cs_CZ,nl_NL,en_US,fi_FI,fr_FR,de_DE,el_GR,hu_HU,
it_IT,ja_JP,ko_KR,nb_NO,fa_IR,pt_BR,ru_RU,es_ES,sv_SE,tr_TR,vi_VN,hi_IN
-
-
Save the portal-ext.properties file.
-
Navigate to the content folder and open the Language.properties file.
Note –A folder named content is created on extracting the portal-impl.jar file using the unjar command.
-
Translate all the strings you want to localize from temp/test/content/Language.properties to the new language.
-
Rename the translated Langauge.properties file to Language-ext_<LanguageCode>.properties.native.
-
Run the following commands on the directory which contains the Language-ext_<LanguageCode>.properties.native file:
native2ascii -encoding UTF-8 Language-ext_<LanguageCode>.properties.native Language-ext_<LanguageCode>.properties
-
Copy the portal-ext.properties file (under temp/test), and paste it to GlassFish install-dir/domains/domain1/applications/j2ee-modules/websynergy/WEB-INF/classes.
-
Copy the Language-ext_<LanguageCode>.properties.native file (under temp/test/content) and the Language-ext_<LanguageCode>.properties files (under temp/test/content), and paste them to GlassFish install-dir/domains/domain1/applications/j2ee-modules/websynergy/WEB-INF/classes/content.
-
Restart GlassFish server.
 To Verify the Localization of the Interface
-
Log in to WebSynergy as admin user.
-
Click on My Account from the welcome dock, it takes you to the Control Panel.
-
Click on the Display Settings link under Miscellaneous.
The new language setting is reflected in the Language drop-down menu.
-
Select the language for the user and click Save.
The user interface is changed to the new language.
Removing Localization Support for Unwanted Languages
Generally, users don't require localization support for all the languages which are supported by WebSynergy. This section describes how you can remove localization support for the languages which are not required.
 To Remove Localization Support for Unwanted Languages
Overwrite the locales property of portal.properties to remove unwanted languages. You need to make sure that the portal-ext.properties file is placed at GlassFish install-dir/domains/domain1/applications/j2ee-modules/websynergy/WEB-INF/classes.
-
Create a temporary folder. In this example, name the folder as test.
Equivalent step in the command prompt or in the terminal window of a UNIX like OS:
mkdir /tmp/test
-
Copy portal-impl.jar to the temp folder.
portal-impl.jar contains language resource bundles for WebSynergy. This jar file is located under the GlassFish install-dir/domains/domain1/application/j2ee-modules/websynergy/WEB-INF/lib/ directory.
Equivalent step in the command prompt or in the terminal window of a UNIX like OS:
cp GlassFish install-dir/domains/domain1/application/j2ee-modules/websynergy/WEB-INF/lib/portal-impl.jar /tmp/test
-
Change directory to temp.
Equivalent step in the command prompt or in the terminal window of SOLARIS or any UNIX like OS:
cd /tmp/test
-
Extract the portal-impl.jar file.
Equivalent step in the command prompt or in the terminal window of a UNIX like OS:
jar -xvf portal-impl.jar
After unjar it will have portal.properties file in the same directory.
-
Open portal.properties and copy the locales property from the Languages and Time Zones section.
-
if portal-ext.properties does exits in WebSynergy then paste the locales property into it. Otherwise, create a text file (using any text editor) and name it as portal-ext.properties, and paste the locales property into it.
Default location of portal-ext.properties is GlassFish install-dir/domains/domain1/applications/j2ee-modules/websynergy/WEB-INF/classes/portal-ext.properties.
-
Edit the locales property to include only the languages which are needed.
For example, If you want to support only English, German and Spanish, remove all the unwanted locales so that the locales value looks as below:
locales=en_US,de_DE,es_ES
-
Save the portal-ext.properties file.
-
Copy the portal-ext.properties file (under temp/test), and paste it to GlassFish install-dir/domains/domain1/applications/j2ee-modules/websynergy/WEB-INF/classes.
-
Restart the GlassFish server.
Enabling the Guest Users to Select a Browser Language
Follow the below procedure to enable guest users to select their preferred browser language.
 To Enable Guest Users to Select a Browser Language
Overwrite locale.default.request property in the Languages and Time Zones section of portal.properties to enable guest users to select their preferred browser language. You need to set this property value to true and put it in portal-ext.properties.
-
Create a temporary folder. In this example, name the folder as test.
Equivalent step in the command prompt or in the terminal window of a UNIX like OS:
mkdir /tmp/test
-
Copy portal-impl.jar to the temp folder.
portal-impl.jar contains language resource bundles for WebSynergy. This jar file is located under the GlassFish install-dir/domains/domain1/application/j2ee-modules/websynergy/WEB-INF/lib/ directory.
Equivalent step in the command prompt or in the terminal window of a UNIX like OS:
cp GlassFish install-dir/domains/domain1/application/j2ee-modules/websynergy/WEB-INF/lib/portal-impl.jar /tmp/test
-
Change directory to temp.
Equivalent step in the command prompt or in the terminal window of SOLARIS or any UNIX like OS:
cd /tmp/test
-
Extract the portal-impl.jar file.
Equivalent step in the command prompt or in the terminal window of a UNIX like OS:
jar -xvf portal-impl.jar
After unjar it will have portal.properties file in the same directory.
-
Open portal.properties and copy the locale.default.request property from the Languages and Time Zones section.
-
if portal-ext.properties does exits in WebSynergy then paste the locale.default.request property into it. Otherwise, create a text file (using any text editor) and name it as portal-ext.properties, and paste the locale.default.request property into it.
Default location of portal-ext.properties is GlassFish install-dir/domains/domain1/applications/j2ee-modules/websynergy/WEB-INF/classes/portal-ext.properties.
-
Edit the property to set it to locale.default.request=true.
-
Save the portal-ext.properties file.
-
Copy the portal-ext.properties file (under temp/test), and paste it to GlassFish install-dir/domains/domain1/applications/j2ee-modules/websynergy/WEB-INF/classes.
-
Restart the GlassFish server.
Note –Clear browser cookies before accessing WebSynergy interface to allow above changes to take place.
Hierarchy of Precedence for Language.properties files
Language/display information is defined in Language.properties, as well as various other Language_<LanguageCode>.properties files for foreign languages. These files are obtained on extracting the portal-impl.jar file, and are placed in the content folder. Language.properties is the primary and "default" language definition file, but definitions in that file may be overridden by language specific definitions. For example, the file Language_en.properties contains the English versions of most of the definitions. The file Language_fr.properties contains the French version, etc.
Language files can further have locale specific definitions. The Language_en_US.properties file (if it exists), contains the English phrase variations further defined for the United States. Other languages can also have locale specific definitions.
Rules of Precedence
The following is the hierarchy of precedence for different Language.properties files to override each other:
-
Language-ext.properties takes precedence over Language.properties.
-
Language specific versions take precedence over the non language specific versions. For example, Language_en.properties takes precedence over Language.properties.
-
Location specific versions take precedence over the non location specific versions. For example, Language_en_US.properties takes precedence over Language_en.properties.
For the Language.properties file for English, the following is the hierarchy of precedence, where Language-ext_en_US.properties will have the highest precedence and the Language.properties file will have the least precedence:
-
Language-ext_en_US.properties
-
Language_en_US.properties
-
Language-ext_en.properties
-
Language_en.properties
-
Language-ext.properties
-
Language.properties
Changing the Existing Language Entries
WebSynergy allow a easy way to change existing language entries. You can change English and foreign languages entries. Consider the example of changing the name of a portlet from Message Boards to Forums. To do this in the case when English is the default language, you need to create the Language-ext_en.properties to override the Language_en.properties file. Replicate Language-ext_en.properties with the content in the Language_en.properties file, and search and replace the entry javax.portlet.title.19=Message Boards with javax.portlet.title.19=Forums. The portlet Message Boards is renamed to Forums.
WebSynergy also allows you to add new language entries for customization or for new portlets. For example, you can make an entry similar to javax.portlet.title.EXT_1=Reports, to add the name of a new portlet named Reports.
Customizing the Name of a Portlet for a Language
Consider the example of localizing WebSynergy to French. In this case, name of the Admin portlet translates as Administration du portail. You may not find this appropriate, and may want to have a customized name for the Admin portlet when WebSynergy is localized to French. You can customize the name of a portlet for any language by using the Look and Feel button on a portlet.
 To Customize the Name of a Portlet for a Language
-
Login the WebSynergy as admin user.
-
Click on the 'Look and Feel' button on a portlet.
In this example, click on the Look and Feel button on the Admin portlet.
-
Select the 'Use Custom Title' option.
-
Select a language from the language list.
In this example, select French.
-
Type a title for the portlet in the selected language in the 'Portlet Title' box.
In this example, specify the name of the portlet as Administration.
-
Click Save.
Note –For the changes to take effect, you may have save twice with 'Use Custom Title' option canceled and selected respectively. Some times the portlet name in the default language too may have changed. You need to verify this.
-
Select 'My Account' from the welcome dock.
-
Click 'Display Settings' under 'Miscellaneous'.
-
Select a language from the 'Language' list which is the same as the language selected previously.
In this example, select French.
-
Click Save and navigate back to the community page.
You can see the changed name of the portlet in the localized version. In this example, the name of the Admin portlet localized to French is changed from Administration du portail to Administration.
- © 2010, Oracle Corporation and/or its affiliates
