| C H A P T E R 2 |
|
Installing the DMM |
This chapter includes the steps to download and install the DMM.
Before you install the DMM, install and configure the Sun Control Station according to the instructions in the Sun Control Station CC Edition Software Installation Guide. Also verify that your monitored system meets the requirements listed in Meeting System Requirements.
You must create a company in Sun Net Connect before you can download the DMM.
Perform the following steps to download the DMM package from Sun Net Connect:
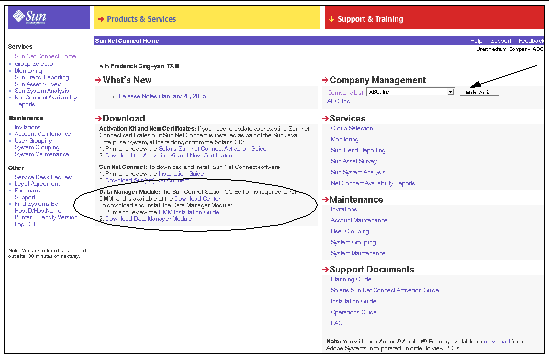
1. Go to https://srsnetconnect.sun.com and log in to Sun Net Connect. The Sun Net Connect Home page appears.
2. From the Sun Net Connect Home page, click Download Data Manager Module, as shown in FIGURE 2-1.
|
Note - If you did not click Create Company when you created your root administrator account, you will not be able to download the DMM installation package until you create a company. If you have not created a company, see Download Link Does Not Work for the steps to create a company. If you have more than one company, you need to select the company from the Company drop-down list and click Make Active before the download link is available. |

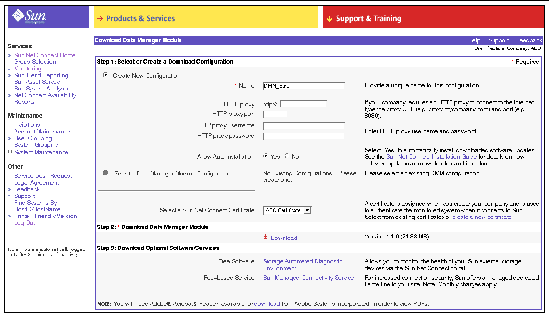
3. To create a new configuration, click Create New Configuration and type a unique name for the configuration. If your company uses an HTTP proxy to connect to the Internet, type the URL or IP address of the HTTP proxy. At HTTP Proxy Port, type the port number it uses. Type your HTTP proxy username and password.
|
Note - Leave the HTTP proxy fields blank if you have a direct connection to the Internet and do not use an HTTP proxy. |
4. To enable software updates to be automatically installed on the DMM, click Yes to Allow Auto Installation.
The updates include new software versions and messages. If you click Yes at Allow Auto Installation, you should set the Update Mode field in the New Company page to Auto or Review to deliver the update. FIGURE 2-2 is an example of a new configuration on a system that does not use an http proxy. The Allow Auto Installation is set to Yes.

5. To use an existing DMM configuration, click the Select a Data Manager Module Configuration option and select the configuration from the drop-down menu.
6. In the Download Data Manager Module section, click Download to save the approximately 21.92 Mbyte installation package called dmm.001.001.000.tar to your system.
7. At the Save As dialog box, specify a directory on the system where you want to perform the installation, and click OK.
If you put the installation package in the /tmp directory, the files will be deleted on system reboot, so the /var directory is a more permanent location.
When you install the DMM on the system on which the Sun Control Station is installed, a compatible version of Sun Net Connect is also installed.
Perform the following steps to install the DMM on a system:
1. Verify that the system meets the requirements listed in Meeting System Requirements.
2. Open a terminal window on the system and log in as the root user.
3. Change to the directory where you copied the installation package. This directory should be owned and readable only by the root user.
4. Extract the DMM installation package in that directory by typing:
# tar -xvf dmm.001.001.000.tar
5. Run the installation script by typing:
The default package base directory is /opt.
Copyright © 2005, Sun Microsystems, Inc. All Rights Reserved.