| Skip Navigation Links | |
| Exit Print View | |

|
Oracle Solaris Administration: Network Interfaces and Network Virtualization Oracle Solaris 11 Express 11/10 |
| Skip Navigation Links | |
| Exit Print View | |

|
Oracle Solaris Administration: Network Interfaces and Network Virtualization Oracle Solaris 11 Express 11/10 |
2. NWAM Configuration and Administration (Overview)
3. NWAM Profile Configuration (Tasks)
4. NWAM Profile Administration (Tasks)
5. About the NWAM Graphical User Interface
Introduction to the NWAM Graphical User Interface
Accessing the NWAM GUI From the Desktop
Differences Between the NWAM CLI and the NWAM GUI
Functional Components of the NWAM GUI
Interacting With NWAM From the Desktop
Checking the Status of Your Network Connection
How to Show Details About an Enabled Network Connection
Controlling Network Connections From the Desktop
Joining and Managing Favorite Wireless Networks
How to Join a Wireless Network
About the Network Preferences Dialog
Viewing Information About Network Profiles
Switching From One Network Profile to Another Network Profile
Adding or Removing a Network Profile
How to Open the Network Profile Dialog
Creating and Managing Locations
How to Change a Location's Activation Mode
About External Network Modifiers
About the Network Modifiers Dialog
Part II Administering Single Interfaces
6. Overview of the Networking Stack
7. Datalink Configuration and Administration
8. Configuring an IP Interface
9. Configuring Wireless Interface Communications on Oracle Solaris
Part III Administering Interface Groups
11. Administering Link Aggregations
Part IV Network Virtualization and Resource Management
15. Introducing Network Virtualization and Resource Control (Overview)
16. Planning for Network Virtualization and Resource Control
17. Configuring Virtual Networks (Tasks)
18. Using Link Protection in Virtualized Environments
19. Managing Network Resources
When using the NWAM GUI, network profiles are the equivalent to the NCPs that are described in Description of an NCP.
A network profile specifies which network interfaces can be enabled or disabled at any given time. Using network profiles can be helpful in situations where you have more than one network interface available. For example, most modern laptop brands have both a wired and a wireless interface. Depending on your physical location, and your work environment, you might want to use only one of those interfaces and disable the other interface for security or other reasons.
There are two network profile types that are available in the NWAM GUI, the default Automatic network profile and the user-defined network profile. You can enable and disable both types of profiles. You can modify user-defined profiles, but not the Automatic profile. You cannot create or destroy the Automatic profile by using the NWAM GUI or the CLI. However, you can create, modify, and destroy user-defined network profiles by using either the GUI or the CLI.
By default, the Automatic network profile first attempts to enable one wired connection. If that attempt fails, it then attempts to enable one wireless connection.
The Network Preferences dialog is where individual network connections are configured and how the current state of each network connection is viewed. The dialog provides access to various views that you can switch to by using the drop-down list located at the top of the dialog.
You can open the dialog in the following ways:
By clicking the Network Status notification icon on the desktop.
By selecting System -> Administration -> Network from the Main Menu bar on the desktop panel.
By selecting Network Preferences from the Network Status notification's icon menu.
At the top of the Network Preferences dialog is a drop-down list that is labeled, Show. This list enables you to switch between the Connection Status view, the Network Profile view, and the Connection Properties view for every network connection in each network profile.
Connection Status View
The Connection Status view displays information about each enabled network connection in the enabled network profile that has a manual activation type and each connection (whether enabled or disabled) in the active priority group. The Enabled Connections: section lists all of the enabled connections, in the same order that they are listed in the Network Profile view. See How to Show Details About an Enabled Network Connection.
Network Profile View
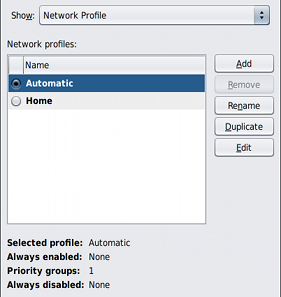
Network profile information can be viewed in the Network profile view of the Network Preferences dialog.
To display this view, select Network Profile in the drop-down list that is located at the top of the Network Preferences dialog.

Connection Properties View
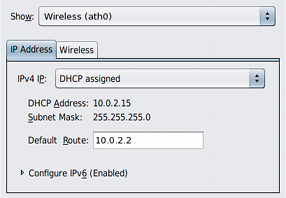
The Connection Properties view enables you to view and change properties of a specified network connection. To switch to this view, select the connection name from the Show drop-down list or double-click the connection name while in either the Connection Status or the Network Profile view. A tabbed view is displayed, whereby you can view or edit the connection's properties.
The Connection Properties view has two tabs: an IP address tab and a wireless tab. The wireless tab is only displayed if the connection type is wireless. In this IP address tab, you can configure both IPv4 and IPv6 addresses. In the wireless tab, you can configure the list of favorite networks and choose how the wireless interface connects to available networks.

Network profile information can be viewed in the Network profile view of the Network Preferences dialog.
To display this view, select Network Profile in the drop-down list that is located at the top of the Network Preferences dialog.
The Network Profiles list displays the name of each available network profile. The currently enabled profile is shown with a radio button indicator. By default, there is one profile, Automatic, that you can activate, but not edit or delete. However, you can create multiple additional network profiles. Network profiles that are manually created can be activated, edited, or deleted, as needed.
Below the Network Profiles list is a summary of the profile that is selected. To view the selected profile in full or edit the profile, click the Edit button.
Note - The selected profile might be different than the enabled profile.
Open the Network Profile view of the Network Preferences dialog.
Select the radio button next to the network profile that you want to activate.
To switch network profiles, click OK or click Cancel to close the dialog without switching profiles.
To create or edit a network profile, select Network Profile from the drop-down list that is located at the top of the Network Preferences dialog.
To create a new network profile, click the Add button, then type the name of the new profile.
To duplicate an existing network profile, select the profile in the list, click the Duplicate button, then type the name of the new profile.
To remove a network profile, select the profile in the list, then click the Remove button.
Note - You cannot remove the Automatic network profile.
For more information about editing a profile that you have added or duplicated, see Editing Network Profiles.
When you manually add a new network profile or duplicate an existing network profile, you must edit the new profile to specify those network connections that are enabled and disabled by the new profile.
Note - You can edit and remove a manually created network profile. However, you cannot edit or remove the Automatic network profile.

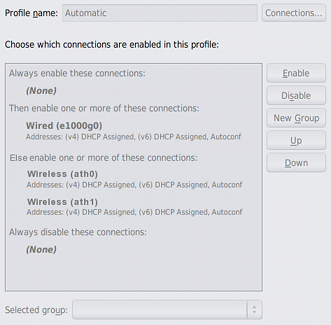
The list of network profiles consists of a minimum of two top level group descriptions. For example, the Automatic profile, which is shown in the preceding figure, contains four group descriptions that are explained in more detail in the following sections.
Note - The Automatic network profile cannot be changed or deleted. Any time the Automatic network profile is selected in the Edit Network Profile dialog, all of the profile editing buttons and drop-down lists are disabled.
For more information, see the online help.
A network connection in the "always enabled" group is always enabled when the selected network profile is active.
To move a network connection to the "always enabled" group, first select the connection, then do one of the following:
Click the Enable button.
Click the Up button until the connection moves to the “always enabled” group.
A network connection in the "always disabled" group is always disabled when the selected network profile is active.
To move a network connection to the "always disabled" group, first select the connection, then do one of the following:
Click the Disable button.
Click the Down button until the connection moves into the "always disabled" group.
You can create a network profile that treats one or more network interfaces as a group. If one or more of the interfaces in the highest priority group cannot be enabled, according to the group's priority type, then the group with the next highest priority is considered.
The following table describes the three different priority groups that are available.
|
For example, the default Automatic network profile contains two exclusive priority groups. The higher priority group contains all of the wired network connections. The lower priority group contains all of the wireless network connections.
For detailed instructions on performing these and other tasks, see the online help.
A location comprises certain elements of a network configuration, for example a name service and firewall settings, that are applied together, when required. You can create multiple locations for various uses. For example, one location can be used when you are connected at the office by using the company intranet. Another location can be used at home when you are connected to the public Internet by using a wireless access point. Locations can be activated manually or automatically, according to environmental conditions, such as the IP address that is obtained by a network connection.
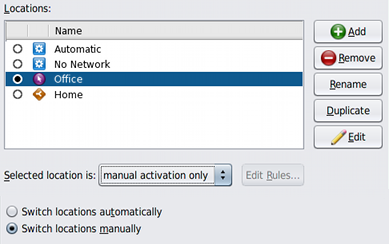
The Network Locations dialog is where you can to switch locations, edit location properties, create new locations, and remove locations. Note that only user-defined locations can be created and removed. The Location dialog can be opened from the Connection Status view of the Network Preferences dialog.

The Locations list is similar to the list on the Network Status notification's icon menu. Each available location, with an icon that represents its activation type, is listed.
Location types are as follows:
System – Locations with this type are system-defined locations (Automatic and No Network), which means the system determines when to activate the location, based on current network conditions.
Manual – Locations with this type can be manually enabled or disabled by using the Network Locations dialog or by interacting with the Network Status notification icon.
Conditional – Locations with this type are enabled or disabled automatically, according to the rules that you specify during the creation of the location.
The activation type of a selected location is also displayed in the Selected location drop-down list. The enabled location is represented by a selected radio button that is displayed in the first column of the list.
The following task describes how to change the activation mode for a location by using the NWAM GUI. If you are using the nwamcfg command, you would change the activation mode by modifying the properties of the specified location. For more information, see Setting and Changing Property Values of a Profile.
Note - Note that when a system location is selected, the drop-down list displays Activated by system, and both the drop-down list and the Edit Rules button are disabled.
When a manual or a conditional location is selected, the drop-down list options are as follows:
Manual activation only: This location is only enabled when it is manually selected. When this option is selected, the Edit Rules button is disabled.
Activated by rules: This location is automatically selected under certain network conditions. When this option is selected, the Edit Rules button is enabled.
For further instructions, see “Working With the Rules Dialog” in the online help.
The following task describes how to switch from one location to another location by using the NWAM GUI. To switch locations by using the CLI, use the nwamadm command to activate a new location. Because exactly one location must be activated on the system at all times, activating a new location implicitly disables the currently enabled location. The same rule applies when activating a network profile. For more information about activating and deactivating locations, see Activating and Deactivating Profiles.
If the Switch Locations Automatically option is selected on the Locations submenu, you cannot manually choose a location to activate. The most appropriate System or Conditional location will be activated automatically at any given time, according to changes in the network environment.
If the Switch Locations Manually option is selected on the Location submenu, you can activate any available location, regardless of its activation type. The selected location remains activated indefinitely.
Editing a location by using the NWAM GUI is the equivalent to modifying a location's properties if you are using the NWAM CLI.
To edit a location, choose Network Locations from the Network Status notification icon's Location submenu. Or, from the Connection Status view of the Network Preferences dialog, click the Locations button.
To edit the properties of a specified location, select the location in the list, then click Edit.
Alternatively, you can double-click the location in the list.
The Edit Location dialog opens, with the following two tabs available:
Enables you to configure name services in the specified location.
Enables you to select configuration files to be used by IP Filter and IPsec features, when the specified location is enabled.
To display the information to be edited, select the appropriate tab.