| Oracle® VM User's Guide Release 3.0 for x86 Part Number E18549-03 |
|
|
PDF · Mobi · ePub |
| Oracle® VM User's Guide Release 3.0 for x86 Part Number E18549-03 |
|
|
PDF · Mobi · ePub |
Management for the Oracle VM environment is provided by Oracle VM Manager, a transaction-based framework that also includes an integrated database and a web-based management user interface.
This chapter discusses using the Oracle VM Manager user interface, and contains:
To open the Login page of Oracle VM Manager, enter the following address in a Web browser:
http[s]://hostname:port/ovm/console
Where, hostname refers to the host name or IP address of the Oracle VM Manager host, and port refers to the port number on which Oracle VM Manager is listening.
To connect to Oracle VM Manager using Secure Sockets Layer (SSL) on a host named example.com, use:
https://example.com:7002/ovm/console
To connect to Oracle VM Manager on a host named example.com, use:
http://example.com:7001/ovm/console
Enter your Oracle VM Manager administration username in the Username field. This is the administration username you create during the Oracle VM Manager install. Enter the password for the Oracle VM Manager administration username in the Password field.
To manage the local instance of Oracle VM Manager (installed on localhost), leave the Management Server URI field as the default, tcp://localhost. If you want to manage a remote instance of Oracle VM Manager, enter the hostname or IP address for that machine, for example:
tcp://example.com
Now you are logged in, you can create storage repositories, server pools, add Oracle VM Servers, and create virtual machines, import resources, and so on.
The user interface displays context sensitive information, relevant to the selection in the navigator and content panes.
The Oracle VM Manager user interface provides a set of work areas (management panes), buttons, menus, and tabs for access to various functions and configuration screens. Figure 3-1 shows the main components of the Oracle VM Manager user interface.
Figure 3-1 Oracle VM Manager User Interface
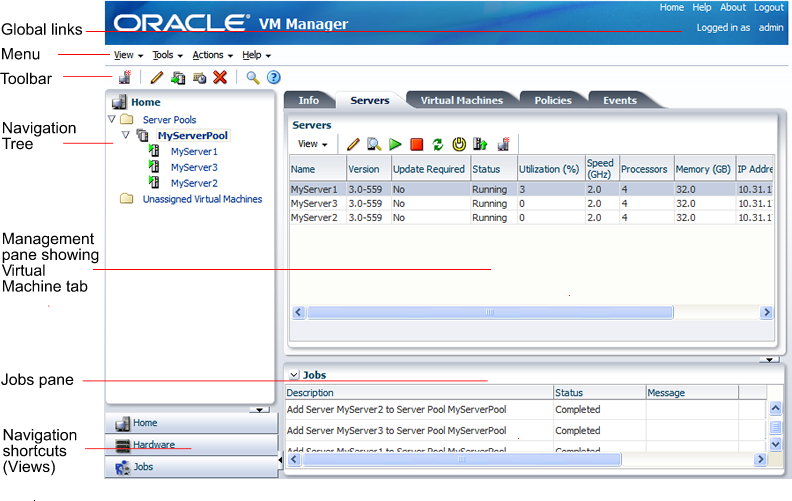
The components of the Oracle VM Manager user interface are described in more detail in Table 3-1.
Table 3-1 Oracle VM Manager User Interface components
| User Interface Item | Description |
|---|---|
|
Global Links |
Contain navigation and resources which are relevant to the whole Oracle VM Manager user interface. See Section 3.3, "Using the Global Links" for information on each global link. |
|
Menu |
The menus available are View, Tools, Actions, and Help. See Section 3.4, "Using the Menus" for information on each menu item. |
|
Toolbar |
Allows quick access to a group of task icons. See Section 3.6, "Using the Toolbar" for information on each toolbar item. |
|
Navigation Pane |
Contains the navigation tree, and navigation shortcuts. See Section 3.7, "Using the Navigation Tree" and Section 3.5, "Using the Navigation Shortcuts (Views)" for more information on the navigation objects. |
|
Navigation Tree |
Shows hierarchy of physical and virtual components. Click on a component to open its default pane and related management panes. See Section 3.7, "Using the Navigation Tree" for more information on the navigation tree. |
|
Management Pane |
Contains the management panes for the selected view. The management panes that can be displayed are described under each view. See Section 3.5, "Using the Navigation Shortcuts (Views)" for a list of the panes that can be displayed in each view. |
|
Navigation Shortcuts (Views) |
Allow quick access to all views, Home, Hardware, and Jobs. See Section 3.5, "Using the Navigation Shortcuts (Views)" for information on each navigation shortcut. |
The sections that follow describe each set of controls and their relationship to one another, in more detail.
The global links are available on every page. The global links are as shown in Table 3-2:
Table 3-2 Global Link Item Descriptions
| Global Link | Description |
|---|---|
|
Home |
Displays the Home view. See Section 3.5.1, "Home" for more information on the Home view. |
|
Help |
Displays the Oracle VM Manager online help system in a separate window. |
|
About |
Displays the About Oracle VM dialog box which contains the release number. This is synonymous with the Help > About menu item. |
|
Logout |
Logs out of the Oracle VM Manager user interface and displays the Oracle VM Manager log in screen. |
|
Logged in as username |
Displays the username of the user currently logged in. |
Oracle VM Manager contains a set of standard menus:
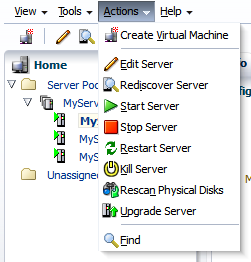
For example, Figure 3-2 shows the Action menu options when an Oracle VM Server is selected in the Home view.
This section discusses each of the menu options.
Use the View menu to display a view of the virtualization environment. This is identical functionality to the navigation shortcuts The View menu contains the following options:
Home
Hardware
Jobs
The View menu options open the management pane for the selected option. These options are discussed in Section 3.5, "Using the Navigation Shortcuts (Views)".
Use the Tools menu to manage your virtual network interfaces, and configure Oracle VM Server software update notifications. The Tools menu options are as shown in Table 3-3.
| Tools Menu Option | Icon | Description |
|---|---|---|
|
VNIC Manager... |
|
Displays the Virtual Network Interface Card Manager dialog box. Use this option to create virtual NICs for virtual machines. See Section 8.6, "Using the VNIC Manager" for more information on using the VNIC Manager. |
|
Server Update Manager (YUM)... |
|
Displays the Server Update Management (YUM) dialog box. Use this option to configure YUM repositories for automatic updates of the Oracle VM Servers being managed by Oracle VM Manager. See for more information on using the Server Update Manager. |
The Actions menu options are context-sensitive, and change to display actions related to the object selected in the navigator. The toolbar icons also change to the same items, depending on which object is selected in the navigator.
The Actions menu and toolbar icon options are discussed in Table 3-4.
| Action Menu Option | Icon | Description |
|---|---|---|
|
Create Server Pool |
Displays the Create Server Pool dialog box. Use this option to create a server pool. Select Home > Server Pools, or Hardware > Resources to enable this option. |
|
|
Create Virtual Machine |
|
Displays the New Virtual Machine Wizard. Use this option to create a virtual machine in the selected server pool. Select the Home view to enable this option. |
|
Edit Server Pool |
|
Displays the Edit Server Pool wizard. Use this option to edit a server pool. Select a server pool in the Home or Hardware view to enable this option. |
|
Add/Remove Servers |
|
Displays the Add/Remove Servers from the Server Pool dialog box. Use this option to add or remove Oracle VM Servers from a server pool. Select a server pool in the Home or Hardware view to enable this option. |
|
Edit Policies |
|
Displays the Configure DRS/DPM dialog box. Use this option to set or edit resource policies for the server pool. Select a server pool in the Home or Hardware view to enable this option. |
|
Edit Server |
|
Displays the Edit Server dialog box. Use this option to edit the name and description for an Oracle VM Server. This is also used to put the Oracle VM Server into maintenance mode, take ownership of it, and to configure remote management of the Oracle VM Server using IPMI (Intelligent Platform Management Interface). Select an Oracle VM Server in the Home or Hardware view to enable this option. |
|
Rediscover Server |
|
Rediscovers the Oracle VM Server. Use this to refresh information about the Oracle VM Server. Select an Oracle VM Server in the Home or Hardware view to enable this option. |
|
Start Server |
|
Starts a stopped Oracle VM Server. Select an Oracle VM Server in the Home or Hardware view to enable this option. |
|
Stop Server |
|
Stops a running Oracle VM Server. Select an Oracle VM Server in the Home or Hardware view to enable this option. |
|
Restart Server |
|
Restarts a running Oracle VM Server. Select an Oracle VM Server in the Home or Hardware view to enable this option. |
|
Kill Server |
|
Powers off an Oracle VM Server. This is the equivalent of physically pushing the Off button on the hardware. Select an Oracle VM Server in the Home or Hardware view to enable this option. |
|
Rescan Physical Disks |
|
Rescans the local storage on an Oracle VM Server. Use this option to rescan the storage presented to an Oracle VM Server when the storage configuration is changed, for example, a new storage array is added. Select an Oracle VM Server in the Home or Hardware view to enable this option. |
|
Upgrade Server |
|
Updates or upgrades the Oracle VM Server if an update is available in the YUM repository. Select an Oracle VM Server in the Home or Hardware view to enable this option. |
|
Edit |
Displays the Edit Virtual Machine wizard. Use this option to edit a virtual machine. Select a virtual machine in the Home view to enable this option. |
|
|
Start |
Starts up a stopped virtual machine. Select a stopped virtual machine in the Home view to enable this option. |
|
|
Stop |
|
Shuts down a virtual machine. Select a running virtual machine in the Home view to enable this option. |
|
Restart |
Restarts a running virtual machine. Select a running virtual machine in the Home view to enable this option. |
|
|
Kill |
Shuts down a running virtual machine. Select a running virtual machine in the Home view to enable this option. |
|
|
Suspend |
Suspends (pauses) a running virtual machine. Select a running virtual machine in the Home view to enable this option. |
|
|
Resume |
Resumes (unpauses) a suspended virtual machine. Select a suspended virtual machine in the Home view to enable this option. |
|
|
Migrate |
Migrates a virtual machine to another Oracle VM Server. Select a virtual machine in the Home view to enable this option. |
|
|
Clone |
Displays the Clone Virtual Machine or Template dialog box. Use this option to clone a virtual machine to create another virtual machine, or to create a template from the virtual machine. Select a virtual machine in the Home view to enable this option. |
|
|
Launch Console |
Launches the virtual machine console to access the virtual machine. Use this option to connect to a virtual machine's console and access the virtual machine directly. Select a virtual machine in the Home view to enable this option. |
|
|
Abort Job |
Aborts and cancels a job. Select a running job in the Jobs view to enable this option. |
|
|
Delete |
Displays the Delete Confirmation dialog box. Use this option to delete the object selected in the navigator. |
|
|
Find |
|
Displays the Find dialog box. Use this option to search for server pools, Oracle VM Servers, and virtual machines. |
Use the Help menu to display the Oracle VM Manager online help, release number, and go to Oracle's home page. The Help menu options are as shown in Table 3-5.
| Help Menu Option | Icon | Description |
|---|---|---|
|
Oracle VM Help |
|
Opens a new web browser window which contains the Oracle VM Manager online help system. |
|
Getting Started |
|
Opens a new web browser window which contains the Getting Started chapter of the online help system. Read this section to quickly get started using Oracle VM Manager. |
|
Oracle.com |
|
Opens a new web browser window which contains the Oracle home page. |
|
About |
Displays the About Oracle VM dialog box which contains the release number. |
Each navigation shortcut defines a functional area of operations that can be performed in Oracle VM Manager, or a view. The navigation shortcuts display the default management pane for each view. The navigation shortcut options are:
Click Home to manage server pools, and virtual machines. To manage the physical objects, use the Hardware view. Use Home to create server pools, assign Oracle VM Servers to server pools, and create and configure virtual machines in server pools.
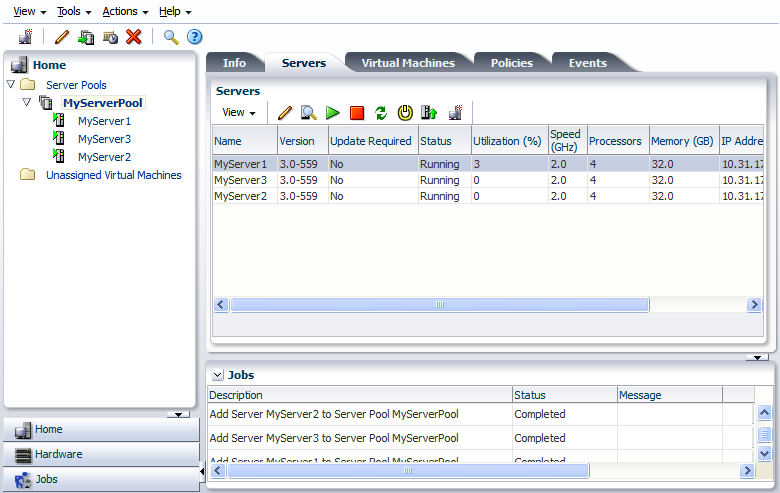
The Home navigation shortcut displays the Home view.
Figure 3-3 shows the Home view.
The Home view contains the tabs set out in Table 3-6.
| Management Pane Tab | Description |
|---|---|
|
Displays a high-level view of server pools, Oracle VM Servers, and virtual machines. The Info tab management pane contents change to reflect information about the object selected in the tree. You can use this management pane to view information about server pools, Oracle VM Servers and virtual machines. Select an object in the tree to display this tab. See Chapter 7, "Managing Server Pools" for information about managing and editing server pools, Section 7.8, "Managing Oracle VM Servers" for information on managing and editing Oracle VM Servers, and Chapter 8, "Managing Virtual Machines" for information on managing virtual machines. |
|
|
Server Pools |
Displays information about the server pools. Use this tab to edit server pool policies, add or remove Oracle VM Servers from a server pool, edit information about a server pool, and delete a server pool. Select the Server Pools folder in the tree to display this tab. For more information about managing server pools, see Chapter 7, "Managing Server Pools". |
|
Displays information about the storage repositories, and the resources in each repository. Use this tab to discover, create, edit, view and delete storage repositories. You can also use this tab to create and manage the contents of storage repositories; assemblies, ISO files, template files, virtual disks and virtual machine configuration files. To view the contents of each storage repository, select it in the Repositories table, and the sub-tabs display the contents of the repository. Select the Server Pools folder in the tree to display this tab. For more information on managing storage repositories and their contents, see Chapter 5, "Managing Storage". |
|
|
Templates |
Displays information about the virtual machine templates in all storage repositories. Use this tab to import, edit and delete templates. To view configuration, network and storage information for a template, select it in the Templates table, and the sub-tabs display this information about the template. Select the Server Pools folder in the tree to display this tab. See Section 8.5.3, "Virtual Machine Templates" for information on working with virtual machine templates. |
|
Servers |
Lists the Oracle VM Servers in the server pool. You can perform actions on the Oracle VM Servers using the tab's toolbar, such as start, stop, and edit. You can also use the tab's toolbar to create a virtual machine on a selected Oracle VM Server. Select a server pool in the tree to display this tab. See Section 7.8, "Managing Oracle VM Servers" for information on managing Oracle VM Servers. |
|
Virtual Machines |
Displays information about the virtual machines in the server pool, or on the Oracle VM Server. You can perform actions on the virtual machines using the tab's toolbar, such as start, stop, edit, migrate and clone. Select a server pool or Oracle VM Server in the tree to display this tab. The Virtual Machines tab is also displayed when you select the Unassigned Virtual Machines folder. See Section 8.9, "Managing Virtual Machines" for information on managing virtual machines. |
|
Policies |
Displays information about server pool power and resource management policies; Distributed Resource Scheduler (DRS), or Distributed Power Management (DPM). You can create or edit a policy for the server pool using the Edit icon in the tab's toolbar. Select a server pool in the tree to display this tab. See Section 7.5, "Server Pool Policies" for information on managing server pool policies. |
|
Events |
An Events tab is displayed for each object in the tree and displays events related to that object. Select an object in the tree to display this tab. |
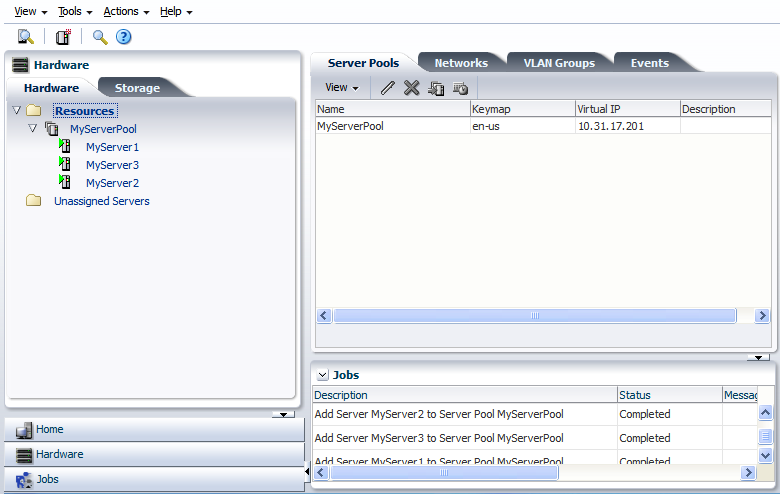
Click Hardware to manage physical objects such as Oracle VM Servers and networks. The Hardware tab can also be used to manage server pools. To manage virtual objects, use the Home view.
Figure 3-4 shows the Hardware view.
The Hardware view contains the tabs set out in Table 3-7.
| Hardware View Tab | Management Pane Tab | Description |
|---|---|---|
|
Hardware |
Displays information on the physical hardware resources of Oracle VM Servers in the server pool. When an Oracle VM Server is discovered, it is listed in the Unassigned Servers folder. When an Oracle VM Server is added to a server pool, it is listed in the Resources folder. See Section 7.8, "Managing Oracle VM Servers" for more information on managing Oracle VM Servers. |
|
|
Server Pools |
Displays information about the server pools. Use this tab to edit server pool policies, add or remove Oracle VM Servers from a server pool, edit information about a server pool, and delete a server pool. Select the Resources folder to display this tab. For more information about managing server pools, see Chapter 7, "Managing Server Pools". |
|
|
Networks |
Displays information about the networks available to server pools. Use this tab to create, edit, and delete networks. Select a network in the table to view and edit information about the network ports and VLAN segments used in a network. These network options are displayed in sub-tabs. Select the Resources folder to display this tab. For more information on managing networks, see Chapter 6, "Managing Networks". |
|
|
VLAN Groups |
Displays information about the VLAN Groups available to the server pool. Use this tab to create, edit and delete VLAN Groups. Select a VLAN Group in the table to view and edit information about the ports and VLAN Segments used in a VLAN Group. These options are displayed in sub-tabs. Select the Resources folder to display this tab. For more information on managing networks, see Chapter 6, "Managing Networks". |
|
|
Servers |
Lists the Oracle VM Servers in the server pool. You can perform actions on the Oracle VM Servers using the tab's toolbar, such as start, stop, and edit. You can also use the tab's toolbar to create a virtual machine on a selected Oracle VM Server. Select a server pool in the tree to display this tab. See Section 7.8, "Managing Oracle VM Servers" for information on managing Oracle VM Servers. |
|
|
Info |
Displays information about the object select in the tree. |
|
|
Bonding |
Lists the bonded ethernet ports on the selected Oracle VM Server. Use this tab to create, edit and delete bonds on ethernet ports. Select an Oracle VM Server in the tree to display this tab. For more information on network bonding, see Section 6.4, "Network Bonding". |
|
|
Ethernet Ports |
Lists the ethernet ports on the selected Oracle VM Server that can be used for network bridges. Use this tab to edit the type of addressing (none, DHCP or static IP address) used for the ethernet port. Select an Oracle VM Server in the tree to display this tab. For more information on network bridges, see Section 6.5, "Network Bridges". |
|
|
Physical Disks |
Lists the local storage available on the selected Oracle VM Server. Use this tab to edit, rescan, clone, and delete local storage. You can also use this tab to create or delete an OCFS2 file system on local storage. Select an Oracle VM Server in the tree to display this tab. For more information on local storage, see Section 5.2.1, "Local Storage". |
|
|
Events |
Displays information about the events related to the object selected in the tree. |
|
|
Storage |
Displays information about file servers and storage arrays. See Chapter 5, "Managing Storage" for more information on managing storage. |
|
|
File Servers |
Lists the file servers which contain file-based storage. Use this tab to register, edit, delete and discover file-based storage. Select File Servers in the tree to display this tab. For more information on file-based storage, see Section 5.2, "Storage Types". |
|
|
File Servers |
Lists the storage arrays. Use this tab to register, edit, delete and discover storage arrays. Select Storage Arrays in the tree to display this tab. For more information on storage arrays, see Section 5.2, "Storage Types". |
|
|
Physical Disks |
Lists the physical disks on the storage array. Use this tab to edit, clone and delete physical disks. Select a storage array in the tree to display this tab. |
|
|
Access Groups |
Lists the access groups for the storage array. Use this tab to create, edit and delete storage array access groups. Also use this tab grant access to physical disks in the storage array to Oracle VM Servers using the access groups. Select a storage array in the tree to display this tab. |
|
|
Volume Groups |
Lists the volume groups for the storage array. Use this tab to create, edit and delete storage array volume groups. Also use this tab grant access to physical disks in the storage array to Oracle VM Servers using the volume groups. Select a storage array in the tree to display this tab. |
|
|
Info |
Displays information about the storage. |
|
|
Servers |
Displays the Oracle VM Servers that have access to the disk in the storage array. This is not available for file servers. Select a disk in a storage array to display this tab. |
|
|
Events |
Displays information about the events related to the object selected in the tree. |
Click Jobs for information on current and past tasks, or jobs. A job is a set of one or more operations made in Oracle VM Manager. See Section B.1, "Working with the Jobs Framework" for more information on managing jobs.
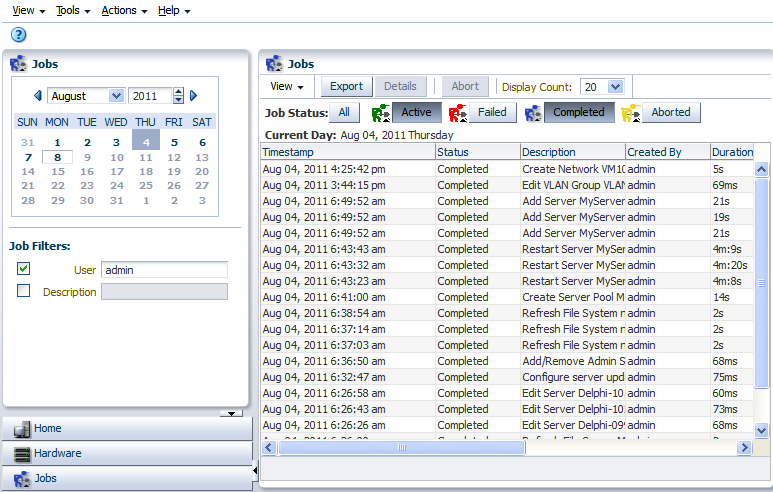
The Jobs view provides comprehensive information on all completed and in-progress jobs in the virtualization environment. The Jobs view is used to get a global view on jobs, to evaluate information on jobs completed or aborted, or to cancel a job in progress.
Jobs can be displayed for all users, or just for the administrator.
The Jobs calendar enables you to display the jobs for a particular date. Select a date in the Jobs calendar and the jobs for that date are displayed in the Jobs management pane.
Figure 3-5 shows the Jobs view.
The Jobs view contains the tabs set out in Table 3-8.
| Management Pane Tab | Subtab | Description |
|---|---|---|
|
Jobs |
Displays information on all jobs in a time-stamped list in the Jobs table. Jobs can be sorted and viewed by any column in the Jobs table. Click a column heading to resort the table content. The table contents can be reordered using View > Reorder Columns in the Jobs tab toolbar. The columns listed in the Jobs table can be selected using View > Columns in the Jobs tab toolbar. You can select which columns to view, and order the columns in the Jobs table using the View drop down menu. Click Export to save a list of the jobs to a spreadsheet file. Select an job in the tab and click Details to see the details of the job. To abort a job, select the job in the table and click Abort. |
|
|
Job Detail |
This tab is displayed on the Jobs tab. The Job detail tab displays all the available information about the job selected in the Jobs table. If a message is associated with the job detail, it is displayed in the message pane. |
|
|
Job Operation |
This tab is displayed on the Jobs tab. The Job operations tab displays the operations performed as part of the job. |
|
|
Job Events |
This tab is displayed on the Jobs tab. The Job events tab displays a list of the events performed during the job. |
|
|
Events Tab |
Displays information about each event. You can select which columns to view, and order the columns in the Events table using the View drop down menu. You can also use the View drop down menu, or the Query By Example icon to search for events. Click Export to save a list of the events to a spreadsheet file. |
The toolbar is positioned just below the menu. The icons in the toolbar are arranged to support the work-flow required to the perform tasks associated with the object selected in a view.
The menu and toolbar are used together to perform specific actions. Depending on the operation, the options in the Actions menu and the buttons in Toolbar change. For example, if you select an Oracle VM Server, the toolbar icons to manage Oracle VM Servers are displayed, as shown in figure Figure 3-6.
Figure 3-6 Toolbar Icons for Managing an Oracle VM Server
In this case, you click the buttons in the toolbar to:
Create a new virtual machine
Edit the selected Oracle VM Server
Rediscover the selected Oracle VM Server
Start the selected Oracle VM Server
Stop the selected Oracle VM Server
Restart the selected Oracle VM Server
Kill (power off) the selected Oracle VM Server
Rescan the physical disks on the Oracle VM Server
Update the Oracle VM Server using the configured YUM server
Search for Oracle VM Servers, server pools, virtual machines and so on
Display the online help
The options available in the toolbar mirror those available in the menus. See Section 3.4.3, "Actions Menu" for more information.
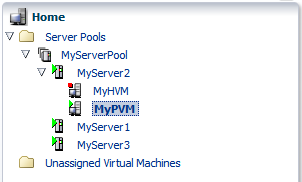
The navigation tree shows the relationship between managed objects. These objects are both physical and virtual, and include Oracle VM Servers, server pools, and virtual machines created using Oracle VM Manager. For example, the Home view shows the relationships between server pools, Oracle VM Servers, and the virtual machines hosted on those Oracle VM Servers.
The content of the navigation tree changes, depending on the object you click in the tree.
A sample of the navigation tree for the Home view is shown in figure Figure 3-7.
In this example, the server pool named MyServerPool contains three Oracle VM Servers, named MyServer1, MyServer2, and MyServer3. A stopped virtual machine named MyHVM and a running virtual machine named MyPVM is hosted on MyServer2.
The icon for an object may be one of three colors: gray, yellow or red. These colors represent the status of the object and the color meanings are listed in table Table 3-9, "Object Icon Colors".
| Icon Color | Icon Example | Status |
|---|---|---|
|
Gray |
Normal. No warning or error events. |
|
|
Yellow |
|
The object has a warning event associated with it. |
|
Red |
The object has an error event associated with it. |
To see the events associated with an object, select the object in the navigation tree. The object's management pane is displayed, and includes the Events tab. The Events tab lists all the events for that object.
|
Copyright © 2011, Oracle and/or its affiliates. All rights reserved. Legal Notices |
|