 Understanding Candidate Gateway
This chapter provides overviews of Candidate Gateway and of the Careers Home page, and it discusses how to:
Register online and sign in.
Using the Careers Home page.
Manage names, contact information, and passwords
Review and search for job postings.
Save searches and job agents.
Email job openings to friends.
Save job openings.
Apply for jobs.
Enter references.
View interview schedules.
Review and respond to job offers.
Review career tools.
Enter referrals.
Understanding Candidate GatewayCandidate Gateway is the applicant self-service front-end to Oracle's PeopleSoft Enterprise Recruiting Solutions platform. It provides a gateway for both internal and external candidates and employees to search, apply for, and track job opportunities.
Candidate Gateway and PeopleSoft Talent Acquisition Manager
All of the setup for Candidate Gateway occurs in PeopleSoft Talent Acquisition Manager. For example, you use Talent Acquisition Manager to set system-wide defaults, to set up site definitions for your internal and external recruiting websites, and to define resume templates that control the layout and flow of the online application process. Candidate Gateway also gets all of its job postings from the job openings that you create and manage using PeopleSoft Talent Acquisition Manager.
When applicants apply online, the system creates applicant records in PeopleSoft Talent Acquisition Manager, where you manage the overall recruiting process. During the recruiting process, certain information that originates in Talent Acquisition Manager (for example, interview schedules and job offers) is also made visible in Candidate Gateway. Candidate Gateway also displays notifications that Talent Acquisition Manger generates during the recruiting process.
External applicants can perform these actions without registering:
View a list of the latest job postings.
Search for job postings.
Access the detailed posting information for each, and email that information to a friend.
Registered users, which includes your employees as well as external applicants who register, can perform these additional actions:
Update name and contact information.
Submit applications (with or without selecting specific jobs to apply for).
View notifications.
Save search criteria and job agents.
Save a list of job openings.
View and process requests for references.
View interview schedules.
View and respond to job offers.
Add attachments.
Refer friends (internal applicants only).
Registering Online and Signing InThis section provides an overview of online registration and discusses how applicants can:
Log in to Candidate Gateway.
Register for Candidate Gateway.
Get login help.
 Understanding Online Registration
Internal applicants do not need to register to use Candidate Gateway; they receive access through their user profiles. External applicants, however, must register online to perform many recruiting-related tasks.
To register online, external applicants create a user name and password. External applicants only need to register for an account once. They can then use their user name and password to sign in to that account regardless of which site they use to access their account.
See Applicant Activities.
The Registration and Sign In Process
When an external applicant first accesses the site, the Careers page appears. On this page, applicants can sign in to an existing account, register for a new account, request help with forgotten user names and passwords, or perform the actions that do no require registration.
After an applicant signs in, either on the Careers page or by registering, the system displays the Careers Home page, which provides additional functionality for registered users.
The following diagram illustrates this flow:
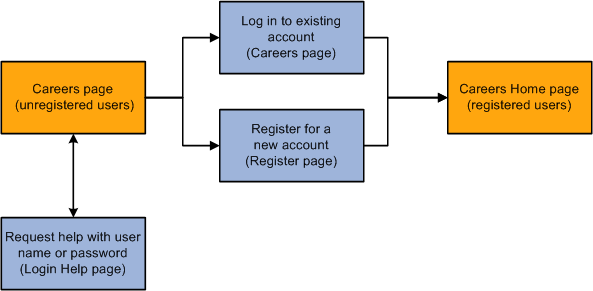
Process flow for registering or logging in
The Careers page also has buttons and links for actions that are unavailable unless the user is signed in. For example, there are buttons for saving selected jobs and applying for selected jobs. If an applicant attempts to perform these actions without first signing in, the system prompts the user to sign in on the Login page. The Login page also provides links to the Register page and the Login Help page. The following diagram illustrates this flow:
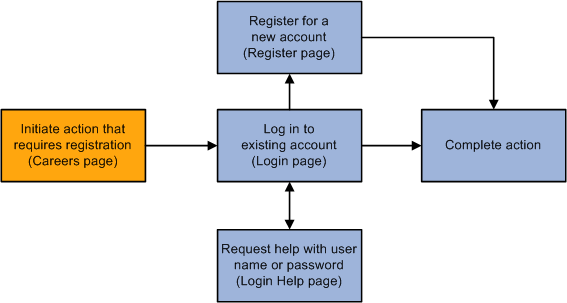
Process flow for logging in before performing an action that requires registration
If applicants have forgotten their user name or password, they can use the Login Help page to:
Request an email with a new password,
Request an email with their forgotten user name.
External applicants can change the passwords for their accounts using the Change Password page.
See Updating Passwords.
Pages Used to Register Online and Sign In|
Page Name |
Definition Name |
Navigation |
Usage |
|
HRS_CE_HM_PRE |
Careers, Careers |
View the latest job postings, search for jobs, and sign in to perform additional actions. This is the page that appears to external applicants before signing in. |
|
|
HRS_APP_LOGIN_EXP |
When you are not signed into the system, perform any action that requires you to be signed into the system. For example, click the Save Selected Jobs button on the Careers page. |
Sign in to an existing account. |
|
|
HRS_CE_HM_REG |
|
Register online. To register, applicants enter a user name and password, confirm the password, and click theRegister button. |
|
|
HRS_APP_PSSWD_HLP |
Click the Login Help link on the Careers page or the Login page. |
Change your password or find your user name for a current account. |
Logging In to Candidate Gateway
Access the Careers page (Careers, Careers) or the Login page (on the Careers page, initiate an action that requires you to be logged in).
To sign in, applicants enter a user name and password, then click the Login button. Applicants who have forgotten their user name or password can click the Login Help button.
To create a new account, applicants click the Register Now link.
Registering for Candidate Gateway
Access the Registration page (click the Register Now link or the Register Here link on the Careers page).
To register, applicants provide a user name and password.
Getting Login Help
Access the Login Help page (click the Login Help button on the Careers page or on the Login page)
Forgot Your Password?
Applicants enter their user name and click the Get New Password button. The system creates a new password and, if there is an email address for the applicant in the system, sends the applicant an email notification (HRS_APPLICANT_PASSWORD) that contains the new password.
If the applicant has not provided an email address, a message appears stating that the applicant doesn't have an email address and must register for a new account.
Forgot Your User Name?
Applicants enter their email address and click the Find User Name button. If the applicant's email address is recognized, the system sends an email notification (HRS_APPLICANT_PASSWORD) that contains the user name that is associated with that address.
If the email address is not recognized, a message appears stating that there is no record of the applicant's email address.
Using the Careers Home Page
When an external applicant first accesses the site, the Careers page appears. On this page, applicants can sign in to an existing account, register for a new account, or perform certain actions that do not require registration.
When an applicant signs in, the Careers page becomes the Careers Home page and displays additional elements for managing the applicant's job search.
Primary Navigation Links
The row of links across the top of the Careers Home page and many other pages enables applicants to move among various Candidate Gateway pages:
The Careers Home, Job Search, My Saved Jobs, My Saved Searches, and My Career Tools links provide access to pages of the same names.
The Logout link logs the user out of the system and returns the user to the Careers page.
Basic Job Search
Applicants use this group box to perform simple keyword searches for job postings.
See Reviewing and Searching for Job Postings.
My Career Tools
This group box summarizes the applicant's job search activities. The summary information for applications, cover letters and attachments, and saved resumes always appears, as does a link to the My Profile page. Information about available job offers appears only when an online offer has been posted.
Except for the My Profile link, all of the links in this group box go to the My Career Tools page, which provides more detailed information about the same activities.
This grid lists various recruiting-related notifications:
Reference requests.
See Entering References.
Requests to complete an online questionnaire.
These appear if a recruiter has linked the applicant to a job opening that includes screening questions. The applicant's existing applications can't be used because they don't include answers to the questions, so the applicant is invited to reapply. When the applicant clicks the notification link, the system displays the Job Description page, where the applicant can click the Apply Now button to begin applying.
Interview schedule notifications.
Online job offer notifications.
This group box provides options for browsing recent job openings, saving jobs to a personal list, applying for selected jobs, or applying without selecting a job.
The Latest Job Postings grid lists the latest job postings according to their posting date. Applicants can click a job posting title to access the Job Description page, where they can review the complete job posting information.
The number of job openings included in the list is controlled by the Days Available for Latest Postings setting on the Recruiting Installation – Jobs page. The grid is a useful tool for catching a prospective applicant's eye, but because applicants see only five postings at a time, the expectation is that applicants will use the search to find the jobs they are interested in.
See Defining Job-Related Settings.
Managing Names, Contact Information, and Passwords
This section provides an overview of the My Profile page and discusses how to:
Entering name and contact information.
Update passwords.
Note. Applicants must be signed in before they can perform these tasks.
Understanding the My Profile PageExternal applicants use the My Profile page to enter their name and contact information and to change the passwords for their accounts. When the applicant updates name and contact information, changes are automatically reflected in existing applications and in Talent Acquisition Manager pages.
For internal applicants, the system populates the My Profile page with information from PeopleSoft Enterprise Human Resources. Internal applicants can only view their information; they cannot make updates on this page. Because internal applicants do not self-register for the site, they do not manage their password on this page either.
An applicant's My Profile data can include a name, address, multiple email addresses, and multiple phone numbers. It also includes the applicant's overall preferred method of contact as well as the preferred email address and phone number when there are multiple values.
The system requires a first and last name before an applicant can submit an application, and the My Profile page appears as the second page in the job application process if the this information is missing. (This does not happen for internal applicants, for whom this data is automatically populated.)
Pages Used to Manage Names, Contact Information, and Passwords|
Page Name |
Definition Name |
Navigation |
Usage |
|
HRS_APP_PRFILEINFO |
|
External applicants can view and update their name, preferred contact method, address, email, and phone information. Internal applicants can view this information, but not update it. |
|
|
HRS_APP_PSSWD_HLP |
Click the Change Password link on the My Profile page (external applicants only). |
External applicants can change their password. |
Entering Name and Contact Information
Access the My Profile page (click the My Profile link on the Careers Home page).
Note. Fields for entering address, email address, and phone number information also appear on this page, but are not pictured here.
Applicants must enter at least a first and last name before completing a job application.
Only applicants who provide an email address can receive recruiting-related email notifications.
Updating Passwords
Access the Change Password page (click the Change Password link on the My Profile page).
To change the password, an applicant enters the new password, reenters the new password to confirm it, and clicks Save.
Reviewing and Searching for Job Postings
This section provides an overview of job searches, lists prerequisites, and discusses how to:
Review a job description.
Perform a basic keyword search.
Perform an advanced search.
Perform a profile search.
Note. Applicants do not need to sign in to perform job searches or view job postings.
Understanding Job Searches
This section discusses job searches in PeopleSoft Candidate Gateway.
Search Types
In addition to listing recent job postings, PeopleSoft Candidate Gateway offers three types of job searches:
A basic keyword search.
Applicants use the basic search to search for jobs that contain specified keywords. Applicants can limit search results based on how recently the job opening was posted.
The basic search is available on the Careers page, the Careers Home page, and the Job Search page. Search results always appear on the Job Search page.
An advanced search with multiple search criteria fields.
The advanced search enables applicants to search for jobs based on keywords, location, job family, job type (full-time/part-time and regular/temporary), desired pay, job opening ID, and posting dates. Internal applicants can also search for jobs based on recruiter or hiring manager.
The advanced search is available on the Job Search page.
A profile search (internal applicants only).
Internal applicants use the profile search to find job postings that match their person, job, or interest profiles.
Important! You must run the Verity Job Posting Index Build (HRS_JSCH_IDX) Application Engine process to build the search collections that applicants use to search for job postings. Because job openings and job postings are always being added to the system, you must continually build the collections to ensure that they contains up-to-date data.
See Building the Job Posting Collections.
Data Sources
The following table lists the data sources that correspond to various search criteria:
|
Search Criteria |
Data Source |
|
Keyword |
Posting title and job description. |
|
Recruiting location |
Job opening. |
|
Job family |
The job family that is associated with the job code. Note. (USF) For U.S. federal government jobs, the system searches GVT_PATOCB_CD. |
|
Full-time/part-time |
Job opening. |
|
Regular/temporary |
Job opening. |
|
Desired pay |
Default salary range that is associated with the job code. |
|
Job opening ID |
Job opening. |
|
Posting date |
Job opening. |
Applicants can view only job postings for job openings that have an open status. For example, the job opening status Open is an open status, but Pending Approval is not. You define which job opening statuses are open on the Status/Reason Definition page.
Additionally, the job posting must meet the following criteria:
The job posting is current.
Job postings are current from the job posting opening date until the job posting closing date (the Post Date and Remove Date fields on the Posting Information page).
The posting destination is a recruitment source with the type Company.
The posting destination is specified in the Destination field on the Posting Information page. The values in that field correspond to the recruitment sources that you define in the Source Setup page.
The posting must have the appropriate posting type for the user.
The posting type comes from the Posting Type field on the Posting Information page.
For external applicants, the posting type must be External.
For internal applicants, the posting type must be Internal.
See Also
Prerequisites
Before applicants can search for jobs, you must run the Verity Job Posting Index Build (HRS_JSCH_IDX) Application Engine process to build the job posting collections.
Before internal applicants can perform profile searches, you must run the Maintain Profile Indexes (JPM_BLD_INDX) Application Engine process to build the profile collections.
See Also
Building the Job Posting Collections
Setting Up Search and Compare Profiles
Pages Used to Search for and View Job Openings|
Page Name |
Definition Name |
Navigation |
Usage |
|
Careers Careers Home |
HRS_CE_HM_PRE HRS_CE_HM_POST |
|
When searching for job openings, use the Careers and Careers Home pages to perform basic keyword searches. You can also view job openings that appear in the Latest Job Postings grid. |
|
HRS_CE_JOB_DTL |
|
View the description of a job opening as entered on the Posting Information page in PeopleSoft Enterprise Talent Acquisition Manager. |
|
|
HRS_APP_SCHJOB |
|
Search for jobs, review search results, and save jobs. Applicants can switch between basic and advanced search modes. The search mode that initially appears depends on how the applicant accessed the page. The Search Results group box doesn't appear until applicants search for jobs. |
|
|
HRS_APP_SCHMYPRF |
Self Service, Recruiting Activities, Careers, Careers Home Click the Search Your Profiles link on the Careers Home page. |
Search for job openings that match one of your profiles. Note. This page is available only to internal applicants. |
|
|
Search Tips |
HRS_APPLSRCH_TIPS |
Click the Search Tips link on the Careers page, the Careers Home page, or the Job Search page. |
View tips for constructing keyword searches. For example, the search tips provide information on the use of and and or in searches and on searching for entire phrases. |
Reviewing a Job Description
Access the Job Description page (click a job posting title link on the Careers Home page, in your search results, or in any list of job openings).
See Also
Emailing Job Openings to Friends
Performing a Basic Keyword Search
Access the Careers page (Careers, Careers) or the Careers Home page (Self-Service, Recruiting Activities, Careers, Careers Home).
To use the basic job search, enter job keywords, indicate the time frame during which the job was posted, and click the Search button.
To perform other types of searches, click the Advanced Search link or the Search Your Profiles link.
Note. The Search Your Profiles link is only visible to internal applicants.
Performing an Advanced Search
Access the Job Search page (click the Advanced Search link on the Careers Home page).
The Recruiter and Hiring Manager fields are only visible to internal applicants.
Performing a Profile Search
Access the Job Openings that Match Your Profiles page (click the Search Your Profiles link on the Careers Home page).
Important! Only internal applicants can perform profile searches.
An employee with more than one person, job, or interest profile must select a profile to use for the search. The system looks for job openings with profiles that have similar content to the selected profile.
See Also
Understanding Profile Architecture
Saving Searches and Job AgentsThis section provides an overview of saved searches and job agents and discusses how to:
Save search criteria.
Review saved searches.
Note. Applicants must sign in before they can save searches and job agents.
Understanding Saved Searches and Job Agents
When applicants are signed in to the site, they can save their search criteria. Saving enables applicants to rerun the searches without having to re-enter their search criteria. Applicants can run the saved searches from the Job Search page or the My Saved Searches page. The My Saved Searches page additionally enables applicants to delete and edit saved searches.
Saved searches can be designated as a job agents that will automatically notify the applicant of job postings that meet the search criteria. To support this functionality, you must regularly run the Job Agent Application Engine process (HRS_JOB_AGNT).
Each time the Job Agent process runs, the system checks for job openings that meet the saved search criteria. If there are postings that match the criteria, the system sends the applicant an email with information about the search results. The email includes links to the job openings that match the applicant's criteria, up to the maximum number of job openings specified in the Max Job Posts Per Notification field in the Recruiting Installation - Jobs page. If the number of matches exceeds the maximum, the notification email also directs the applicant to visit the Careers page to view all of the search results. The Job Agent process also posts a notification in the Notifications group box on the Careers Home page. By clicking the subject link for the notification, applicants can view the job agent search results.
If the applicant has multiple job search agents, the system generates separate emails and notifications for each job agent.
Although applicants can save an unlimited number of searches, the system limits the number of job agents an applicant can save based on the value that you enter in the Maximum Job Agents field on the Recruiting Installation - Applicants page.
See Also
Pages Used to Save Searches and Job Agents|
Page Name |
Definition Name |
Navigation |
Usage |
|
HRS_APP_SCHJOB |
|
An applicant who wants to save search criteria begins by clicking the Save Search button on this page. |
|
|
HRS_APP_SAV_SCH |
Click the Save Search button on the Job Search page. |
Save search criteria, and optionally designate a saved search as a job agent. |
|
|
HRS_APP_SEARCHES |
Click the My Saved Searches link at the top of the Careers Home page and other pages. |
View, edit, delete, and run saved searches and job agents. |
|
|
HRS_APP_SCHJOB |
Click the Edit link for a saved search on the My Saved Searches page. |
Edit a saved search. |
Saving Search Criteria
Access the Save Search page (click the Save Search button on the Job Search page)
These are the steps an applicant takes to save search criteria:
Click the Save Search button on the Job Search page.
The Save Search page appears.
Enter a name for the saved search in the Name your search field.
(Optional) Select the Use As Job Agent check box to save the search criteria as a job agent.
(Optional) Enter an email address for job agent notifications in the Send Job Agent notification to field.
Click Save.
If the Use as Job Agent check box is selected, and the applicant already has the maximum permitted number of job agents, the system issues an error, and the applicant must deselect the Use as Job Agent check box before saving.
See Also
Understanding Saved Searches and Job Agents
Reviewing Saved Searches
Access the My Saved Searches page (click the My Saved Searches link at the top of the Careers Home page and other pages).
|
Edit |
When an applicant clicks this link, the Edit Saved Search page appears. The Edit Saved Search page displays the fields from the Save Search page so that the applicant can modify the save settings, and it displays the search criteria fields from the Job Search page so that the applicant can modify the actual search criteria. |
|
Run Search |
When an applicant clicks this button, the Job Search page appears and displays the saved criteria and the search results. |
Emailing Job Openings to Friends
When applicants find a job opening that might interest someone they know, they can email the job opening to that person. The email is sent from the system and not from the applicant's personal email address.
This section discusses how to send a job description.
Note. Applicants do not need to sign in to perform job searches or view job postings.
Pages Used to Email Job Openings to Friends|
Page Name |
Definition Name |
Navigation |
Usage |
|
HRS_CE_JOB_DTL |
Click a job posting title on the Careers page, the Careers Home page, the Job Search page, the My Saved Jobs page, or the Interview Details page. |
View the description of a job opening. This description comes from the job opening's Posting Information page. |
|
|
HRS_JOB_EML_FRND |
Click the Email to Friend button on the Job Description page. |
Email jobs to friends. |
Sending a Job Description
Access the Send Email page (click the Email to Friend button on the Job Description page).
These are the steps an applicant takes to send the job description to a friend:
Access the Send Email page.
Enter a comma-delimited list of email addresses to which the message will be sent.
Enter the applicant's own name in the Your Name field.
The system references this name in the default email message text, which begins with the sentence "<your name> found this job and thought you might find it interesting."
Optionally modify the email subject.
Although applicants can modify the email subject, they cannot modify the system-generated message text.
Click the Send button.
The system sends the email notification (HRS_CE_EML_FRND) to all persons that applicants enter in the To field.
Saving Job Openings
This section provides an overview of saved job openings and discusses how to review saved jobs.
Note. Applicants must sign in before they can save job openings.
Understanding Saved Job OpeningsApplicants can select and save job openings that they are interested in and apply to these jobs at a later date. Applicants can save jobs from several pages in the Careers component and can view their saved jobs on the My Saved Jobs page.
There is no limit to the number of jobs that an applicant can save. The system does not automatically remove closed, cancelled, or on hold jobs from an applicant's list of saved jobs. However, the system does display the job opening status on the My Saved Jobs page, and applicants can manually remove jobs from the list of saved jobs.
Pages Used to Save Job Openings|
Page Name |
Definition Name |
Navigation |
Usage |
|
Careers Home |
HRS_CE_HM_POST |
|
When saving job openings, use the Careers Home page to select jobs to save. |
|
HRS_APP_SVDJB_SEC |
|
View and delete saved jobs and apply to saved jobs. |
Reviewing Saved Jobs
Access the My Saved Jobs page (click the My Saved Jobs link on the Careers Home page and other pages).
Applying for Jobs
This section provides an overview of the job application process, lists prerequisites, and lists the pages used to apply for job openings.
Note. Applicants must sign in before they can apply for job openings.
Understanding the Job Application Process
This section describes the job application process.
The Online Application Process
The following diagram shows the online application process. After signing in to Candidate Gateway, the applicant begins the application process by providing a resume. If you use a resume extractor, the extractor uses the resume information to enter default values into the application form. Whether or not there are default values, the applicant completes the form and submits it, which saves the application record in the Recruiting Solutions tables.
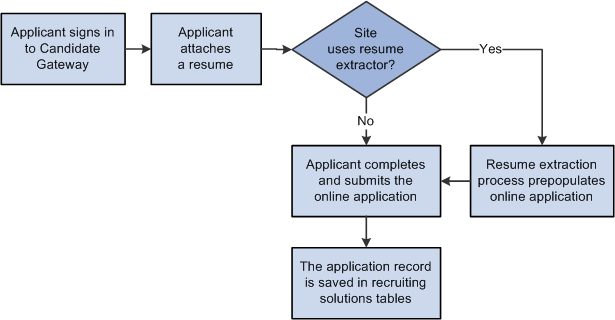
Online application process
Online Application Format and Content
When an applicant applies online, the pages that the applicant sees and the information that they must complete depend on the resume template that the system uses:
If the applicant applies for a single job opening, the system uses the resume template for that job opening.
If an applicant applies for more than one job at a time, the system merges the associated resume templates so that all possible sections are included in the new resume template and no sections are duplicated.
If an applicant applies without selecting a job opening, the system uses the default resume template that is associated with the site.
See Setting Up Resume Templates.
The Application Process
Certain aspects of the online application flow are fixed regardless of which template or templates are used. These are the general steps for completing an online application:
The applicant initiates the process by clicking one of the following:
Apply Without Selecting Jobs: this link appears on the Careers page and the Careers Home page.
Apply Now: this button appears on the Job Description page and the My Saved Jobs page.
Apply for Selected Jobs: this button appears on pages the Careers page, the Careers Home page, and the Job Search page.
If an external applicant is not signed in, the system prompts the user to sign in before continuing the application process.
Internal applicants do not need to register or sign in.
(IRL) If the resume template is configured to require community background information, the Community Background Information page appears so applicants can indicate their community background.
This page appears only if you selected the Use Community Background option on the Country Specific page for the resume template that is associated with the job opening.
Applicants are prompted to enter community background information each time they apply for a Northern Ireland job opening. If they have already entered community background information for a another job opening to which they applied, the system displays the value that they selected in the Select Community field. Applicants can select a new value if necessary.
The Choose Resume page presents options for providing a resume, and then the applicant completes any pages or fields that are related to the selected resume option.
All resume templates have the Choose Resume page as the first page in their structure definition, but different templates offer applicants different options for providing a resume.
If you use a resume extractor, the system extracts data from the resume and prepopulates data in the online application.
If the applicant's first and last name have not yet been supplied, the My Profile page appears and the user must enter the required information.
All resume templates have this as the second page in their structure definition.
The system skips this step if the system already has the applicant's first and last name (as is always true for internal applicants).
If the resume template includes prescreening questions, the Pre-application Questionnaire page displays those questions along with an explanatory message and prescreening terms that the user must accept.
The Pre-application Questionnaire page displays the prescreening results.
If the applicant failed prescreening, the process ends and the applicant returns to the Careers page.
Applicants who pass prescreening can continue to the next step.
The Complete Application page displays the resume and profile information that has already been provided, along with a row of links that correspond to the rest of the pages in the resume template's structure definition.
Clicking these links displays the sections that are associated with the page on the resume template. For example, if the resume template has sections for Preferences, Education and Work Experience, and References, then those are the links that appear.
The applicant enters data in the sections that are associated with each link.
If the resume template enforces a linear application, only the first link is active at first, and applicants must move through the links in order. Otherwise, applicants can click any of the links to access the different parts of the application form.
For internal applicants, the system uses existing employee information to populate data in the application fields. Internal applicants can review and update this information as needed.
If you use a resume extractor, default data comes from the resume extraction process. Applicants can review the populated information and make changes as necessary.
The applicant submits the job application.
The system saves the application, but does not truly submit it until the applicant completes the next step.
The Submit Online Application page displays your organization's employment terms, which the applicant is required to accept before continuing.
If the job opening uses online screening and includes an explanatory message about the online screening, this page also displays that message. Online screening does not occur until the applicant submits the application.
It is possible for online screening to occur without any notification to the applicant. This is different from prescreening, which must display the results to the applicant.
Organizations can change the default text or add data privacy statements to the Terms & Agreements section using the text catalog.
(USA) If the application is for a job opening that is associated with a company in the United States, and the applicant is an external applicant, the Submit Online Application page also displays self-identification fields.
Applicants can specify gender and ethnicity information, explicitly decline to provide the information, or simply ignore the self-identification fields. The information is used for Equal Employment Opportunity Commission (EEOC) reporting purposes. This group box is not used for internal applicants, and it is an optional part of the application process. The information that the applicant supplies is not used in the application or recruitment process, and access to the data is restricted.
The applicant submits the information from the Submit Online Application page.
The My Applications appears, and the newly submitted application appears in the My Applications grid. If the job opening uses online screening, the relevant pass or fail message (if any) appears as well.
If you integrate with a resume extractor vendor, the system extracts data from the applicant's uploaded resume and populates fields on the Complete Application page automatically.
See Managing Resumes.
Here is how resume extraction works:
Applicants attach their resume files or paste resume text into a field.
The resume extractor extracts recognized applicant information from the resumes and populates fields on the Complete Application page.
When the extraction is complete, the system displays the Complete Application page to the applicant.
Applicants verify the information, update fields, and provide additional information, as required.
If contact information already exists for the applicant, the system doesn't override the contact information with information that is extracted from the resume. However, the system will update contact information if no contact information exists. For example, if an applicant does not have an email address, but the extraction process finds one, the system will update the email address information. The system will override all other applicant data—for example, work history, competencies, and accomplishments—with the data that is extracted from the resume. Applicants can view the information on the Complete Application page and make changes or add new information as needed.
Viewing Submitted Job Applications
After applicants submit an application, they cannot make changes to it (other than name and contact information updates, which automatically appear in the application). However, users can apply for the same job more than once if they need to change their information. If they do, a warning message lets them know that they have already applied for the job and asks if they want to apply again. An applicant who has already passed prescreening for a job opening is not presented with the prescreening questions when reapplying for the same job opening.
Applicants can view all of their job applications in the My Applications group box on the My Career Tools page. Applicants click a job application to view the application.
Applicants can save drafts of their online applications and submit the applications at a later time. To save a draft, applicants click the Save button on the Complete Application page. The job application appears in the My Applications group box on the My Career Tools page with a status of Not Applied. Applicants click a job application to access the application, make changes if needed, and save as a draft or submit.
Prerequisites
Before applicants can apply for jobs online, you must:
Create resume templates.
(Optional) Link resume templates to recruitment templates on the Recruitment Template Settings page.
Set up sites, and specify the default resume template for the site.
The site's default resume template is used when an applicant applies without selecting a job opening.
See Setting Up Sites.
(Optional) Set up resume extractors.
Create job openings and job postings.
Run the Verity Job Posting Index Build Application Engine process (HRS_JSCH_IDX) to build the job posting collections.
Pages Used to Apply for Job Openings|
Page Name |
Definition Name |
Navigation |
Usage |
|
HRS_APP_CB2 |
Select the check box for one or more job openings on the Careers Home, Job Search, or My Saved Jobs page and click Apply Now. |
(IRL) Enter community background information. This page appears only if you select the Use Community Background option on the Country Specific page when you set up the associated resume template. |
|
|
HRS_RESUME_OPTION |
|
Choose a resume option. The options that appear on this page vary depending on the resume template that the system selects. |
|
|
HRS_APPLY_RESUME |
Select Copy and Paste Resume Text on the Choose Resume page and click Continue. |
Enter resume details, including a title for the resume, the language in which the resume is written, and the complete resume text. |
|
|
HRS_CE_PROFILE |
Click Continue on the Choose Resume page or the Enter Resume Text page. |
The applicant must provide at least a first and last name in order to continue with the online application process. |
|
|
HRS_APP_JOPRESCRN |
Continue from the previous step in the online application process (entering a resume or entering name and contact information) |
If prescreening is applicable, the applicant first must agree to the prescreening terms and answer the prescreening questions. After the applicant continues, this page displays the prescreening results. |
|
|
HRS_CE_PROFILE |
Continue from the previous step in the online application process (entering a resume, entering name and contact information, or reviewing prescreening results) |
Complete an online application. The pages and sections that appear on this page vary depending on the resume template that the system selects. |
|
|
HRS_CE_D_WRK_EXP |
Click Add Work Experience on the Complete Application page. |
Enter work experience information. |
|
|
HRS_CE_D_TRAINING |
Click Add Job Training on the Complete Application page. |
Enter job training information. |
|
|
Add <qualification> Update <qualification> |
HRS_CG_APP_DETAIL |
On the Complete Application page, click the Add <qualification> link for a profile-based qualification. |
Enter details about a profile-based qualification. |
|
HRS_CE_G_D_PP |
Click Add Priority Placement on the Complete Application page. |
Enter priority placement information. |
|
|
HRS_CE_D_REFERENCE |
|
Enter information for a reference. |
|
|
HRS_CE_SELF_IDENT |
Click Submit on the Complete Application page. |
Agree or disagree to a company's application and data privacy statement. (USA) Enter gender and ethnicity information in the Self Identification Details group box. This group box appears only for external applicant that apply for job openings in the United States. |
|
|
HRS_APP_APLC |
Click Submit on the Submit Online Application page. |
Confirm that the application is completed and submitted correctly. View all submitted applications and statuses of each. |
Initiating the Application Process
The applicant initiates application process by clicking one of the following:
Apply Without Selecting Jobs: this link appears on the Careers page and the Careers Home page.
Apply Now: this button appears on the Job Description page and the My Saved Jobs page.
Apply for Selected Jobs: this button appears on pages the Careers page, the Careers Home page, and the Job Search page.
Selecting a Resume Option
Access the Choose Resume page (begin the online application process by clicking Apply Now, Apply for Selected Job Openings, or Apply Without Selecting Job).
Resume Options for Applicants
Although the resume template controls the pages that an applicant sees while applying, all resume templates have the same first page, and the online application process always starts on the Choose Resume page, which offers the applicant up to four options for submitting a resume. Applicants select an option and then click the Continue button to complete their resume processing and continue with the application process.
The resume options are:
Copy and paste resume text.
When the applicant continues, the system displays the Enter Resume Text page. The applicant manually enter resume text and then clicks Continue complete the rest of the application.
Apply without using a resume.
When the applicant continues, the system skips any resume processing steps and guides the applicant through the rest of the application.
Upload a new resume.
When the applicant continues, the system displays a dialog for selecting an uploading a file attachment.
Use an existing resume.
When the applicant selects this option, the Resume to Use field appears. If the applicant has created or uploaded any resumes previously, those resumes appear in the drop-down list box. The applicant must select an option before continuing.
Applicants can view all of their uploaded resumes in the Resumes grid on the My Career Tools page. After an applicant uploads a resume, they cannot make changes to it.
Entering Resume Text
Access the Enter Resume Text page (select Copy and Paste Resume Text on the Choose Resume page and click Continue.)
Applicants can type or paste resume text into the Resume field and then use the available formatting tools to control the presentation of the resume text.
Entering Name and Contact InformationIf the applicant record does not already have at least a first and last name, this information must be supplied during the online application process.
See Entering Name and Contact Information.
Completing Prescreening
Access the Pre-application Questionnaire page (continue from the previous step in the online application process: entering a resume or entering name and contact information).
When prescreening is active, applicants cannot continue with the application process until they pass prescreening.
See Also
Understanding Prescreening and Online Screening
Completing the Online Application
Access the Complete Application page (continue from the previous step in the online application process: entering a resume, entering name and contact information, or reviewing prescreening results).
Jobs You Applied For
This group box lists the job openings, if any, for the current application. Applicants can add or remove job openings until they submit the application.
Resume and Personal Information
The next area of the Complete Application page identifies the resume (if any) that the applicant provided and includes links to the resume and to the My Profile page. After the application is submitted, the only data that is ever updated is the name and contact information on the My Profile page.
Save, Submit, and Navigation Elements
The next area of the Complete Application page provides various page elements for saving, submitting, and navigating.
Use the navigation links to access each area of the application form—these area correspond to page definitions on the resume template. The navigation links appear only if the resume template includes multiple pages (other than the mandatory resume page and the mandatory name and contact information page).
There are two sets of navigation links:
Previous and Next links for navigating to each page.
If the template enforces a linear application, there is no Previous link.
Direct links to each section.
If the template enforces a linear application, the only active link is for the next page in the sequence. Otherwise, applicants can access any section at any time.
Application Details
Resume templates define the application in terms of pages (rendered as links on the Complete Application page) and sections. Sections include the actual fields that the applicant fills out.
Some sections, such as Preferences, consist of standard data entry fields.
The Application Questionnaire section consists of a list of questions. The question order is set in the job opening unless the system is configured to randomize question order, but open-ended questions always appear after multiple choice questions.
Several sections, such as work experience and references, are rendered as grids that summarize data. Links provide access to separate detail pages where applicants enter data. For example, if the resume template includes the Work Experience section, the system renders it as a Work Experience grid. You click the Add Work Experience link to access the Add Employment History page, or you click an existing entry to access the same page in update mode.
All profile-based qualifications (such as competencies, degrees, or licenses & certificates) are rendered as grids. There is just one detail page (HRS_APP_DTL_SEC) for all of the profile-based qualifications, but its title and content vary according to the specific qualification. For example, when you access the page from the Degrees grid, the title is either Add Degrees or Update Degrees, and the page displays degree-related fields for entering the degree code, the major code, and so forth.
See Setting Up Profile Integration, Understanding Profile Information in Job Applications.
Submitting the Application
Access the Submit Online Application page (click the Submit button on the Complete Application page).
(USA) Self Identification Details
This group box appears only if the company on any of the job openings is in the United States, and if the applicant is an external applicant.
Online Screening Explanatory Message
This group box appears only if online screening is active and if the screening level has an explanatory message to display.
Terms and Agreements
The applicant must agree to the terms before submitting the application.
When the applicant clicks the Submit button, the system performs online screening, if applicable, then displays the My Applications page. If online screening is active, and if the screening level includes pass or fail messages, the appropriate message is displayed.
Entering References
A recruiter using Talent Acquisition Manager can send an applicant a request for references. This request appears in the Notifications section of the Careers Home page.
This section provides an overview of reference notifications and discusses how to:
Review references.
Add reference details.
Note. Applicants must sign in before they can enter references.
Understanding Reference Notifications
In Talent Acquisition Manager, recruiters and hiring managers can click the Request References button on the Add New Applicant page: Verification section or on the Manage Applicant page: Applicant Data tab: Verification section. Clicking this button sends an email notification (HRS_UPDATE_REFERENCES) to applicants (provided there is an email address for the applicant in the system) that notifies them to update their references. The email notification contains a link to the Careers Home page. The system also posts a notification in the Notifications group box on the Careers Home page.
Applicants can click the Please add your references link in the Notifications group box on the Careers Home page to access the Applicant References page, where they can submit references.
Note. If an applicant did not apply online, the email notification includes an auto-generated user name and password that enables the applicant to sign in, see the notification, and submit references.
Pages Used to Enter References|
Page Name |
Definition Name |
Navigation |
Usage |
|
HRS_CE_HM_POST |
|
The Careers Home page displays the notification requesting that the applicant enter references. Click the notification link to access the Applicant References page. |
|
|
HRS_CE_APP_REF |
Click the Please add your references link in the Notifications group box on the Careers Home page. |
Review existing reference information. |
|
|
HRS_CE_D_REFERENCE |
|
Enter information for a reference. |
Reviewing References
Access the Applicant References page (click the Please add your references link in the Notifications group box on the Careers Home page).
Click the Add Reference link to add additional references.
Adding Reference Details
Access the Add Reference page (click the Add Reference link on the Applicant References page).
Viewing Interview Schedules
When a recruiter schedules an interview using Talent Acquisition Manager, the system can optionally send the applicant an interview notification. This notification appears in the Notifications section of the Careers Home page.
This section provides an overview of interview notifications and discusses how to review interview details.
Note. Applicants must sign in before they can view interview schedules in Candidate Gateway.
Understanding Interview Notifications
When you schedule an interview using the Interview Schedule page in Talent Acquisition Manager, you can select the Notify Applicant option to send a notification to the applicant. The system sends an email notification (HRS_INTVWSCHED_APPL) to the applicant (provided there is an email address for the applicant in the system), and if the applicant applied online, the system also posts a notification in the Notifications group box on the Careers Home page.
When an applicants click the notification link in the Notifications group box, the system displays the interview schedule on the Interview Details page. The email also contains the interview schedule for the applicant.
Note. If Talent Acquisition Manager is configured for full calendar integration with Microsoft Outlook, applicants whose calendars are accessible to the user who created the interview also receive a Microsoft Outlook meeting invitation for the interview.
See Also
Understanding Calendar Integration for Interviews
Pages Used to View Interview Schedules|
Page Name |
Definition Name |
Navigation |
Usage |
|
HRS_CE_HM_POST |
|
The Careers Home page displays the interview notification. Click the notification link to access the interview details. |
|
|
HRS_APP_INT_DET_SB |
Click an interview link in the Notifications group box on the Careers Home page. |
View the details for all scheduled interviews (start and end times, date, interviewer, location) for a specific job opening. |
Reviewing Interview Details
Access the Interview Details page (click an interview link in the Notifications group box on the Careers Home page).
Reviewing and Responding to Online Job OffersThis section provides an overview of online job offers and lists the pages used to respond to online job offers.
Note. Applicants must sign in before they can access online job offers.
Understanding Online Job OffersWhen PeopleSoft Talent Acquisition Manager is configured to support online job offers, users of Candidate Gateway can access offer documents online, review offer documents, accept or reject the offer, and upload offer or employment documents that need to be returned to your organization.
When the job offer is posted to Candidate Gateway, the system sends the applicant an email notification (HRS_OFFER_NOTICE) that the offer is there. When the applicant signs on to Candidate Gateway, there is also a offer notification on the Careers Home page. The notification subject is Job Offer, and clicking the subject displays the detailed offer information on the Job Offer page. A list of job offers also appear on the My Career Tools page, and applicants can click a job offer to access detailed information.
Pages Used to Review and Respond to Online Job Offers|
Page Name |
Definition Name |
Navigation |
Usage |
|
HRS_ONL_OFR_CE_DTL |
|
Review a job offer, accept or reject it, and upload offer acceptance documents. |
|
|
HRS_CE_ATTNOTE_SEC |
|
View the text of an offer-related note. |
|
|
HRS_ONL_OFR_NT_SEC |
Click the Send Document button on the Job Offer page. |
Send uploaded offer and employment forms to the primary recruiter for the job opening. |
Reviewing and Responding to an Online Job Offer
Access the Job Offer page (click the View link in the Job Offers grid on the My Career Tools page).
Attachments
The attachments section of the Job Offer page enables applicants to review offer documents. There are separate tabs for the three types of attachments: file attachments (including the offer letter), links, and offer notes.
|
View |
Clicking the View icon for a file attachment or a link displays the item in a new browser window. Clicking the View icon for a note displays the note on the Job Offer Attachment Note page. |
|
Action Required |
An icon in this column marks attachments where the Action Required check box was selected on the Prepare Job Offer page in Talent Acquisition Manager. If an applicant accepts an offer without viewing these documents, a warning appears. |
Acknowledgments
Before accepting an online job offer, the applicant must acknowledge that the offer and all attachments have been reviewed and understood. The Accept button is not available until the applicant selects the check box in the Acknowledgments group box.
Comments
The applicant can enter comments before accepting or rejecting an offer. The comments are included in the contact note that the system creates when the applicant clicks the Accept or Reject button. The comments do not become part of the job offer, and do not appear here after the applicant leaves the page.
Accept and Reject
Accept and Reject buttons enable the applicant to respond to the offer online. Before accepting an online job offer, the applicant must acknowledge that the offer and all attachments have been reviewed and understood. The Accept button is not available until the applicant selects an acknowledgement check box.
Confirmation messages appear before either accept or reject actions are processed. When the applicant confirms the acceptance or rejection, the system performs these actions:
Updates the offer status to show that it has been accepted or rejected.
As long as you use the delivered status change effects, updating the offer status also makes various other status changes, including updating the applicant disposition to Offer Accepted.
See Understanding Recruiting Statuses.
If notifications are active for the particular status that is applied, the change triggers a notification (HRS_OFFER_RESPONSE) to the recruiter.
Creates an applicant contact note with the subject Online Acceptance of Job Offer or Online Rejections of Job Offer.
Any comments that the applicant entered on the Job Offer page are included in the contact note, along with a statement of the date and time that the offer was accepted or rejected.
An accepted offer remains accessible in Candidate Gateway indefinitely, enabling the applicant to re-access offer documents at any time. A rejected offer is immediately removed from Candidate Gateway.
Applicants cannot change their response after clicking the Accept or Reject button. Any changes must be handled manually and require that the applicant contact the recruiter.
An offer that has not been accepted or rejected before its expiration date is removed from Candidate Gateway.
Completed Documents
Applicants can optionally upload documents such as completed offer forms either before or after accepting an offer. For example, an applicant can print a confidentiality agreement, sign it, then scan and upload the document.
After uploading documents, applicants should select the documents and click the Send Document button to send a notification (HRS_OFFER_DOC_ATCH ) to the recruiter.
See Also
Sending Notifications to a Recruiter
Access the Send Notification to Recruiter page (click the Send button on the Job Offer page).
|
Subject |
If no documents were selected when the applicant accessed this page, the applicant enters both the subject text and body test. If there were documents selected, then the system sets the subject text, and the field is read-only. |
|
Completed Documents |
This section appears only if the applicant selected any documents before clicking the Send button on the Job Offer page. The read-only grid lists the selected documents. |
|
Submit |
When the applicant submits the notification, the system creates a contact note with the attachments and sends the notification to the primary recruiter for the job opening. |
Reviewing Career ToolsThis section provides an overview of career tools, lists a prerequisite, and lists the pages used to review career tools.
Note. Applicants must sign in before they can review career tools and add attachments.
Understanding Career ToolsAn applicant's career tools include applications, resumes, attachments, and job offers. In Candidate Gateway, applicants use the My Career Tools page to review these tools.
For applications, resumes, and job offers, which are all created elsewhere, the page provides summary grids with links that you click to review details.
Attachments, on the other hand, are managed directly on the My Career Tools page.
Prerequisite
Before applicants can submit attachments, you must define attachment types on the Attachment Type Setup page in Talent Acquisition Manager.
See Setting Up Application Attachments.
Pages Used to Review Career Tools|
Page Name |
Definition Name |
Navigation |
Usage |
|
HRS_CE_RESUME |
|
Review and access detailed information about applications, resumes, attachments, and job offers |
|
|
HRS_APPL_ATTACH_NR |
|
Submit attachments. |
|
|
HRS_APP_CE_RES_SEC |
Click a link in the Resume Title column in the Resumes grid on the My Career Tools page. |
View an uploaded resume. |
Reviewing Career Tools
Access the My Career Tools page
My Applications
This group box enables applicants to view a list of all applications, or applications from the last week, month, or three months.
The grid that lists the applications displays the job posting title for each application. Click this title to access the Complete Application page and review the application details.
Applications can have the following statuses:
Applied: The application was submitted.
Submitted applications cannot be modified; an applicant who wants to make changes must submit a new application.
Not Applied: The applicant saved the application without submitting it, or the application was submitted when an employee referred the applicant.
Not Submitted: The applicant did not pass prescreening.
See Applying for Jobs.
Resumes
This grid lists all resumes that the applicant has submitted, including uploaded resumes and resumes that were copied and pasted into the Enter Resume Text page. Click a resume title to view the resume.
See Selecting a Resume Option.
Applicants sometimes need to submit additional documents such as cover letters, references, transcripts, and so forth. On the My Career Tools page, applicants can manage these attachments.
Applicants can view all submitted attachments in the Cover Letters and Attachments grid on the My Career Tools page. Applicants can click an attachment file name to view the attachment. The system opens the attachment in a separate browser window. Applicants cannot edit the attachment in the browser window. Applicants can delete attachments on the My Career Tools page and edit the attachment type and purpose on the Add Attachments page.
Job Offers
This grid lists any open or accepted job offers that a recruiter posted to Candidate Gateway. (Posting online offers is optional in Talent Acquisition Manager). Rejected job offers are not listed.
Click the icon in the View column to access the job offer details, or click the job title to access the application that is associated with the offer.
See Reviewing and Responding to Online Job Offers.
Adding Attachments
Access the Add Attachments page (click the Add Attachment link on the My Career Tools page).
To submit an attachment, applicants select an attachment type, enter an attachment purpose, click Add Attachment to browse for and upload the attachment, and then click Save & Return to save the attachment and return to the My Career Tools page.
Entering ReferralsThis section provides an overview of the referral process and lists the pages used in the referral process.
Note. Only employees can refer friends. External applicants do not have access to this feature.
Understanding the Referral Process
This section describes how employees can refer friends for job openings.
Employees use the Careers Home page to refer a friend. Applicants can be referred either with or without a job opening selected. Employees can optionally submit the friend's resume and must enter the friend's name and contact information.
After receiving the referral, the system creates an applicant record with a status of Not Applied and sends the friend an email with a link and a request to complete the application. The employee information is contained in the referral section of the application and the employee sees the referral in their self service referral information.
Note. If the employee makes the mistake of referring an external person to an internal job opening, the applicant will not be able to see the job posting. The system warns the employee on submission of an internal only job that the referral might not reach the person to whom it is being sent.
When an applicant completes an application and enters an employee's name as a reference, the system automatically sends a notification to the employee asking them to confirm the referral. This occurs regardless of whether the application is in response to a referral from the employee.
The employee who was entered as a reference uses the Confirm Referral page to validate the referral.
Employee Checks Referral Status
Employees who have referred friends can use the Review Referral Details page to see the referral status.
Pages Used in the Referral Process|
Page Name |
Definition Name |
Navigation |
Usage |
|
HRS_ERP_RES_OPTION |
Click the Refer Friend button on the Careers Home page or on the Job Description page. |
Choose how and whether to submit the friend's resume. This page works the same as the page applicants use when they initiate an application. |
|
|
HRS_ERP_APPLY_RES |
Select Copy and paste resume text on the Refer Friend - Choose Resume page, then click the Continue button. |
Enter resume details, including a title for the resume, the language in which the resume is written, and the complete resume text. This page works the same as the page applicants use when they enter their own resume text. |
|
|
HRS_ERP_APP_PRFILE |
|
Enter the friend's name and contact information. |
|
|
HRS_ERP_APP_APLC |
Click the Save & Submit button on the Refer Friend - Contacts Details page. |
Confirms that the referral has been submitted. |
|
|
HRS_EE_REVW_SRCH |
|
Review a list of referred applicants. |
|
|
HRS_EE_REVW_DTL |
Click the referred applicant name link on the Review Referral page. |
View the detailed information about the referral. |
Submitting a Referral
Access the Refer Friend - Contact Details page (click the Continue button on the Refer Friend - Choose Resume page).
The employee must enter at least a first and last name before submitting the referral. Although an email address is not required, without it the system cannot contact the potential applicant to invite an application.
Reviewing Referrals
Access the Review Referral page (Self-Service, Recruiting Activities, Check Referral Status).
Reviewing Referral Details
Access the Review Referral Details page (click the referred applicant name link on the Review Referral page).