| Skip Navigation Links | |
| Exit Print View | |

|
Oracle Identity Synchronization for Windows 6.0 Installation and Configuration Guide |
| Skip Navigation Links | |
| Exit Print View | |

|
Oracle Identity Synchronization for Windows 6.0 Installation and Configuration Guide |
Part I Installing Identity Synchronization for Windows
Opening the Identity Synchronization for Windows Console
To Open Identity Synchronization for Windows Console
Creating a Sun Java System Directory Source
To Create a New Sun Java System Directory Source
Preparing Sun Directory Source
To Prepare your Directory Server Source
Creating an Active Directory Source
To Configure and Create Windows Active Directory Servers in a Network
Creating a Windows NT SAM Directory Source
To Deploy Identity Synchronization for Windows on Windows NT
Selecting and Mapping User Attributes
Selecting and Mapping Attributes
To Select and Map Attributes for Synchronization
Propagating User Attributes Between Systems
Specifying How Object Creations Flow
To Specify How Object Creations Should Flow Between Directory Server and Active Directory Systems
Specifying New Creation Attributes
Specifying How Object Modifications Flow
Configuring and Synchronizing Object Activations and Inactivations
Specifying Configuration Settings for Group Synchronization
Configuring and Synchronizing Account Lockout and Unlockout
Prerequisites for Account Lockout
Using the Account Lockout Feature
To Specify how Deleted Entries Flow Between Directory Server and Active Directory Systems
Creating Synchronization User Lists
To Identify and Link User Types Between Servers
To Save your Current Configuration from the Console Panels
6. Synchronizing Existing Users and User Groups
9. Understanding Audit and Error Files
Part II Identity Synchronization for Windows Appendixes
A. Using the Identity Synchronization for Windows Command Line Utilities
B. Identity Synchronization for Windows LinkUsers XML Document Sample
C. Running Identity Synchronization for Windows Services as Non-Root on Solaris
D. Defining and Configuring Synchronization User Lists for Identity Synchronization for Windows
E. Identity Synchronization for Windows Installation Notes for Replicated Environments
After you have created and configured your Directory Server and Windows directory sources, you must decide which user attributes you want to synchronize and then map those attributes between systems.
The information in this section is organized as follows:
There are two types of attributes:
Significant: Attributes that are synchronized between systems when you create or modify user entries.
Creation: Attributes that are synchronized between systems only when you create user entries.
Some creation attributes are mandatory based on the schema used for each platform. These attributes are required for password synchronization and they must be mapped to Directory Server attributes to successfully create a user object class entry on the Active Directory server.
This section explains how to select user attributes for synchronization and how to map these attributes (one-to-one) so that when you specify an attribute for Directory Server the equivalent attribute will display in your Active Directory and/or Windows NT environment (and vice versa), and the companion Windows attributes will have their values synchronized.
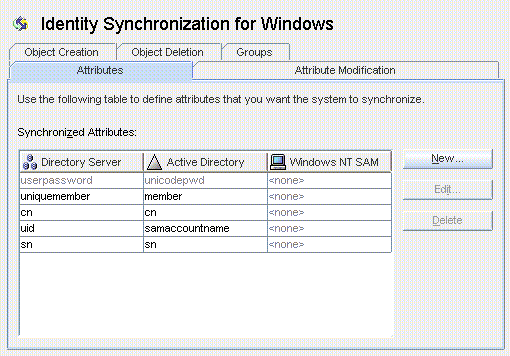
Figure 4-28 Attributes Tab

Note - When the Group Synchronization feature has been enabled, the uniquemember (Directory Server) attribute and member attribute (Active Directory) are internally mapped and would be indicated as shown in the console.
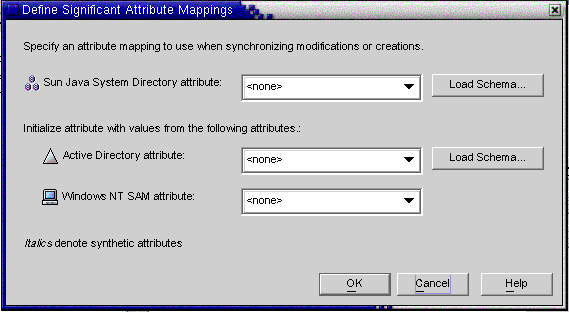
The Define Significant Attribute Mappings dialog box is displayed. Use this dialog box to map attributes from Directory Server to your Windows Systems (Active Directory and/or Windows NT).
Figure 4-29 Defining Significant Attribute Mappings

Note - Which creation attributes are mandatory for Directory Server (or for Active Directory) will depend on the objectclass configured for your Sun-side (or Active Directory-side) user entries.
The program automatically uses inetOrgPerson as the default objectclass for Directory Server, and you loaded the Active Directory schema when you specified the global catalog. So you do not use the Load Schema buttons unless you want to change the default schema.
If you want to change the default schema source, see Changing the Schema Source
A finished Synchronized Attributes table might look something like the following example, which shows the userpassword, cn, and telephonenumber Directory Server attributes mapped to unicodepwd, cn, and telephonenumber Active Directory attributes.
Figure 4-30 Completed Synchronized Attributes Table

Identity Synchronization for Windows allows you to create parameterized default values for attributes using other creation or significant attributes.
To create a parameterized default attribute value, you embed an existing creation or significant attribute name— preceded and followed by percent symbols (% attribute_name %) — in an expression string. For example, homedir=/home/%uid% or cn=%givenName% %sn%.
When you create these attribute values:
You can use multiple attributes in a creation expression (cn=%givenName% %sn%).
If A=0, then B can have one default value only.
You can use the backslash symbol (\\) for quoting (for example, diskUsage=0\\%).
Do not use expressions that have cyclic substitution conditions (for example, if you specify description=%uid%, you cannot use uid=%description%.)
Note - When Group Synchronization is enabled, the following are important:
The creation expression supported at Active Directory is cn=%cn%.
The creation expression must contain valid attribute names belonging to the group objectclass also since the creation expression is common to both user as well as the group.
For example: The attribute sn is not part of the groupofuniquenames objectclass at the Directory Server. Hence the following creation expression would be invalid for a group object. (Though it would work fine for user.)
cn=%cn%.%sn%
The attribute used in the creation expression must be provided with a value for every user/group entry created. The value maybe provided using the command line interface, if the console does not have the provision.
The program automatically provides default schema sources, but allows you to change the default schema.
The Select Schema Sources panel is displayed.
Figure 4-31 Selecting Schema Sources

Use this panel to specify from which Sun Java System Directory Server schema server you want to read the schema. This schema contains the object classes that are available on your system, and object classes define which attributes are available for users on your system.
The program adds your configuration directory to the Sun Java System Directory schema server field by default.
The Select a Sun Schema Host dialog box is displayed. This dialog box contains a list of the configuration directories that gather administrative information about your directory sources.
From this dialog box, you can:
Create new configuration directories and add them to the list.
Click New, and when the New Configuration Directory dialog box displays; specify a Host, Port, User DN, and Password. Click OK when you are done.
Edit existing directories.
Click Edit, and when the Edit Configuration Directory dialog box displays, you can change the Host, Port, User DN, and/or Password. Click OK when you are done.
Remove directories from the list.
Select a directory name from the list and then click the Remove button.
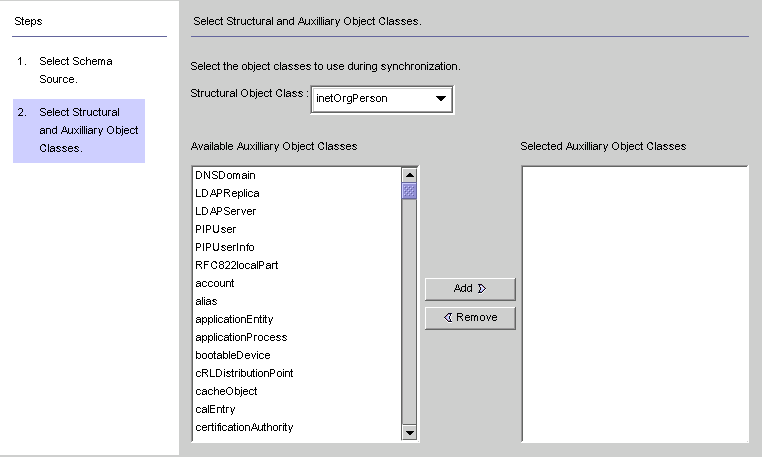
Figure 4-32 Selecting Structural and Auxiliary Object Classes

Use this panel to specify the object classes to synchronize, as follows:
Structural Object Class: Every entry that is created or synchronized from the selected Directory Server must have at least one structural object class.
Auxiliary Object Classes: These object classes augment the selected structural class and provide additional attributes for synchronization.
The selected object class(es) determine which Directory Server source attributes will be available for selection as significant or creation attributes. The object class(es) also determine the mandatory creation attributes.
To delete selections from the Selected Auxiliary Object Classes list, click the object class name and then click the Remove button.