| Skip Navigation Links | |
| Exit Print View | |

|
Oracle Integrated Lights Out Manager (ILOM) 3.0 Supplement for Sun Server X2-4 |
| Skip Navigation Links | |
| Exit Print View | |

|
Oracle Integrated Lights Out Manager (ILOM) 3.0 Supplement for Sun Server X2-4 |
1. Determining Your Server Management Strategy
Common Server Management Tasks
Server Management Software Benefits
Oracle Integrated Lights Out Manager
Oracle Hardware Management Pack
Oracle Hardware Installation Assistant
Evaluating Your Server Environment
Which Operating System Do You Plan to Install?
From Which Platform Do You Want to Run the Software?
Do You Want to Update or Monitor Your System Components?
Do You Have a Modular System Environment?
Server Management Downloads and Documentation
2. Oracle ILOM 3.0 Documentation
Oracle ILOM 3.0 Documentation Collection
Oracle ILOM 3.0 Server-Specific Documentation
3. Oracle ILOM Platform Features for the Sun Server X2-4
Supported Sun Server X2-4 Firmware
Host Power Throttling and Recovery
Service Processor Power-On Policy
Configure SP Power Management Policies Using the Web Interface
Configure SP Power Management Policies Using the CLI
Oracle ILOM Sideband Management
Special Considerations for Sideband Management
Configure Sideband Management Using the Web Interface
Configure Sideband Management Using the CLI
Configure Sideband Management Using the Host BIOS Setup Utility
Switch Serial Port Output Between SP and Host Console
Switch Serial Port Output Using the Web Interface
Switch Serial Port Output Using the CLI
Server Chassis Intrusion Sensor
How the /SYS/INTSW Sensor Works
Components With No Fault Diagnosis
Viewing Sensors Using IPMItool
Sensors and Indicators Reference Information
Fan Speed and Physical Security Sensors
Power Supply Unit Current, Voltage, and Power Sensors
SNMP and PET Message Reference Information
4. Getting Server Firmware and Software
Firmware and Software Access Options
Available Software Release Packages
Accessing Firmware and Software
Download Firmware and Software Using My Oracle Support
Gathering Information for the Physical Media Request
Request Physical Media (By Phone)
By default, you connect to the server's service processor (SP) using the out-of-band network management port (NET MGT). The Oracle ILOM sideband management feature enables you to select either the NET MGT port or one of the server's Gigabit Ethernet ports (NET 0, 1, 2, 3), which are in-band ports, to send and receive Oracle ILOM commands to and from the server SP. In-band ports are also called sideband ports.
The advantage of using a sideband management port to manage the server's SP is that one fewer cable connection and one fewer network switch port is needed. In configurations where numerous servers are being managed, such as data centers, sideband management can represent a significant savings in hardware and network utilization.
You can configure sideband management using either the web interface, the command-line interface (CLI), the BIOS, or IPMI. For special considerations and configuration instructions, see the following sections:
When sideband management is enabled in Oracle ILOM, the following conditions might occur:
Connectivity to the server SP might be lost when the SP management port configuration is changed while you are connected to the SP using a network connection, such as SSH, web, or Oracle ILOM Remote Console.
In-chip connectivity between the SP and the host operating system might not be supported by the on-board host Gigabit Ethernet controller. If this condition occurs, use a different port or route to transmit traffic between the source and destination targets instead of using L2 bridging/switching.
Server host power cycles might cause a brief interruption of network connectivity for server Gigabit Ethernet ports (NET 0, 1, 2, 3) that are configured for sideband management. If this condition occurs, configure the adjacent switch/bridge ports as host ports.
Note - If the ports are configured as switch ports and participate in the Spanning Tree Protocol (STP), you might experience longer outages due to spanning tree recalculation.
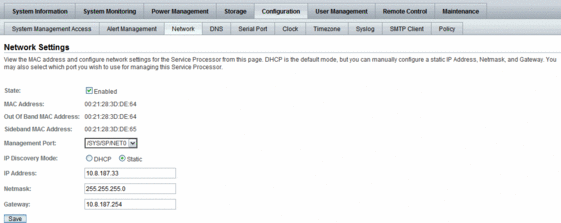
The Network Settings page is displayed.

The drop-down list enables you to change to any one of the four Gigabit Ethernet ports, /SYS/MB/NETn, where n is 0 to 3. The SP NET MGT port, /SYS/SP/NET0, is the default.
Note - Using a serial connection for this procedure eliminates the possibility of losing connectivity during sideband management configuration changes.
For instructions, see the information about assigning an IP address in the Sun Server X2-4 Installation Guide.
-> show /SP/network
The network properties are displayed. For example:
/SP/network
    Targets:
    Properties:
        commitpending = (Cannot show property)
        dhcp_server_ip = none
        ipaddress = xx.xx.xx.xx
        ipdiscovery = static
        ipgateway = xx.xx.xx.xx
        ipnetmask = xx.xx.xx.xx
        macaddress = 11.11.11.11.11.86
        managementport = /SYS/SP/NET0
 outofbandmacaddress = 11.11.11.11.11.86
        pendingipaddress = xx.xx.xx.xx
        pendingipdiscovery = static
        pendingipgateway =  xx.xx.xx.xx
        pendingipnetmask =  xx.xx.xx.xx
        pendingmanagementport = /SYS/SP/NET0
        sidebandmacaddress = 11.11.11.11.11.87
        state = enabled
In the above output the current active macaddress is the same as the SP's outofbandmacaddress and the current active managementport is set to the default (/SYS/SP/NET0).
-> set /SP/network pendingmanagementport=/SYS/MB/NETn
Where n equals 0, 1, 2, or 3.
-> set commitpending=true
-> show /SP/network
The network properties appear and show that the change has taken effect. For example:
/SP/network
    Targets:
    Properties:
        commitpending = (Cannot show property)
        dhcp_server_ip = none
        ipaddress = xx.xx.xx.xx
        ipdiscovery = static
        ipgateway = xx.xx.xx.xx
        ipnetmask = xx.xx.xx.xx
        macaddress = 11.11.11.11.11.87
 managementport = /SYS/MB/NETn
        outofbandmacaddress = 11.11.11.11.11.86
        pendingipaddress = xx.xx.xx.xx
        pendingipdiscovery = static
        pendingipgateway =  xx.xx.xx.xx
        pendingipnetmask =  xx.xx.xx.xx
        pendingmanagementport = /SYS/MB/NETn
        sidebandmacaddress = 11.11.11.11.11.87
        state = enabled
In the above output the macaddress matches the sidebandmacaddress, and the managementport matches the pendingmanagementport.
You can access the BIOS Setup Utility screens from the following interfaces:
A USB keyboard, mouse, and VGA monitor connected directly to the server.
A terminal (or terminal emulator connected to a computer) connected through the serial port on the back panel of the server.
A connection using the Oracle ILOM Remote Console. To use this interface, you must know the IP address of the server. For instructions on viewing the server IP address, see the Sun Server X2-4 Installation Guide.
To configure sideband management using the host BIOS Setup Utility, perform the following steps:

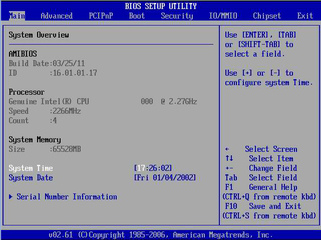
When BIOS is started, the main BIOS Setup Utility top-level screen appears. This screen provides seven menu options across the top of the screen.

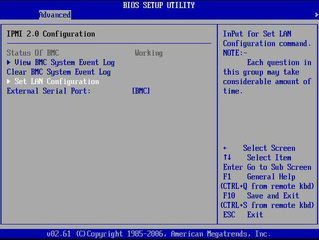
The IPMI 2.0 Configuration screen appears.

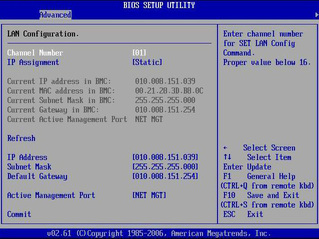
The LAN Configuration screen appears.

The NET MGT port is the default.