JavaScript is required to for searching.
Skip Navigation Links
Exit Print View
Developing OTDs for Oracle Java CAPS Application Adapters     Java CAPS Documentation
search filter icon
search icon

Document Information

Developing OTDs for Application Adapters

Creating SAP BAPI OTDs

SAP BAPI Encoding

Date and Time Stamp Requirements

Installing SAP JCo for SAP BAPI

To Install SAP JCo on Windows 32

To Install SAP JCo on UNIX

Important Notes:

Creating BAPI and RFC OTDs

To Create BAPI OTDs

Relaunching BAPI and RFC OTDs

Creating a SAP ALE OTD

SAP JCo and SAP IDoc Class Library Installation

The SAP Java Connector

SAP Java IDoc Class Library

To Download the SAP Java IDoc Class Library

Important Notes:

Creating IDoc OTDs

To Create IDoc OTDs Directly From SAP

To Create IDOC OTDs From a Description File

Exporting the IDOC File from SAP

To Download the IDoc Description File From SAP

Saving the IDoc Description File (After 4.6)

To Save the IDoc Description File From SAP

Creating Siebel EAI OTDs

Configuring Your System Before Creating the OTD

Configuring NetBeans to Work with Siebel

Installing seebeyond.sif for Siebel 7.5.x

Installing SiebelMessage XSD Generation Process.xml for Siebel 7.7 and 7.8.x

Creating the OTD

To Create the OTD

To Relaunch the OTD

Creating COBOL Copybook OTDs

To Create COBOL Copybook OTDs

Parsing Copybook Entries

Relaunching OTDs

To Relaunch an Existing OTD

COBOL Copybook OTD Methods

OTD Method Guidelines

Encoding Behavior for Redefinitions

DBCS Items

Root-level Methods

enableUnmarshalValidation(boolean enable) Method

marshal() Method

marshal(String charset) Method

marshal(OtdOutputStream out) Method

marshal(OtdOutputStream out, String charset) Method

marshalToString() Method

reset() Method

resetHigh() Method

resetLow() Method

retrieveEncoding() Method

unmarshal(byte[] in) Method

unmarshal(OtdInputStream in) Method

unmarshal(OtdInputStream in, String charset) Method

unmarshal(byte[] in, String charset) Method

unmarshalFromString(String in) Method

useEncoding(String enc) Method

Non-Root Methods

BPEL Operations

Creating an Oracle Applications OTD

To Create an Oracle Applications OTD

Exposed Oracle Applications OTD Nodes

Staging Table Node

COUNT

Description

Parameters

Requirements

DELETE

Description

Parameters

Requirements

INITIALIZE

Description

Parameters

Requirements

MOVE

Description

Parameters

Requirements

REQUEST

Description

Parameters

Requirements

REQUEST_STATUS

Description

Parameters

Requirements

VALIDATE

Description

Parameters

Requirements

SWIFT Alliance Gateway Adapter OTD Features

Configuration Node

Constants Node

Primitives Node

Remote APIs Node

Service Node

Generating DTDs from PeopleTools 8.13

Generating and Publishing an XML Test Message

To generate a PeopleSoft XML message

Extracting and Viewing the XML Test Message

To view the XML message

Generating a DTD for the XML File

OTD Methods and Business Process Operations

sendMessage() method

Syntax

Description

Parameters

Return Value

Throws

sendMessage Operation

Description

Input and Output

processRequest Operation

Description

Input and Output

Creating Siebel EAI OTDs

Perform the following tasks to create a Siebel EAI OTD:

Configuring Your System Before Creating the OTD

The NetBeans IDE needs to be configured to use the appropriate JAR files to correspond with the version of your Siebel Server. Before you use the NetBeans IDE to create your Siebel EAI Project, make sure that your local NetBeans IDE installation is using the proper JAR files for your Siebel Server.

Configuring NetBeans to Work with Siebel

Depending on which version of Siebel you are using, perform one of the following tasks to configure NetBeans:

To Run NetBeans with Siebel 7.5.x

  1. Using Windows Explorer, navigate to the Siebel Adapter directory for your NetBeans IDE.

    The Siebel Adapter directory is JavaCAPS_Home\.netbeans\caps\modules\ext\siebeleaieway.

  2. If you have previously used Siebel 7.7 or 7.8.x with this installation of the NetBeans IDE, remove the following files from this directory:
    • Siebel.jar

    • SiebelJI_enu.jar

  3. Copy the following files from your Siebel 7.5.x system (SiebelTools/Classes) to JavaCAPS_Home\.netbeans\caps\modules\ext\siebeleaieway:
    • SiebelJI.jar

    • SiebelJI_Common.jar

    • SiebelJI_enu.jar

  4. Restart the NetBeans IDE.

To Run the NetBeans IDE with Siebel 7.7 or 7.8.x

  1. Using Windows Explorer, navigate to the Siebel Adapter directory for your NetBeans IDE.

    The Siebel Adapter directory is JavaCAPS_Home\.netbeans\caps\modules\ext\siebeleaieway.

  2. If you have previously used Siebel 7.5.x with this installation of the NetBeans IDE, then remove the following files from the Siebel Adapter directory:
    • SiebelJI.jar

    • SiebelJI_Common.jar

    • SiebelJI_enu.jar

  3. Copy the following files from your Siebel 7.7 or 7.8.x system (SiebelTools/Classes) to the Siebel Adapter directory:
    • Siebel.jar

    • SiebelJI_enu.jar

  4. Restart the NetBeans IDE.

Installing seebeyond.sif for Siebel 7.5.x

If you are using Siebel 7.5.x, before you create an OTD using the OTD Wizard, you must install the seebeyond.sif file into your Siebel Tools system.

To Install the seebeyond.sif File

  1. In a web browser, navigate to http://java.net/projects/javacaps-samples/pages/Home.
  2. In the Application Adapters list, click the Adapter for Siebel EAI Sample Workflows link.
  3. Download the file and extract it to a local directory.
  4. Use the Siebel Tools utility to import the seebeyond.sif file from the above location into your Siebel Server.
  5. After importing the file, use the Siebel Tools utility to compile your SRF file.
  6. Stop the Gateway Server and the Siebel Server.
  7. Replace the file on the Siebel Server with the one you created in step 2.
  8. Restart the Gateway Server and the Siebel Server.

Installing SiebelMessage XSD Generation Process.xml for Siebel 7.7 and 7.8.x

If you are using Siebel 7.7 or 7.8.x, before you can create an OTD using the OTD Wizard, you must install the SiebelMessage XSD Generation Process.xml file.

To Install the SiebelMessage XSD Generation Process.xml File

Before You Begin

Complete the steps under Installing seebeyond.sif for Siebel 7.5.x.

  1. Open the Siebel Tools utility.
  2. In the Object Explorer, click the Workflow Process.
  3. Right-click the item in the Object list, and then click Import Workflow Process.
  4. Browse to the directory that contains SiebelMessage XSD Generation Process.xml.

    This file is included in the ZIP file you downloaded when you imported seebeyond.sif.

  5. Click Open to begin importing the Workflow template.
  6. Select your project.
  7. Stop the Gateway Server and the Siebel Server.
  8. Use the Siebel Tools utility to compile your SRF file.
  9. Copy the SRF file to the objects folder in your Siebel Server.
  10. Restart the Gateway Server and the Siebel Server.

Creating the OTD

Steps required to create an OTD include:

To Create the OTD

  1. In the Projects window, right click the Project, point to New, and then select Object Type Definition.

    The Select Wizard Type page appears, displaying the available OTD wizards.
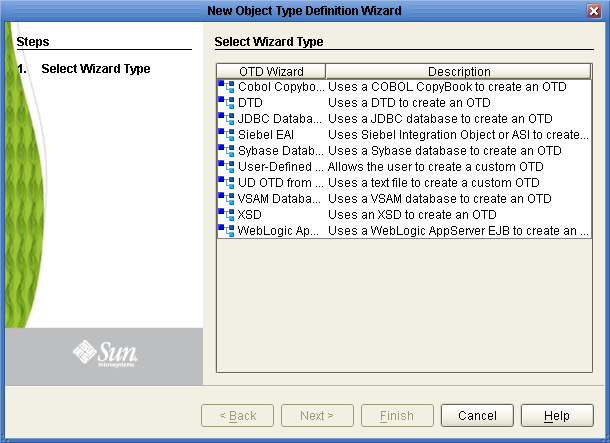

    image:Select Wizard Type window
  2. Select Siebel EAI and then click Next.

    The Connect to Siebel EAI Server window appears.
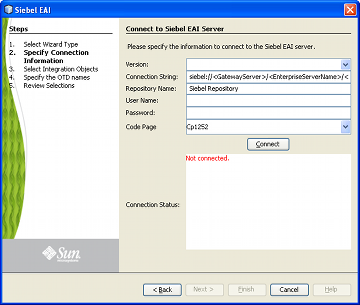

    image:Siebel Server Connection Window
  3. Enter the following information into the text fields:
    • Version: The Siebel Server version (the same version used to create the OTD appears by default)

    • Connection String

      • For Siebel 7.5.x: siebel://<GatewayServer>/<EnterpriseServerName>/<ApplicationObjectManager>/<SiebelServerName>

      • For Siebel 7.7 and 7.8.x: siebel://<SiebelServerName>:<port>/<EnterpriseServerName>/<ApplicationObjectManager>

    • Repository Name: Siebel Repository

    • User Name: A valid user name

    • Password: A valid password

    • Code Page: The code page to use for value mapping

  4. Click Connect.

    A message appears confirming a successful connection.
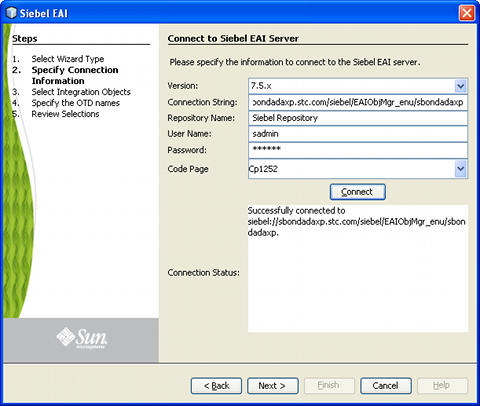

    image:Successful Server Connection Window
  5. Click the Next button.

    The Select Integration Objects window appears.

  6. Scroll down the Integration Objects selection table and select Account Interface.
  7. Click Add.

    Account Interface appears in the Selected Objects window.
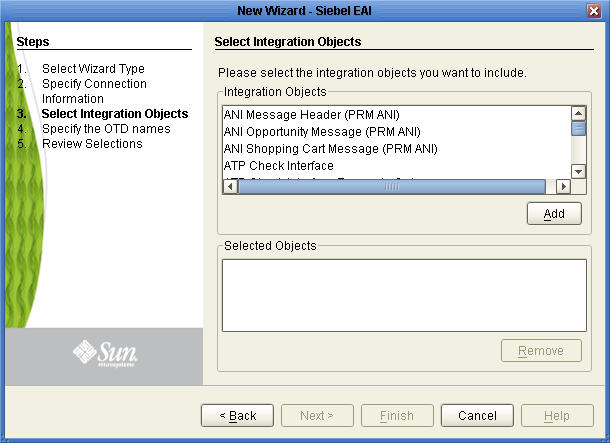

    image:Select Integration Objects Window
  8. Click Next.

    The Specify the OTD names window appears.


    image:Specify the OTD names window
  9. In the OTD Name column, enter the name for the new OTD, and then click Next.

    The Review your Selections window appears.


    image:Review your Selections window
  10. Click Finish.

    A message appears confirming the successfully generated OTD.

To Relaunch the OTD

  1. From the Project tree, right-click the OTD, point to Version Control, and then select Check Out from the shortcut menu.

    The Version Control - Check Out dialog box appears.

  2. Select Check Out on the Version Control - Check Out window.
  3. Right-click the OTD once again and select Relaunch.

    The Connect to Siebel EAI Server window appears.
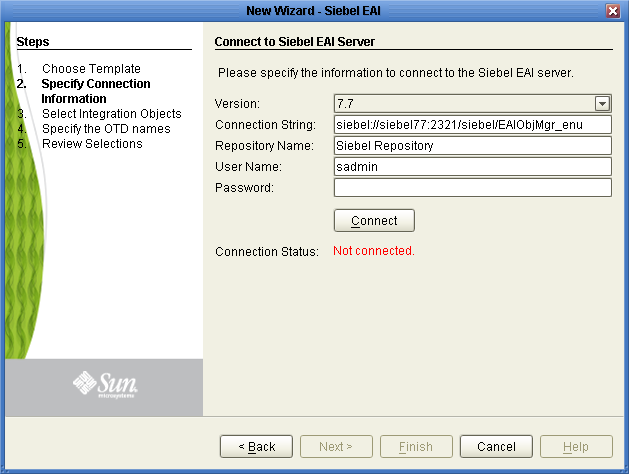

    image:Siebel Server Connection window

    The fields (with the exception of Password) will be populated with metadata information selected when building the original OTD.

  4. Enter a valid password in the Password field.
  5. Click Connect.

    A message appears confirming a successful connection.

  6. Click Next.

    The Select Integration Objects window appears and is already populated with the previously selected Integration Object.


    Note - If you attempt to select a different Integration Object, an error dialogue appears.


  7. Click Next.

    The OTD Name column is already populated with the original OTD’s name.

  8. Click Next.

    The Review your Selections window appears.

  9. Click Finish.

    A message appears confirming the successfully generated OTD.