| Skip Navigation Links | |
| Exit Print View | |

|
Oracle Java CAPS Scheduler Binding Component User's Guide Java CAPS Documentation |
| Skip Navigation Links | |
| Exit Print View | |

|
Oracle Java CAPS Scheduler Binding Component User's Guide Java CAPS Documentation |
Using the Scheduler Binding Component
About the Scheduler Binding Component
Scheduler Binding Component Features
Using the Scheduler Binding Component in a Project
Steps to Create the BPEL Project
Create a Scheduler Binding Component
Create a File Binding Component
Create a Composite Application
Using the Scheduler Control and Triggers Wizard
Accessing the Scheduler Control and Triggers Wizard
Understanding the Scheduler Wizard
Using the Add New Simple Trigger Editor
Using the Add New Cron Trigger Editor
Using the Add New Hybrid Trigger Editor
Example Hybrid Trigger Configuration
Adding Triggers and Editing an Existing Scheduler Project
Accessing the Configure Scheduler Binding Wizard
Scheduler Binding Component Properties
Runtime Properties for the Scheduler Binding Component
Scheduler Binding Component Loggers
Using the Trigger Properties Editor
Trigger Configuration Properties
Scheduler BC Normalized Message Properties
Scheduler Application Configuration
Using Scheduler Binding Component Application Configuration
Defining the Scheduler Application Configuration for a Project
Other Tools Used to Edit the Application Configuration
Scheduler Binding Component Application Variables
Using Application Variables in a Trigger Message
Creating and Using Application Variables
Using Admin Console and asadmin to Create Application Variables
Configuring Redelivery and Throttling for the Scheduler Binding Component
Configuring Redelivery for an Endpoint
Configuring Throttling for an Endpoint
The binding component Application Variables property allows you to define a list of name:value pairs for a given stated type. The application variable name can be used as a token for a WSDL extensibility element attribute in a corresponding binding. For example, if you were defining an application variable for the hostname as FOO, then the WSDL attribute would be ${FOO}. In the Application Variables property you would enter a String value of FOO for the name, and the desired attribute as the value.
When you deploy an application that uses application variables, any variable that is referenced in the application's WSDL is loaded automatically.
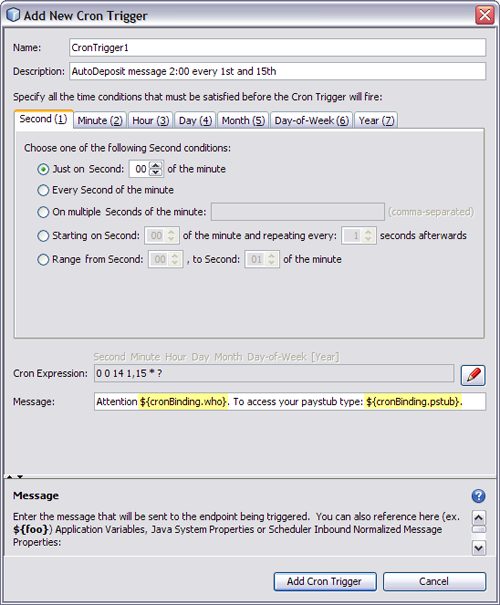
The message sent by the Scheduler Bonding Component when a trigger is fired can reference Application Variables. These Application Variables are set at the time of deployment and are appraised each and every time a message is sent. This allows that variables to be changed dynamically, on the fly.
This feature allows the administrator to control confidential information in a message, such as passwords, by allowing them to add this information after a project's design time, and allowing changes to this information without changing a project's business logic.
Application Variables are created using the Scheduler Binding Component runtime properties editor. They can also be created using the GlassFish Admin Console and the asadmin Command Line Interface (CLI).

 | Caution - Any defined Application Variable is available to all JBI applications deployed in a GlassFish server, therefore care must be taken to qualify Application Variables for different deployments. Typically, you can do this by adding a unique prefix to the Application Variable name, such as the name of the WSDL binding. For example, in the image above, the prefix “cronBinding.” is used to differentiate the variables. |
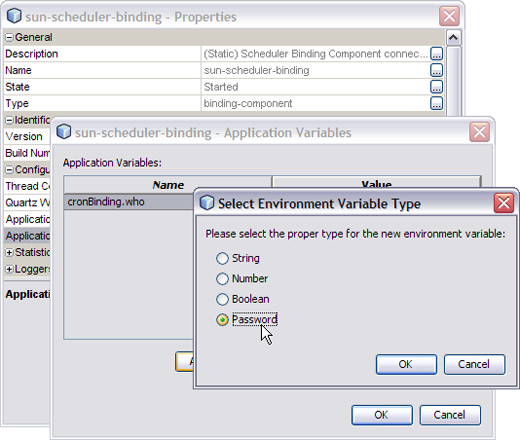
The sun-scheduler-binding Properties editor appears.
The Application Variables dialog box appears.

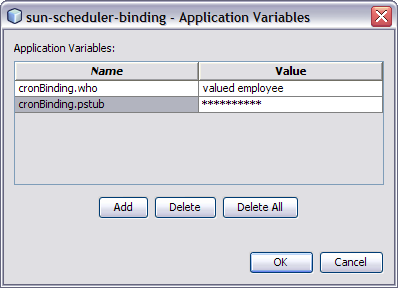
A new row is added to the Application Variables dialog box.

Note - The value field cannot reference another Application Variable.
The Application Variables are added to the sun-scheduler-binding Properties Editor's Application Variables field, and are ready to use.
In addition to the NetBeans IDE, you can also use these other tools to create Application Variables for the Scheduler Binding Component.
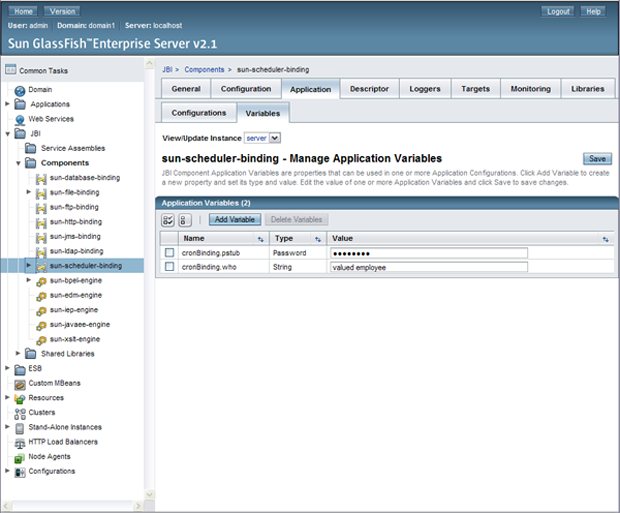
GlassFish Admin Console: To access the Admin Console, from the NetBeans Services window, right-click GlassFish V2 under Servers and choose View Admin Console from the pop-up menu. You can also access the Admin Console at http://localhost:4848/login.jsf.
To open the Manage Application Variables window in the Admin Console, select the sun-scheduler-binding, under Common Tasks -> JBI -> Components. Select the Application tab and the Variables sub-tab.

asadmin Command Line Interface: For information on using the Command Line Interface (CLI) to create, update, and delete Application Variables, see create-jbi-application-variable, update-jbi-application-variable, or delete-jbi-application-variable.