| Skip Navigation Links | |
| Exit Print View | |

|
Oracle Java CAPS Scheduler Binding Component User's Guide Java CAPS Documentation |
| Skip Navigation Links | |
| Exit Print View | |

|
Oracle Java CAPS Scheduler Binding Component User's Guide Java CAPS Documentation |
Using the Scheduler Binding Component
About the Scheduler Binding Component
Scheduler Binding Component Features
Using the Scheduler Binding Component in a Project
Steps to Create the BPEL Project
Create a Scheduler Binding Component
Create a File Binding Component
Create a Composite Application
Using the Scheduler Control and Triggers Wizard
Accessing the Scheduler Control and Triggers Wizard
Using the Add New Simple Trigger Editor
Using the Add New Cron Trigger Editor
Using the Add New Hybrid Trigger Editor
Example Hybrid Trigger Configuration
Adding Triggers and Editing an Existing Scheduler Project
Accessing the Configure Scheduler Binding Wizard
Scheduler Binding Component Properties
Runtime Properties for the Scheduler Binding Component
Scheduler Binding Component Loggers
Using the Trigger Properties Editor
Trigger Configuration Properties
Scheduler BC Normalized Message Properties
Scheduler Application Configuration
Using Scheduler Binding Component Application Configuration
Defining the Scheduler Application Configuration for a Project
Other Tools Used to Edit the Application Configuration
Scheduler Binding Component Application Variables
Using Application Variables in a Trigger Message
Creating and Using Application Variables
Using Admin Console and asadmin to Create Application Variables
Configuring Redelivery and Throttling for the Scheduler Binding Component
Configuring Redelivery for an Endpoint
Configuring Throttling for an Endpoint
The Scheduler Binding Component is similar to other binding components in that you use a binding wizard that steps you through creating the binding.
You can access the Scheduler Control and Triggers Wizard and create a Schedule Binding by doing any of the following:
Create a New File:
Selected your project in the NetBeans IDE Projects window, then click the New File icon, or select File -> New File from the NetBeans menu, or type Ctrl+N. Each of these open the New File Wizard.
From the New File Wizard select ESB as the category, and Binding as the File Type. Click Next.
The New Binding Wizard opens. Select Scheduler as the Binding and enter a name and any other necessary values. Click Next.
Create a New Binding:
Right-click your project in the Projects tree, and select New -> Binding.
The New Binding Wizard opens. Select Scheduler as the Binding and enter a name and any other necessary values. Click Next.
Create a New WSDL Document:
Right-click your project in the Projects tree, and select New -> WSDL Document.
The New WSDL Document Wizard opens. Enter a File Name, and select Concrete WSDL Document as the WSDL Type. This adds additional options to the wizard.
Select Scheduler as the Binding, and click Next.
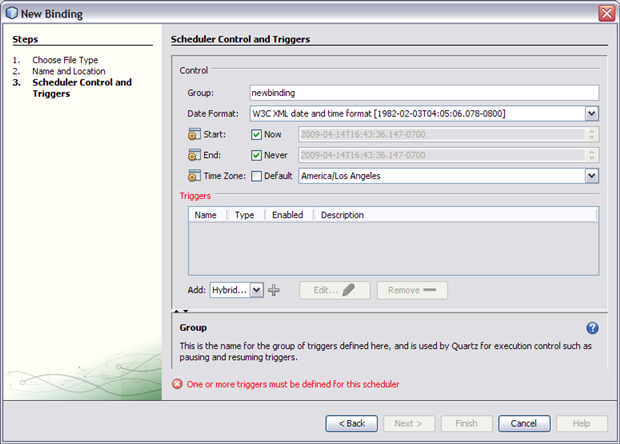
Each of these processes bring you to the Scheduler Control and Triggers Wizard
From the Scheduler Control and Triggers Wizard you can configure multiple triggers for your project.

The wizard allows you to specify the following:
The Group field specifies the name for the group of triggers defined here. This group name is used by Quartz to control actions such as pausing and resuming triggers. At this time, triggers are controlled through the service unit lifecycle management. They are not controlled individually. Typically the group name defaults to the name of your binding, but can be changed as needed.
The Date Format field specifies a date and time format based on java.text.SimpleDataFormat patterns. The selected format is used to interpret and display date and time values for all of the defined triggers in this group.
The choices are:
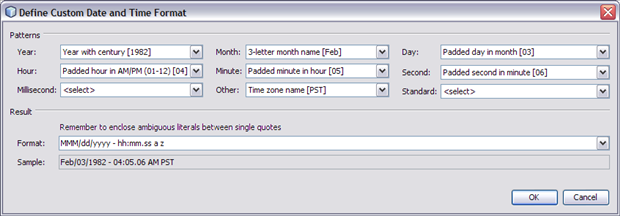
Define Custom: Allows you to define and save your own custom date and time format. When you select the define custom option, the Define Custom Date and Time dialog box appears.

From the dialog box you can select the order and format for the year, month, day, hour, minute, second, and millisecond, as well as more abstract options such as week of the year, week of the month, time zone and so fourth.
Choose your options in the order you would like them to appear in your custom format. For example, If you wanted the date and time to appear in this format: MM/dd/yyyy - hh:mm.ss a z which translates to Feb/03/1982 — 04:05.06 AM PST, you would select these options in the following order:
Month: Three letter month name [Feb]
Day: Padded day in month [03]
Year: Year with century [1982]
Hour: Padded hour in AM/PM (01–12) [04]
Minute: Padded minute in hour [05]
Second: Padded second in minute [06]
Other: AM/PM marker [AM]
Other: Time zone name [PST]
As you select your different values they are displayed in the Format field. An example of the created format is also displayed in the Sample field. You can then add separators and text as desired. Any ambiguous literals you add to the format need to be placed between single quotes.
The Standard option allows you to select complete standard time formats for date and time. Default Local Date and Time Format adds a standard time for the location of the computer. Once a format is selected, you may edit the format from the Format field.
Default Local Date and Time Format: Adds the standard date and time for the configured location of the computer.
W3C XML Date and Time Format: Defines the date and time as follows: year, month, day, hour, minute, second, and time zone in the following format: YYYY-MM-DDThh:mm:ss.sssssszzzzzz.
Default Local Date and Time Format [2/3/82 4:05 AM]: Adds the standard date and time for the configured location of the computer.
W3C XML Date and Time Format [1982–02–03T04:05:06.078–0800]: Defines the date and time as follows: year, month, day, hour, minute, second, and time zone in the following format: YYYY-MM-DDThh:mm:ss.sssssszzzzzz.
Date and time are separated by a “T”. A value of 24 is allowed for the hour if minutes and seconds are set to zero, and is treated as 00:00:00 of the following day. Seconds can optionally include a decimal value of up to 6 digits, preceded by a period. The time zone is represented as a plus or minus, for earlier or later than UTC, followed by hh:mm for hours and minutes. For example, Los Angeles could have a time zone of -0800 or -0700, depending on Daylight Savings Time. Example: 1982-02-03T04:05:06.078-0800 equals 4:05 and 6.078 seconds AM US Pacific time on February 3, 1982.
The symbols that appear before Start, End and Time Zone, indicate that these parameters can be overwritten by application configuration at the time of deployment. This allows administrators to override these parameters without affecting the business logic of the project.
Start and End values are configured using your arrow keys:
The left and right arrows let you select the portion of the value to edit.
The up and down arrows allow you to edit the selected portion.
You can also edit the value by clicking on the Start and End value portion you want to edit and use the up and down arrows at the end of the field.
Start, End, and Time Zone are used to control the triggers as follows:
Start: Specifies the date and time when the triggers defined is this group start, once the respective service assembly has been deployed and started. The date and time format is defined by the Date Format field. The Now option specifies that triggers are active immediately after deployment.
End: Specifies the date and time when the triggers defined is this group end, once the respective service assembly is running. The date and time format is defined by the Date Format field. The Never option specifies that triggers are never always remain active after deployment.
Time Zone: Specifies the appropriate time zone for the environment where the deployed scheduler runs. This value overrides any time zones specified in the Start and End fields. The Default option specifies the configured time zone for the computer as the selected value.
The Triggers section of the wizard allows you to add, enable or disable, and delete triggers, using the following tools:
The Triggers table displays the configured triggers for this group.
The table specifies the following:
Name: Specifies the name of the configured trigger.
Type: Specifies the type of trigger: Simple, Cron, or Hybrid.
Enabled: Specifies whether the trigger is enabled or disabled.
Description: Displays the user defined description for the configured trigger.
The Add field lets you select the a trigger type: Using the Add New Simple Trigger Editor, Using the Add New Cron Trigger Editor, or Using the Add New Hybrid Trigger Editor. Once the type is selected, click the Plus icon next to field to open an editor window for that specific type.
The Edit button opens the editor window for the trigger that is selected in the Triggers table.
The Remove button deletes the trigger selected in the Triggers table, from the group.