Managing Pages in a Database Application
A page is the basic building block of an application. When you build an application in Application Builder, you create pages that contain user interface elements, such as tabs, lists, buttons, items, and regions.
About Creating Pages in a Database Application
You add a page or add a component to an existing page by running the Create Page Wizard. You can access this wizard by:
-
Clicking Create Page on the Application home page. See "Creating a Page from the Application Home Page".
-
Click the Create link on the Developer toolbar and then select New Page. "Creating a Page from the Developer Toolbar".
-
Click the Create button on the Page Definition and select New page. See "About the Page Definition".
Note:
You can also use the Create Page Wizard to add a component (that is, a report, chart, form, wizard, a calendar, or tree) to an existing page. When prompted, specify an existing page number.Creating a Page from the Application Home Page
To create a page from the Application home page:
-
On the Workspace home page, click Application Builder.
-
Select an application.
The Application home page appears.
-
Click the Create Page button.
-
Select the type of page you want to create as described in the following table.
Page Type Description Blank Page Creates a blank page. Multiple Blank Pages Creates multiple blank pages. Report Formatted result of a SQL query. Available options: -
Classic Report - Creates a report based on a custom SQL SELECT statement or a PL/SQL function returning a SQL SELECT statement that you provide.
-
Interactive Report - Creates an interactive report based on a custom SQL SELECT statement you provide. Users can alter the layout of report data by selecting specific columns, applying filters, highlighting, and sorting. They can also define breaks, aggregations, different charts, and their own computations.
-
Report on Web Service Result - Creates a report on a Web Service result.
-
Wizard Report - Creates a report without requiring any SQL knowledge. Select the appropriate schema, table, columns, and result set display.
See Also: and "Implementing Web Services"
Form Creates a form interface with which users can update a single row or multiple rows within a table. See Also: "Creating Forms"
Plug-ins Creates a new page based on a region type plug-in. Plug-ins enable developers to declaratively extend, share, and reuse the built-in types available with Oracle Application Express. Chart Enables you to create HTML and Flash graphical charts. See Also: "Creating Charts"
Map Creates a Flash map based on the AnyChart AnyMap Interactive Maps Component. See Also: "Creating Maps"
Tree Creates a tree to graphically communicate hierarchical or multiple level data. See Also: "Creating Trees"
Calendar Generates a calendar with monthly, weekly, and daily views. See Also: "Creating Calendars"
Wizard Create a wizard. Data Loading Creates a new data loading wizard allowing the end user to manage the loading of data into a table to all schemas for which the user has privileges See Also: "Creating Applications with Data Loading Capability"
Feedback Page Adds a feedback page. Feedback is the process of gathering real-time comments, enhancement requests, and bugs from your application users. See Also: "Managing Feedback"
Login Page Creates a login page. See Also: "About Building a Login Page"
Access Control Creates a page containing an access control list, enabling developers to control access to an application, individual pages, or page components. See Also: "Controlling Access to Applications, Pages, and Page Components"
-
-
Follow the on-screen instructions.
Creating a Page from the Developer Toolbar
To view a rendered version of your application, you run or submit it to the Application Express engine by clicking the Run or Run Application icon.
See Also:
"Running an Application or Page"When you run an application, the Developer toolbar appears at the bottom of the page. The Developer toolbar offers a quick way to edit the current page, create a page, region, or page control, view session state, or turn edit links on and off. You can control whether the Developer toolbar displays by changing the Status attribute on the Edit Application page.
See Also:
"Editing the Application Definition" for information on the Status listTo create a page from the Developer toolbar:
-
Run the application. See "Running an Application or Page".
-
On the Developer toolbar, click Create.
-
Select the type of component you want to create and click Next. Available options include:
-
New Page. See "About Create Page Types".
-
Region on this page
-
Page control on this page
-
Shared control
-
-
Follow the on-screen instructions.
See Also:
"About the Developer Toolbar"About Create Page Types
When you run the Create Page Wizard, you select a page type. Table 7-8 describes available create page options based on the type of page you select.
| Create Page Options | Available Selections |
|---|---|
|
New Page |
Available page types:
|
|
Region on this page |
Regions function as containers for content. Available region types:
See Also: "Understanding Regions" and "About Region Types" |
|
Page control on this page |
Page controls:
|
|
Shared control |
Shared component options:
|
Copying a Database Application Page
You can copy a page from the current application or from another application. During the copy process, you can also copy shared components or change mappings to shared components in the target application.
To copy a page:
-
Navigate to the application you want to copy to:
-
Navigate to the Workspace home page.
-
Click the Application Builder icon.
-
Select an application.
-
Select a page.
The Page Definition appears.
-
-
In Tree view:
-
Under Page Rendering, select the page name.
-
Right-click and select copy.
-
-
In Component view:
-
Under Page, click the Copy icon.
-
For Copy Page Option, select one of the following:
-
Page in this application
-
Page in another application
-
-
-
Follow the on-screen instructions.
Running an Application or Page
The Application Express engine dynamically renders and processes pages based on data stored in database tables. To view a rendered version of your application, you run or submit it to the Application Express engine. As you create new pages, you can run them individually, or run an entire application. You can run an application by clicking the Run Application icon.
About the Run Application and Run Page Icons
The Run Application icon resembles a large traffic light and displays on the Application home page. Clicking the Run Application icon runs an entire application.
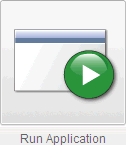
Description of the illustration run_ico_sm.gif
The Run Page icon resembles a small, light gray traffic light and displays in the upper right corner of many pages within Application Builder. Clicking the Run Page icon runs the current page.
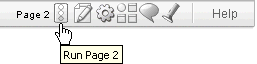
Description of the illustration run_ico_green.gif
Running an Application from the Application Builder Home Page
To run an entire application from the Application Builder home page:
-
On the Workspace home page, click the Application Builder icon.
-
From the View list, select Report and click Go.
-
Locate the application in the Applications list.
-
Click the Run icon in the far right column.
Running an Application from the Application Home Page
To run an entire application from the Application home page:
-
On the Workspace home page, click the Application Builder icon.
The Application Builder home page appears.
-
Select on application.
-
Click the Run Application icon at the top of the page.
Running a Page on the Application Home Page
You can control how the Application home page displays by making a selection from the View list on the navigation bar at the top of the page. Selecting Details displays each page as a line in a report. Each line includes the page number, the page name, when the page was last updated, who last updated the page, a lock icon, and a Run icon.
To run a page from the Pages list:
-
On the Workspace home page, click the Application Builder icon.
-
Select an application.
-
From the View list, select Report and click Go.
-
From the Pages list, locate the page you want to run and click the Run icon in the far right column.
See Also:
"Locking and Unlocking a Page"Running a Page from the Page Definition
To run a specific page from the Page Definition:
-
On the Workspace home page, click the Application Builder icon.
-
Select an application.
-
Select a page.
The Page Definition appears.
-
Click the Run button at the top of the page.
Grouping Pages
You can make the pages within your application easier to access by organizing them into page groups. To use page groups, you create a group and then assign pages to the group.
Page groups do not have any function other than to help developers organize their application pages.
Viewing Page Groups
The section describes different ways to view page groups.
To access the Page Groups page:
-
On the Workspace home page, click the Application Builder icon.
-
Select the application.
-
Click the Utilities icon.
-
From Page Specific Utilities, click Cross Page Utilities.
-
Click Page Groups.
The Page Groups page appears.
A Search bar displays at the top of the page. Available controls include:
-
Search columns icon - Resembles a magnifying glass. Click this icon to narrow your search. To search all columns, select All Columns.
-
Text area - Enter case insensitive search criteria (wildcard characters are implied) to search for a page group by name and then click Go.
-
Go button - Executes a search or applies a filter.
-
View. Use this control to toggle between icon and report views. To change the view, click these icons:
-
View Icons (the default) displays each group as a large icon. To edit a group, click the appropriate icon.
-
View Report displays each group as a line in a report. To edit a group, click the name.
-
-
Actions menu - Use the Actions menu to customize the report view. See "About the Actions Menu".
-
-
To view the pages associated with a group, click Pages by Page Group.
Creating a Page Group
To create a page group:
-
On the Workspace home page, click the Application Builder icon.
-
Select the application.
-
Click the Utilities icon.
-
From Page Specific Utilities, click Cross Page Utilities.
-
Click Page Groups.
-
On the Page Groups page, click Create.
-
Enter a name, a description (optional), and click Create.
Editing a Page Group Definition
When you create page group you specify a name and description.
To edit the Page Group definition:
-
On the Workspace home page, click the Application Builder icon.
-
Select the application.
-
Click the Utilities icon.
-
From Page Specific Utilities, click Cross Page Utilities.
-
Click Page Groups.
-
Select a page group.
-
On the Page Group page, edit the name or description and click Apply Changes.
-
To move to the next Page Group definition, click the Previous (<) and Next (>) buttons and repeat the previous step.
Assigning a Page to a Page Group
To assign pages to a group:
-
On the Workspace home page, click the Application Builder icon.
-
Select the application.
-
Click the Utilities icon.
-
From Page Specific Utilities, click Cross Page Utilities.
-
Click Page Groups.
-
Click the Page Assignments tab.
The Page Assignments page appears. Clicking a page number takes you to the Page Attributes page. Clicking the page Name links to the Page Definition.
-
From the New Group list, select a group to which you want to assign pages and click Go.
-
Select the pages to be assigned and click Assigned Checked.
Reassigning a Page to a Another Page Group
To reassign a page to a page group:
-
On the Workspace home page, click the Application Builder icon.
-
Select the application.
-
Click the Utilities icon.
-
From Page Specific Utilities, click Cross Page Utilities.
-
Click Page Groups.
-
Click the Page Assignments tab.
The Page Assignments page appears. Clicking a page number takes you to the Page Attributes page. Clicking the page Name links to the Page Definition.
-
Select a page.
-
From New Group, select a group to which you want to assign pages.
-
Select the pages to be reassigned and click Assigned Checked.
Viewing Pages by Page Group
To view pages by page group:
-
On the Workspace home page, click the Application Builder icon.
-
Select the application.
-
Click the Utilities icon.
-
From Page Specific Utilities, click Cross Page Utilities.
-
Click Page Groups.
-
Click the Pages by Page Group tab.
The Pages by Page Group page appears. Clicking a page number takes you to the Page Attributes page. Clicking the page Name links to the Page Definition.
-
To create a new group, click Create and follow the on-screen instructions.
Deleting a Page Group
To remove a page group:
-
Remove all pages from the group to be deleted. See "Viewing Pages by Page Group".
-
Access the Page Group page:
-
On the Workspace home page, click the Application Builder icon.
-
Select the application.
-
Click the Utilities icon.
-
From Page Specific Utilities, click Cross Page Utilities.
-
Click Page Groups.
-
Select a page group.
-
-
Click Delete.
A confirmation page appears.
-
Confirm your request.
Locking and Unlocking a Page
You can prevent conflicts during application development by locking pages in your application. By locking a page, you prevent other developers from editing it.
Determining If a Page Is Locked
A lock icon indicates whether a page is currently locked. If a page is unlocked, the icon appears as an open padlock. If the page is locked, the icon appears as a locked padlock. A lock icon appears on the Application home page and on the Page Definition.
To view the lock icon on the Application home page, click the View Detail icon. A detail view appears. The lock icon appears on the right side of the page.
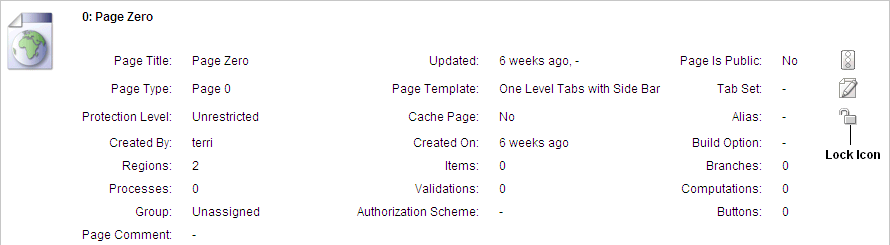
Description of the illustration lock_ico.gif
The lock icon also appears on the Action Bar on the Page Definition. See "About the Developer Action Bar".
Locking a Page
You can lock pages from the Page Locks page, the Pages list, and from a Page Definition.
Locking a Page from the Page Locks Page
To lock a page from the Page Locks Page:
-
On the Workspace home page, click the Application Builder icon.
-
Select an application.
-
Click the Utilities icon.
-
On the Page Specific Utilities list, click Cross Page Utilities.
-
Click Page Locks.
-
Select the appropriate pages and click Lock Checked.
-
Enter a comment in the Comment field.
-
Click Lock Page(s).
Locking a Page from the Detail View
To lock a page from the Detail view:
-
On the Workspace home page, click the Application Builder icon.
-
Select an application.
-
On the search bar, click the View Detail icon.
-
Locate the page you want to lock and click the Lock icon.
-
Enter a comment in the Comment field.
-
Click Lock Page(s).
Locking a Page from the Page Definition
To lock a page from the Page Definition:
-
Navigate to the appropriate Page Definition. See "Accessing the Page Definition".
-
Click the Lock icon in the Developer Action bar. See "About the Developer Action Bar".
-
Select the selected page and click Lock Checked.
-
Enter a comment in the Comment field.
-
Click Lock Page(s).
Tip:
You can also lock a page on the Page Definition, by clicking the Utilities button and then Lock.Unlocking Pages
Only the developer who locked a page can unlock it. However, a developer with administrative privileges can unlock pages locked by other developers.
Unlocking Pages from the Page Locks Page
To unlock a page from the Page Locks page:
-
On the Workspace home page, click the Application Builder icon.
-
Select an application.
-
Click the Utilities icon.
-
On the Page Specific Utilities list, click Cross Page Utilities.
-
Click Page Locks.
-
Select the appropriate pages.
-
Click Unlock Checked.
Unlocking Pages from the from the Detail View
To unlock a page from the Detail view:
-
On the Workspace home page, click the Application Builder icon.
-
Select an application.
-
On the search bar, click the View Detail icon.
-
In the Pages list, locate the page you want to unlock and click the Lock icon.
The Edit Lock Comment page appears.
-
Click Unlock.
Unlocking Pages from the Page Definition
To unlock pages from the Page Definition:
-
Navigate to the appropriate Page Definition. See "Accessing the Page Definition".
-
Click the Lock icon in the upper right corner above Shared Components.
The Page Locks page appears.
-
Select the page you want to unlock and click Unlock.
Tip:
You can also unlock a page on the Page Definition, by clicking the Utilities button and then Unlock.
Unlocking Pages As a Workspace Administrator
To unlock pages as a Workspace Administrator:
-
On the Workspace home page, click the Application Builder icon.
-
Select an application.
-
Click the Utilities icon.
-
On the Page Specific Utilities list, click Cross Page Utilities.
-
Click Page Locks.
-
Click Lock Administration.
-
Select the appropriate pages.
-
Click Unlock Page(s).
Deleting a Page
Deleting a page deletes the corresponding tabs, breadcrumbs, and list entries. You can only delete pages that are locked or unlocked by you. See "Locking and Unlocking a Page".
Deleting a Page from the Page Definition
To delete a page from the Page Definition:
-
Navigate to the appropriate Page Definition. See "Accessing the Page Definition".
-
Verify the page number.
-
Click the Utilities button and then click Delete.
-
Click Permanently Delete Page.
See Also:
"Editing a Page in Component View" for information about editing page attributesDeleting a Page While Editing Page Attributes
To delete a page while editing page attributes:
-
Navigate to the Page Definition. See "Accessing the Page Definition".
-
To access the Edit Page:
-
Tree view - Under Page Rendering, double-click the page title at the top of the tree.
-
Component view - Under Page, click the Edit All icon.
The Page Attributes page appears. Required values are marked with a red asterisk (*).
-
-
Verify the page number and page name.
-
Click Delete.
-
Follow the on-screen instructions.
Deleting Multiple Pages
To delete multiple pages:
-
On the Workspace home page, click the Application Builder icon.
-
Select an application.
-
Click Utilities.
-
From Page Specific Utilities, click Cross Page Utilities.
-
Click Delete Multiple Pages.
-
Select the pages to be deleted and click Delete Pages.
Deleting a Range of Pages
To delete a range of pages:
-
On the Workspace home page, click the Application Builder icon.
-
Select an application.
-
Click Utilities.
-
From Page Specific Utilities, click Cross Page Utilities.
-
Click Delete Multiple Pages.
-
Click the Delete Pages by Range tab.
-
Enter the pages to be deleted and click Delete Pages.