4 Bundle Patch 1 for Windows and zLinux Management Agents
This chapter describes various usecases for Bundle Patch 1 for Windows 64 bit OMS and Management Agent, Windows 32 bit Management Agent only, and zLinux Management Agent only. The following scenarios are discussed:
4.1 Installing Enterprise Manager Cloud Control 12c on Windows (64-bit)
To install Enterprise Manager Cloud Control 12c on Windows, download the binaries from Oracle Technology Network. You can get the 12.1.0.1 installation software from the product DVD or from Oracle Technology Network (OTN) at:
http://www.oracle.com/technetwork/oem/enterprise-manager/downloads/index.html
For more information, refer to the Procuring Software section of the Oracle® Enterprise Manager Cloud Control Advanced Installation and Configuration Guide 12c Release 1 (12.1.0.1), which can be found at the following location:
http://docs.oracle.com/cd/E24628_01/install.121/e24089/getstrtd_proc_sw.htm#BACFDBCA
On the download page, select the Windows (64-bit) (With Bundle Patch 1) release.
The Bundle Patch 1 binaries will be installed by default. Enterprise Manager binaries will have BP1 patches included by default. You do not need to follow the BP1 patch instructions outlined in this document.
The 12.1.0.2 versions of the Oracle Database and Oracle Fusion Middleware plug-ins will also be installed by default as part of the Windows installation process. You will have the option of installing additional available plug-ins, such as the Fusion Applications plug-in, during installation. Oracle recommends that you also install all the plug-ins that you think you may need.
When you invoke the Enterprise Manager Cloud Control Installation Wizard, you will be given a choice between two Install Types: Simple and Advanced. To install the additional plug-ins, you must perform an Advanced installation.
For more information, see "Installing with Advanced Configuration" in the Oracle® Enterprise Manager Cloud Control Basic Installation Guide 12c Release 1 (12.1.0.1), available at the following link:
http://docs.oracle.com/cd/E24628_01/install.121/e22624/install_em_exist_db.htm#CHDECIFI
You can also find more installation information in the Oracle® Enterprise Manager Cloud Control Advanced Installation and Configuration Guide 12c Release 1 (12.1.0.1), available at the following location:
http://docs.oracle.com/cd/E24628_01/install.121/e24089/toc.htm
4.2 Managing Windows or zLinux Hosts from OMS on Linux with BP1
This section discusses the management of Windows (32-bit or 64-bit) or zLinux Hosts from Oracle Management Service on Linux (32-bit or 64-bit) with BP1. The following assumes that you have an Oracle Management Service 12.1.0.1 instance running on a Linux host with BP1 applied, or a fresh installation that includes the BP1 binaries, and want to monitor Windows and/or zLinux host machines. The Oracle Management Service 12.1.0.1 instance must either be a fresh installation, as noted in the section above, or must be patched with BP1.
See Section 2.1, "Applying Bundle Patch 1 on Oracle Management Service" for instructions on applying BP1 on a Linux 32-bit or 64-bit Oracle Management Service host.
Note:
A Linux OMS should have BP1 applied or included. This is a mandatory requirement for monitoring the Windows or zLinux agents.Once these prerequisites have been met, you must complete the steps outlined in the following sections in the order specified:
-
Applying Patch 14040891 on Oracle Management Service (Required)
-
Patching Database, Fusion Middleware, and Fusion Application Plug-ins
-
Downloading and Upgrading Plug-ins to Windows-specific Revisions
-
Deploying Management Agents to Windows or zLinux Host Targets
The processes described in the following sections are identical for Windows 32-bit, Windows 64-bit and zLinux Management Agents.
4.2.1 Applying Patch 14040891 on Oracle Management Service (Required)
You must apply patch 14040891 on your Oracle Management Service 12.1.0.1 on Linux 32-bit or 64-bit. To install the patch, complete the following:
Note:
In the case of a multi-OMS environment, once you have performed these steps on the first OMS host, repeat the same steps for each of the other OMS hosts, except for steps (8), (9), (14), and (15).-
Back up the following before beginning this process:
-
Oracle Inventory
-
Management Repository database
-
Middleware Home
-
Instance Home
-
Software Library
-
Management Agent
For instructions, see "Backing Up Enterprise Manager" in the Enterprise Manager Cloud Control Administrator's Guide available here:
http://docs.oracle.com/cd/E24628_01/doc.121/e24473/ha_backup_recover.htm#BGBCCIJC -
-
Verify that the correct OPatch version is installed under the OMS Home. The OPatch version required for installing the Bundle Patch 1 is 11.1.0.9.4 or higher. Do not use OPatch 11.2.0.x. For more information on OPatch version, see Section 1.4.3, "Using the Correct OPatch Version".
-
Ensure that the Management Repository database and its listener are up and running.
-
Ensure that you set the ORACLE_HOME environment variable to the OMS Home, which is:
<
%MIDDLEWARE_HOME%>/omsThis is the top-level directory of the Oracle Management Server installation.
-
Ensure that you set the PATH environment variable to include the location of the unzip executable, the ORACLE_HOME/bin, and the ORACLE_HOME/OPatch directories present in the Oracle home of the OMS with the following command:
setenv PATH $ORACLE_HOME/bin:$ORACLE_HOME/OPatch:$PATHRun the following command to verify that the PATH variable is set:
echo $PATH -
Download patch 14040891 from My Oracle Support (
https://support.oracle.com) -
Verify the Oracle Inventory by running the following command:
$ opatch lsinventoryThis verification is needed because OPatch accesses the Oracle Inventory. If the command displays any errors, contact Oracle Support to resolve the issue.
-
Identify a location for storing the contents of the patch ZIP file.
In the rest of this section, this location (absolute path) is referred to as
PATCH_TOP_DIR. -
Run the following command to extract the contents of the patch ZIP file to the location you created in the previous step:
$ unzip -d PATCH_TOP_DIR p14040891_121010_Generic.zip -
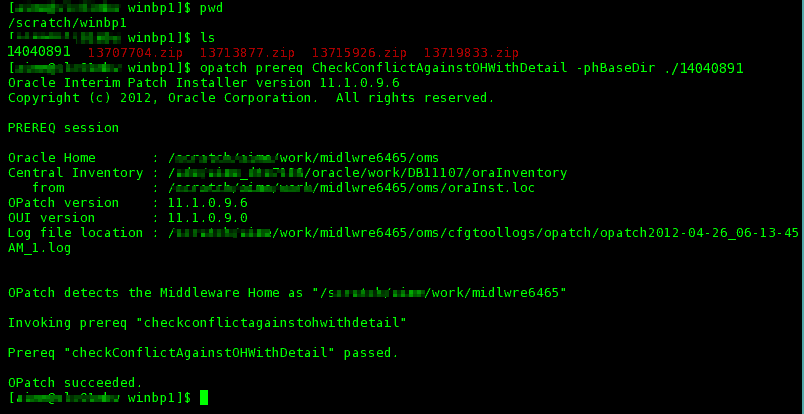
Run the following command from the patch directory to ensure that patch 14040891 does not conflict with existing one-off patches on the Linux OMS:
$PATCH_TOP_DIR/opatch prereq CheckConflictAgainstOHWithDetail -phBaseDir ./14040891The command will generate a report that lists all conflicting patches. If you do not see any conflicting patches, then proceed with installing the patch.
If you see one or more conflicting patches, then follow these steps:
-
Submit a request for Merge patches from Oracle Support.
-
Download the Merge one-off patches from My Oracle Support.
-
Manually deinstall the conflicting patches by following the instructions in the README file for each conflicting patch. Refer to My Oracle Support note 965556.1 for additional information.
-
Apply patch 14040891 on the Linux OMS.
-
Apply the Merge one-off patches.
-
-
Invoke the following command to ensure that the OMS is not running:
<OMS_ORACLE_HOME>/bin emctl stop oms -allRun the following command to verify that the OMS has completely stopped:
<OMS_ORACLE_HOME>/bin emctl status omsIdeally, the OMS and its associated services will be down. Note: In a multi-OMS environment, these commands should be run on all OMS instances.
-
Use the following command to navigate to the
PATCH_TOP_DIR/14040891directory:$ cd PATCH_TOP_DIR/14040891 -
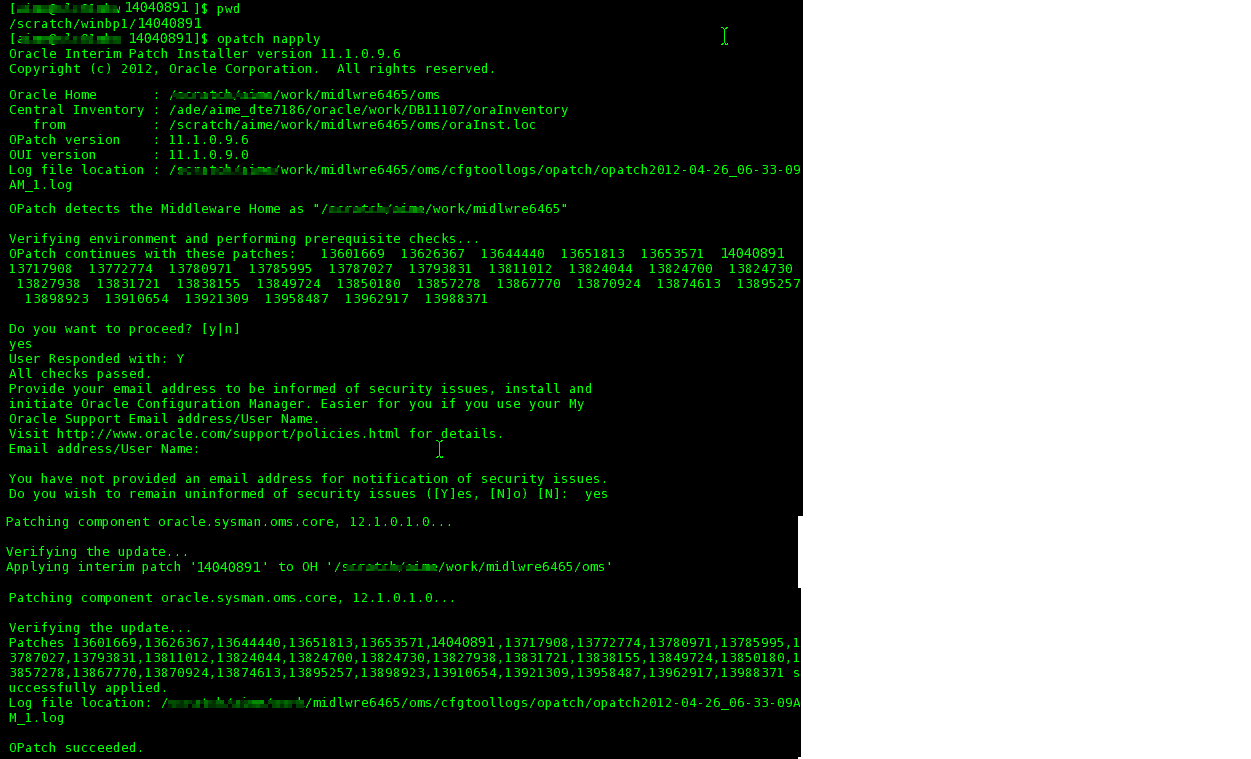
Run the following command to apply the patch:
This command should be run on each OMS instance in a multi-OMS environment.
$ opatch napply
The following messages may appear on screen:
-
Do you want to proceed? [y|n]: (yes)
Note:
If you have any patches applied in your environment that are a superset of 13638422, you will get a message to rollback the existing patches. This is expected behavior and enter Y to proceed.The following is an example of this message:
Conflicts/Supersets for each patch are:
Patch : 13824700
Bug Superset of 13638422
Super set bugs are:13638422
Patches [ 13638422 ] will be rolled back.

Do you want to proceed? [y|n]"
-
Oracle Support Email address/User Name: (provide your details or press Enter to continue)
-
Do you wish to remain uninformed of security issues ([Y]es, [N]o) [N]: (y)
-
-
Run the following command on the first OMS only (you will be prompted for the SYSMAN password):
$ ORACLE_HOME/bin/emctl applypatch repos -patchHome $PATCH_TOP_DIR/14040891/13653571
If the command succeeds, the following message is displayed:
PATCH APPLICATION HAS SUCCEEDED
-
Run the following commands on the first OMS only (you will be prompted for the SYSMAN password):
<command prompt> emctl register oms metadata -service swlib -file $ORACLE_HOME/sysman/metadata/swlib/multioms -core
<command prompt> emctl register oms metadata -service procedures -file $ORACLE_HOME/sysman/metadata/procedures/multioms/MultiOMS.xml -core
If the command succeeds, the following message is displayed:
Metadata registration successful
<command prompt> emctl register oms metadata -service derivedAssocs -file $ORACLE_HOME/sysman/metadata/derivedAssocs/emSystemAssocRules.xml -core
If the command succeeds, the following message is displayed:
Metadata registration successful
-
Start the OMS by running the following command on each OMS instance:
ORACLE_HOME/bin/emctl start oms

4.2.2 Patching Database, Fusion Middleware, and Fusion Application Plug-ins
Patches must be applied to the version 12.1.0.2 Oracle Database, Oracle Fusion Middleware, and Oracle Fusion Applications plug-ins deployed on the OMS host. A separate patch must be applied to the Oracle Home for each individual plug-in.
Installation instructions are provided for the following patches:
To patch the plug-ins on OMS, download and apply the patches listed in Table 4-1 on the OMS host (one patch at a time in the order specified) in the respective plug-in Homes. The patches are available from My Oracle Support (https://support.oracle.com).
Note:
You can reduce the downtime by stopping the OMS before applying the three patches listed below to the respective Oracle Homes, then re-starting once all patches have been successfully applied.Table 4-1 Plug-In Patches for Microsoft Windows
| Plug-In Name | Plug-In ID | Patch | Oracle Home to be Patched |
|---|---|---|---|
|
Oracle Database |
oracle.sysman.db |
13713877 |
%MIDDLEWARE_HOME%/plugins/oracle.sysman.db.oms.plugin_12.1.0.2.0 |
|
Oracle Fusion Middleware |
oracle.sysman.emas |
13715926 |
%MIDDLEWARE_HOME%/plugins/oracle.sysman.emas.oms.plugin_12.1.0.2.0 |
|
Oracle Fusion Applications |
oracle.sysman.emfa |
13719833 |
%MIDDLEWARE_HOME%/plugins/oracle.sysman.emfa.oms.plugin_12.1.0.2.0 |
4.2.2.1 Applying Oracle Database Plug-in Patch 13713877
Apply Oracle Database Plug-in patch 13713877 on your Oracle Management Service. To apply the patch, ensure that all the prerequisites specified in the README are met and complete the following:
-
Shut down the OMS by running the following command:
<ORACLE_HOME>/bin emctl stop oms
Make sure to shut down all OMS instances in a multi-OMS environment.
-
Set the environment variable PLUGIN_HOME to:
<
%MIDDLEWARE_HOME%>/plugins/oracle.sysman.db.oms.plugin_12.1.0.2.0For example:
setenv PLUGIN_HOME /example/work/midlwre6465/plugins/oracle.sysman.db.oms.plugin_12.1.0.2.0 -
Maintain a location for storing the contents of the patch ZIP file.
In the rest of this section, this location (absolute path) is referred to as
PATCH_TOP_DIR. -
Run the following command to extract the contents of the patch ZIP file to the location you created in the previous step:
$ unzip -d PATCH_TOP_DIR p13713877_121010_Generic.zip -
Use the following command to navigate to the
PATCH_TOP_DIR/13713877directory:$ cd PATCH_TOP_DIR/13713877 -
Run the following command on each OMS instance (in a multi-OMS environment) to apply the patch:
$ opatch napply -oh $PLUGIN_HOME
The following messages may appear on screen:
-
Do you want to proceed? [y|n]: (yes)
-
Oracle Support Email address/User Name: (provide your details or press Enter to continue)
-
Do you wish to remain uninformed of security issues ([Y]es, [N]o) [N]: (y)
If the patch is applied successfully, the following message is displayed:
OPatch succeeded
-
-
Run the following four commands on the first OMS only (you will be prompted for the SYSMAN password):
If the commands succeed, the following message is displayed:
Metadata registration successful
Note:
In the following commands, <command prompt> is OMS_ORACLE_HOME/bin.-
<command prompt> emctl register oms metadata -service swlib -file $PLUGIN_HOME/metadata/swlib -pluginId oracle.sysman.db -
<command prompt> emctl register oms metadata -service procedures -file $PLUGIN_HOME/metadata/procedures/ExtendClusterNG.xml -pluginId oracle.sysman.db -
<command prompt> emctl register oms metadata -service procedures -file $PLUGIN_HOME/metadata/procedures/provsidb.xml -pluginId oracle.sysman.db -
<command prompt> emctl register oms metadata -service preNGProcedures -file $PLUGIN_HOME/metadata/preNGProcedures/RACProvisionWIN.xml -pluginId oracle.sysman.db
-
-
Start the OMS instance:
<ORACLE_HOME>/bin emctl start oms
4.2.2.2 Applying Oracle Fusion Middleware Plug-in Patch 13715926
This section describes how to apply the Oracle Fusion Middleware Plug-in patch 13715926 on your Oracle Management Service. To apply the patch, ensure that all the prerequisites specified in the README are met and then complete the following:
-
Shut down the OMS by running the following command:
<ORACLE_HOME>/bin emctl stop oms
Make sure to shut down all OMS instances in a multi-OMS environment.
-
Set the environment variable PLUGIN_HOME to:
<%MIDDLEWARE_HOME%>/plugins/oracle.sysman.emas.oms.plugin_12.1.0.2.0For example:
setenv PLUGIN_HOME /example/work/midlwre6465/plugins/oracle.sysman.emas.oms.plugin_12.1.0.2.0 -
Maintain a location for storing the contents of the patch ZIP file.
In the rest of this section, this location (absolute path) is referred to as
PATCH_TOP_DIR. -
Run the following command to extract the contents of the patch ZIP file to the location you created in the previous step:
$ unzip -d PATCH_TOP_DIR p13715926_121010_Generic.zip -
Use the following command to navigate to the
PATCH_TOP_DIR/13715926directory:$ cd PATCH_TOP_DIR/13715926 -
Run the following command on each OMS (in a multi-OMS environment) to apply the patch:
$ opatch napply -oh $PLUGIN_HOME
The following messages may appear on screen:
-
Do you want to proceed? [y|n]: (yes)
-
Oracle Support Email address/User Name: (provide your details or press Enter to continue)
-
Do you wish to remain uninformed of security issues ([Y]es, [N]o) [N]: (y)
-
-
Run the following eight commands on the first OMS only to register the job type. Enter the SYSMAN Password for each command when prompted.
If the commands succeed, the following message is displayed:
Metadata registration successful
Note:
In the following commands, <command prompt> is OMS_ORACLE_HOME/bin.-
<command prompt> emctl register oms metadata -service swlib -file $PLUGIN_HOME/metadata/swlib/coherenceprov -pluginId oracle.sysman.emas -
<command prompt> emctl register oms metadata -service swlib -pluginId oracle.sysman.emas -file $PLUGIN_HOME/metadata/swlib -
<command prompt> emctl register oms metadata -pluginId oracle.sysman.emas -service procedures -file $PLUGIN_HOME/metadata/procedures/FMWPROV.xml -
<command prompt> emctl register oms metadata -pluginId oracle.sysman.emas -service procedures -file $PLUGIN_HOME/metadata/procedures/DomainScaleUp.xml -
<command prompt> emctl register oms metadata -pluginId oracle.sysman.emas -service jobTypes -file $PLUGIN_HOME/metadata/jobTypes/CreateFMWBundle.xml -
<command prompt> emctl register oms metadata -pluginId oracle.sysman.emas -service jobTypes -file $PLUGIN_HOME/metadata/jobTypes/CreateFMWGoldImage.xml -
<command prompt> emctl register oms metadata -service procedures -file $PLUGIN_HOME/metadata/procedures/WholeServerMigration.xml -pluginId oracle.sysman.emas -
<command prompt> emctl register oms metadata -service swlib -file $PLUGIN_HOME/metadata/swlib/patch -pluginId oracle.sysman.emas
-
-
Start the OMS instance:
<ORACLE_HOME>/bin emctl start oms
4.2.2.3 Applying Oracle Fusion Applications Patch 13719833
This section describes how to apply the Oracle Fusion Applications patch 13719833 on your Oracle Management Service. To apply the patch, ensure that all the prerequisites specified in the README are met and complete the following:
Note:
Do not perform these steps if you do not have a Fusion Application plug-in in your environment.-
Shut down the OMS by running the following command:
<ORACLE_HOME>/bin emctl stop oms
Make sure to shut down all OMS instances in a multi-OMS environment.
-
Set the environment variable PLUGIN_HOME to:
<
%MIDDLEWARE_HOME%>/plugins/oracle.sysman.emfa.oms.plugin_12.1.0.2.0For example:
setenv PLUGIN_HOME /example/work/midlwre6465/plugins/oracle.sysman.emfa.oms.plugin_12.1.0.2.0 -
Maintain a location for storing the contents of the patch ZIP file.
In the rest of this section, this location (absolute path) is referred to as
PATCH_TOP_DIR. -
Run the following command to extract the contents of the patch ZIP file to the location you created in the previous step:
$ unzip -d PATCH_TOP_DIR p13719833_121010_Generic.zip -
Use the following command to navigate to the
PATCH_TOP_DIR/13719833directory:$ cd PATCH_TOP_DIR/13719833 -
Run the following command to apply the patch:
$ opatch napply -oh $PLUGIN_HOME
The following messages may appear on screen:
-
Do you want to proceed? [y|n]: (yes)
-
Oracle Support Email address/User Name: (provide your details or press Enter to continue)
-
Do you wish to remain uninformed of security issues ([Y]es, [N]o) [N]: (y)
After the patch is applied, the following message is displayed:
OPatch succeeded
-
-
Start the OMS instance:
<ORACLE_HOME>/bin emctl start oms
4.2.3 Downloading the Management Agent Software
Management Agent software for the various platforms (operating systems) supported by Enterprise Manager Cloud Control can be downloaded to the Software Library using the Self Update console. Once an Agent is persisted to the Software Library, it can be installed on host machines that you want to bring under Cloud Control management using the Management Agent installation wizard.
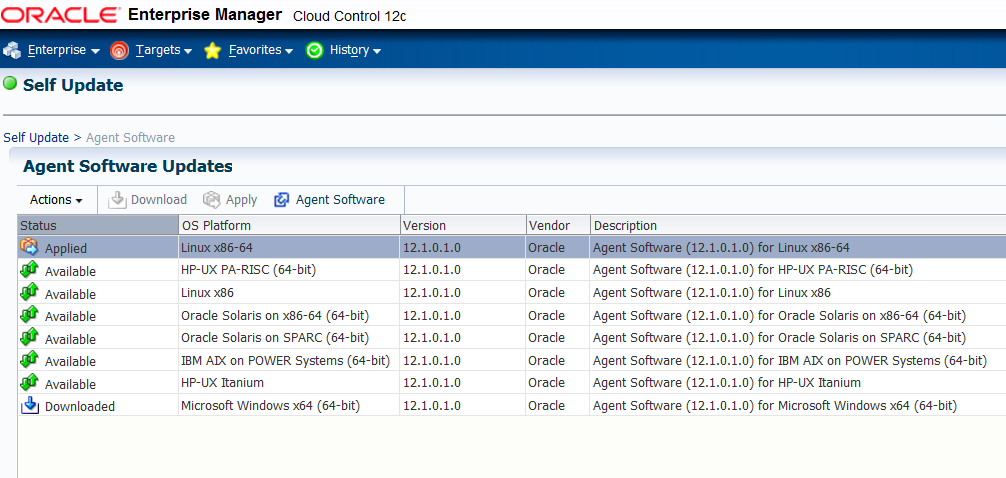
Once the Management Agent has been downloaded, it will appear in the Self Update interface as shown below. To view this page, log in to the Cloud Control console and from the Setup menu, select Extensibility, then select Self Update, and then click Agent Software.
Steps for obtaining Agent software in both online and offline modes are discussed below.
4.2.3.1 Acquiring Management Agent Software in Online Mode
Using Self Update in online mode requires Enterprise Manager to have access to My Oracle Support, which can be found at the following location:
https://support.oracle.com
-
From the Setup menu, choose Extensibility, then choose Self Update.
-
Select the entity type Agent Software and click Check Updates.
Note:
Make sure that you have first set your My Oracle Support credentials. For more information see, Section 2.2.1, "Setting Up My Oracle Support Credentials". -
Choose Open from the Action menu. The entity type page appears to show agent software for different platforms.
-
Select an update from the list of available updates.
-
Select the software that needs to be downloaded from the available list and click Download. The Schedule Download dialog opens.
-
Select when to download the update. The following options are available:
-
Immediately
-
Later (specified time)
-
Whether or not to send a notification when the download is complete
-
-
Click Select. An Enterprise Manager job is created to download the Agent software to the Software Library.
Enterprise Manager starts downloading the archive from the Oracle Enterprise Manager store. Wait for the download to complete.
When the job is submitted, Enterprise Manager displays the Confirmation page and the downloaded plug-in is shown in the local Oracle Enterprise Manager Store.
-
Once the download is complete, select the Agent, then click Apply. This step will stage the Agent software in the Software Library and make it available to the Add Targets wizard, which you will use to install the Agent on host machines.
-
Click Agent Software to launch the Add Targets/Agent Installation wizard.
For more information, see Section 4.2.5, "Deploying Management Agents to Windows or zLinux Host Targets".
4.2.3.2 Acquiring Management Agent Software in Offline Mode
Follow this Self Update process only when Enterprise Manager is in offline mode.
-
Ensure Cloud Control is set to offline mode. From the Setup menu, select Provisioning and Patching, then select Offline Patching and click Apply.
-
Run the following command:
$ <OMS_ORACLE_HOME>/emcli login -username=sysman
Provide the password and you should see the following confirmation message:
Login successful
-
Run the following command:
./emcli sync
The following confirmation message is displayed:
Synchronized successfully
-
From the Setup menu, select Extensibility, the select Self Update.
-
Click Check Updates on Self Update home page. A message is displayed that contains the URL to be accessed to download a catalog of all updates.
-
From an Internet-enabled computer, download the catalog file using the aforementioned URL mentioned in the message window.
-
Copy the downloaded file to either of the following:
-
To any host that has a Management Agent and EM CLI installed
-
To the Oracle Management Service host
-
-
Once the catalog is downloaded, it can be imported to Enterprise Manager in one of the following two ways:
-
Transfer the catalog to the management server host and run the following command to import to Enterprise Manager:
$ emcli import_update_catalog -file=<catalog file name with full path> -omslocal
-
Transfer the catalog to any managed host in your environment and run the following command to import to Enterprise Manager:
$ emcli import_update_catalog -file=<catalog file name with full path> -host=<host name> <host credential options>
-
-
Select the entity type Agent Software and choose Open from the Actions menu. The entity type page appears displaying agent software for different platforms.
-
Select an update from the list of available updates.
-
Click Download. A message is displayed with a URL and instructions.
-
From an Internet-enabled computer, download the file from the URL displayed in the message window. Do one of the following:
-
Copy the file to a Management Agent.
-
Copy the file to Oracle Management Service.
Go to the 12.1 OMS home/bin directory and import the update file that you download in the previous step by executing the following command:
$ OMS_ORACLE_HOME/emcli import_update -omslocal -file=<absolute location of the zip file>
Note:
if your session has expired, you might be prompted to log in again. Do so by running the following command:$ emcli login –username=sysman
At this stage, the update will show up in downloaded state in the Self Update home page.
-
-
Once the download is complete, select the entity management agent, then click Apply. This step will stage the entity management agent software in the Software Library and make it available to the Add Targets wizard, which you will use to install the agent on host machines.
-
Click Agent Software to launch the Add Targets/Agent installation wizard.
For more information, see Section 4.2.5, "Deploying Management Agents to Windows or zLinux Host Targets".
4.2.4 Downloading and Upgrading Plug-ins to Windows-specific Revisions
Ensure that you obtain the Windows specific version- 12.1.0.2, and revision- 120427 of Oracle Database, Oracle Fusion Middleware, and Oracle Fusion Application plug-ins using the Self Update feature in either online or offline mode. The steps are similar to those outlined in Section 2.3, "Upgrading All Deployed Plug-ins to the 12.1.0.2 Releases on OMS".
To view the available revisions for the Oracle Database, Oracle Fusion Middleware, and Oracle Fusion Applications plug-ins, log in to the Cloud Control console and from the Setup menu, select Extensibility, then select Plug-ins.
4.2.5 Deploying Management Agents to Windows or zLinux Host Targets
After the plug-ins have been updated to their respective Windows revisions, you will deploy Management Agents to Microsoft Windows hosts or zLinux machines using Cloud Control.
-
Acquire the Management Agent binaries for the host target (Windows or zLinux).
-
From the Setup menu, select Add Target, and then, click Add Targets Manually. On the Add Targets Manually page, select Add Host Targets and click Add Host.
For more information, refer to the Add Host Wizard section in the Install Guide, which can be found at the following location:
http://docs.oracle.com/cd/E24628_01/install.121/e22624/install_agent.htm#CACJEFJI
4.2.6 Adding Targets to Monitor
Once plug-in revisions are deployed on a Windows or zLinux host, you are ready to discover Oracle Database, Oracle Fusion Middleware and Oracle Fusion Applications targets running on the host.
When a target is discovered on the Windows host, the required plug-in code needed to monitor the target types will be deployed to the Management Agent installed on the host. For example, if you discover an Oracle Database target, the required Oracle Database plug-in code will be pushed to the Management Agent installed on the database host machine.
Enterprise Manager offers two options for target discovery:
-
Automatic target discovery: This feature scans host machines for Oracle components that can be managed and monitored by Enterprise Manager Cloud Control.
For instructions on configuring automatic discovery, see:
http://docs.oracle.com/cd/E24628_01/doc.121/e24473/discovery.htm#CBACIHEJ -
Manual target discovery: This feature guides you through the process of manually discovering targets on the Windows host.
For instructions on manually discovering targets, see:
http://docs.oracle.com/cd/E24628_01/doc.121/e24473/discovery.htm#CBAEIBCC
4.3 Managing Windows or zLinux Hosts from OMS without BP1
If you are planning to monitor a Windows 32 or 64 bit host or zLinux host from an OMS that does not have BP1 included or applied, this usecase is not supported. You need to wait until BP1 is released for the respective platform. Refer to the BP1 release schedule contained in My Oracle Support note 1395505.1 at the following location:
https://support.oracle.com/CSP/main/article?cmd=show&type=NOT&doctype=ANNOUNCEMENT&id=1395505.1