3 Using the JD Edwards EnterpriseOne Web Application User Interface
This chapter contains the following topics:
-
Section 3.2, "Accessing JD Edwards EnterpriseOne Web Client"
-
Section 3.11, "Working with Send Email and Meeting Invite Options (Release 9.1 Update 5)"
3.1 Understanding Web Application Form Types
EnterpriseOne applications use a variety of form types. The characteristics of each form type remain the same, regardless of the application in which you access the form.
3.1.1 Find/Browse Form
The Find/Browse form provides the entry point to most applications. It contains an optional query-by-example (QBE) line enabling you to search using any field in the grid. Most Find/Browse forms include the Query control, which enables you to define additional search criteria when searching for records. The standard title for a Find/Browse form begins with ”Work With” followed by information that is specific to the business task. You cannot add or change existing records on a Find/Browse form.
Find/Browse forms enable you to:
-
Search, view, and select multiple records in a grid
-
Exit to another form to add, change, or view a record
3.1.2 Search/Select Form
Use the Search/Select form to locate a value for a field. The grid displays values that are stored in a database table. When you select a value from the grid and click the Select button, that value is automatically placed in the field. For example, when you need to enter a user defined code (UDC) into a field, the search button appears, enabling you to access a Search/Select form that displays a list of UDCs. You can select an item from the list and place it in the appropriate field. Search/Select forms include the Query control unless the form appears in a pop-up window. The Query control enables you to define additional search criteria when searching for records. You cannot edit the information that appears on this form.
3.1.3 Header Detail and Headerless Detail Forms
The Header Detail and Headerless Detail forms include a detail area, the OK button, and the Cancel button. You can change multiple records using these forms. The Header Detail form includes information from two different business views to provide more depth on the information that appears on the form. The Headerless Detail form provides information from only one table. Data that is common to all the records in the grid appears at the top of the form.
Header Detail and Headerless Detail forms enable you to:
-
Display multiple records
-
View records
-
Add records
-
Change records
-
Delete records
3.1.4 Fix/Inspect Form
The Fix/Inspect form does not include a detail area. If you selected a record on the previous form, the Fix/Inspect form displays data for that record. If you are adding a record, the Fix/Inspect form is empty, except for any default values.
Fix/Inspect forms enable you to:
-
View a single record
-
Add a record
-
Change a record
3.1.5 Parent/Child Form
The Parent/Child form presents parent/child relationships in an application on one form. The left portion of the form presents a list of items. The right portion of the form displays information that relates to the selected item in the left portion of the form. The Parent/Child form supports the ability to drag and drop items from one area to another. This form includes Select and Close buttons.
You can resize the display areas according to your personal preferences.
3.1.6 Message Form
The message form contains information about processing that occurs when you work with JD Edwards EnterpriseOne software. For example, when you delete a record, a Confirm Delete message appears to ask if you are sure that you want to delete the object. The message might also include information about an event that occurs while you work with the system.
3.1.6.1 Message Form as Hover Form
The message form may also contain the context-based information, which is displayed when you click the hover indicator in the hover supported JD Edwards EnterpriseOne controls.
This hover form appears around the control.
The hover form may contain context-based information about the Address Book Number, Item Number and so on. Also, the hover from may contain card information about the Address Book Number.
The hover form closes when you move the mouse cursor away from the control or grid cell. You can also use the Close button on the hover form.
Note:
The hover form does not appear on the empty control or space and error form controls and grid cells.You see an orange ”dot” indicator at the top left corner of the control, if the hover form is associated with the control. Hovering on the orange ”dot” will change it into a checkable indicator. Click on the indicator to display the hover form.
![]() Tutorial:
Tutorial:
Click here to view a recording of this feature.This tutorial shows the pre-9.1.5 user interface.The hover form may contain a tab called Collaborate. SeeSection 3.11.3, "Accessing Send Email and Meeting Invite options from Data Dictionary items"
You can enable or disable the hover form using the Preferences window from the Personalization drop-down menu at the user level. Select or deselect the Enable Hover Forms option in the Preferences window.
Also, your system administrator can enable or disable the hover form at the system level in the JAS.ini file or in Server Manager.
See ”Understanding Hover Forms” in the JD Edwards EnterpriseOne Tools System Administration Guide.
The hover form association is supported on form level controls and also on the grid. For example, Edit Control, Check Box, Combo Box, Associated Text Images, Radio Buttons, Text Block, and Grid Cell all support the hover form.
3.1.7 Power Forms
Power forms are web-only application forms that enable you to view multiple, interrelated views of data, grids, and tab pages on one form and to pass logic between them. The tab pages can have their own business views (BVs), and these BVs can communicate with each other and can update based on data selection and changes that occur in other BVs on the form. Most Power Browse forms include the Query control, which enables you to define additional search criteria when searching for records.
3.2 Accessing JD Edwards EnterpriseOne Web Client
This section provides an overview of accessing the JD Edwards EnterpriseOne web client and discusses how to:
-
Access the JD Edwards EnterpriseOne Web Client through the JD Edwards Collaborative Portal.
-
Accessing the JD Edwards EnterpriseOne Web Client through the Oracle Web Center Portal.
-
Access the JD Edwards EnterpriseOne Web Client Directly.
3.2.1 Understanding JD Edwards EnterpriseOne Web Client Access
Accessing JD Edwards EnterpriseOne applications on the web is similar to accessing files and applications on a company network. Typically, either when you start your computer or when you want to access company network directories, you must sign in to identify yourself to the system as an employee who has the right to access company resources. After you sign in, you can access files and applications on the network. Similarly, you must sign into the web client, the gateway through which you access JD Edwards EnterpriseOne, before you can launch JD Edwards EnterpriseOne applications.
To sign in to the JD Edwards EnterpriseOne web client, your computer must have access to your company's intranet, you must have a web browser installed on your computer, and your system administrator must create an account for you. When your system administrator sets up your account, he or she creates a user ID and assigns you a password.
Usually, you must enter your ID and password when you launch the JD Edwards EnterpriseOne web client. However, your system administrator can configure your computer in such a way so that you appear to bypass the sign-in process. For security reasons, however, most system administrators want you to sign in manually. When you sign in to the JD Edwards EnterpriseOne web client, EnterpriseOne Menu appears. EnterpriseOne Menu enables you to access JD Edwards EnterpriseOne applications, reports, and other features.
3.2.2 Accessing the JD Edwards EnterpriseOne Web Client through the JD Edwards Collaborative Portal
When you sign in to the Collaborative Portal, the portal can pass your sign-in information to JD Edwards EnterpriseOne. Therefore, all you must do is bring up a workspace containing the EnterpriseOne Menu portlet. The EnterpriseOne Menu portlet enables you to access JD Edwards EnterpriseOne applications, reports, and other features.
3.2.3 Accessing the JD Edwards EnterpriseOne Web Client through the Oracle WebCenter Portal
When you sign in to the Oracle WebCenter Portal, the portal can pass your sign-in information to JD Edwards EnterpriseOne. To access specific JD Edwards EnterpriseOne applications, reports, or features, your system administrator must provide you with specific menu options. Choose a menu option to launch a specific JD Edwards EnterpriseOne object.
3.2.4 Accessing the JD Edwards EnterpriseOne Web Client Directly
Use these steps to sign into the JD Edwards EnterpriseOne web client if you do not use a portal.
To sign in to the JD Edwards EnterpriseOne web client directly:
-
Launch your web browser and navigate to your company's JD Edwards EnterpriseOne Web sign-in.
Depending on how your system administrator has configured your system, the web sign-in might appear when you launch your browser, you might need to click a button or a link, or you might need to navigate to a particular page. Your ability to access the JD Edwards EnterpriseOne web client directly might have been disabled. If you do not know how to find the JD Edwards EnterpriseOne web sign-in, contact your system administrator.
-
Complete the following fields:
-
User ID
-
Password
-
-
If your system administrator indicates that you must sign in to a particular environment, click Details and complete the Environment field.
-
If you have multiple roles and wish to sign in as one of them, click the Details button and complete the Role field.
Note:
The default value is *ALL, which signs you in as a member of all of your roles. Select the *ALL role if you are not sure which role to use. -
If you want your computer to remember your settings for the future, select Remember my sign in information.
Note:
Do not use this option if other people have access to your computer. -
Click Sign In.
The EnterpriseOne Menu appears.
3.3 Navigating in JD Edwards EnterpriseOne
This section provides an overview of the EnterpriseOne Menu, and discusses how to:
-
Access the JD Edwards EnterpriseOne Home Page.
-
Navigate in the Navigator menu.
-
Use the Fast Path.
-
Access your Favorites menu.
-
Add a Task to your Favorites task view
-
Access the carousel container.
3.3.1 Understanding JD Edwards EnterpriseOne Home Page
When you log into the JD Edwards EnterpriseOne application, you see the EnterpriseOne home page.
EnterpriseOne Page displays the Navigator drop-down menu in the top menu bar.
See Chapter 3, "Understanding EnterpriseOne Navigation"
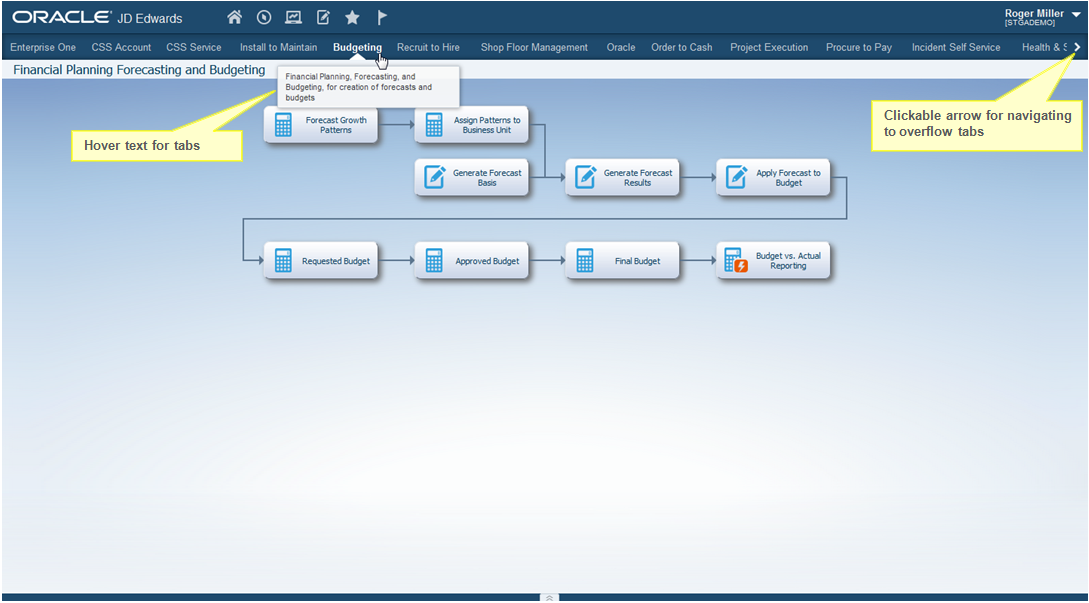
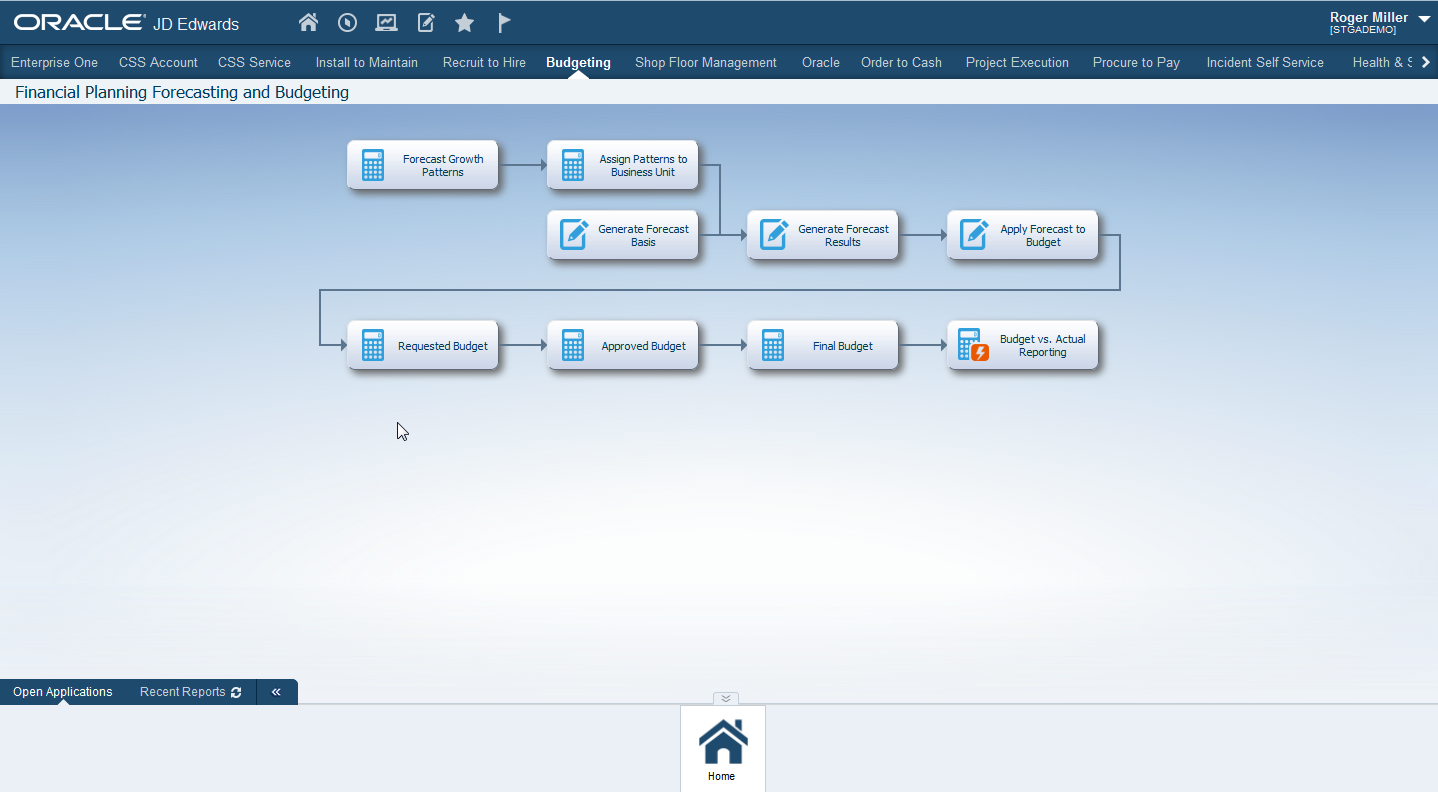
(Release 9.1 Update 5) The EnterpriseOne Home Page may also contain EnterpriseOne Pages that have been assigned to your user ID or your user role. EnterpriseOne Pages display as tabs located across the top of the interface. If you are not assigned any EnterpriseOne Pages, a default page is displayed when you log into JD Edwards EnterpriseOne.
Some EnterpriseOne Pages might contain interactive content, links to external URLs, links to EnterpriseOne applications, and so forth.
For example, some EnterpriseOne Pages might display interactive information about Financial Budgeting and Planning, Capital Asset Management, HCM Recruitment Management, Manufacturing Work Orders, Order to Cash, Procure to Pay, Projects, Work Orders based on the role of the user.
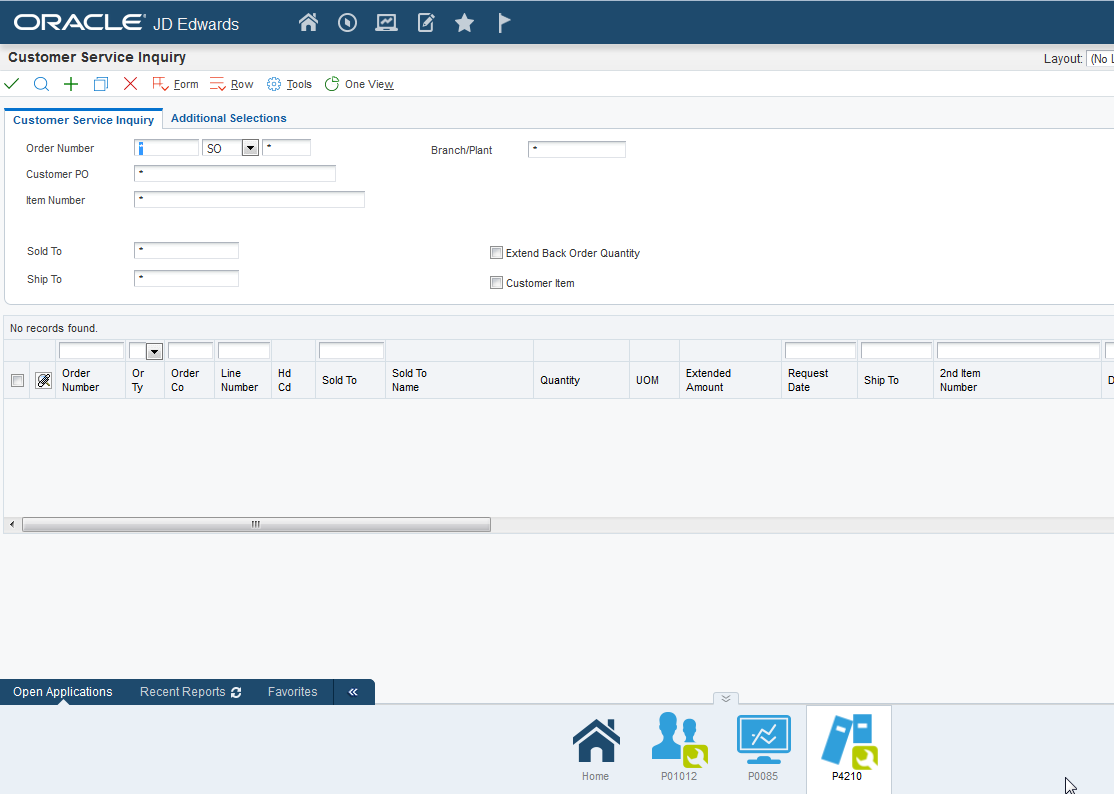
Other EnterpriseOne Pages, called Embedded Pages, automatically launch an application when you click the tab. Applications launched from these EnterpriseOne Pages do not contain a Close button. Instead, you navigate away from the application by clicking other EnterpriseOne Pages located at the top of the screen. When you navigate away from an Embedded EnterpriseOne Page, EnterpriseOne saves any information you have already entered, so when you return, your information remains as you left it.
The following example shows the EnterpriseOne Page with tabs and overflow arrows. Click the arrow on the tabs, at the right-hand corner of the page to maximize or minimize the tabs.
You cannot change the existing EnterpriseOne page or create a new one. When more than one EnterpriseOne page is published to a user/role, then you can access the pages using the tabs on the home page.
The system administrator can create new pages.
Drag and drop the tabs if you want to rearrange the published pages as shown in the following example.

JD Edwards EnterpriseOne saves the tab position of the EnterpriseOne pages. Next time you log into the JD Edwards EnterpriseOne application, the tabs appear depending on the setting during your last session.
The system administrator can change the existing EnterpriseOne page through the User Generated Content administration application.
3.3.2 Understanding EnterpriseOne Navigation
The Navigator menu is the web-based application you run to access JD Edwards EnterpriseOne applications.
3.3.2.1 Menu
The top portion of the JD Edwards EnterpriseOne Menu bar displays a drop-down menu that you can use to navigate to the specific application or report that you want to launch. The drop-down menu can contain objects other than applications; for this reason, all objects in the drop-down menu are called tasks. Applications, reports, and shortcuts in the drop-down menu are all tasks.
Principal sets of tasks are called task views. Your system administrator configures your task view list. This contains the initial contents of the drop-down menu.
System administrators use JD Edwards Solution Explorer and JD Edwards EnterpriseOne ERP security applications to manage user accounts and to configure EnterpriseOne Menu.
The following example shows the JD Edwards EnterpriseOne drop-down menu.
Figure 3-3 JD Edwards EnterpriseOne Drop-down menu
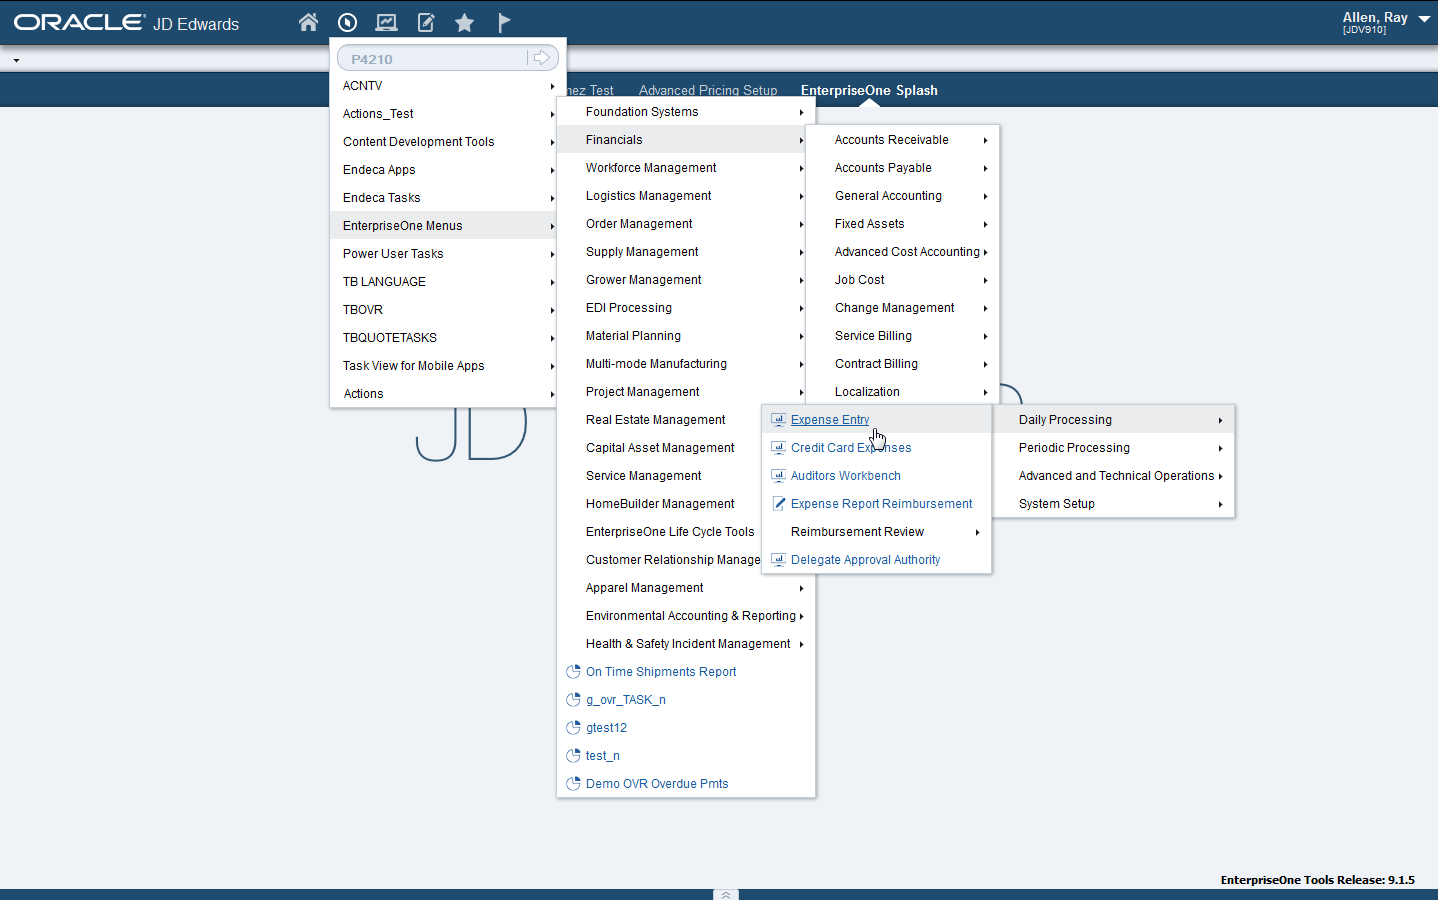
Description of "Figure 3-3 JD Edwards EnterpriseOne Drop-down menu"
When you click on the menu, the sub-menu appears.
The Navigator menu displays visual cues to help you identify the type of task.
Each task will have a context menu. Right-click the task to view the context menu.
3.3.2.2 Breadcrumbs (Release 9.1 Update 2)
Breadcrumbs enable you to keep track of the menus you have used to navigate to your current application. When clicked, each breadcrumb displays the associated menu and its submenus at the location of the breadcrumb. If you use breadcrumbs to navigate in EnterpriseOne, the breadcrumb string changes to reflect the new navigational path you have chosen. Breadcrumbs do not appear if you use Fast Path or EnterpriseOne Pages to launch an application.
The breadcrumb history is saved by default whenever you open any application using the Navigator drop-down menu.
To view or hide the breadcrumbs, click the Personalization menu, then the Preferences menu, and then select or deselect the Show Menu Breadcrumbs check box. Click Save and Close button to save your changes.
(9.1 Update 5) Click the drop-down menu icon located near the breadcrumbs to view the history and to access the application as required.
The breadcrumbs history is arranged in a chronological order. The path that you last accessed is listed first.
You can view and access the breadcrumbs history even after you log out and log in to the JD Edwards EnterpriseOne application.
The breadcrumbs history can be deleted by clicking the Personalization menu, then the preferences menu. Click on the Clear button in front of the Clear Breadcrumbs history option to delete the history of bread crumbs. Click Save and Close to save your changes.
If you clicked the Clear button but do not want to delete the breadcrumbs history, click the Undo button before you click the Save and Close button.
If you are a system administrator, the Server Manager interface for runtime and metric parameters provides details on the usage of each setting applicable to that parameter. Access this setting by clicking the ”i” (Information) icon for a desired parameter. Breadcrumbs are enabled if both the Show Menu Breadcrumbs option on the Preferences menu (located on the Personalization menu), and the Enable Menu Breadcrumbs in the JAS.ini file are enabled.
The JAS.ini settings are in the Web Runtime section OWWEB.
Setting name = Enable Menu Breadcrumbs
The number of breadcrumbs that can be stored in the history can be defined in the JAS.ini file under the section OWWEB. The range for maxRecentBreadcumbs value should be set between 1 and 10.
If maxRecentBreadcrumbs property is not defined in JAS.ini, the system sets the maximum number of breadcrumbs history as 10.
If you are a system administrator, log in to the SM console and select the appropriate JAS server from the management dashboard. Navigate to the Configuration section of the selected JAS server and select Advanced option from the View drop-down menu. Click on the Web Runtime link in the configuration section. In the Web Runtime section, you can see a parameter called 'Maximum number of Recent Breadcrumbs'. The default value of this parameter is 10. You can change the value of this parameter from 1 to 10.
3.3.2.3 Open Application List
The Navigator menu enables you to choose whether the system launches applications in a new window, or launches them in the same window, replacing the current application located there. Click the task in order to launch the task in the current window.
To launch a task in a new window, right-click the task and click "Open in New Window" from the context menu.
Each open application is listed in the Open Application drop-down menu. This enables you to navigate between open applications.
Also, the open applications appear as carousel tiles in the Open Applications tab of the carousel container.
3.3.2.4 Recent Reports
The Recent Reports drop-down menu displays the recently opened reports.
The Navigator menu displays visual cues to help you identify the status of the reports. For example, as shown in the following table, reports with the Done status have a green color check icon beside them and reports with the Error status have a red color error icon beside them.
3.3.2.5 Fast Path
Fast Path is a field that enables you to access a specific task (that is, a folder, application, or report) directly. You use commands in Fast Path to move quickly among menus and applications.
To access the Fast Path field, click on the Navigator drop-down menu.
To use the Fast Path field, enter a Fast Path code and click the button to the right of the field. Depending on how your system administrator configured your account, you might not be able to see Fast Path.
You can also use the Fast Path field to access menus. Task views are composed of menus and individual tasks. Menus have no special format in EnterpriseOne Menu; they simply provide application developers with a convenient method of grouping applications. When you access a menu, you actually access a specific place in a task view.
To access a menu, enter its menu ID. For example, enter G0 to access the Foundation Systems menu.
When you enter a menu ID in the Fast Path field, the corresponding menu appears in the Navigator drop-down menu. Also, the label Back to Navigation by Role is displayed in the top menu bar. Click Back to Navigation by Role label to display the default JD Edwards EnterpriseOne menu in the Navigator drop-down menu.
You can find a Navigating in EnterpriseOne menu's ID by hovering over it. To launch an application, enter the application's program number. To specify a form in the application, enter the application's program number followed by a |, and then enter the form ID. For example, when you enter P01012|W01012B, the system displays the Work with Addresses form in the Address Book application. You can specify a version of a form by adding a | and the version number after the form name; for example, P01012|W01012B|ZJDE0003.
Contact your system administrator for specific internal task, menu, and application IDs. Not all objects have Fast Path commands.
3.3.2.6 Favorites
If you frequently run a task or access a folder, you can save it as a favorite for quick access. The favorites that you add are displayed under the Favorites menu. You can access that task or folder directly from the Favorites menu.
You can customize the list of favorites displayed in the Favorites menu. Depending on how your system administrator configured your account, you might not be able to see or change your Favorites menu options.
See Section 3.4, "Working with Favorites"
Note:
When a customer upgrades to the latest JD Edwards EnterpriseOne Tools release, the existing Favorites for the user appear in the Favorites menu.3.3.2.7 Roles — Role Chooser
The tasks you see in the Navigator menu are filtered by role. Your system administrator decides the tasks that are available for each role and then assigns the role to you. You can have one or many roles assigned to you. You choose which role you want to use at the time you sign into EnterpriseOne. The role you choose determines the tasks that are available to you. Your ability to choose roles at sign in and to choose roles from the Navigator menu depends on if your system administrator has given you permissions to do so. If she/he has not, then you can only sign in using the *ALL (All My Roles) role. When signed in as *ALL, the EnterpriseOne Menu displays a concatenated list of all the tasks enabled for each role that is included in *ALL.
Note:
Your system administration determines the roles that are included in *ALL role.If enabled by your system administrator, the JD Edwards EnterpriseOne Menu bar displays the Role drop-down menu. This menu enables you to display different sets of tasks by role. You can either select *ALL – ALL My Roles to view a concatenated view of all of the tasks assigned to all of the roles in the *ALL role. Or you can select an individual role and view only the tasks for that role. Only the roles that are included in the *ALL role appear in the drop-down menu. If your system administrator has not enabled you to choose roles, the Roles drop-down menu will not appear. Instead, you only see the *ALL role and the tasks enabled within that role. This feature is only available if your system administrator has enabled viewing tasks by role. You sign in using *ALL.
3.3.2.8 Personalization
The Personalization drop-down menu has the following sub-menus:
-
My System Options
-
My System Profile
-
Preferences
See Chapter 5, "Working with User Options"
Click My System Profile to view the details of your system such as the release number, environment, and role.
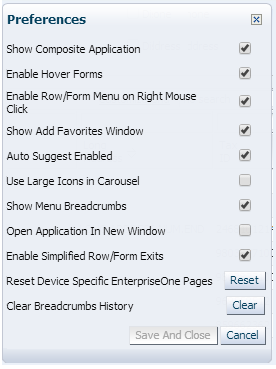
Select or deselect the check boxes in Preferences window to select or deselect the following user interface preferences in JD Edwards EnterpriseOne. Click the Save & Close button to save the changes and to close the Preferences window.
| Preferences | Default Value | Details |
|---|---|---|
|
Show Related Information |
Checked |
Select this option to activate the Composite Application Framework for a User ID or Role. Deselect this option to disable the Composite Application Framework for a User ID or Role. |
|
Enable Hover Forms |
Checked |
Use this option to enable/disable informational hover windows when the mouse cursor hovers over selected controls. |
|
Enable Row/Form Exit Menu on right click |
Checked |
Use this option to enable/disable right-click option on Form/Grid cell to access Form / Row Exit menu. |
|
Show Add Favorites Window |
Checked |
Use this option to enable/disable Add Favorites pop-up window |
|
Auto Suggest Enabled |
Checked |
Use this option to enable/disable auto-suggest feature. |
|
Zoom in |
Checked |
This option is available only when you are accessing JD Edwards EnterpriseOne using an Apple iPad. See ”User Interface” in JD Edwards EnterpriseOne Web Client for iPad Quick Start Guide. |
|
Use Large Icons in Carousel |
Checked |
Select this option to change the size of the carousel tile to large. De-select this option to change the size of the carousel tile to small. |
3.3.3 Navigating in Navigator Menu
Access Navigator.
-
In Navigator Menu, click a task (that is, a folder).
The drop-down menu displays the child tasks as sub-menu.
-
Continue to navigate through the sub-menu until you reach the object you want to launch.
Hover over a task to see more information about it. The system tells you what kind of object the task is (for example, application, report, and so on) and other information, such as its number and version.
-
To launch the object, click it.
You can launch multiple applications. Depending on how your system administrator has configured your system, additional applications launch in the same window or in a different window. If the system is configured for multiple browser windows, you can hold down the CTRL key when you press Enter to launch the application in a new window. Either way, the applications you have running appear at the top of the tree under Open Applications.
-
If you have multiple applications open, click the application name under the Open Applications drop-down menu to bring a specific application to the forefront. You can also click the application tile in the Open Applications tab of the carousel container to bring a specific application to the forefront.
Depending on the object type, you might be able to select a version or to set data selection or processing options. Right-click the task to make a choice from the context menu.
3.3.3.1 Hot Keys
Click the ’i' button on any open JD Edwards EnterpriseOne form to open the information dialog. Then, click on Display list of all hot keys to obtain the list of hot keys supported by the JD Edward EnterpriseOne software. You can also use Ctrl+ Shift+K to open the hot keys information window.
3.3.4 (Release 9.1 Update 5) Understanding Standard and Simplified Modes
EnterpriseOne has two modes: Standard and Simplified. Your system administrator determines the mode assigned to you. Standard mode is for users who need access to the full range of EnterpriseOne actions. If you are using Standard mode, you are able to view the Navigation bar, the Carousel, the Fast Path (if you have the appropriate permissions), and Breadcrumbs.
In Standard mode, your Personal Preferences dialog box contains the following options:
The Simplified mode is a scaled-down interface that provides you with only the limited actions you might need to use in EnterpriseOne. In Simplified mode, you see the Banner Bar, Personalization, Help, Username, Environment, and Sign Out options.
Simplified mode enables you to access applications by clicking the EnterpriseOne Page tabs located across the top of the screen. Some EnterpriseOne Pages contain links and buttons that you click to access applications, URLs, etc.
In Simplified mode, your Personal Preferences dialog box contains the following options:
Figure 3-5 Personal Preferences Dialog box, Simplified Mode
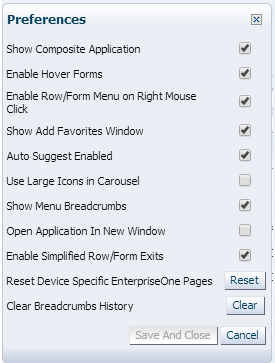
Description of "Figure 3-5 Personal Preferences Dialog box, Simplified Mode"
3.3.4.1 Selecting Standard or Simplified Modes
If your system administrator has enabled you to do so, you can choose if your EnterpriseOne interface displays Simplified or Standard mode.To choose Simplified or Standard mode:
-
Ensure that you have permissions to change the Standard or Simplified mode by clicking Personalization, My System Options, and then User Profile Revisions.
-
Ensure that the Simplified mode option is set to Yes if you want to view EnterpriseOne in Simplified mode, and that the option unchecked if you want to view EnterpriseOne in Standard mode.
3.3.4.2 Closing Applications when too Many are Open
Your system administrator determines the number of applications you can have open at one time. If you have reached the maximum number of applications that you can have open, you will receive the following error message:
Too many EnterpriseOne Applications are open at this time. Find one or more open application(s) with a Close button located in the toolbar and click the Close button to close the application.
This message means that you must close one or more EnterpriseOne applications before you can open any others.
Some EnterpriseOne Pages, called Embedded Pages, launch an application automatically when you click the EnterpriseOne Page tab. You cannot close these pages because they do not have a Close button. Therefore, find an application that has a close button, save your work if desired, and click Close. You may resume opening applications once you have closed enough applications so that you are below the maximum number specified by your system administrator.
Note:
If you have opened the maximum number of Embedded EnterpriseOne Pages, you might have to log out and log back in to JD Edwards EnterpriseOne.3.4 Working with Favorites
This section discusses how to:
-
Access the Favorites Menu
-
Add a Favorite
-
Add a Favorite from an Open Application
-
Manage the Favorites Window
-
Rename Favorites
-
Remove Favorites
-
Reorder Favorites
-
Reorganize Favorites
3.4.1 Accessing the Favorites Menu
To access the Favorites menu, click Favorites on the EnterpriseOne menu.
The Favorites menu displays all of the tasks and folders that you added.
Note:
The favorite tasks and folders are also displayed in the Favorites tab in the carousel container.3.4.2 Adding a Favorite
Tasks can be added as favorites. To add a favorite:
-
Right-click the task that you want to add as favorite, and select Add to Favorites from the context menu.
-
In the Add to Favorites dialog box, use the default name or enter the name for your favorite.
-
Click Create Favorite.
The task is added to the Favorites menu.
Notes:
-
Duplication of favorites in the same folder level is not allowed.
-
While adding a favorite, you can hide the Add to Favorites window from appearing again by placing a check mark in the Do not show this screen again check box.
To make the Add to Favorites window appear again, access the Personalization menu, and from the Preferences option, select the Show Add Favorites Window check box.
3.4.3 Adding a Favorite from an Open Application (Release 9.1 Update 2)
You can add a favorite from any form of an open application instead of from a task view. Navigate to an application either through the Navigator menu, or through the Fast Path. Your ability to add a favorite from an open application form depends on whether or not your system administrator has enabled you to do so.
If you are a system administrator, the Server Manager interface for runtime and metric parameters provides details on the usage of each setting applicable to that parameter. Access the interface by clicking the ”i” (Information) icon for a desired parameter. The ability to add a favorite from an open application form is enabled if the Setting name = Allow Non-Task Favorites in the JAS.ini file is enabled.
Note:
You cannot add a favorite to an application that has form interconnects, which is the ability of application forms to pass information back and forth between them.-
To add a favorite from an open application, launch an application.
-
From the Tools menu, click Add to Favorites.
The Add to Favorites dialog box appears.
-
In the Name field, accept the default name or enter a new name.
Note:
Select the Do not show this screen again check box if you do not want the Add to Favorites Dialog box to appear when you add a favorite. To make the Add to Favorites window appear again, access the Personalization menu, and from the Preferences option, select the Show Add Favorites Window check box.Also, you can click the Manage Favorites link to launch the Manage Favorites window where you can delete, rename, reorder, and create user-defined folders to reorganize the favorites. See Manage Favorites in the Foundation guide for more information about this topic.
-
Click Create Favorites.
You will see your new favorite on the Favorites menu, and the Favorites folder on the Carousel.
3.4.4 Manage Favorites Window
The Manage Favorites window displays the favorites that are added by the user. You can delete and edit favorites from this window. The Manage Favorites window allows you to delete, rename, and reorder favorites, as well as create user-defined folders to reorganize favorites.
You can access the Manage Favorites window in the following ways:
To access Manage Favorites from the Favorites menu:
-
Click Favorites.
-
Click Manage Favorites.
The Manage Favorites window appears.
To access Manage Favorites from the carousel:
-
Click the Favorites tab in the carousel.
-
Click the Manage Favorites icon.
The Manage Favorites window appears.
Note:
The Manage Favorites link is also available in the Add to Favorites window, and the Favorites Properties option.3.4.5 Renaming Favorites
You can rename a favorite in the following ways:
To rename a favorite from the Favorite Properties:
-
Right-click a favorite from Favorites menu.
-
Select Favorite Properties.
-
Enter the name for the favorite in the Favorite Properties window.
-
Click Save Changes.
The new name of the favorite appears in the Favorites menu.
To rename a favorite from the Manage Favorites window:
-
Click Favorites.
-
Click Manage Favorites.
-
From the Manage Favorites window, select the favorite you want to edit.
-
Click the edit button next to the selected favorite.
-
Enter a name for the favorite.
-
Click outside the name field or press the Tab key on the keyboard.
The new name of the favorite appears in the Favorites menu.
To rename a favorite from the Add to Favorites Window:
When you add a task or folder as favorite the Add to Favorites window appears.
-
Clear the name that is displayed in the Favorites field.
-
Enter the new name.
-
Click Create Favorite.
The new name of the favorite appears in the Favorites menu.
3.4.6 Removing Favorites
You can remove or delete a favorite in the following ways:
To remove a favorite from the Favorites menu:
-
Click Favorites.
-
Right-click the favorite which you want to remove.
-
Select Remove From Favorites.
-
On the Remove Favorite dialog box, click OK.
JD Edwards EnterpriseOne removes the favorite from the Favorites menu.
To remove a favorite from the Manage Favorites window:
-
Access the Manage Favorites window.
-
Select the favorite that you want to remove.
-
Click the Remove Favorite icon next to the selected favorite.
-
On the Remove Favorite dialog box, click OK.
JD Edwards EnterpriseOne removes the favorite from the Favorites menu.
To remove all the favorites:
From the Manage Favorites window, click Delete All.
All the favorites are removed from the Favorites menu.
3.4.7 Reordering Favorites
You can arrange favorites in the order you prefer them to appear in the Favorites menu. To reorder favorites:
-
Access the Manage Favorites window.
-
Drag and drop the favorites in the order you want them to appear.
The Favorites menu displays the favorites in the sequence you arranged.
3.4.8 Reorganizing Favorites
You can create new folders to organize your favorites. To create a folder:
-
Access the Manage Favorite window.
-
From the Manage Favorites window, click New Folder.
-
Use the default folder name or enter the name for the folder.
-
Click outside the folder name field or press the Tab key on keyboard.
A user-created favorite folder is created.
In the Manage Favorites window, you can drag and drop the favorites into the user-created favorite folder to organize your favorites.
You can view the content of the user-created favorite folder by clicking the Manage user-created folder icon, on the left side of the user-created folder's name.The favorites appear in the order you added them in the user-created folder. To navigate back to the main view of the Manage Favorites window, click the Back button.
Note:
You cannot drag and drop a user-created folder into another folder.3.5 Accessing Carousel Container
A carousel is a generalized container that holds objects which can be activated. These objects are displayed on tiles arranged from left to right, and you can flip through these tiles. The carousel container provides quick access to the open applications, batch versions, and favorite JD Edwards EnterpriseOne applications and batch jobs.
Note:
The carousel is to JD Edwards EnterpriseOne as the taskbar is to Microsoft Windows.To access the carousel container, click the bar along the inside edge at the bottom of the browser window. Click this bar to toggle between minimized and maximized modes of the carousel container.
When the carousel is minimized, only the toggle bar is visible, and the arrow points out from the edge towards the center of the page. The carousel tiles are linear and have two distinct ends.
Click the Move icon, next to the Favorites tab, to hide and unhide the tabs of the carousel container.
3.5.1 Carousel Tiles
The carousel tile uses a background image to indicate what type of tile it is. For example, application tiles have a different icon to distinguish them from UBE's.
Each carousel tile contains text describing the application or UBE with which it is associated. For example, an application tile lists the application name, form name, and application title.
Click the tile in the carousel container to open the task. As shown in the following example, the tile that represents the application that is currently open is highlighted.
You can change the carousel tile size by accessing Preferences dialog from the Personalization drop-down menu. Select or deselect the Use Large Icons in Carousel checkbox and click the Save and Close button.
The carousel container contains the following three tabs:
-
Open Applications
-
Recent Reports
-
Favorites
3.5.1.1 Open Applications
Each application that is open is represented as a tile in the Open Applications tab of the carousel container. Click the tile in the Open Application tab to bring a specific application to the forefront.
Note:
Open applications are also listed under the Open Applications drop-down menu.Hover over the tiles in the Open Applications tab to view the details of each application.
3.5.1.2 Recent Reports
The Recent Reports tab displays all of the recently submitted reports (batch versions). Click the first tile, which represents Submitted Jobs, to open Submitted Job Search (P98305W).
Hover over the report tiles to view report, version, status, submitted date, and last activity as shown in the following example.
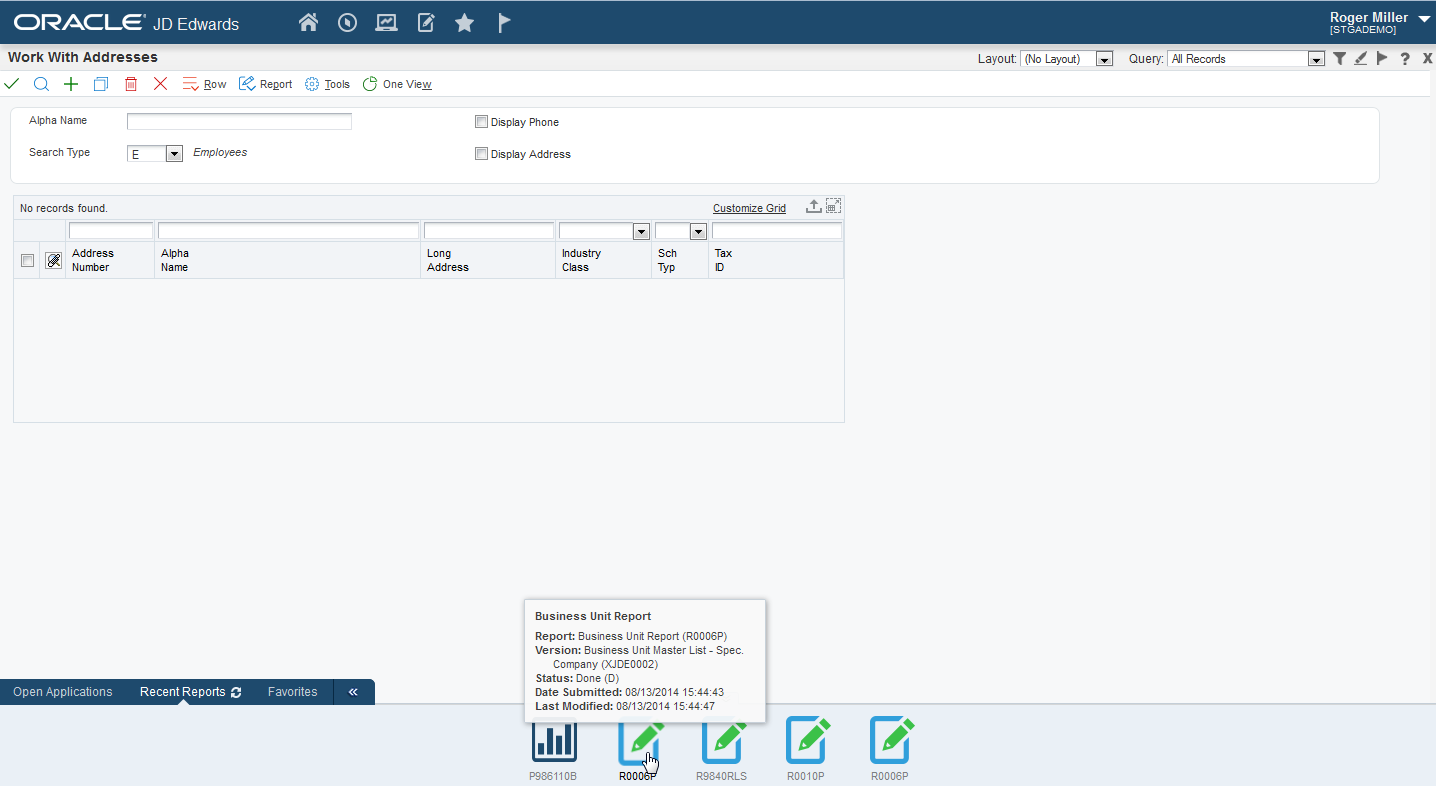
The tiles that represent the reports display visual cues to help you identify the status of the reports. The status of a report is conveyed by the color of the pencil icon in the tile. For example, Green = Done (D), Red = Error (E), Blue = Submitted (S)/Waiting (W)/Processing (P), Yellow = Held (H).
Note:
Use the Refresh icon to trigger an immediate update.3.5.1.3 Favorites Tab (Release 9.1 Update 2)
The items that you add as favorites from the JD Edwards EnterpriseOne menu also display on the Favorites tab in the Carousel. When the Carousel is docked on the bottom of EnterpriseOne, favorite items display on the Favorites tab. When the Carousel is docked on the side of EnterpriseOne, favorite items display in the Favorites section. In most cases, Favorites performs the same no matter where the Carousel is docked. However, there are some instances where functionality differs slightly, and these will be noted in this documentation. This documentation describes Favorites and its performance while docked at the bottom of EnterpriseOne. The Favorites tab can contain three types of tiles: task folder tiles, user-defined folder tiles, and task tiles.
When you open the Favorites tab and click a parent-level task folder or user-defined folder located there, EnterpriseOne adds a tab to the tab bar. This new tab displays the task folder or user-defined folder name and all the contents of that folder. When you double-click a sub-folder, a '^' appears on the left side of the tab. The '^' indicates that there is a higher-level folder. When you click the '^', the higher- level folder and its contents appear.
When you create a user-defined folder, you can include in it tasks and task folders, but not additional user-defined folders. However, task-folders can, and often do, contain other task-folders as well as tasks, though you cannot add a task-folder or task to any existing task-folder. If you click a task folder contained within another task-folder, the current tab displays the new task folder name. If you hover above a task folder, a list of everything within that folder displays in a box near the cursor. You can change the name of the parent-level task folder at the Favorites level but you cannot change the names of items in the folder or the structure of its contents. You cannot change the name of the task folder, or its contents. If you click a task, the appropriate application launches.
![]() Tutorial:
Tutorial:
3.5.1.4 Organizing Favorites (Release 9.1 Update 2)
The Favorites tab can contain one or all of the following tiles:
-
User-defined folder
-
Task folder
-
Task
You can move task or task-folder tiles from the Favorites tab to a user-defined-folder tab and you can move those tiles back from a user-defined-folder tab to the Favorites tab. You cannot move user-defined folder tiles from the Favorites tab.
To move a task folder or task tile, click the tile, hold the mouse button until a red border appears, and then drag the tile over the user-defined folder tile to where you want the tile moved. The user-defined folder tile displays a grey background and a green border when it is activated to receive an acceptable tile. Release the mouse button to drop the tile. The tile will be moved to the user-defined folder's content.
You can also move a task folder or task tile by briefly holding (or hovering) a tile over an open user-defined-folder tab or Favorites tab. The tab is activated and enables you to view the contents of that tab. It also indicates that you can drop the tile into the existing content on the receiving tab.
Note:
When the Carousel is docked on the side of EnterpriseOne, you hold the tile over a user-defined section. When the section is ready to receive the tile, it will be highlighted in grey and display green borders. Releasing the tile when the section is activated will drop the tile into the section. The tile is positioned at the end of the section.EnterpriseOne ensures that you drop Favorite task tiles or task-folder tiles to an appropriate location. An appropriate location is one where the tab is activated to receive a tile, and the tile meets the criteria to be moved and dropped. If the location in which you are trying to drop is not appropriate, it will either move out from underneath the tile you are dragging or change the mouse icon to ”not-allowed,” indicating that either the location to which you are trying to drop is not activated or the tile you are dragging does not meet the criteria to be moved and dropped.
3.5.1.5 Ordering Tabs
You can change the order in which the tabs display by dragging and dropping them to a different location on the Carousel tab bar. The tab order will be the same if the Carousel is docked in the horizontal or vertical position. When you log out and login back into EnterpriseOne, your latest changes to the tab order are retained.
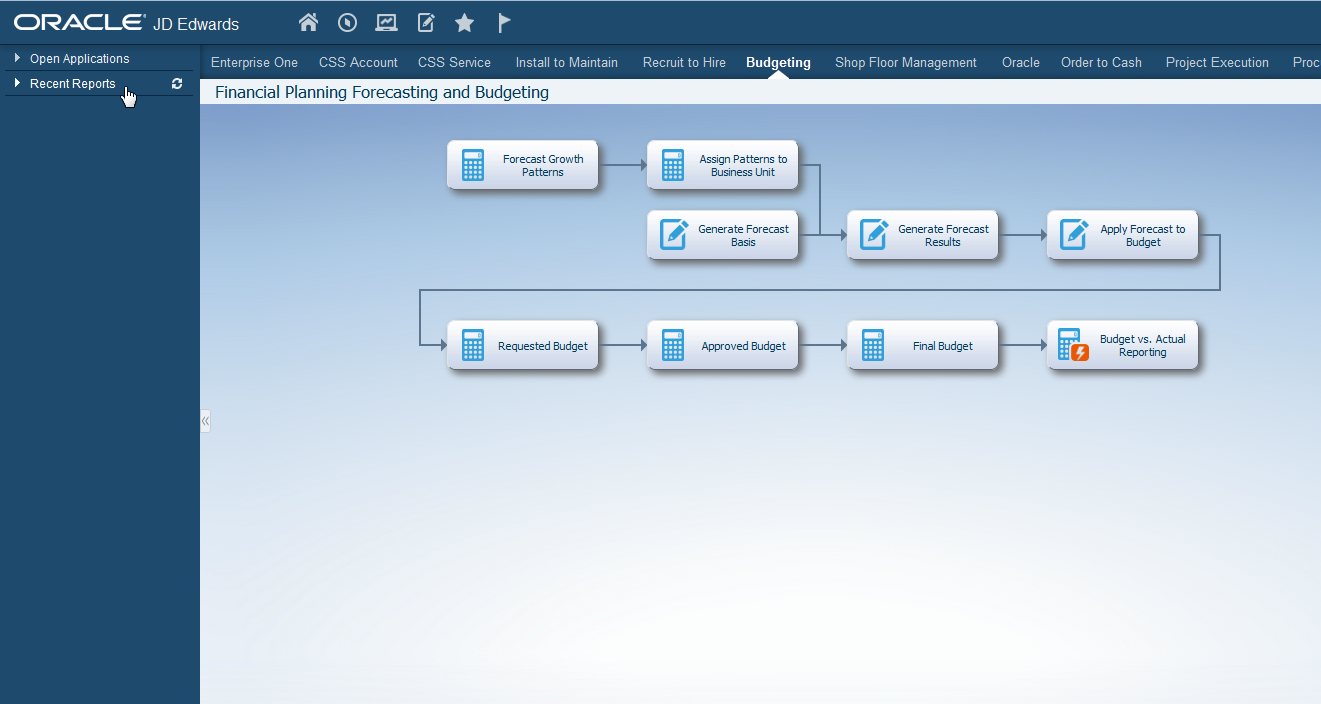
3.5.1.6 Hiding and Showing Recent Reports, Open Applications, Favorites Tabs and Sections (Release 9.1 Update 3)
You might want to hide the Recent Reports, Open Applications, and Favorites default tabs if you never use them, use them infrequently, or just want more space on the screen. The changes you make to the Carousel are saved and remain when you log off and log back into EnterpriseOne.
Note:
This document refers to ”tabs” if you have docked the Carousel on the top or bottom of the screen, and ”sections” if you have docked the Carousel on either side of the screen.If you hide any of these tabs or sections, you can show them again at any time.
You can hide only two of the default tabs or sections. You must have at least one tab or section visible at all times.
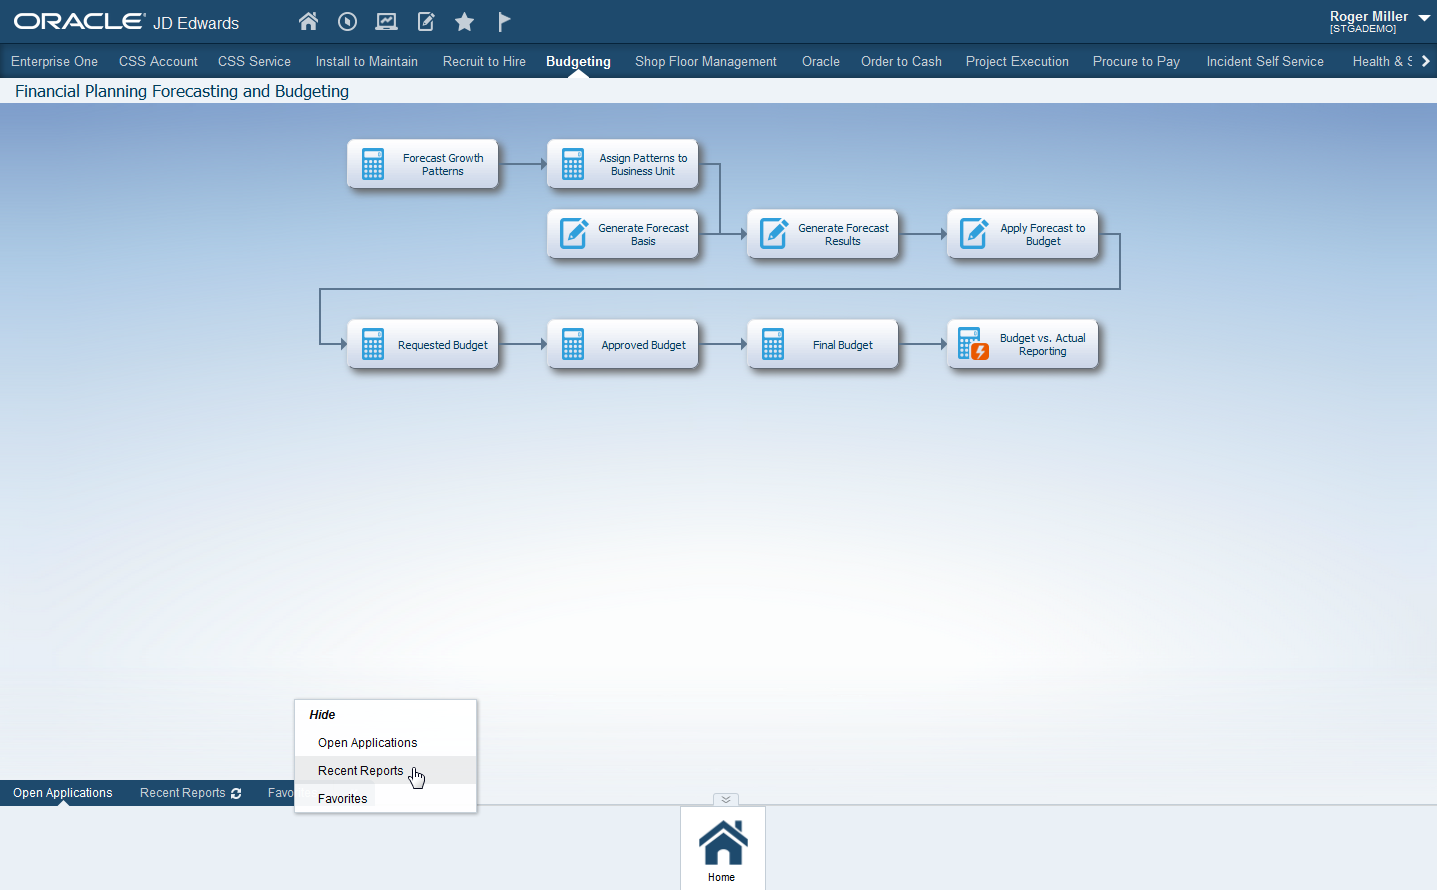
To hide a default tab when the Carousel is docked on the top or bottom of the screen, right-click the tab, then click the tab name in the Hide pop-up window that displays, as shown in the following graphic:
To hide a default tab when the Carousel is docked on the side of the screen, right-click the tab, then click the tab name in the Hide pop-up window that displays, as shown in the following graphic:
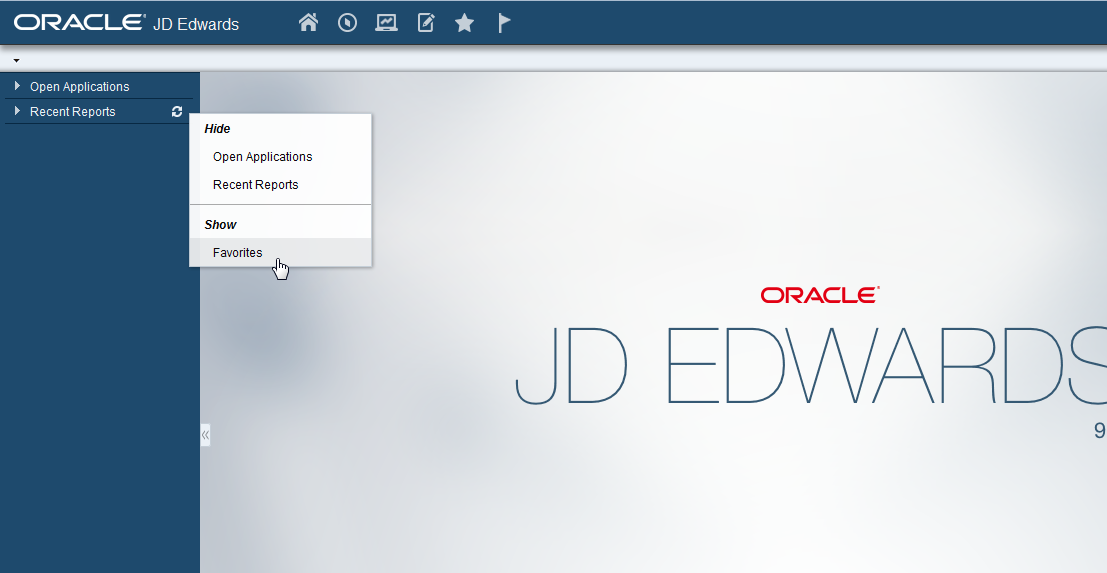
In the following graphics, the Favorites tab and section are hidden:
Figure 3-10 Favorites Tab Hidden on Bottom
Description of "Figure 3-10 Favorites Tab Hidden on Bottom"
When you hide a default tab, the change is reflected wherever the Carousal is docked. For example, if you make the change when the Carousal is docked at the bottom of the screen, then move it to the side, the changes remain.
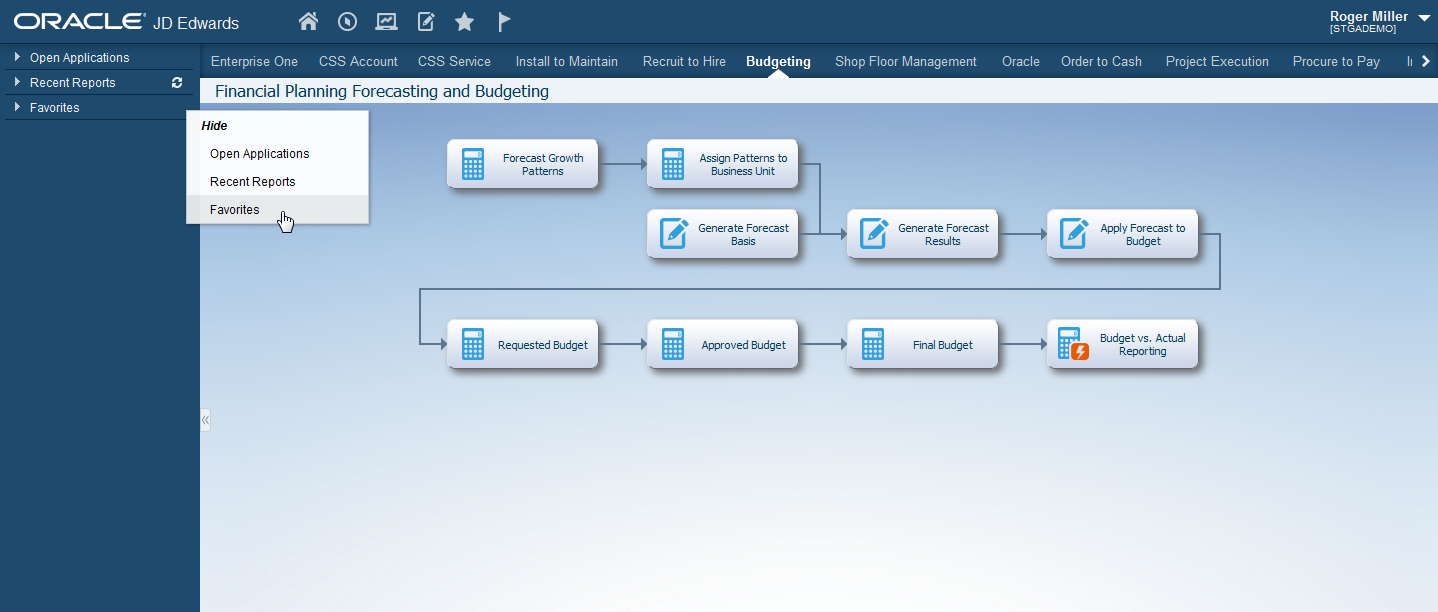
To show the tab or section again, right-click the remaining tabs or sections, and select the tab or section name under Show, as shown in the following graphics:
Figure 3-12 Favorites Show Pop-Up Window Bottom

Description of "Figure 3-12 Favorites Show Pop-Up Window Bottom"
Figure 3-13 Favorites Show Pop-Up Window Side
Description of "Figure 3-13 Favorites Show Pop-Up Window Side"
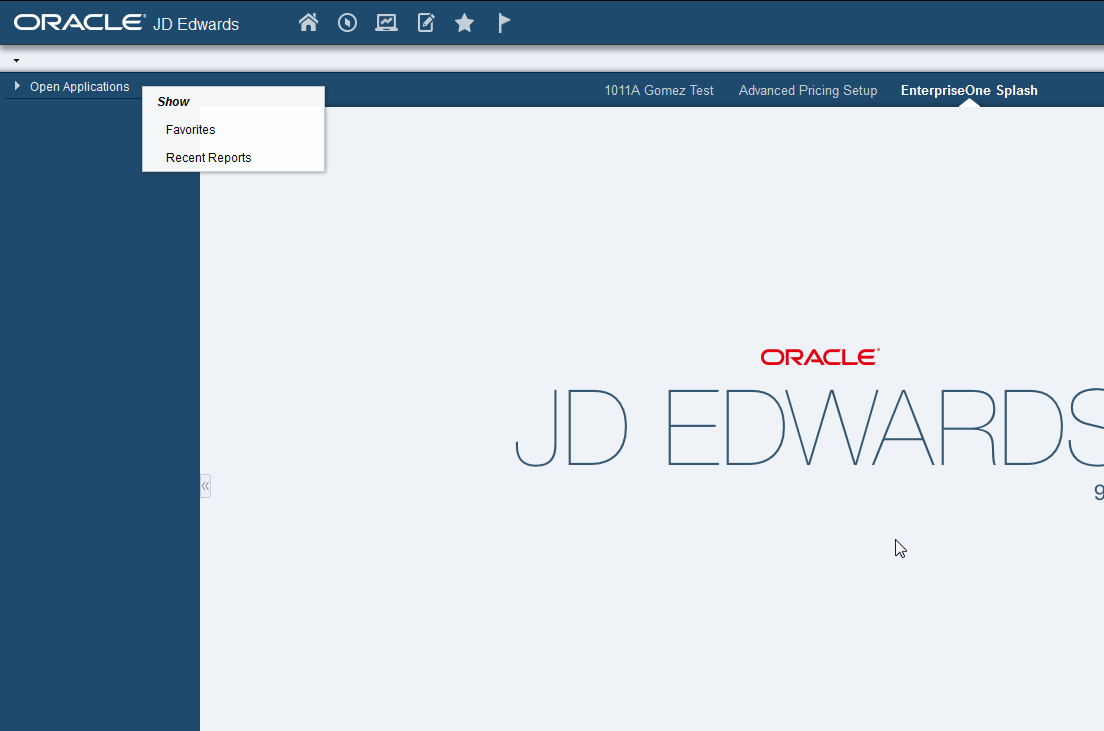
EnterpriseOne does not enable you to hide all three default tabs or sections at once; instead, you can only hide two at a time. Therefore, since you must have one tab or section shown at all times, EnterpriseOne gives you only the option to Show if you have already hidden two tabs, as shown in the graphics below:

3.5.2 Carousel Position
The carousel can be docked along any of the four edges of the browser window.
By default, the carousel is docked along the bottom of the browser page.
You can change the carousel position by dragging and dropping the carousel to a new position. When docked along the top or bottom of the browser window, the tiles are displayed horizontally. When docked along the right or left, the tiles are displayed vertically.
When the carousel is docked along the top or bottom of the browser window, you can click on the caption text of the tile to cycle through the different options.
JD Edwards EnterpriseOne saves the carousel position. Next time you log into the JD Edwards EnterpriseOne application, the carousel appears at the bottom, top, left, or right position depending on the setting during your last session.
3.6 Using the Grid
This section provides an overview of the grid and discusses how to:
-
Create a Grid Format.
-
Create a Grid Format for Pervasive Devices.
-
Apply a Grid Format.
-
Change a Grid Format.
-
Delete a Grid Format.
-
Hide and Show Grid Columns.
-
Freeze and UnFreeze Grid Columns.
-
Rearrange Grid Columns.
-
Set Grid Color and Font.
-
Change Grid Column Width.
-
Change the Sort Sequence of a Grid.
-
Export All Records from a Grid.
-
Export Detail Area Content to Microsoft Excel, Word or to a Comma Separated Values File.
-
Import Data from an External Spreadsheet to a Grid.
-
Customize the Grid Dynamically.
-
Copy and Paste Grid Data.
3.6.1 Understanding the Grid
Similar to find/browse forms, hierarchical grids, or parent/child browse forms, are used to query business views (BVs) and select records from BVs for operations. However, instead of a default grid control, hierarchical grids contain a default parent child control. Whether or not you have hierarchical grids depends on if your system administrator incorporated them into the applications you use.
The following table describes the features of the hierarchical grid:
| Feature | Description |
|---|---|
| Cut, Copy, and Paste | You can cut, copy, and paste a node in the tree. Cutting a node copies the data of a node and marks the node as being cut. Copying a node copies the data of a node. Pasting a node pastes the node as the last child of the new node. If the node is copied, the original node stays. If a node has been cut, the original node is removed. Cancel Cut will cancel the operation. Use the copy, cut, and paste buttons located on the toolbar of the grid to perform these functions. |
| Indent/Outdent | You can change the indentation of a tree node. Use the Indent and Outdent buttons located on the toolbar of the grid to perform these functions. |
| Expand All | You can expand all the nodes in the tree. Use the Expand All button located on the toolbar of the grid to perform this function. |
| Collapse All | You can collapse all the nodes in the tree. Use the Collapse All button located on the toolbar of the grid to perform this function. |
| Fully Expand One Tree Node | You can fully expand a selected tree node. When this happens, all cascading children of the selected tree node will be displayed. Use the Expand All button to perform this function. |
| View Location Number | If your system administrator has turned on the View Location Number option, you see a number beside each tree node. Use this number to determine the location of the tree node within the tree. |
| Flat Display Tree | You can make all tree nodes display on one vertical level. Child nodes are not indented. |
| Select All Children | You can select all of the children in a node. Use the Select All button located on the toolbar of the grid to perform this function. |
| Editable Parent Child | You can edit the tree column and all the grid columns in the hierarchical grid. |
| Change Data Dictionary Item on the Fly | You can display custom selected columns in a user defined sequence. |
| Vertical Scrolling Keeps Column Header | When scrolling down grid data, the grid column header remains visible. |
3.6.2 Understanding Grid Icons and Buttons
This table shows the icons and buttons that might display on the grid. Whether or not you see any of these icons or buttons depends on if the application you are using was designed to display them. You might see a variation of these icons and buttons, depending on the application in which you are working.
| Icon | Description |
|---|---|
| Delete | |
| Edit | |
| Lock | |
| Unlock | |
| Move Up | |
| Move Down | |
| Price | |
| Attach | |
| Copy | |
| View | |
| Toggle Off | |
| Toggle On | |
| Weigh |
3.6.3 Creating a Grid Format
Your ability to create a grid format depends on whether or not your system administrator has enabled the Customize Grid option. If you do not see the Customize Grid option in the blue bar located at the top of the grid, you do not have permissions to customize the grid.
If you want to recall the default format, save the original grid format before you save a new format. Otherwise, you must remove the new format, exit the application, and then access the application again to view the default grid format.
Note:
Columns that you are required to use have an asterisk beside the column name. You cannot remove these required columns from your grid format.Access the application for which you want to create a new grid.
-
Launch the application for which you want to create a new grid format and click the Customize Grid link
-
On Select Grid Format, click the Create button.
-
Enter a name for the format in the Grid Format Name field.
-
Complete the rest of the options as desired, and click the OK button.
-
Click the Close button.
3.6.4 Creating a Grid Format for Pervasive Devices
Access the JD Edwards EnterpriseOne web client.
-
Using the JD Edwards EnterpriseOne web client, launch the application for which you want to create a grid format for pervasive devices.
-
Click Customize Grid and select the format that you want to use for pervasive devices.
If you have not created the format, do so now. Follow the same steps for creating the format that you use for creating a web-based format. However, keep in mind the limited space and color options offered by most pervasive devices when you decide about columns to display, column widths, column and text colors, and so forth.
-
Click Default for Mobile Device and click Close.
3.6.5 Applying a Grid Format
Access a form with a grid.
On any form with a grid, select a grid format from the drop-down list next to Customize Grid.
You must create one or more grid formats before you can apply a grid format.
3.6.6 Changing a Grid Format
Your ability to change a grid format depends on whether or not your system administrator has enabled the Customize Grid option. If you do not see the Customize Grid option in the blue bar located at the top of the grid, you do not have permissions to customize the grid.
Note:
Columns that you are required to use have an asterisk beside the column name. You cannot remove these required columns from your grid format.Access the application containing the grid format that you want to change.
-
Click the Customize Grid link.
-
On Select Grid Format, select the grid format that you want to change and click the Modify button.
-
To change the name of the grid format, enter a new name in the Grid Format Name field.
-
Change other elements of the grid as desired and click the OK button.
-
Click the Close button.
3.6.7 Deleting a Grid Format
Your ability to delete a grid format depends on whether or not your system administrator has enabled the Customize Grid option. If you do not see the Customize Grid option in the blue bar located at the top of the grid, you do not have permissions to delete the grid format.
Access a form with a grid.
-
On any form with a grid, click the Customize Grid link.
-
On Select Grid Format, select the grid format that you want to delete and click the Delete button.
The grid format disappears from the list.
-
Click the Close button.
3.6.8 Hiding and Showing Grid Columns
When you work with forms that have grid columns, you can hide one or more columns that you might not need. You can show the hidden columns when you need them.
You can use one of these methods to hide and show grid columns.
-
Customize grid link.
-
Right-click in column header.
Note:
Columns that you are required to use have an asterisk beside the column name. You cannot remove these required columns from your grid format.3.6.8.1 Customize Grid Link
Access the application containing the grid you want to change.
-
Click the Customize Grid link and either create a new format or select an existing one to modify.
-
On Customize Grid, scroll to the Display and Order section.
-
To prevent a column from showing on the grid, select it in the Display and Order list, and then click the left arrow.
-
To make a column appear on the grid, select it in the Available Columns list, and then click the right arrow.
-
Use the up and down arrows to change the order in which the system displays the columns on the grid.
-
When finished, click the OK button, and then click the Close button.
3.6.8.2 Right-Click in Column Header
Access the application containing the grid you want to change.
-
Click the drop-down menu next to the Customize Grid link and either select Show All Columns to create a new grid format or select an existing grid format to modify.
-
Right-click the header of the column that you want to hide.
-
Select the Hide option from the context menu
-
Click the Save icon to save the grid format.
If you are creating a new grid format, the Enter Format Name window appears. Enter a new grid format name and click the OK button.
-
To make a hidden column appear on the grid, right-click in any column header.
Note:
If you do not save the grid format, the column is hidden until you exit the application. The hidden column will be visible when you log into the JD Edwards EnterpriseOne application again -
On the context menu, select Unhide, then select the hidden columns that you want to appear on the grid, and then click OK.
3.6.8.3 Maximizing and Restoring the Grid
Access the application containing the grid you want to change.
The Maximize Grid and the Restore Grid icons in the grid enable you to toggle between maximized and restored modes of the grid.
Click the Maximize Grid icon, to display only the grid, and to hide all of the other fields in the form.
Click the Restore Grid icon in the grid to restore the grid as well as all of the other fields in the form.
3.6.9 Freezing and Unfreezing Grid Columns
You can freeze grid columns on JD Edwards EnterpriseOne form grids that have a horizontal scroll bar. This is helpful when you want to enter data into a selected number of columns in an editable grid. Also, this helps you to view and compare the data in different columns.
You can view two areas of a grid by freezing columns in the left side of the grid.
Only the left side of the grid can be frozen. The columns that are to the right side of the frozen grid can be scrolled. You can scroll through all of the rows by using the vertical scroll bar.
The functionalities in Row Selector, Media Object Attachments Column, Row Exit context menu and QBE fields are supported in the frozen area. Other functionalities such as Resize Column, Reorder Column and so on are not supported in the frozen area but are supported in the non-frozen columns.
Note:
The Freeze functionality is available only in the grids that have a horizontal scroll bar.Hide and Freeze functionalities are not supported for Accessibility users.
You cannot Freeze the right-most part of the grid. If you right-click the right-most column's header and select the Freeze option, a pop-up message saying 'Cannot Freeze at the right part of the grid' is displayed.
Freeze and unfreeze functionality is supported for both editable and non-editable grids.
3.6.9.1 Non-Editable Grids
If you select Freeze option in non-editable browse grids when the horizontal scroll bar is not set to the left-most position, the columns that are visible to the left side of the selected column header, including the selected column, will be frozen.
As shown in the following example, if you select the Freeze option, the columns from Description 1 to Unit Price are frozen.
Figure 3-16 Freeze functionality in Non-Editable Grids
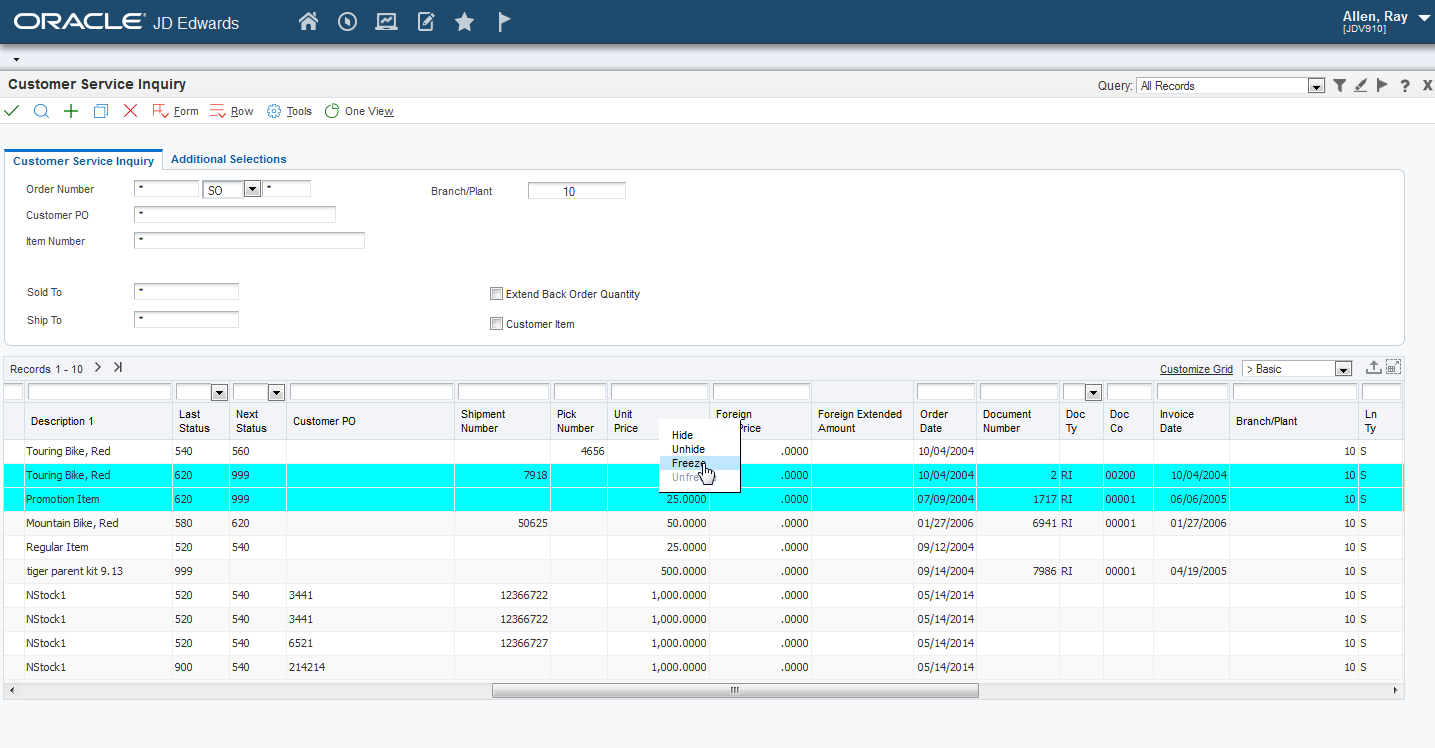
Description of "Figure 3-16 Freeze functionality in Non-Editable Grids"
The columns before the Description 1 column are frozen and hidden; that is, you cannot see or scroll the columns before the Description 1 column as shown in the following example.
Figure 3-17 Freeze functionality in Non-Editable Grids
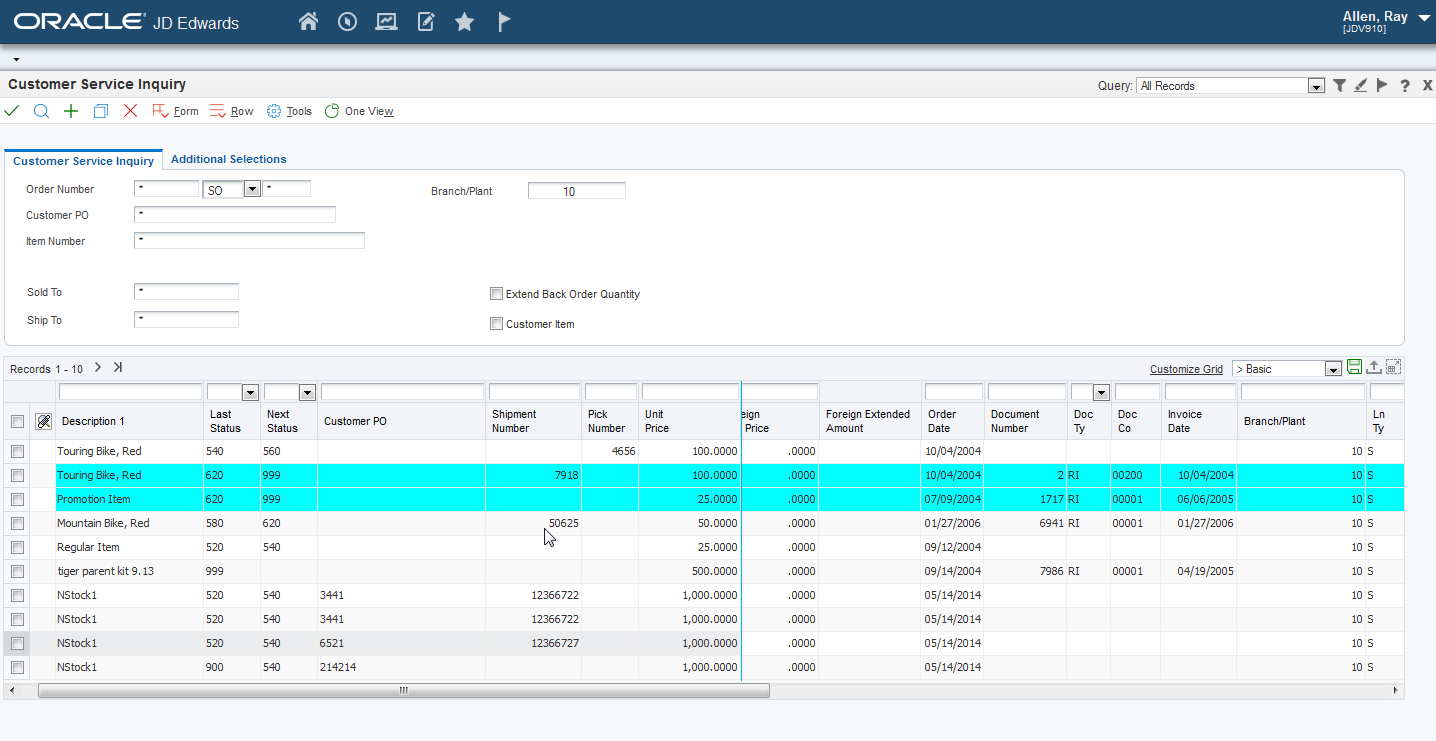
Description of "Figure 3-17 Freeze functionality in Non-Editable Grids"
3.6.9.2 Editable Grids
In editable grids, you must set the horizontal scroll to the left-most position of the grid to use the Freeze functionality. If you right-click the column header and select the Freeze option when the horizontal scroll bar is not set to the left-most position, a pop-up message saying 'Please set the horizontal scroll bar to the left-most position of the edit grid to use Freeze functionality.' is displayed.
The frozen column in an editable grid acts as an Auto Return column. If you press the TAB key when the focus is in the last cell in the frozen column, the focus is set to the first editable cell of the next row (instead of setting the focus to the next editable cell in the unfrozen column.)
3.6.9.3 Freezing and UnFreezing Grid Columns
Access the application containing the grid you want to change.
-
Right-click the column header of the grid you want to freeze.
-
Select the Freeze option from the context menu.
The columns that are visible to the left side of the selected column header, including the selected column will be frozen.
A blue vertical line separates the frozen columns on the left side and the other columns in the unfrozen area.
-
To unfreeze the columns, right-click in any column header and select the Unfreeze option from the context menu.
Note:
The column header context menu closes automatically if you click anywhere else in the form or grid.![]() Tutorial:
Tutorial:
3.6.10 Rearranging Grid Columns
Access the application containing the grid you want to change.
-
Click the Customize Grid link and either create a new format or select an existing one to modify.
-
On Customize Grid, scroll to the Display and Order section.
-
In the Display and Order list, click a column name and use the up and down arrows to move it up or down in the list.
The system displays the columns in the list in the order in which they appear from top to bottom. In other words, the column at the top of the list appears first on the grid, the column second from the top appears second on the grid, and so forth.
-
Repeat step 4 for any other columns that you want to move.
-
When finished, click the OK button, and then click Close.
3.6.11 Setting Grid Color and Font
Access the application containing the grid that you want to change.
-
Click the Customize Grid link and either create a new format or select an existing one to modify.
-
On Customize Grid, scroll to the Display and Order section.
-
Click a column name in the Display and Order list.
The column name appears in the Selected Column field.
-
To apply a background color to the column, click a color in the pallet under Column Color.
The hexadecimal value for the color that you chose appears in the Column Color field.
-
To apply a color to the text in the column, click a color in the pallet under Text Color.
The hexadecimal value for the color that you chose appears in the Text Color field.
-
To apply a font style such as bold or italics to the text in the column, click the styles that you want to apply in the Text Options list.
-
Click the Update Style button.
The system updates the Selected Column field to show you how your choices will look. The system also places a plus sign next to the column name in the Display and Order list. This symbol indicates that user-defined formatting will be applied to the column.
-
Repeat steps 4-8 to apply formatting to additional columns in the grid.
-
When finished, click the OK button, and then click the Close button.
3.6.12 Changing Grid Column Width
Access the application containing the grid that you want to change.
-
Click the Customize Grid link and either create a new format or select an existing one to modify.
-
On Customize Grid, scroll to the Display and Order section.
-
Click a column name in the Display and Order list.
The column name appears in the Selected Column field.
-
Enter a percentage value in the % Column Width field.
This value is the percentage of the space that you want the system to allot to the column based on the width defined for the data item on which the column is based. You can enter a value between 25 and 400.
-
When finished, click the OK button, and then click the Close button.
3.6.13 Changing the Sort Sequence of a Grid
Access the application containing the grid that you want to change.
-
Click the Customize Grid link and either create a new format or select an existing one to modify.
-
On Customize Grid, scroll to the Data Sequencing section.
-
If you want to sort on a column, click the column name in the Available Columns list, and then click the right arrow.
The system moves the column name from the Available Columns list to the Sequenced Columns list.
A column must be included in the grid-that is, its name must appear in the Display and Order list-before you can sort on it.
-
If you do not want to sort on a column, click the column name in the Sequenced Columns list, and then click the left arrow.
The system moves the column name from the Sequenced Columns list to the Available Columns list.
-
To rearrange the order of sort precedence, use the up and down arrows under the Sequenced Columns list to rearrange the column names.
The system first sorts by the column at the top of the list, then by the column second from the top, and so forth.
-
To sort column values in ascending order, click the column name in the Sequenced Columns list and select the Ascending check box.
If you leave the Ascending box blank, the system sorts the column in descending order.
An A appears next to the column names to be sorted in ascending order, and a D appears next to the column names to be sorted in descending order.
-
When finished, click the OK button, and then click the Close button.
3.6.14 Exporting All Records from a Grid
You can export all records from a grid, rather than choosing a range of records to export.
-
Launch an application with a detail area, and then click the Find button to load the detail area with records.
-
Click the Tools icon, and then click the Export Grid Data menu. You can also click the Export Grid Data icon in the grid.
-
On Export Assistant, select one of these options:
-
Export To Excel
Note:
If you select this option, also select whether you want to export to a new workbook or an existing workbook. -
Export To Word
-
Export To Comma Separated Values (CSV) File character encoding
-
-
Select the Export All option.
-
Click Continue.
3.6.15 Exporting Detail Area Content to Microsoft Excel, Word, or to a Comma Separated Values File
Access an application with a grid.
-
Launch an application with a grid, and then use Find to load the detail area with records.
-
From the Tools menu, click Export Grid Data. You can also click the Export Grid Data icon in the grid.
-
On Export Assistant, select one of these options:
-
Export to Excel
If you select this option, select if you want to export the data to a new workbook, or an existing workbook.
-
Export to Word
-
Export to Comma Separated Values
-
-
Select Export All to export all the data in the grid, or clear the Export All check box to export a range cells within the grid containing data that you want to export.
If you clear the Export All check box, then you must select on the grid the range of cells you want to export. First, click the cell where you want the range to begin, then click the cell where you want the range to end.
If you click the wrong cell, click Reset Selection.
-
Click Continue.
The system exports the detail area contents that you selected to the appropriate file type and displays it.
3.6.16 Importing Data from an External Spreadsheet to a Grid
You can import data from an external spreadsheet into a grid in EnterpriseOne. The external grid must be in CSV or Excel format. EnterpriseOne enables you to choose a range of data by entering the beginning and ending row and column where the data resides in the spreadsheet.
Access an application with a grid.
-
From the Tools menu, choose Import.
-
Click the Import from Excel or the Import From Comma Separated Values (CSV) option.
If you choose the CSV option, the Excel file and Worksheet name options are hidden.
-
In the Excel file field, enter the location where the external spreadsheet from which you want to import data resides. You can also click the Browse button located beside the field and navigate to the file.
-
In the Starting Cell fields, in the Col and Row fields, enter the co-ordinates of the first cell in the range of cells you want to import from the external file.
-
In the Ending Cell fields, in the Col and Row fields, enter the co-ordinates of the last cell in the range of cells you want to import from the external file.
-
Click one of the following options:
-
Insert (Import new rows at column A, row 0 of the grid): click this option if you want to add the rows you identified to the beginning of the grid. This option does not overwrite the existing data that resides in the grid; rather, it adds the rows to the existing data.
-
Paste: click this option if you want to overwrite the existing data that resides in the grid. With this option, you can paste the new rows anywhere in the existing grid. If you paste a range of data that exceeds the existing range of data in the grid, EnterpriseOne appends the new data after the last row of the grid data. These new rows are new, not overridden.
If you choose Paste, the Select Paste Location in Grid fields become active. Enter the first cell location where you want to paste the data.
You can click Reset to undo your changes and to return the initial data that was in the grid when you first entered the Import Assistant.
-
-
Click Apply.
Importing and Exporting to the Clipboard
Exporting/importing to the Clipboard is available in ActiveX mode and HTML mode. When HTML mode is enabled the following options are removed:
-
Export to Word
-
Import from Excel
The clipboard functionality replaces these options when in HTML mode.
To export data to the clipboard:
-
Navigate to the Export Assistant
-
Select Export to Clipboard.
-
Define the cell range in the Export Assistant.
-
Click the Apply button.
-
Press Ctrl+C to copy the data to the clipboard.
To Import Data from the Clipboard:
-
Navigate to the source data.
-
Copy the desired data.
-
Navigate to the Import Assistant from the target application.
-
Select Import From Clipboard.
-
Define an import location.
-
Press Ctrl+V in the Import Assistant to view the data in the preview grid.
-
Click the Continue button to complete the import.
3.6.17 Customizing the Grid Dynamically
JD Edwards EnterpriseOne enables you to dynamically customize a grid. ”Dynamically” means that you are able to make changes directly to a grid on which you are working. You can change column widths, arrangement. You can save these changes and use them in any application where dynamic grid formatting is enabled.
To change column width:
-
Navigate to an application grid that you want to modify.
-
Click the right side of the column and, while holding down the left mouse button, drag it to the desired width.
To rearrange columns:
-
Navigate to an application grid that you want to modify.
-
Click the top of the column and, while holding down the left mouse button, drag it to the desired location and release the mouse button.
To save the changes you have made to the grid:
-
Navigate to an application grid that you want to modify.
When you customize a grid, the page refreshes and a Save icon displays in the upper-right corner of the grid, beside the grid format name.
-
Click the Save icon on the grid. If prompted, type a name in the field that is located beside it.
When you log into the application again, your saved grid format is available.
3.6.18 Copying and Pasting Grid Data
In JD Edwards EnterpriseOne, you can select a single cell or a range of cells that contains grid data to copy and paste into any EnterpriseOne editable grid. An editable grid is one in which you can enter or delete data. You can also paste grid data into a tab delimited spreadsheet, like Microsoft Excel. You deselect cells by pressing the F5 button on your keyboard, or by clicking outside of the grid.
The ”start cell” is the first grid cell you click to begin selecting a range of cells. The ”end cell” is the last grid cell you click to end selecting a range of cells. The cells you select to copy can be editable or non-editable.
To copy and paste grid data:
Navigate to an application grid that contains the data that you want to copy.
-
Select a range of cells to copy by completing one of the following actions:
-
Click the start cell and, while holding down the left button, drag the mouse to the end cell. If the start cell is editable, you cannot use this action to select a range of cells. Instead, use the action described below.
-
Click on the start cell and while pressing the Shift key on your keyboard, click on the end cell. You can expand the range of cells you have already selected by pressing the Shift key and clicking on a different end cell.
As you move your cursor toward the scroll bar, the grid will automatically begin scrolling so that you can select a cell outside of those that are currently visible on the grid.
-
Click the check box located beside a record. Press the Ctrl+C keys on your keyboard.
This option only works if you have not selected a range of cells as described in option A or B.
-
-
Press the Ctrl+C keys on the keyboard.
The grid data that you selected is copied to the EnterpriseOne clipboard, which is located at the following location: \WINDOWS\system32\clipbrd.exe
-
Navigate to an editable grid, and place your cursor in an editable cell.
It is important that you notice in which columns you are pasting the grid data. EnterpriseOne enables you to paste the grid data in any field on an editable grid, regardless of whether or not the columns match up. Therefore, you can paste grid date from an Alias Name column into an Address column, and EnterpriseOne will not correct the action.
-
Press the Ctrl+V keys on the keyboard.
EnterpriseOne pastes the data into the grid.
3.7 Working with Records
The section provides an overview of records and discusses how to:
-
Locate Records Using Specific Selection Criteria
-
Use the Query-by-Example Line
-
Locate Records Using Wildcard and Operators
-
Work with Search Criteria
-
Choose a Record
-
Add a Record
-
Change a Record
-
Delete a Record
3.7.1 Understanding Records
Databases store information in units called records. Each record might contain more than one item of information. For example, Dominique Abbott is an item of information in the EnterpriseOne system. When you access Dominique Abbott from the Address Book application, the record that appears might also include Dominique's phone number, address, and other pertinent information. The system might save all of this information as one record, or it might save some of this information as a primary record and other information as secondary records. These types of relationships exist throughout the system. Database tables store all system records. Each record must have at least one key that links the record to a database table. Keys are unique identifiers that distinguish one record from another. For example, Address Book uses Address Number as the key to distinguish each record. Therefore, each Address Number must be unique. When creating new records, you must enter information into a key field. If you do not enter information into a key field, the system displays an error message. Once you have entered information into a key field, you cannot edit that key field later. To change the key field information, you need to create a new record. The Media Objects feature allows you to add notes, graphics, and other objects to records.
3.7.2 Locating Records Using Specific Selection Criteria
Selection criteria defines your search by specific types of records. For example, you can include information in filter fields such as Name Search and Search Type to search only for employees whose names begin with the letter A.
-
On Work With Addresses, complete the Search Type field.
If you do not know the Search Type, use the Search button to view a list of user defined codes.
-
Click the Find button.
A list of matching records appears.
3.7.3 Using the Query-by-Example Line
You can use the query-by-example line to search for records by a grid column. For example, if you are searching for a person by name, enter all or part of the name in the query-by-example line directly above the Alpha Name column in the grid. The information that you enter in the query-by-example line must be a valid value for the column. If it is not, the system does not find a match. You cannot enter values in the disabled (grayed-out) columns because these columns do not allow searches. Some query-by-example lines work differently. On some forms in the Tools setup applications, tabbing to the end of a line after filling in one or more fields achieves the same result as clicking the Find button.
On any Find/Browse form, type the characters on which you want to search in the corresponding column of the query-by-example line, and then click Find. For example, on Address Book Revisions (P01012), type all or part of the name of the individual you are searching for in the Alpha Name column of the query-by-example line, and then click Find. The record that matches the query criteria appears in the grid.
3.7.4 Locating Records Using Wildcards and Operators
You can use the asterisk (*) as a wildcard character in place of one or more letters. Using the asterisk widens your search. For example, you can type abb* in the Alpha Name column of the query-by-example line to view all records that begin with the letters abb. Or you can type *bb* in the query-by-example line to retrieve those records that contain the letters bb in the middle of the name. In addition, you can search for values in a set using operators. For example, in the Address Number column of the query-by-example line, type <87 to specify address numbers that are less than 87. Type <b in the Alpha Name column of the query-by-example line to specify names that begin with a. The following operators are valid in the query-by-example line:
< Less than
< = Less than or equal to
> Greater than
> = Greater than or equal to
! Not equal to
Each time that you enter values in a search, click the Find button to retrieve matching records.
3.7.5 Working with Search Criteria
This section discusses:
-
Understanding the Query control
-
Managing queries
-
Creating queries to search for data
-
Using existing queries to search for data
-
Modifying queries
-
Copying queries
-
Deleting queries
3.7.5.1 Understanding the Query Control
In addition to using QBE and wildcards to search for records, you can define additional search criteria by creating a query. The Query control appears on Find Browse, Search/Select, and Power Browse forms that have a Find button, unless the form appears in a popup window (such as when using the visual assist). Additionally, the Query control appears in the Data Browser, which enables you to view the data in tables and business views and save the search criteria as a query.
See Viewing the Data in Tables and Business Views .
Note:
The queries created using the Query control are Enhanced Queries, which differ from the Saved Queries that users might have created in previous releases. You can convert the format of the old Saved Queries to Enhanced Queries by using a conversion process.The query feature enables you to select additional fields from a form and add conditions to narrow the search results. Queries enable you to create searches that are more specific than the search results from wildcards and QBE columns alone. The system combines the conditions defined in the form filter fields, the QBE line, and the query to retrieve records from the database.
Security options are available to prevent users from performing searches if they have not entered search criteria in the form filters or QBE columns. If application query security has been implemented, you receive an error or warning message that informs you that your search has been suppressed.
You can design and save queries for search criteria that you use often to find records. Queries can be designated to run automatically by selecting the ”Run query when selected” option, which enables the query to search without having to click the Find button.
Additionally, you can designate a saved query as the default query for a form. A default query with the ”Run query when selected” option will run whenever you enter the form, as well as any time you select the query from the drop-down query list. If a default query has not been defined, the Query field displays ”All Records” when the form appears.
Note:
A default query will not run automatically if values are passed into the form by a form interconnection, or if the "Run query when selected" option is not selected.If you want to search for records without using a query, set the Query field to All Records.
Any queries that you save are listed alphabetically under the My Queries label in the query drop-down list. The My Queries subgroup also includes an All Records selection, which enables you to search without queries. Any queries that you save are available to you only; no other user can access them unless they are copied and designated as public queries. If public queries are available, they are listed alphabetically under the Public Query subgroup in the query drop-down list.
See ”Making Private Queries Public” in the JD Edwards EnterpriseOne Tools System Administration Guide
3.7.5.2 Managing Queries
You use Query Management mode to create, modify, and save queries. Click the icon to the right of the Query field to enter Query Management mode. You can also use the Ctrl+E hot key combination to toggle between normal mode and Query Management mode. Depending on the value in the Query field when you enter Query Management, the options for a new query or an existing query appear in the Query Management side panel. You can change the width of the Query Management side panel, which causes a corresponding adjustment in the JD Edwards EnterpriseOne form until the minimal width is reached.
When you enter Query Management mode, a plus sign on the form designates each field and QBE column that you can select for a query. When you click a field or QBE column, the item appears in the Query Management side panel with the appropriate comparison selections for the item's data type. Any items that you select display an X in the Query Management side panel, which indicates that they have been selected. You can remove an item from the Query Management side panel by clicking it.
When you edit the criteria in a query, both the query item and its corresponding field or QBE column on the form are highlighted.
The Populate Query icon enables you to enter values in fields and QBE columns on the form, and then click the Populate Query button to automatically create the query for you. The system populates the comparison selections for each item according to its data type.
The following table describes the fields in the Query Management panel:
| Field | Description |
|---|---|
| Query | Select either (add new query) or an existing query from the drop-down list. The default value for the Query field is (add new query), unless an existing query was selected before entering Query Management mode. The (add new query) selection enables you to create a new query. Select an existing query to run it or modify it. |
| Set As Default | Select this option to designate a query as the default. Only one query can be the default query for a form. The default query is used whenever the form opens, until the user selects another query or the All Records selection. |
| Run query when selected | By selecting this option, you do not have to click the Find button to run the query. The query will run automatically whenever you select it. If you select this option for a default query, the query will run automatically when the form opens, unless it opens in a pop-up window (such as when using the visual assist) or when values are passed into the form by a form interconnection. |
| Match All | Select this option if you want the query results to include all of the criteria specified in the query. |
| Match Any | Select this option if you want the query results to include any (not all) of the criteria specified in the query. |
| Fields and QBE Columns | Form fields and QBE columns that display a plus sign can be included in a query. Click the plus sign of the field or QBE column to include it in a query. |
| Comparison List | When you select a field or QBE column to include in a query, fields display to the right of the item in the Query Management side panel that enable you to customize the search criteria for the item. The comparison types that display for each data item (such as equal, not equal, starts with, between, is blank, etc.) depend on the data type. |
| Set Special Value | Some conditions enable you to set a value for comparison. For example, if you select a date field and the "between" comparison type, the Set Special Value option enables you to specify the dates to be compared. |
The following table describes the comparison types that are supported for each data type when it is included in the search criteria.
| Data /Type | Example | Comparison Types |
|---|---|---|
| String | Order Type (DCTO) | Equal, not equal, starts with, ends with, contains, between, in list, is blank, is not blank |
| Character | Type Code (TYC) | =, !=, <, <=, >, >=, between, in list |
| Numeric | Address Number (AN8) | =, !=, <, <=, >, >=, between, in list |
| Date | Order Date (TRDJ) | =, !=, <, <=, >, >=, between, in list |
| JDEUtime | Start UTime (TASUTIME) | =, !=, <, <=, >, >=, between, in list |
The ”in list” comparison type enables you to create a list of values for a data item. When you select ”in list” from the comparison drop-down list, the Add More Value icon appears. Click the icon to display another field in which to enter the next value. To remove a value from the list, delete the value in the value field. The field is removed unless it is the only value field in the list.
Fields or QBE columns that are based on string or date data types enable you to specify additional search criteria by using the Set Special Value option. Click the down arrow to the right of the value field to display the Set Special Value pop-up window. The Set Special Value window provides additional search options for the field or QBE column. For example, you could specify search criteria for orders that are due 5 days from the current date.
To set special values, make the appropriate selections in the Set Special Value window and then click OK. To clear special values, click the Reset button. The following table describes the special value options that are available for each data type.
| Data /Type | Special Value Options | Description |
|---|---|---|
| String | Login User ID | Some forms enable you to customize a query to return records with data related only to the user ID of the person who is logged in. |
| Date | Today + or Today -
Value Days, Months, or Years |
Use special values to search for dates that are a specified number of days, months or years before or after the current date.
In the Set Special Value pop-up window, select + or -, enter a number, and then select days, months, or years from the drop-down list. |
3.7.5.3 Creating Queries to Search for Data
Access a form with the Query control.
-
To create a new query, select All Records from the Query drop-down list if it does not appear as the query selection.
-
Click the Query Management icon.
-
In the Query Management side panel, verify that (add new query) is the value in the Query field. If another value appears, select (add new query) from the drop-down list.
-
If you want the new query to be the default query for the form, click the Set As Default option.
-
If you want the query to run automatically whenever it is selected, click the ”Run query when selected” option.
-
Select either the Match Any or Match All option.
-
Click the form fields or QBE columns that you want use as search criteria.
Note:
You can select only the form fields and QBE columns that have a plus sign. -
Select a comparison type for each field or QBE column.
-
Specify the comparison value for each field or QBE column in the query.
Note:
The system displays an error if the value entered is not valid. Close the error dialog box and enter a valid value. -
For date or string data items, enter a value for comparison or select the down arrow to specify values in the Set Special Value pop-up window.
-
Click the Find button in the Query Management side panel or on the form to run the query.
-
If you want to save the query, click the Save Query icon in the Query Management side panel.
-
Enter a name for the query.
The new query name appears in the Query field.
-
Close the Query Management panel.
The new query name appears in the Query field on the form. To find records without using a query, you must reset the Query field to All Records.
3.7.5.4 Using Existing Queries to Search for Data
Access a form with the Query control.
-
From the Query drop-down list, select the query that contains the search criteria that you want to apply.
-
Click the Find button to display the search results.
If the query includes the ”Run query when selected” option, the Find happens as soon as the query is selected.
3.7.5.5 Modifying Queries
Access a form with the Query control.
-
From the Query field, select the query that you want to edit.
-
Click the Query Management icon to display the search criteria.
-
Edit the information.
You can change the query options and change search values. You can add or remove fields and QBE columns from the query.
-
Click the Save Query icon to save the changes.
Note:
You can click the Save As icon if you want to save the edited query with a different name. -
Close the Query Management side panel.
The new query name appears in the Query field on the form. To find records without using a query, you must reset the Query field to All Records.
3.7.5.6 Copying Queries
Access a form with the Query control.
-
From the Query field, select the query that you want to copy.
-
Click the Query Management icon to display the search criteria.
-
If desired, change the search criteria.
-
In the Query Management side panel, click the Save As icon.
-
Enter a name for the query.
The new query name appears in the Query field.
-
Close the Query Management side panel.
The new query name appears in the Query field on the form. To find records without using a query, you must reset the Query field to All Records.
3.7.5.7 Deleting Queries
Access a form with the Query control.
-
From the Query field, select the query that you want to delete.
Note:
You cannot delete Public queries. -
Click the Query Management icon.
-
In the Query Management side panel, click the Delete Query icon.
The message ”Are you sure you want to delete this query?” appears.
-
Click OK to delete the query.
The Query field changes to (add new query).
-
Close the Query Management side panel.
3.7.5.8 Selecting Additional Fields
See 3.7.5.3 Creating Queries to Search for Data in the JD Edwards EnterpriseOne Tools Foundation Guide.
You can select a comparison type in the Query Management panel for each field or query-by-example (QBE) column and specify the comparison value in the query. To do so, click the form fields or QBE columns that you want use as search criteria. You can select only the form fields and QBE columns that have a plus sign.
Alternatively, you can use the Additional Fields Selection section to select the form fields or QBE columns. This section displays only the business view (BSVW) columns that are included on the form including the hidden columns. For example, if BSVW includes the columns A, B and C; A is displayed on the form, B is hidden and C is not included, then the Additional Fields Selection section displays A and B columns.
3.7.5.9 Clearing the Form
You can clear the values that you have entered on the form. For example, the values entered in the header or QBE column.
To clear the values on the form:
-
Access a form with the Query control.
-
Enter any search criteria on the header or the QBE and then, click Find.
-
Click the Clear Form icon located to the right of the Add, Edit Queries icon. The system deletes the values in the header or the QBE.
Alternatively, you can select Clear form when selected option in the Query Management panel to clear the values on the form automatically when the query is selected.
3.7.6 Choosing a Record
You choose a record for a variety of reasons. For example, you might need to change an employee's address and phone number. You can choose a single record or multiple records from the Find/Browse form, and then you can change the information on a Revision form.
You can choose a record in one of two ways:
-
Click the record and then click the Select button to open the corresponding form.
-
Double-click a record to select it and open the corresponding form.
To choose a record:
-
On any Find/Browse form, locate a record.
-
Double-click the record to display it on a revision form.
-
On the revisions form, revise the record and then click OK.
If you selected more than one record, your second record might appear now. If your second record does not appear, click the Next button at the top of the form. Continue to revise as needed.
-
After you finish, be sure to click OK to save your latest revision and then click Cancel to exit.
3.7.7 Adding a Record
When adding records to the database, you add the primary record first and then add the secondary records.
To add a record:
-
On a Find/Browse form, click Add to open a blank revision form.
-
Enter the information for the new record.
Note:
Some fields enable you to enter any value, and some require you to select from a list of values. A user defined code (UDC) is one value in a set of values that is assigned as valid for a field. UDCs simplify, standardize, and validate the data that is contained in fields.See ”Working with User Defined Codes” in the JD Edwards EnterpriseOne Tools System Administration Guide.
-
Click OK.
When you add records, the system uses the Next Numbers feature to automatically number Address Book records, journal entries, purchase orders, and other documents.
3.7.8 Changing a Record
In EnterpriseOne, a Find/Browse form appears when you open most applications. On the Find/Browse form, you choose the action that you want to perform. Choosing a button or function that you want to perform displays, for example, a Fix/Inspect form on which you can change your record.
As you move from field to field, you view your changes reflected in the form. If you type an invalid value in a field, the field highlights in red and an error appears. You must correct the error before you click OK. Clicking OK saves your changes in the database.
Note:
Some fields enable you to enter any value, and some require you to select from a list of values. A user defined code (UDC) is one value in a set of values that is assigned as valid for a field. UDCs simplify, standardize, and validate the data that is contained in fields.See ”Working with User Defined Codes” in the JD Edwards EnterpriseOne Tools System Administration Guide.
You cannot change information on the Find/Browse form itself. The information you have changed appears after you choose the appropriate button on the Find/Browse form.
To change a record:
-
On a Find/Browse form, select a record.
You can double-click a record, or choose a record and then click the Select button.
-
On the revisions form, revise information as needed.
-
Click OK to accept the revisions.
3.7.9 Deleting a Record
Occasionally, you might need to remove a record from your database. For example, you might no longer use a particular supplier. Depending upon the application, if you delete a primary record the system might also delete any secondary records related to the primary record, such as phone numbers. See the appropriate application guide for information about deleting child records.
To delete a record:
-
On a Find/Browse form, select one or more records.
-
Click Delete.
The system prompts you to confirm the deletion.
3.8 Working with Toolbar Options
This section provides an overview of toolbar options and discusses how to:
-
Work with Row and Form Exits
-
Set Up Favorite Row and Form Menu Selections
3.8.1 Understanding Toolbar Options
Most JD Edwards EnterpriseOne forms include a toolbar with buttons that provide access to specific tasks. You must be familiar with toolbar options to use the JD Edwards EnterpriseOne system. Toolbar options vary depending on form type. For example, a Find/Browse form usually includes a Select button so that you can select a record in the grid, whereas a Fix/Inspect form does not have a Select button because it displays the values for a specific record.
The following table describes many of the standard toolbar buttons:
| Toolbar Button | Description |
|---|---|
| Find | The Find button displays records in a grid. |
| Select | The Select button selects one or more records and opens corresponding forms. |
| Search | The Search button displays all the entries from your database that match the search criteria that you specify. |
| Add | The Add button opens a new form where you can add a new record. |
| OK | When you click the OK button, record additions and updates are written to the database. |
| Copy | From a Find/Browse form, the Copy button copies the entire record. The system copies all fields into a new record, except those fields that are unique to the existing record.From a Fix/Inspect form, the Copy button selects the fields for the new form. You must enter data in all other fields. You can modify on the new form those fields that you copied from the existing record. |
| Delete | From a Find/Browse or Fix/Inspect form, the Delete button deletes the entire record.
Depending on the application that you are using, the Delete button might also remove related information. For example, if you delete an Address Book record, the system also deletes the phone numbers for that record. See your application user guide for information about deleting child records. |
| Close | The Close button closes the form. |
| Cancel | When you click the Cancel button, any changes you have made are lost and no database changes are made. |
| Tools | The Tools button can include options such as Refresh, Export Grid Data, or Data Browser. |
| Collaborate | The Collaborate submenu under the Tools menu has the following options:
|
In addition to standard buttons, the toolbar can include other options such as reports (which provides a list of reports pertaining to the application), row exits, and form exits.
3.8.2 Working with Row and Form Exits (9.1 Update 5)
There are two types of Row and Form Exits: Standard and Simplified.
Standard Row and Form exits display as buttons on the toolbar. When you click the Form or Row button on the toolbar, a list appears with options relating to the active form. The functions on the form and row exits vary from form to form. For example, a form or row exit might open a data entry form or provide access to other forms that relate to the record you selected.
You can also use row exit and form exit right-click options to access the selections on the row and form toolbar menus. When you right-click a cell in the grid, the grid row is selected and the row menu selections display in a context menu. Using this feature, you do not need to click the Row button at the top of the form. This feature has been enabled for Find/Browse, Search & Select, Parent/Child, Headerless Detail, Header Detail, Power Browse, Power Edit, and Subform forms.
The following example shows the context menu that displays on the Customer Service Inquiry form after right-clicking a cell in the grid:
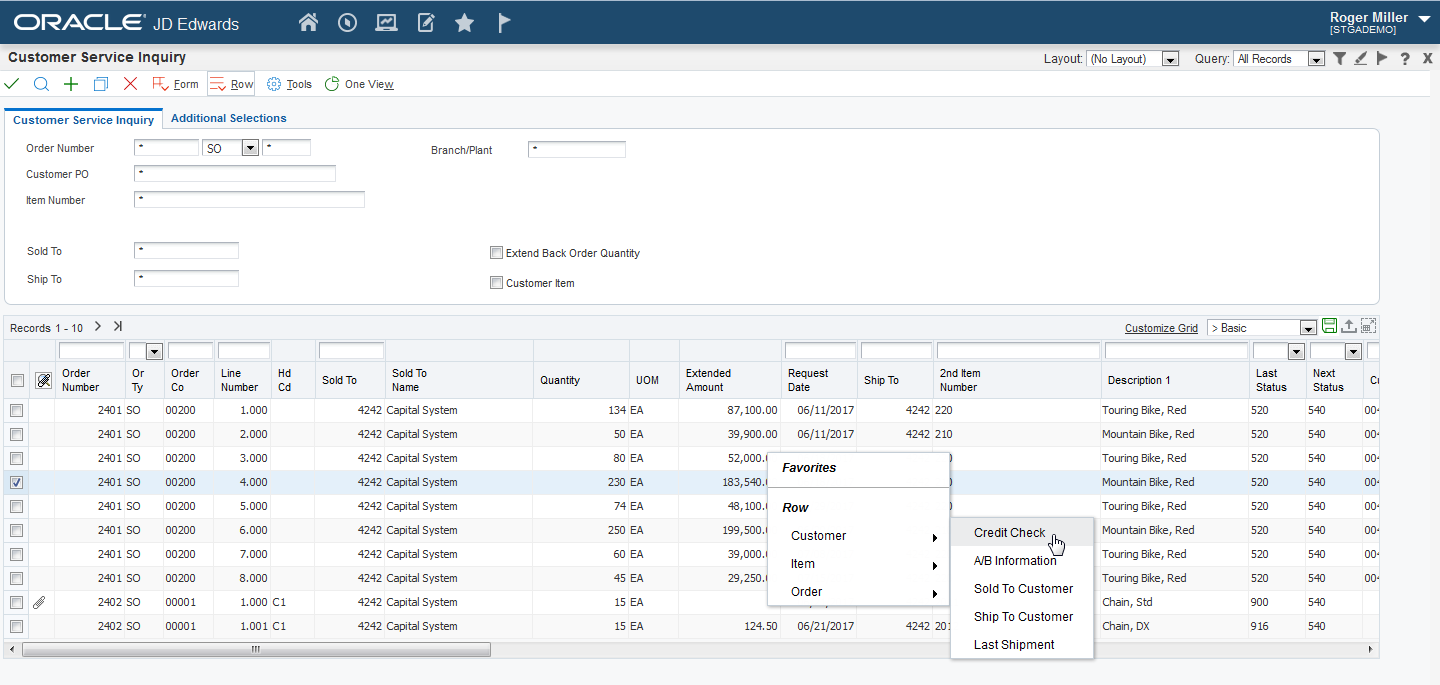
Note:
If the JD Edwards EnterpriseOne form does not have any Row menu selections available, the default browser's context menu appears and the grid row is not selected.Similarly, when you right-click in the form outside the grid, the form menu selections display. The form menu selections are not accessed from a row. Any disabled menu selections in the form and row menus do not display in the context menu list.
The following example shows the form menu selections on the Customer Service Inquiry form:

Note:
To hide the form exit context menu, you can click anywhere in the form header. To hide the row exit pop-up menu, click anywhere in the grid unless the grid is editable. In the case of editable grids, you must click on the form header or below the grid area to hide the pop-up menu.![]() Tutorial:
Tutorial:
Simplified Form and Row exits display as tabs on the side of the screen. If your system administrator has enabled you to do so, you can choose if your EnterpriseOne interface displays Simplified or Standard mode.You can drag and drop Simplified tabs vertically. In Simplified mode, you will see only the tabs. In Standard mode, you can choose the type of Row and Form exits you see. The following graphic displays the Simplified tabs:
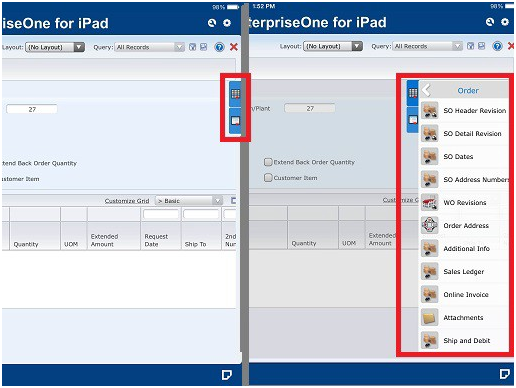
3.8.2.1 Choosing Standard or Simplified Form and Row Exits
To choose Standard or Simplified Row and Form exits:
-
Ensure that you have permissions to change the Standard or Simplified mode by clicking Personalization, My System Options, and then User Profile Revisions.
-
Select the Enable Simplified Row/Form Exits option to view the Simplified Row and Form exit tabs. Deselect the option to view the Standard Row and Form exit buttons.Click the Personalization menu, and then click Preferences.
-
Log out and then log in to EnterpriseOne to see your changes.
3.8.2.2 Accessing Row Menu Selections
To access row menu selections:
-
On a form with a Row button on the toolbar, click the Row button.
The row menu selections display in a drop-down list.
-
Click the desired menu selection.
-
Alternatively, click a cell in the grid to display the row menu selections in a context menu.
3.8.2.3 Accessing Form Menu Selections
To access form menu selections:
-
On a form with a Form button on the toolbar, click the Form button.
The form menu selections display in a drop-down list.
-
Click the desired menu selection.
-
Alternatively, right-click anywhere in the form (except the grid) to display the form menu selections in a context menu.
3.8.3 Setting Up Favorite Row and Form Menu Selections
To add favorites to a form or row pop-up menu:
-
On a form with a Row button on the toolbar, right-click a cell in the grid to display the row context menu.
-
If the form has a Form button on the toolbar, right-click the form to display the form context menu.
-
Click a selection in the Form or Row portion of the context menu and drag it to the Favorites section.
Note:
If there are no menu items in the Favorites section, drag and drop the menu selection onto the Favorites label to add the menu item to the Favorites menu. -
If necessary, drag and drop the Favorites selections to reorder them.
-
To remove a selection from Favorites, drag it to the Row or Form section of the context menu.
3.9 Using Parameterized URL
The Simplified Parameterized URL is a feature that enables an external system to launch a native JD Edwards EnterpriseOne application through the use of a simple URL. This feature provides external applications the ability to have a nearly seamless user interface integration with any available JD Edwards EnterpriseOne application.
When you select Parameterized URL from the Tools menu on a form, a Java Script Alert message shows the parameterized URL for that application. You can copy and paste the URL into a new browser page to launch the application.
Note:
If you are using Microsoft Internet Explorer, you must select the parameterized URL and use the keyboard shortcut Ctrl+C to copy it. If you are using the Mozilla Firefox browser, select the parameterized URL by using the Right -click and copy option in the Alert window to copy it.Considerations for Query Control (Release 9.1 Update 2)
If you use the Query control (for advanced queries) to create and save search criteria on a form, and your system administrator has made the queries public, then the query information is available when someone uses a parameterized URL to launch the application. If multiple public queries have been created, they are available when using the parameterized URL.
Your system administrator must make the query available to other users. After doing so, a public version of the query displays beneath a line in the Query drop-down menu.
Queries located above the line are queries available only to the user who created them. If user A sent a parameterized URL to user B, then user B would be unable to access the query information for the query when using the parameterized URL. Additionally, user B would receive the following error message:
Requested Query Wasn't Found
If you receive this error, contact your system administrator.
Queries located below the line are the queries that have been made public. Therefore, when user A sends a parameterized URL to user B, and user B uses it to log into EnterpriseOne, the query information is available.
If you are a system administrator, see the ”Changing an Individual User Override to a Group User Override” section in the The JD Edwards EnterpriseOne Tools System Administration Guide for more information.
For more information on query control, see Chapter 3, "Working with Search Criteria" in the Foundation Guide.
3.10 Working with Interface Features
The section provides an overview of interface features and discusses how to:
-
Use Online Documentation.
-
Work with Error Messages and Error Dialog Boxes.
-
Turn Auto Populate On or Off.
3.10.1 Understanding Interface Features
EnterpriseOne contains features that you use to globally impact the EnterpriseOne web client interface.
3.10.1.1 Error Messages and Error Dialog Boxes
When you enter information into a field that is inaccurate or unrecognizable by JD Edwards EnterpriseOne, or if you fail to enter data into a required field, the field displays a red background to indicate the error, and an error message displays at the top of the form. If there are multiple errors on one form, they display as a list at the top of the form. You can view more information about the error by clicking the arrow located to the left of the error message. If the error message has a Go To Error link to the right of it, you can click the link and JD Edwards EnterpriseOne places your cursor in the field that correlates to the error message.
When you place your cursor in a field that contains an error, a dialog box displays that further identifies what you must enter into the field to correct the error. You can move the dialog box by clicking the top of it and dragging it to another location on the screen. You can tab out of the field to validate the information. After the information is validated, the error message is removed from the list. To view all the errors on the form listed at the top of the form, click Go to Top. To disable the pop-up dialog box, clear the Enable Error Pop-Ups check box at the top of the form.
3.10.1.2 Auto Populate On
AutoPopulate assists you when you are performing repetitive data entry on the grid control. It uses content that already exists in the grid column to populate the cell in which you are currently typing. If the characters you are typing match those that already exist in the same column, AutoPopulate automatically adds the whole string of characters from the existing cell to the current cell. For example, you have already entered the following number into a cell in the column in which you are currently typing: 330456 If you type a 3 in the current cell, AutoPopulate will automatically place 330456 in the cell in which you are working. You can opt to accept the number by pressing tab, or you can delete the number and enter one of your own. You can turn AutoPopulate on or off. The action you select will apply to all applications to which you have access within JD Edwards EnterpriseOne.
The feature is disabled for simplified Chinese, Korean, Japanese, and traditional Chinese language environments.
3.10.1.3 Visual Assist Form
When you click on the Visual Assist icon, the Visual Assist form is displayed as a modal window along with the parent form. The parent form is displayed in read-only mode.
Note:
You can drag the Visual Assist form and place it anywhere on the parent form.3.10.1.4 Auto Suggest
Auto Suggest is a user interface feature which progressively searches and filters through text. Auto Suggest searches pre-defined tables and returns records that match text you type into a field. As you type text into a text field, one or more possible matches for the text are found and immediately presented to you in the grid around the field. This immediate feedback enables you to stop typing the entire word or phrase for which you are looking. Instead, you can choose a record from the list that appears.
Auto Suggest searches for data in multiple tables and returns 10 matching records per page. The feature does not require you to remember the code or number for the field. Instead, you can type the name or description of the field and the system will search the name or description that begins with what you typed. For example, if you type in ”Bi” in the item number field, the system may return ”Bike”, ”Bike-Mountain” and other items whose name starts with ”Bi”. Once the list of suggested values is displayed, you can use arrow keys or the mouse to navigate to the correct record, then press the Enter key or click on the record to select the record. When a record is selected, the code or item number value (for example, 220) is automatically filled into the item number field. The system automatically queries the database based on the description you typed, and fills in the field value with the proper code or value.
Note:
Auto Suggest is case sensitive. If the item descriptions stored in the database are all lowercase, typing ”Bi” may not return any suggested values because the first letter typed is uppercase.Your system administrator determines which fields have Auto Suggest enabled, and determines the circumstances for which it is activated. For example, Auto Suggest might begin searching after you type two characters into a field or after you pause typing for a number of seconds.
Your system administrator can configure the Auto Suggest feature in the following two ways:
-
Automatic
The system administrator specifies the minimum number of characters you need to enter, and also specifies that a manual hot key is not required to trigger Auto Suggest. When you type into these fields, you will notice a gray down arrow at the bottom right corner of the field. After you type the minimum required number of characters, the gray down arrow turns blue, and the suggested values display automatically. If the down arrow turns blue but no values are displayed, there are no matching records in the system. You need to change or re-type the name or description.
-
Manual
The system administrator specifies that you have to manually trigger the Auto Suggest process (hot key required). The system administrator also specifies the minimum number of characters that you need to enter, before the manual Auto Suggest feature is triggered. When you type into these fields, you will notice a gray down arrow at the bottom right corner of the field. After you type the minimum required number of characters, the gray down arrow becomes a clickable blue arrow. Clicking the blue arrow triggers the system's Auto Suggest process. The system then starts searching for items based on what you typed. The Auto Suggest feature is not triggered automatically. You need to click on the blue down arrow to trigger it.
See ”Setting Up Auto Suggest” in the JD Edwards EnterpriseOne Tools System Administration Guide.
If Auto Suggest is enabled, you do not need to remember codes in order to search for, or enter, data in a field.
If Auto Suggest is enabled, you see a grey color arrow icon in the lower corner of the text field, QBE field, or the grid cell when you click into it. The grey arrow turns into blue arrow when you start typing in the text box. Type in one or two characters and click the blue color arrow icon to display the list of Auto Suggested options.
3.10.1.4.1 Enabling or Disabling Auto Suggest for a Single Form
To enable or disable the Auto Suggest feature for a single form, Select Tools menu and select or deselect the Auto Suggest option.
3.10.1.4.2 Enabling or Disabling Auto Suggest Globally
You can select or deselect the auto suggest feature globally by selecting the Preferences option from the Personalization drop-down menu. Select or deselect the Auto Suggest Enabled check box from the Preferences window to enable or disable the Auto Suggest feature across all forms.
3.10.1.5 UDC Drop-down Menu (Release 9.1 Update 3)
UDC Drop-down is a user interface feature that enables the users to select text on fields.
If the drop-down is enabled for a UDC field, you see a Drop-down icon instead of Visual Assist and Auto Suggest icons. When you click on the Drop-down icon, a window with a list of values is displayed from which you can select the required value. You can click on the Next button at the bottom of the window to navigate to the next set of records. This drop-down window does not contain a column header.
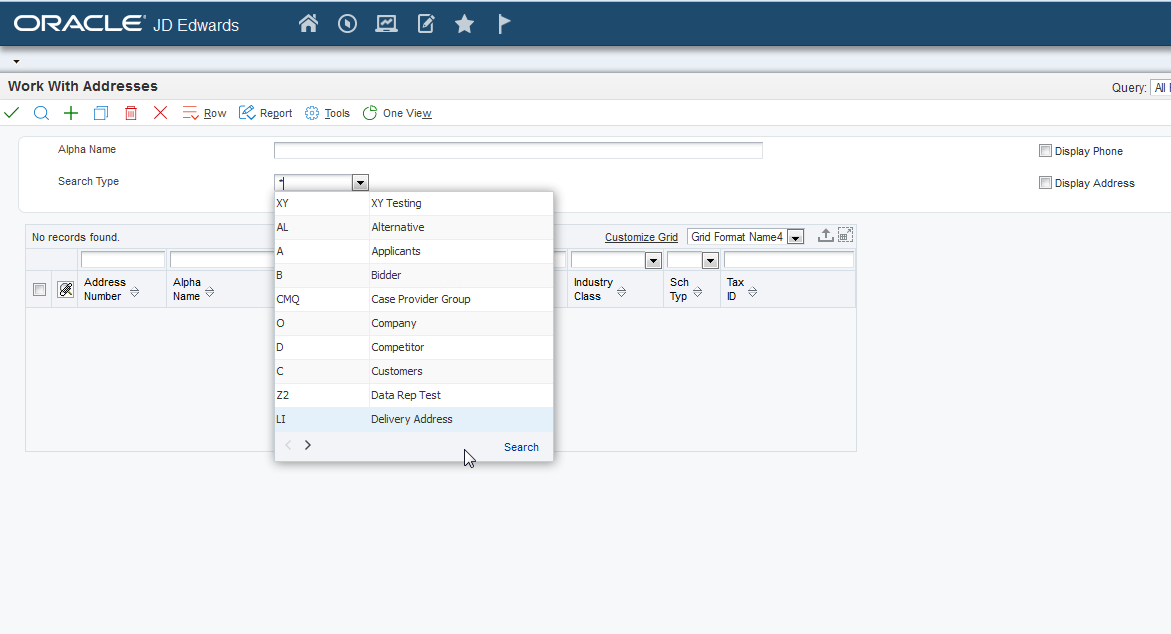
Also, if the drop-down menu is enabled for a UDC, you can progressively search and filter through text. You can type in a letter, number or any wildcard entry. The system searches the pre-defined tables and returns records that match the text you typed into a field. As you type text into a UDC Drop-down enabled field, one or more possible matches for the text are found and immediately presented to you in the grid around the field.
There is a Search link at the lower right corner of the window. You can click this link to open a visual assist window for more advanced search capabilities.
See Setting Up UDC Dropdown Menu in the JD Edwards EnterpriseOne Tools System Administration Guide
3.10.2 Using Online Documentation
You access field-level help by placing the cursor in a field and pressing F1. You can also access the field-level help by clicking the Help icon located at the top-right corner of a form and then clicking the Item Help option. If the field in which the cursor resides is a business view column, the system displays the alias name, business view name and description, table name and description, and glossary text. If the field in which your cursor resides is a data dictionary column, the system displays the alias name, the term Data Dictionary Item, and the glossary text.
You can access the online documentation by the following two ways:
-
Click the Help icon located at the top-right corner of a form and then click the Help option.
-
Click the Down Arrow icon located next to your login name and then click the Help option.
Note for Release 9.1 Update 4:
- If you are using an application with a product code equal to H20, H79, 98, or beginning with H9:
When you click the Help icon, EnterpriseOne searches the EnterpriseOne Tools Documentation Library for topics with program IDs that correspond to the application you are using. For example, if you are using Vocabulary Overrides, and click the Help icon, EnterpriseOne searches for all the documentation topics that pertain to P9220 (Vocabulary Overrides Program ID).
-
If you are using an application without one of the above product codes:
When you click the Help icon, EnterpriseOne searches the EnterpriseOne Applications Documentation Library for topics with program IDs that correspond to the application you are using. For example, if you are using Address Book, and click the Help icon, EnterpriseOne searches for all the documentation topics that pertain to P01012 (Address Book Program ID).
-
If you click the Help icon outside of an application, you are taken to a list of links to JD Edwards EnterpriseOne libraries.
If you are unable to access the online documentation library, contact your system administrator.
![]() Tutorial:
Tutorial:
Click here to view a recording of this feature.This tutorial shows the pre-9.1.5 user interface.For information about how to set up online documentation, see
”Setting Up Help” in the JD Edwards EnterpriseOne System Administration Guide.
3.10.3 Working with Error Messages and Error Dialog Boxes
To view error messages and correct errors:
-
On the application on which you are working, if there are red fields indicating errors, scroll to the top of the form and review the error messages that are displayed.
-
If the error messages you are viewing contains a Go to Error link, click the link to go to the field that correlates to the error message.
-
Enter valid information into the field.
-
Tab out of the field, to ensure that the information you entered is correct or recognizable. If it is, the dialog box disappears, the field displays a white background, and the error message is removed from the list.
![]() Tutorial:
Tutorial:
Click here to view a recording of this feature.This tutorial shows the pre-9.1.5 user interface.3.10.4 Turning Auto Populate On or Off
To turn Auto Populate On or Off, from the Tools menu, click AutoPopulate. If a check mark appears beside AutoPopulate, the feature is turned on. If no check mark appears, it is turned off.
3.11 Working with Send Email and Meeting Invite Options (Release 9.1 Update 5)
This section provides an overview of the Send Email and Meeting Invite options, and discusses how to:
-
Access Send Email and Meeting Invite options from the Tools menu.
-
Access Send Email and Meeting Invite options from the Data Dictionary items.
3.11.1 Understanding Send Email and Meeting Invite Options
JD Edwards EnterpriseOne enables users to collaborate with other users by using the Send Email and Send Meeting Invite options.
All JD Edwards EnterpriseOne forms except the message forms include a toolbar with the Collaborate submenu in the Tools menu. You can use the Collaborate submenu to access Send Email and Send Meeting Invite options.
Also, you can send emails and meeting invites to the required recipients using the Send Email and Meeting Invite options from the Collaborate tab of the hover forms in the Address Book fields.
Note:
You can use this feature with Outlook, Thunderbird, and Gmail as your default email clients, and, with Outlook and Thunderbird as your default calendar clients. You can check or uncheck the Use Thunderbird As Calendar Client option in the Preferences window from the Personalization drop-down menu to enable or disable Thunderbird as your default calendar client.3.11.2 Accessing Send Email and Send Meeting Invite options from Tools menu
This section discusses how to access Send Email and Send Meeting Invite options from the Tools menu.
Note:
The Tools menu is not supported on the embedded form and hence, the Send Email and Meeting Invite options are also not supported on the embedded forms.3.11.2.1 Accessing Send Email Option from Tools menu
To access the Send Email option from the Tools menu:
-
On the form with which you are working, select the Tools menu.
-
Click Collaborate.
-
Select the Send Email option.
-
The system displays the Message window of the default email client.
The subject of the email contains the title of the form. The body of the email contains the title of the form and the parameterized URL of the form. You can view the form or application by clicking the parameterized URL, and then entering your user ID and password.
-
Enter the recipient's email address in the empty Email Recipient field.
-
Click Send.
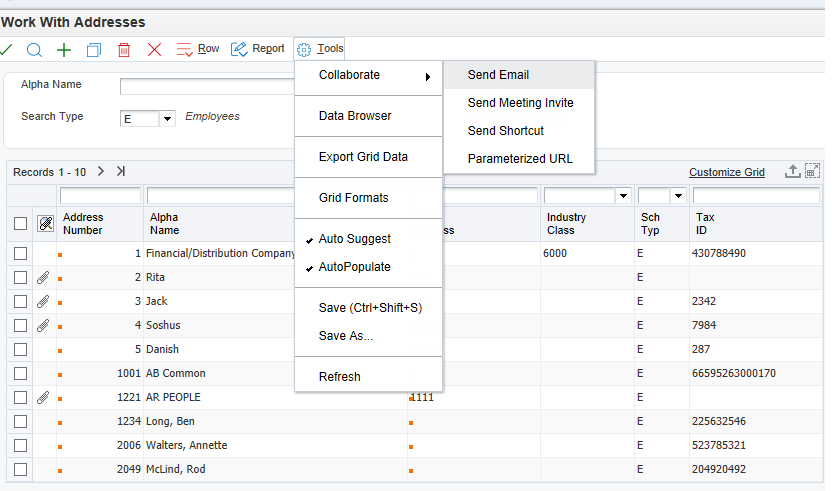
3.11.2.2 Accessing Send Meeting Invite Option from Tools menu
To access the Send Meeting Invite option from the Tools menu:
-
On the form with which you are working, select the Tools menu.
-
Click Collaborate.
-
Select the Send Meeting Invite option.
-
The File Download window of the browser appears with an option to open or save the .ics (calendar file) file.
Note:
For Outlook, you can choose an option to open or save the .ics file.For Thunderbird, save the .ics file to a desired location; then, open Thunderbird, access the Events and Tasks tab, click Import, and navigate to the location where you saved the .ics file. Select the .ics file and click Open. The meeting will be added to the Thunderbird calendar, and also in the Events and Tasks window.
-
Click Open.
Note:
You can also save the file in a desired location and open it later. -
The system displays the Appointment window of the default calendar. The subject of the meeting invite contains the title of the form. The body of the meeting invite contains the title of the form and the parameterized URL of the form. You can view the form or application by clicking the parameterized URL, and then entering your user ID and password.
-
Schedule a meeting time and add the meeting recipients as required.
-
Click Send.
The meeting will be added in the calendar of your default email client.
The Send Meeting Invite creates the meeting request by default using the current time on the machine from where the E1 HTML server is running. It does not use the time on the machine from where the browser with the E1 web client is accessed. You can open your default email/calendar client and edit the time of the meeting request.
3.11.3 Accessing Send Email and Meeting Invite options from Data Dictionary items
Hover forms contain context-based information. The hover form is displayed when you click the hover indicator in the hover-supported JD Edwards EnterpriseOne control.
See Section 3.1.6.1, "Message Form as Hover Form"
You can use the Collaborate tab in the hover form to send emails and meeting invites to the required recipients. Your system administration can enable the Collaborate tab in the following hover forms:
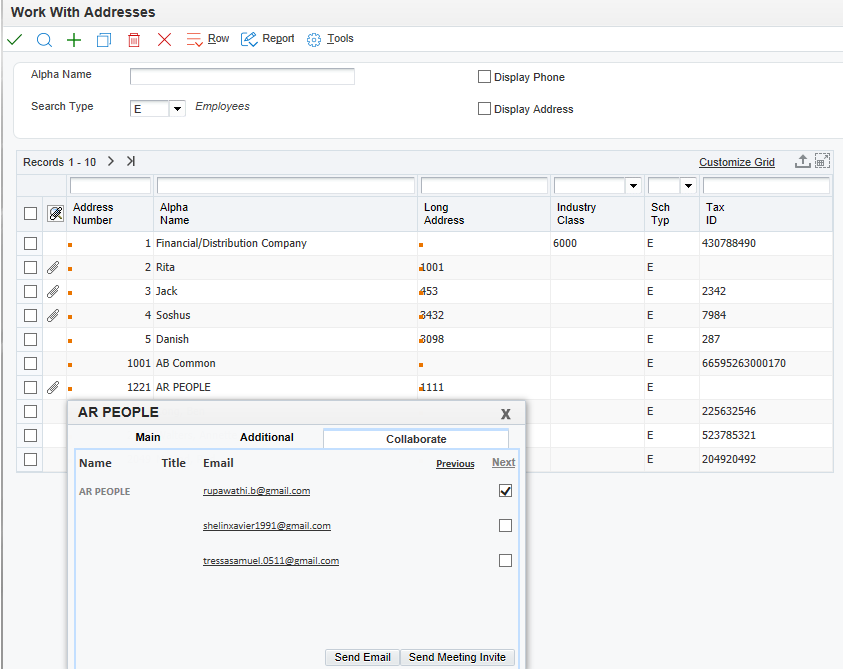
-
Employee Information hover form (P080100)
-
Address book Information hover form (P01700)
-
Customer Information hover form (P03B700)
-
Supplier Information hover form (P04700)
The Collaborate tab in the hover form is enabled by default for the Address Number (AN8) type hover forms listed above. You can disable this tab using Work with Feature Definitions (P958973) application.
See Enabling and Disabling Collaborate tab in the Hover Forms in System Administration Guide.
3.11.3.1 Accessing Send Email Option
To access the Send Email option:
-
Enter a valid Address Book Number in the Address Book field.
-
Hover over the orange dot indicator in the Address Book field. The orange dot indicator will turn into a clickable indicator.
-
Click the clickable indicator. The hover form is displayed.
-
Click the Collaborate tab. The Collaborate tab displays a list of email IDs associated with the Address Book number. The list of email IDs that appears in the Collaborate tab is configured for a particular address number in the Who's Who application. If an email ID is not configured for a particular address number, the Collaborate tab is empty and the Send Email and Send Meeting invite buttons are disabled. If you are using the Chrome browser, the hover form may close when you click the disabled Send Email or Send Meeting buttons.
-
In the Collaborate tab, select the email ID as required. You can select multiple email IDs. A maximum of five email IDs are displayed per page in the Collaborate tab. You can use the Next and Previous links in the Collaborate tab to navigate across the email IDs.
-
Click the Send Email button.
Note:
The Send Email and Send Meeting Invite buttons are disabled by default. The buttons are enabled after you select an email ID. -
The Message window of the default email client is displayed.
The subject of the email contains the title of the form. The body of the email contains the title of the form and the parameterized URL of the form in the case of Employee and Address Book hover forms. You can view the form or application by clicking the parameterized URL, and then entering your user ID and password.
The body of the email is empty in the case of Customer and Supplier hover forms.
-
The recipient email address is populated based on your selection.
-
Click Send.
3.11.3.2 Accessing Send Meeting Invite Option
To access the Send Meeting Invite option:
-
Hover over the orange dot indicator in the address book field. The orange dot indicator will turn into a clickable indicator.
-
Click the clickable indicator. The hover form is displayed.
-
Click the Collaborate tab. The Collaborate tab displays a list of email IDs associated with the Address Book number.
The list of email IDs that appears in the Collaborate tab is configured for a particular address number in the Who's Who application. If an email ID is not configured for a particular address number, the Collaborate tab is empty and the Send Email and Send Meeting invite buttons are disabled.
-
In the Collaborate tab, select the email ID as required. You can select multiple email IDs. You can use the Next and Previous links in the Collaborate tab to navigate across the contacts.
-
Click the Send Meeting button.
-
The File Download window of the default browser is displayed with an option to open or save the .ics file.
-
Click Open.
Note:
You can also save the file in a desired location and open it later. -
The Appointment window of the default calendar client is displayed.
The subject of the meeting invite contains the title of the form. The body of the meeting invite contains the title of the form and the parameterized URL of the form in the case of Employee Information and Address Book Information hover forms. You can view the form or application by clicking the parameterized URL, and then entering your user ID and password.
The body of the meeting invite is empty in the case of Customer Information and Supplier Information hover forms.
Note:
For Outlook, you can choose an option to open or save the .ics file.For Thunderbird, save the .ics file to a desired location; then, open Thunderbird, access the Events and Tasks tab, click Import, and navigate to the location where you saved the .ics file. Select the .ics file and click Open. The meeting will be added to the Thunderbird calendar and also in the Events and Tasks window.
The Send Meeting Invite creates the meeting request by default using the current time on the machine from where the E1 HTML server is running. It does not use the time on the machine from where the browser with the E1 web client is accessed. You can open your default email/calendar client and edit the time of the meeting request.
-
The recipient address will be populated based on your selection.
-
Click Send.
If the hover form contains lot of information, for example, if the email address is very long then the browser inserts the scroll bar. It is recommended to have concise information on the hover forms since the hover forms are intended to provide a small snapshot of the data.
If the parameterized URL is very long, the email clients such as Thunderbird and Gmail will not render the complete URL as a hyperlink.
In that case, you have to manually copy the entire link and paste it into the address bar of your browser to access the E1 application. This does not happen if you are using Microsoft Outlook as your default email client.
3.11.4 INI Settings
This section discusses the server manager settings for Send Email and Send Meeting Invite feature.
3.11.4.1 MailtoInNewWindow
To use Gmail as the email client in Firefox and Chrome browsers:
-
Access the Server Manager Console.
-
Navigate to the Configuration settings for the HTML Server.
-
Select the Advanced View.
-
In the Web Runtime section, set the value of Enable mail to links in new window to True.
When you click the Send Email link, the system will open the Gmail Compose Mail window enabling you to compose a new email message if the value of MailtoInNewWindow setting is set as True.
In the case of Employee Information and Address Book Information hover forms, the body of the email message is pre-populated with the JD Edwards EnterpriseOne parameterized URL to the EnterpriseOne application from which the Send Email link was clicked. The body of the email is empty in the case of Customer Information and Supplier Information hover forms.
If you are not signed in to Gmail before you click the Send Email link, when you click the Send Email link, the Gmail login page appears. After you log in to Gmail, the Gmail Compose Mail window appears.
If you are using Firefox or Chrome browser to access Send Email or Send Meeting Invite functionality, and if the MailtoInNewWindow INI setting is set as True then, a new browser window/tab is displayed with an informational message before the email client is loaded. The informational window/tab closes automatically after the email client is loaded.
3.11.4.2 Use Thunderbird
Add the UseThunderbird setting in the OWWEB section of jas.ini and set the value as ”true”, to use Thunderbird as the default Calendar client.
To use Thunderbird as the default Calendar client, from the Server Manager Console, navigate to the Configuration settings for the HTML Server and then select the Advanced View. In the Web Runtime section, set value of Enable Thunderbird as the default calendar client as True.