27 Net Receivables and Payables
This chapter contains these topics:
27.1 Understanding the Netting Program
You use the A/R Standalone Netting program (P03455) to create net transactions that are from the Accounts Payable system in the Accounts Receivable system that you use for net receivables. You create net transactions prior to entering receipts or at the time of receipts processing.
27.1.1 Transaction Details
When you net open invoices against open vouchers, depending on which net amount is greater (payables or receivables), the system generates two documents:
-
An original document, type NO, for each transaction that it closes. This document represents the open amount that the system uses to offset the greater due to/from amount from the customer/supplier.
-
A matching document, type NM. This document represents the transaction the system closes on the side of the net position with the least due to/from amount.
If the invoice amount (due to the customer/supplier) is greater than the voucher amount (due from the customer/supplier), the system:
-
Closes each of the vouchers you choose
-
Creates a matching document type of NM for the vouchers
-
Generates an original document, type NO, in the A/R system to offset the open receivable amounts
The system assigns the NO and NM transactions the same document number so that an audit trail exists between the documents in the two systems. The system also assigns the net transactions the next invoice number from the Next Numbers program for Accounts Receivable (system code 03).
The following example illustrates how the system generates the net documents when the amount of open invoices is greater than the amount of open vouchers for receivables net.
Transactions before netting:
| A/R Documents | Gross Amount | Open Amount | A/P Documents | Gross Amount | Open Amount |
|---|---|---|---|---|---|
| RI 1234 | 1100 | 1100 | PV 6541 | 500 | 500 |
| RI 1245 | 500 | 500 | PV 6556 | 600 | 600 |
| RI 1270 | 325 | 325 | PV 6572 | 400 | 400 |
| Total A/R | 1925 | 1925 | Total A/P | 1500 | 1500 |
Transactions after netting:
| A/R Documents | Gross Amount | Open Amount | A/P Documents | Gross Amount | Open Amount |
|---|---|---|---|---|---|
| RI 1234 | 1100 | 1100 | PV 6541 | 500 | |
| NO 1280 | 500- | 500- | NM 1280 | 500- | |
| RI 1245 | 500 | 500 | PV 6556 | 600 | |
| NO 1281 | 600- | 600- | NM 1281 | 600- | |
| RI 1270 | 325 | 325 | PV 6572 | 400 | |
| NO 1282 | 400- | 400- | NM 1282 | 400- | |
| Total A/R | 425 | 425 | Total A/P | 0 |
In this example, the customer owes you the net amount of 425.
27.1.2 Features
The A/R Standalone Netting program (P03455) includes several features that can assist you in the netting process.
Displaying Transactions, System Totals, Selected Totals, and Net Amounts
There are two methods to locate transactions in P03455. You can:
-
Complete the fields in the header portion of the screen, such as Customer/Supplier, Company, and Due Date, to retrieve vouchers and invoices that meet your criteria.
-
Choose Supplier Ledger Inquiry (A/P) (F15) or Customer Ledger Inquiry (A/R) (F16) to locate and retrieve transactions. On Supplier Ledger Inquiry or Customer Ledger Inquiry, enter 4 in the Option field and click Enter next to the records you want to calculate in netting process. The program replaces the 4 with an * indicating you have chosen these records for netting. Exit (F3) to display these records in P03455 and continue the netting process.
The system provides a total for A/R, A/P, and their net amount.
The system always derives the net amount by subtracting the A/R amount from the A/P amount so you can quickly determine whether you are netting for receivables or payables and which type of program to use. Use the Use A/R or A/P Netting processing option to choose the type of program you want to run.
-
If the net amount is negative, you are netting for receivables and must use A/R Stand-Alone Netting.
-
If the net amount is positive, you are netting for payables and must use A/P Stand-Alone netting.
In the following example, the Net Total field is 1464.90-, which indicates that you are netting for receivables if you choose to net all of the transactions that display.
Figure 27-1 A/R to A/P Standalone Net screen
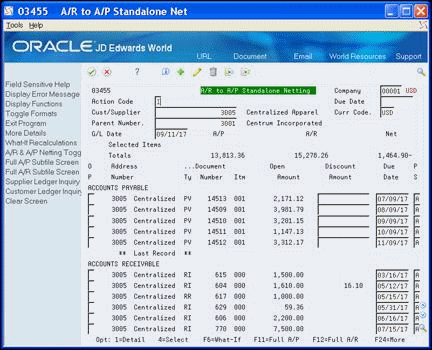
Description of ''Figure 27-1 A/R to A/P Standalone Net screen''
What-If Recalculations for Select Transactions
If you do not want to net all of the transactions that display, you can choose individual transactions on which to perform what-if recalculations. When you enter 4 in the Option field next to the transactions and choose What-If Recalculations (F4), the program recalculates the totals based on the transactions you choose and validates that you are using the correct version of the program.
Toggle Between A/R & A/P Netting
If you do not have the Netting processing option set to launch the type of netting that you intend to use (A/R or A/P) or if you attempt to use the wrong type of program to perform the netting process, the system displays the Invalid Netting Amount error message, and does not create the net transactions. You can choose A/R & A/P Netting Toggle (F10) to access the correct program. The program then displays **Mode Alert** and changes the program name to indicate the program for the netting process.
The program displays the message ** Last Record ** after the last voucher or invoice record for the customer/supplier. You can continue to scroll through the vouchers in the upper part of the subfile detail area using Page Down. To scroll through the invoices in the lower part of the subfile detail area, place your cursor in the Option field next to an invoice and then Page Down.
You can toggle the screen to review only the voucher or invoice transactions. Choose:
-
Full A/P Subfile Screen (F11) to display only vouchers
-
Full A/R Subfile Screen (F12) to display only invoices
To return to the previous screen, choose Exit (F3), Full A/P Subfile Screen (F11), or Full A/R Subfile Screen (F12) again. You must return to the view that includes both vouchers and invoices before you can toggle to another full screen.
The program uses today's date as the G/L date. To net transactions using a different G/L date than today's date, you must first enter a date in the G/L Date field and then locate the customer/supplier transactions. You cannot change the G/L date after you locate the transactions because the system validates the G/L date you enter against the period number for the company you enter or Company 00000, as the default, to determine whether PBCO, PACO, or WACO messages apply.
27.1.3 Multi-Currency
After you activate multi-currency for your system, the system can net transactions only when:
-
The base currency code for the company that you enter in the transactions is the same for both the vouchers and invoices that you want to net.
For example, if you enter an invoice in USD for a company with a currency code of CAD, you cannot net this transaction against a voucher in USD for a company with a currency code of CHL.
-
The transactions must have the same transaction currency.
If you enter an invoice in Canadian dollars for a company with a currency code of USD, you can only net it against a voucher in Canadian dollars for a company with a currency code of USD.
The system displays only the transactions that conform to the currency rules in the A/R Standalone Netting program (P03455).
27.2 Determining Liabilities
When you perform the netting process, you net for either receivables or for payables depending on where the liabilities exist. You can determine liabilities by:
-
Printing the Receivables/Payables Netting report (P03450). This report prints only those customers/suppliers with open invoices and vouchers available to net. If this report includes a customer/supplier that has a potential A/P offset, the total amount of vouchers to pay exceeds the total amount of invoices to receive, you are netting for payables. If this report includes a customer/supplier that has a potential A/R offset, the total amount of invoices to receive exceeds the total amount of vouchers to pay, you are netting for receivables.
-
Running the A/R or A/P Stand-Alone Netting program (P03455). When you locate a supplier/customer, the system displays the totals for A/P, A/R and their net. You can also choose to obtain totals for specific records. If the system displays a net total that is a positive number, you are netting for payables. If the system displays a negative total, you are netting for receivables.
-
Printing the Netting - Aging Report (P03466). This report includes aging information as well as customers/suppliers who have open balances in both systems. Also, the Netting - Aging Report requires that you build netting workfiles to perform the aging function. See Section 28.2, "Creating the A/R and A/P Netting Report Workfile Table" for more information.
See Section 28.1, "Printing Netting Reports" for more information about the reports.
27.2.1 Before You Begin
-
Designate one address book number as the customer/supplier record. The system cannot net vouchers and invoices from more than one address book record. You can assign a unique Search Type to this record, if necessary, to distinguish it as a netting address book record.
-
Set the AR/AP Netting field to Y on the Address Book Control Revisions screen if you want to apply netting to specific address book records. You access this screen from the Address Book Revisions program (P01051) by choosing Address Book Control Revisions (F13). See Section 3.1, "Entering Customers" for more information.
-
Run Update AR from Address Book (P03802) to update the AR/AP Netting Indicator field (RPAT2) with the value in the address book record, if necessary. When you enter invoices, the system updates the AR/AP Netting Indicator field (RPAT2) in the Accounts Receivable Ledger (F0311) invoice records according to the value you enter in the AR/AP Netting field in the Address Book system. If invoices exist prior to you setting this field or if you want to change the setting, you must run this program.
-
Set the Override Address Book Authority processing option in the AP/AR Netting program (P03455) to override the system validating the value in AR/AP Netting Indicator field (RPAT2), if necessary.
-
Set up the AAI for the netting suspense account NC for each company that you use to enter net transactions. NC specifies the distribution account that the system uses when it generates the NO document and the G/L bank account on the receipt for the NM document. The system does not use a default NC for company 00000. See Section 73.3, "About Default AAIs for A/R"for more information.
-
Set the processing options for the A/R Standalone Netting program (P03455).
27.3 Netting the Transactions
There are two methods you can use to net transactions. They include:
-
Netting transactions in stand-alone mode
-
Netting transactions during receipts processing
27.3.1 Netting Transactions in Stand-Alone Mode
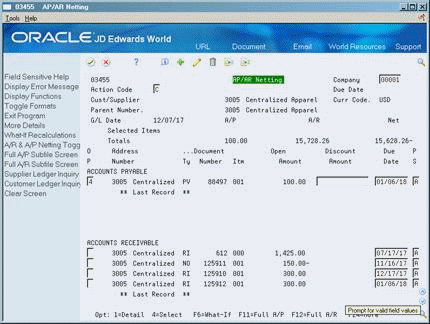
Typically, you use this method to net for receivables when you are not ready to enter receipts. You net transactions in stand-alone mode using the A/R Standalone Netting program (P03455), which you access directly from a menu.
Netting transactions in stand-alone mode includes the following tasks:
-
Create net transactions
-
Review net transactions
-
Delete unposted net transactions
-
Post net transactions
-
Process receipts for net receivables transactions
From Accounts Receivable (G03), choose Manual Receipts Processing
From Manual Receipts Processing menu (G0312), choose A/R Stand-Alone Netting
-
On A/R Stand-Alone Netting, to locate transactions, complete either of the following fields and click Inquire:
-
Cust/Supplier
-
Parent Number
-
-
To narrow your search, complete the following optional fields:
-
Company
-
Due Date
-
Currency Code
-
-
Enter 4 in the Option field next to each transaction you want to net.
Figure 27-2 A/R Stand-Alone Netting screen

Description of ''Figure 27-2 A/R Stand-Alone Netting screen''
-
Choose What-If Recalculations (F6) to perform what if calculations.
Verify that the net total is correct for the program that you are using. If the net total is positive, you must use the AP Stand-Alone Netting program. If the net total is negative, you must use the AR Stand-Alone Netting program.
-
Choose A/R & A/P Netting Toggle (F10) to access the correct program, if necessary.
-
Click Change to net the transactions.
The system creates the NO/NM net transactions and clears the screen.
27.3.2 Processing Options
See Section 104.1, "A/P and A/R Netting (P03455)" for more information.
-
On A/R Stand-Alone Netting, to locate net transactions, perform one of the following:
-
Choose Supplier Ledger Inquiry (A/P) (F15)
-
Choose Customer Ledger Inquiry (A/R) (F16)
-
-
On Supplier Ledger Inquiry or Customer Ledger Inquiry, review the transactions.
Figure 27-3 Customer Ledger Inquiry (Review Net Transactions) screen
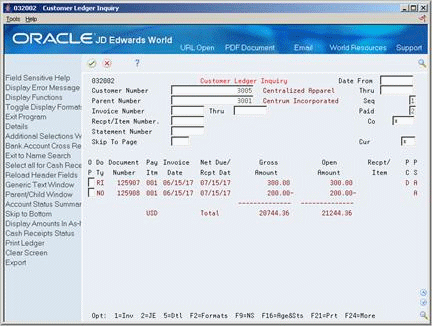
Description of ''Figure 27-3 Customer Ledger Inquiry (Review Net Transactions) screen''
To delete unposted net transactions
You can delete net transactions only if you did not post the transactions. If you did post the net transactions, you must continue the receipt process and then void the receipt to reverse the net transactions.
-
On A/R Stand-Alone Netting, to locate transactions, complete either of the following fields and click Inquire:
-
Cust/Supplier
-
Parent Number
-
-
To narrow your search, complete the following optional fields:
-
Company
-
Due Date
-
Currency Code
-
-
Enter 9 in the Option field next to the NO netting documents that you want to delete.
-
Click Change.
There are three methods to post net transactions. They include:
-
Set the Automatic Posting processing option for P03455 to automatically post the net transactions.
-
Use the A/R Netting Post program (P03853) on the Manual Receipts Processing menu (G0312) to post both A/P and A/R net transactions simultaneously. You must enter both batch numbers. Ensure you leave the A/R Netting processing option blank.
-
Use the Post program (P09800) to post the A/R and A/P batches separately.
The system creates the following entries in the Account Ledger table (F0911) when you post the original netting documents:
-
An AE document to the A/P and A/R trade accounts. The value in the Offset Method field in the A/R and A/P constants determines whether the system generates one AE for the batch of transactions or one AE for each document.
-
An NM document for each payment to the account you specify in AAI item NC.
-
An NO document for each original invoice to the account you specify in AAI item NC.
Note:
You cannot delete posted net transactions. You must include them in a payment/receipt process, void the payment/receipt and then reverse the net transactions.When you net transactions, the system uses the account in the AAI item NC as the revenue distribution account for the NO transaction that it creates for the invoice. The system generates an offset to the same account for the Account Ledger table (F0911) NM transaction that it creates for the net matching document that close the vouchers.
To process receipts for net receivables transactions
There are two methods to process receipts for net receivables transactions. They include:
-
Process A/R receipts automatically. See Section 29.2, "About Automatic Receipts Processing" for more information.
-
Use the Manual Receipts Entry program (P03103).
The system creates the RC matching document for each NO invoice that is paid.
When you post receipts for net transactions, the system creates the standard G/L bank account and trade account (offset) entries. The system does not generate entries to the netting account.
Note:
You can use the spread type input process for the net transactions, instead of the invoice matching type input process, if the amounts net to zero.27.3.3 Netting Transactions during Receipts Processing
You can create net transactions during the receipts process. You typically use this method when a customer remits payment for the net amount owed to you. You use the customer's remittance advice to enter and net receipts. You can apply the receipt to your customer or to its parent. When you choose to create net transactions during the receipt process, you must be aware of the following:
-
The system automatically posts the net transactions even if you leave the Automatic Posting processing option in the A/R Stand-Alone Netting program blank.
-
If you make a mistake during the netting process, you must continue with the receipts process. After the program generates the receipt, you can reverse the receipt, and then reverse the net transactions.
Netting transactions during receipts processing includes the following tasks:
-
Create net transactions using receipts entry
-
Void receipts and reverse net transactions
To create net transactions using receipts entry
From Accounts Receivable (G03), choose Manual Receipts Processing
From Manual Receipts Processing (G0312), choose Receipts Entry
If you display the customer invoices before you choose A/R A/P Netting (F23), the system overwrites the invoices that display with the transactions you choose from the netting application. You cannot retrieve and display invoices, and then append them with vouchers from the netting application.
After you create net transactions, you must complete the receipts entry process and post the receipts.
-
On Receipts Entry, complete the following fields:
-
Display Account
-
Company
-
Recpt/Item Amount
-
Currency Code (optional)
-
Receipt/Item Date
-
Payment G/L Date
Figure 27-4 Receipts Entry (Net Transactions) screen
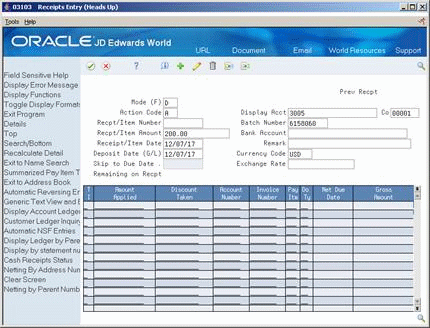
Description of ''Figure 27-4 Receipts Entry (Net Transactions) screen''
-
-
Perform one of the following:
-
To net transactions at the customer level, choose the Netting by Address Number (F21).
-
To net transactions at the customer's parent level, choose the Netting by Parent Number (F23).
-
-
On AP/AR Netting, enter 4 in the Option field for each voucher and invoice you want to net.
-
Choose What-If Recalculations (F6) to perform what if calculations.
Verify that the net amount is negative, indicating that you are netting for receipts.
-
Click Enter.
-
Exit (F3) to Receipts Entry.
Figure 27-6 Receipts Entry (Netting Receipts) screen
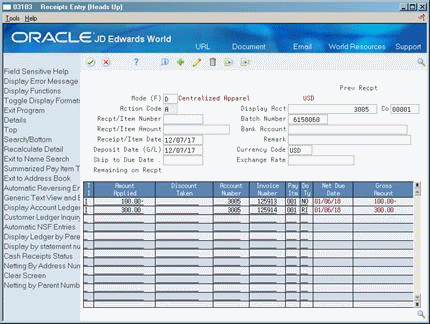
Description of ''Figure 27-6 Receipts Entry (Netting Receipts) screen''
The net transaction display with the Invoice Match type input code (I) for each item.
-
On Receipts Entry, click Enter.
The program creates the NO and NM netting documents. The program also posts the batch of net transactions when you exit this program, even if you leave the Automatic Posting processing option in the A/R Stand-Alone Netting program blank.
| Field | Explanation |
|---|---|
| Display Acct | The address book number that identifies the customer associated with the transaction.
Form-specific information To call the netting program, the AR/AP Netting field (AT2) for this customer must be set to Y (Yes) on Address Book-Additional Information. |
| Currency Code | A code that indicates the currency of a customer's or a supplier's transactions.
Form-specific information The Currency Code field in the header is for the currency code of the transactions you want displayed. The Curr field in the fold area displays the original currency code of the transaction.
You can only net transactions that have the same currency. |
| Deposit Date (G/L) | A date that identifies the financial period to which the transaction is to post. The company constants table for general accounting specifies the date range for each financial period. You can have up to 14 periods. Generally, period 14 is for audit adjustments. |
27.3.4 What You Should Know About
| Topic | Description |
|---|---|
| Applying discounts | Netting has no effect on the way in which the system applies discounts. The system applies discounts to vouchers and invoices but not to netting original or netting matching documents.
See Section 9.2, "Entering an Invoice with Discounts" for more information. |
See Also:
27.3.6 Voiding Receipts and Reversing Net Transactions
You can void receipts that include net transactions using the Receipts Entry program (P03103). The program allows you to restore the open amount of the net transactions or reverse them. The system performs the following when you void receipts:
-
When you void the receipt and do not reverse the net transactions, the system restores the open amount to the original NO net documents.
-
When you void the receipt and reverse the net transactions, the system:
-
Generates the void receipt record (RO matching document type)
-
Creates matching records for the NO and NM documents (RE and PO matching document types respectively)
-
Opens the original voucher and invoice transactions
-
You cannot delete unposted paid net transactions when you void a posted receipt.
When you use the Receipts Entry program to void the receipt, you can also reverse the net transactions. The system displays the Netting/Void Rollback Window only when net transactions exist in the receipt.
To void receipts and reverse net transactions
From Accounts Receivable (G03), choose Manual Receipts Processing
From Manual Receipts Processing (G0312), choose Receipts Entry
-
On Receipts Entry, locate the receipt.
-
Click Change and then choose Automatic Reversing Entries (F13).
-
On Netting/Void Rollback Window, perform one of the following:
-
Cancel the void/delete process (F3)
-
Void/Delete Payment/Receipt only (F5)
-
Rollback all transactions that generated the netting documents (F6)
If you choose Void/Delete Payment/Receipt only (F5) or Rollback all transactions that generated the netting documents (F6), you must post all of the void records.
-