9 Work with Other Types of Standard Invoices

This chapter contains these topics:

In addition to entering basic information for a standard invoice, you can enter and revise other types of information. For example, you might want to enter an invoice for multiple line items with different due dates or tax information.

9.1 Working with Other Types of Standard Invoices

Navigation

From Accounts Receivable (G03), choose Customer & Invoice Entry

From Customer & Invoice Entry (G0311), choose Standard Invoice Entry

Figure 9-1 Standard Invoice Entry screen

Description of Figure 9-1 follows
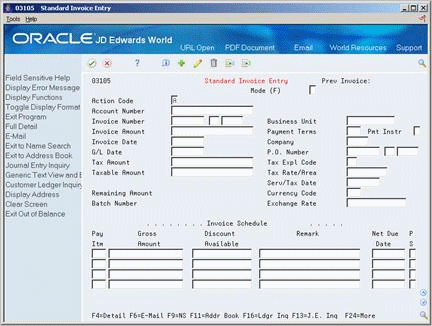
Description of ''Figure 9-1 Standard Invoice Entry screen''

9.2 Entering an Invoice with Discounts

The system calculates the discount and net due dates according to the payment terms. You specify default payment terms in the customer master record or you can manually enter the payment term at time of invoice entry. You can change the discount before you receive payment by:

  • Changing the discount amount or payment terms during invoice entry

  • Overriding the discount amount during receipts entry

  • Overriding the discount amount when you update an invoice for payment

The system creates the associated journal entries for the discount amount when you receive payment.

9.2.1 Before You Begin

  • Verify that AAI item RKD is set up correctly

To enter an invoice with discounts

On Standard Invoice Entry

  1. Follow the steps to enter standard invoices.

    See Section 8.2, "Entering Standard Invoices" for more information.

  2. Toggle to the discount format (optional).

    Figure 9-2 Standard Invoice Entry (Discount Format) screen

    Description of Figure 9-2 follows
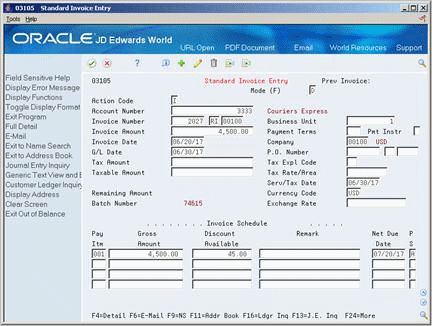
    Description of ''Figure 9-2 Standard Invoice Entry (Discount Format) screen''

  3. Complete one of the following fields:

    • Payment Terms

    • Discount Available

  4. Complete one of the following fields (optional):

    • Net Due Date

    • Discount Due Date

Field Explanation
Discount Available The amount of the discount available as opposed to the amount of the discount actually taken. If the customer's invoice specifies a discount available, type that amount. If not, do one of the following:
  • Compute the amount manually and type it in the field.

  • Compute the discount as a percentage of the invoice amount by keying the percent sign (%) followed by the percentage amount, for example, type %.02 for 2%.

  • Leave the field blank. The system will calculates the amount based on the payment terms specified in the customer master record.

  • Type a zero (0) to override the default value and indicate that a discount is not applicable.

Note: If the discount is to be calculated automatically, take care in determining the amount available for discount. Usually, freight, sales taxes, and labor included in the gross amount do not qualify for discounts. If this is the case, separate these pay items to ensure that the discount is calculated correctly.

Discount Due Date The date that the invoice or voucher is due in order to acknowledge the discount.

9.2.2 What You Should Know About

Topic Description
Changing an invoice with discounts If you change a discount field for an invoice, remove the system-calculated information. For example, if you change the payment terms to calculate a new discount, clear the discount amount, discount date, and net due date. If you clear the payment terms but not the other discount fields, the system will not recalculate the discount information.
Calculate Discount Due Date without a Discount You can choose to calculate a discount due date using payment terms when there is no Discount Available. This is determined by one of the 'Default Processing' processing options for the A/R functional server, XT0311Z1.

9.3 Entering a Split Payment Invoice

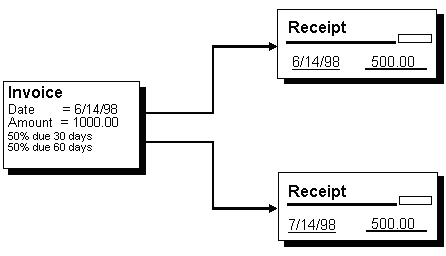
You can allow a customer to pay an invoice in installments. For example, you might require that a customer pay half an invoice amount when the order is placed and pay the remaining amount when the service is complete or when goods are shipped. To do this, enter a split payment invoice.

The system splits the invoice into equal amounts to be paid at regular intervals according to the payment terms set up for the customer. You can change the payment terms and amounts before payment is received. The system calculates the net due date based on the payment terms you specify.

Figure 9-3 Split Payment Invoice

Description of Figure 9-3 follows
Description of ''Figure 9-3 Split Payment Invoice''

To enter a split payment invoice

On Standard Invoice Entry

  1. Follow the steps to enter information for a standard invoice.

    See Section 8.2, "Entering Standard Invoices" for more information.

  2. Complete the following field:

    • Payment Terms

9.3.1 What You Should Know About

Topic Description
Changing a split payment invoice If you change the invoice amount, you must manually adjust the gross amounts for the pay items.
Applying discounts If you split an invoice with a discount, the total discount amount is applied to the first payment.

9.4 Entering a Credit Memo

When a customer is overcharged and you want the customer's statement to reflect the correction, enter a credit memo.

The system assigns the document type you specify in the processing options for the XT0311Z1 A/R Functional Server. Generally, a credit memo is assigned a document type RM.

To enter a credit memo

On Standard Invoice Entry

Enter an invoice for a negative amount.

9.4.1 What You Should Know About

Topic Description
Calculating due dates for credit memos You can choose whether or not credit memos will use payment terms in order to calculate net due dates. This is controlled by the Date Edit processing option for the A/R functional server, XT0311Z1.

9.5 Entering an Invoice with Taxes

Enter tax information on an invoice to override the default tax information. Default information, which you specify in the customer master record, applies to an entire invoice and all pay items.

The system makes accounting entries for taxes when you post the invoice. AAI item RTyyyy points to the tax account. If you enter a tax amount, the system validates it based on the tolerance ranges you specify when you set up tax rules by company.

9.5.1 Before You Begin

To enter an invoice with taxes

On Standard Invoice Entry

  1. Follow the steps to enter standard invoices.

    See Section 8.2, "Entering Standard Invoices" for more information.

  2. Toggle to the alternative tax format (optional).

    Figure 9-4 Standard Invoice Entry (With Taxes) screen

    Description of Figure 9-4 follows
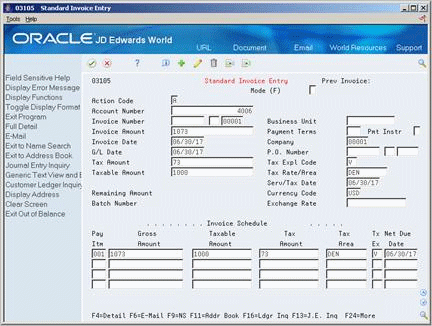
    Description of ''Figure 9-4 Standard Invoice Entry (With Taxes) screen''

  3. Complete the following fields:

    • Tax Explanation Code

    • Tax Rate/Area

  4. Complete the following optional fields:

    • Tax Amount

    • Taxable Amount

    • Service/Tax Date

Field Explanation
Tax Amount This is the amount assessed and payable to tax authorities. It is the total of the VAT, use, and sales taxes (PST).

This is the amount of tax that applies to the payment you are entering. The system makes accounting entries when you post the receipt and invoice. If you leave this field blank, the system calculates it for you based on the tax explanation code and tax rate/area you defined for the customer on Customer Master Information. If you enter a tax amount, the system validates it against the tolerance ranges you specify on Tax Rules by Company.

Form-specific information

When you enter a tax amount, you might receive a warning message if the amount is different than the calculated amount in the Tax Rate/Area field. This warning does not prevent you from completing the entry.

Taxable Amount The amount on which taxes are assessed.

Form-specific information

You can either enter an amount in this field and the system will calculate the tax for you, or you can enter an amount in the Tax Amount field. If you decide to type an amount in the field, the system will validate it according to the tax rules you set up on Tax Rules by Company.

Service/Tax Date A date that indicates either when you purchased the goods or services, or when you purchased the goods and services and incurred the tax liability. Generally, when you leave this field blank, the system uses the G/L date you specified.

9.5.2 What You Should Know About

Topic Description
Changing tax information If you change any of the amount or tax rate fields, you must clear the system-calculated information (tax amount and taxable amount) so that the can system recalculates them based on the new information.

When an invoice has multiple tax rates, you must change tax information for each pay item that differs from the default information.

Dividing tax amounts among pay items You can divide a tax amount among pay items. To do so, enter tax information for each pay item instead of the entire invoice.
Posting tax information The system posts taxes to the appropriate accounts using AAI item RT and records tax pay items in the Sales/Use/VAT Tax table (F0018), based on the processing options.
Default tax information You can choose to have the tax information default from the customer master information or not. This is designated by one of the 'Default Processing' processing options for the A/R functional server, XT0311Z1.

9.6 Working with a Multi-Currency Invoice

To enter an invoice for a currency other than the domestic currency for the customer, enter a multi-currency invoice. The system converts the amount to the domestic currency of the company that the invoice is associated with using the exchange rate in the Currency Exchange Rate table (F0015).

This task consists of:

  • Entering a multi-currency invoice

  • Verifying the invoice currency (optional)

9.6.1 Before You Begin

  • Verify that the following AAIs are set up correctly:

    • Realized Gain (RG)

    • Realized Loss (RL)

To enter a multi-currency invoice

On Standard Invoice Entry

  1. Follow the steps to enter standard invoices.

    See Section 8.2, "Entering Standard Invoices" for more information.

  2. Complete the following fields:

    • Currency Code

    • Exchange Rate (optional)

Field Explanation
Exchange Rate The conversion rate that the system uses to convert foreign currencies to domestic currencies. If the Multi-Currency Conversion option on the Set Multi-Currency Option form is set to Y, this rate is a multiplier. If it is set to Z, this rate is a divisor.

Form-specific information

If you leave this field blank, the rate is supplied from the exchange rate table on the Set Daily Transaction Rates form. The effective date for the exchange rate is either the invoice date or the general ledger date, depending on how the processing options are set.


To verify the invoice currency

On Standard Invoice Entry

  1. Locate the invoice.

    See Section 8.3, "Locating Invoices" for more information.

  2. Verify the following field:

    • Mode

Field Explanation
Mode (F) This code indicates whether amounts are in the domestic currency of the company that the accounts are associated with, or in the foreign currency of the transaction. If Detailed Currency Restatement is being used, amounts restated from the domestic currency of the company that the accounts are associated with are shown. Codes are:

D – Domestic

F – Foreign

Form-specific information

When you inquire on an invoice, the default code in this field is that of the original mode of entry. You can then enter F or D to specify how you want amounts to appear.


9.6.2 What You Should Know About

Topic Description
Changing multi-currency information You cannot change the currency code. If you need to change the currency, you must enter a new invoice with the correct currency code and delete the incorrect invoice.
Reviewing multi-currency information You can display the currency originally entered for the invoice as well as the domestic currency of the company.
Deleting multi-currency information If you delete a foreign currency invoice, the system also deletes the domestic side of the invoice. If you delete a domestic invoice, the system also deletes the foreign side.

9.7 Setting Up a Recurring Invoice

To bill a customer the same amount on a regular basis, set up a recurring invoice. This method of entering a standard invoice is ideal for lease and rent payments.

See Also:

9.7.1 Processing Options

See Section 102.1, "Invoice Entry (P03105)" for more information.