8 Work with Standard Invoices
This chapter contains these topics:
8.1 Working with Standard Invoices
From Accounts Receivable (G03), choose Customer & Invoice Entry
From Customer & Invoice Entry (G0311), choose Standard Invoice Entry
Standard invoices provide the most features and flexibility when you enter invoices for your customers. When you need to change, delete, or void an invoice, use standard invoice entry. If you routinely distribute invoices to multiple G/L accounts, you can set up a journal entry to use as a model.
Invoice information is stored in the A/R Ledger (F0311) and Account Ledger (F0911) tables.
| Topic | Description |
|---|---|
| Revenue Recognition | From the Standard Invoice Entry program (P03105) you can enter an invoice into revenue recognition by choosing Add Invoice to Revenue Recognition (F20).
See Chapter 37, "Work with Revenue Recognition (Release A9.3 Update)" for more information. |
8.2 Entering Standard Invoices
The following graphic illustrates the forms you use to enter standard invoices.
Figure 8-1 Forms to Enter Standard Invoices
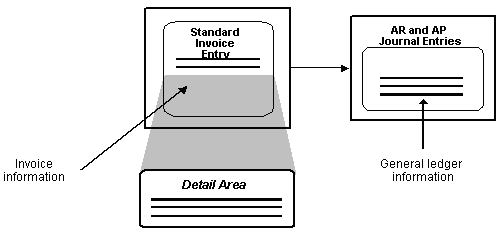
Description of ''Figure 8-1 Forms to Enter Standard Invoices''
You must create an invoice to bill a customer for goods or services. You create an invoice by entering information about how you will process the invoice for receipt or allow the system to enter this information from the customer record.
After you enter information that is specific to the invoice, you enter the G/L distribution information. You typically enter a credit to a revenue account. When you post the invoice, the system creates the offset to the AR trade account as designated by AAI item RC.
When entering standard invoices, you:
-
Enter invoice information
-
Enter general ledger information
You must complete both tasks for each invoice.
The system assigns a batch type of I to invoices.
See Also:
Figure 8-2 Standard Invoice Entry screen
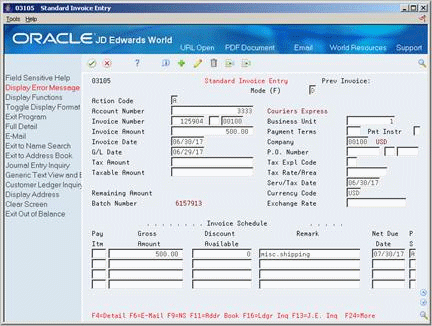
Description of ''Figure 8-2 Standard Invoice Entry screen''
-
Complete the following fields:
-
Account Number
-
Invoice Number (optional)
-
Invoice Amount
-
Payment Terms (optional)
-
Payment Instrument (optional)
-
Invoice Date
-
Company
-
Purchase Order Number (optional)
-
G/L Date
-
-
In the invoice schedule, complete the following optional fields for each pay item:
-
Pay Item
-
Gross Amount
-
Remark
-
Net Due Date
-
Pay Status (PS)
-
-
Press F4 to access the detail area
Figure 8-3 Standard Invoice Entry (Detail) screen
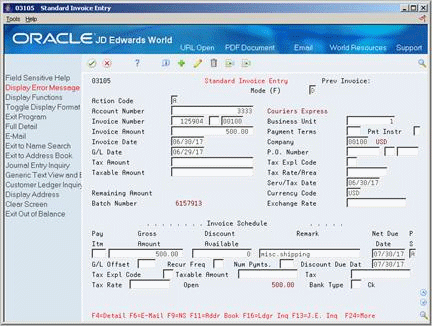
Description of ''Figure 8-3 Standard Invoice Entry (Detail) screen''
-
Complete the following optional fields:
-
G/L Offset
-
Tax Explanation Code
-
Taxable Amount
-
Tax Rate
-
Bank Type
Note:
The fields which display in the Detail area will vary depending on the format selected. -
8.2.1 What You Should Know About
| Topic | Description |
|---|---|
| Creating a customer record | You can create a new customer record when you enter invoice information by choosing the Exit to Address Book function (F11) on Standard Invoice Entry. |
| Invoice Category Codes | By setting a processing option for Invoice Entry (P03105), you may display and update the invoice category codes when adding or changing an invoice. |
| Entry errors | If an error occurs during entry, the system highlights the field. View the error message (F7), correct the error, and press Enter to accept the invoice. |
8.2.2 Processing Options
See Section 102.1, "Invoice Entry (P03105)" for more information.
To enter general ledger information
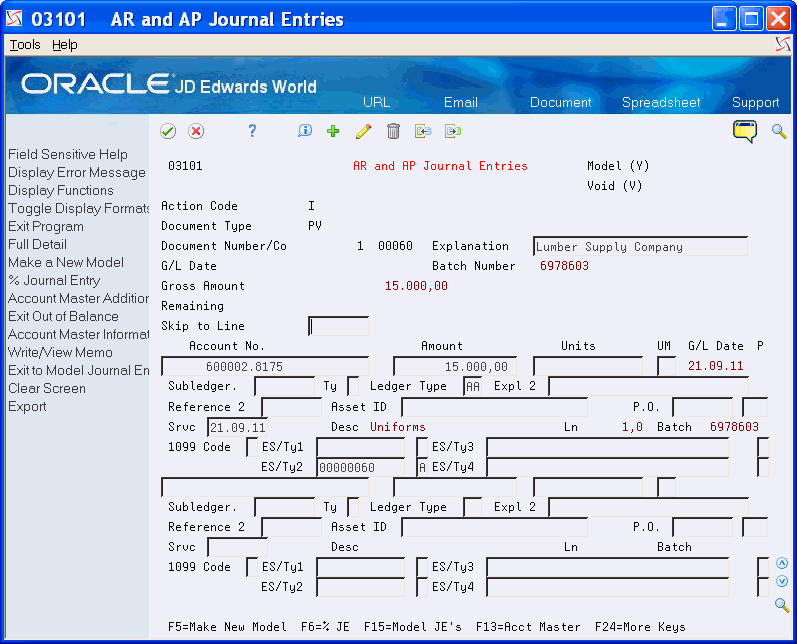
Figure 8-4 AR and AP Journal Entries screen
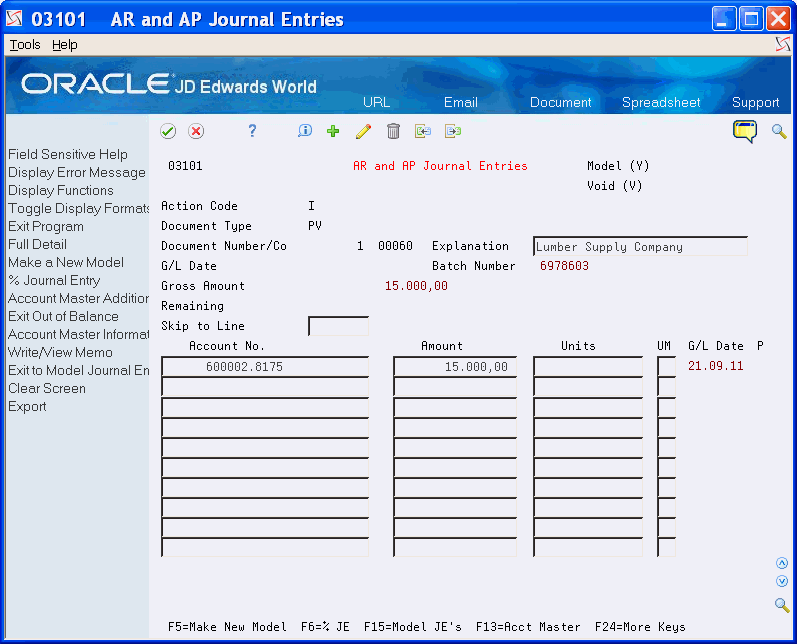
Description of ''Figure 8-4 AR and AP Journal Entries screen''
-
Toggle among alternate formats (F2) to locate the format you want to use.
-
Complete the following fields for each G/L distribution:
-
Account Number
-
Amount
-
Explanation 2 (optional)
Alternately, you can access additional fields in the detail area (F4).
-
-
Complete the following optional fields and click Add.
-
Enhanced Subledger 1-4
-
Enhanced Subledger Types
-
Figure 8-5 AR and AP Journal Entries (Fold) screen
Description of ''Figure 8-5 AR and AP Journal Entries (Fold) screen''
8.2.3 Processing Options
See Section 102.2, "A/R and A/P Journal Entries (P03101)" for more information.
To enter a model journal entry using invoice and voucher entry
To enter a model at the time you are entering an invoice, complete the following steps:
-
After completing the invoice entry portion of the transaction, on the AR and AP Journal Entries screen (P03101), press F5 to create a new model.
-
Type in the model information such as document type, explanation and account information and press Enter. Entering amounts for models is optional.
-
Once you have pressed Enter the original invoice information will appear. At this point, you can either use the newly created model, or enter account information for the transaction.
-
To access the model:
-
Press F15
-
Locate the model (either press enter to display all, or enter a document type to limit your search criteria)
-
Enter a 1 in the option field and press Enter to select the model.
-
Enter amounts, if necessary, and press Enter.
Note:
If the document company field (KCO) assigned to the model Journal Entry is different from what has been defined for that model in the Customer Master file (F0301), the model journal entry will not default into the Journal Entry side of the invoice.If the document company on the model journal entry is 00000 (which can be used regardless of the company on the invoice), and the document company field is blank in the Customer Master record, change the document company to all zeros. Upon re-inquiry, the document company will display as blank, but now the Customer Master file is populated with 00000 instead of BLANK.
-
8.3 Locating Invoices
To review, change, delete, or void an invoice, you must first locate it.
On Standard Invoice Entry
-
Complete the following fields to limit your search:
-
Invoice Number
-
Invoice Type (optional)
-
Invoice Company (optional)
-
-
If Document Inquiry appears, select an invoice.
8.3.1 What You Should Know About
| Topic | Description |
|---|---|
| Other methods of locating invoices | You can also locate an invoice on the following forms:
See Section 11.1, "Reviewing and Approving Invoices" and Chapter 16, "Locate Customer Ledger Information" |
8.4 Revising Unposted Invoices
You can change or delete an invoice before you post it. However, you cannot change the following key fields:
-
Invoice Number
-
Invoice Type
-
Invoice Company
-
Customer Number
-
G/L Date
If you need to change one of the key fields, you must delete the invoice and re-enter it, or you can copy the invoice and change the copied information.
On Standard Invoice Entry
-
Locate the invoice.
-
Change any field that is not a key field.
-
To change the general ledger information on AR and AP Journal Entries, complete the following fields to create a balancing entry, if necessary:
-
Account Number
-
Amount
-
Explanation 2 (optional)
-
-
Press Enter to accept the changes.
8.4.1 What You Should Know About
| Topic | Description |
|---|---|
| Batch headers | Any change to an invoice on an invoice entry form reopens the batch and requires you to repost it. Consider using Speed Status Change to change information, such as due dates, that does not affect the G/L distribution.
See Chapter 19, "Update Invoices for Payment" for information about using Speed Status Change to change invoice information. |
| Changing invoice amounts | You must also change the gross amounts in both the invoice information and general ledger information and ensure that they balance. |
| Changing several invoices | To quickly change specific information for several invoices at the same time, such as discounts, use Speed Status Change.
See Chapter 19, "Update Invoices for Payment" for mor e information. |
| Copying an invoice to another customer | To copy or enter the same invoice information for a new customer, you must change the customer number and invoice number. |
| Deleting unposted invoices | After you delete an unposted invoice, no audit trail exists. You cannot delete a posted invoice. You must void it. |