6 Set Up Discrete Manufacturing
This chapter contains these topics:
You need to set up several user defined codes and constants that are unique to your branch/plants.
6.1 Before You Begin
-
Define your items in the Inventory Management system. See Section 3.1, "Entering Item Master Information."
6.2 Setting Up Manufacturing Constants
From any Product Data Management menu (G30), enter 29
From Product Data Management Setup (G3041), choose Manufacturing Constants
Establish information that is unique to your branch/plants. ERPx systems use manufacturing constants to determine:
-
How to allocate, commit, and backflush inventory
-
How to calculate overhead costs
-
Whether to consider work center efficiency when calculating direct labor and overhead
-
If an audit trail tracks all changes to bills of material
-
Whether to validate bills of material online as you enter them
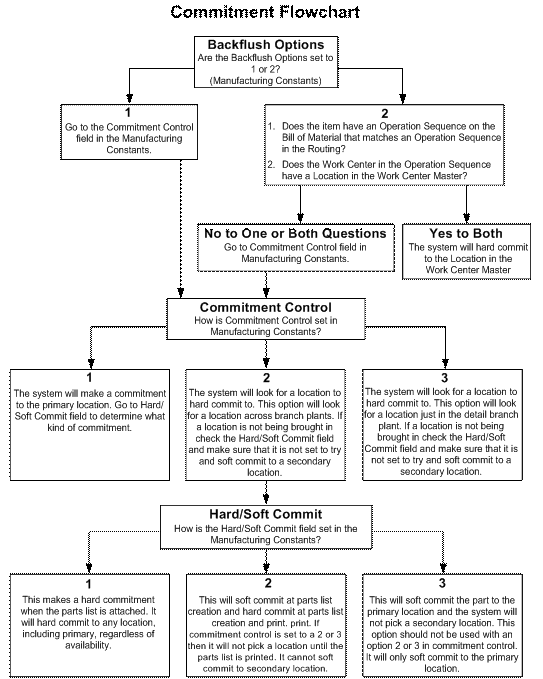
This graphic illustrates how to set up commitments in manufacturing constants.
To set manufacturing constants
On Manufacturing Constants
Figure 6-2 Manufacturing Constants screen
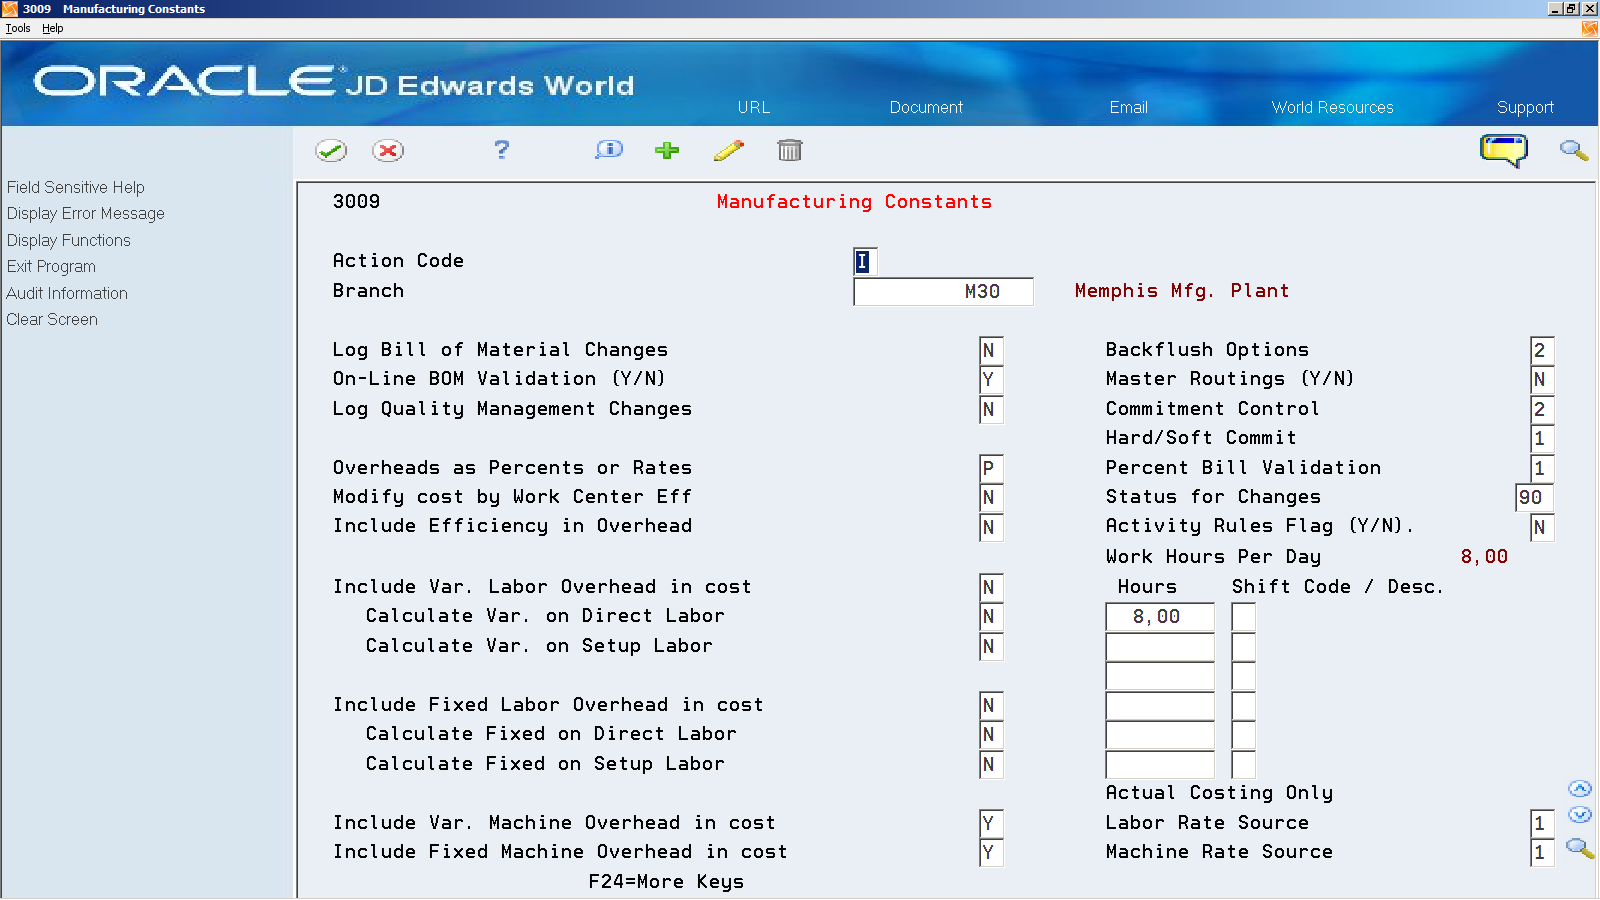
Description of "Figure 6-2 Manufacturing Constants screen"
Complete the following optional fields:
-
Log Bill of Material Changes
-
Online BOM Validation (Y/N)
-
Master Routings (Y/N)
-
Status for Changes
-
Work Hours Per Day
-
Hours
-
Shift Code/Description
-
Activity Rules Flag Y/N
| Field | Explanation |
|---|---|
| On-Line BOM Validation (Y/N) | Determines whether the system performs an online component/parent validation and low-level code assignment when you revise a bill of material.
Valid values are: Y – Yes, validate items online. N – No, do not validate items online. Note: JD Edwards World recommends that you validate items online (enter Y) unless your bills of material are extremely large. Important: If you enter N, you must validate the items in batch. Run the Integrity Analysis program (P30601) after bill of material updates and before you run the Frozen Cost Update program (P30835) or perform a DRP/MPS/MRP generation (P3482). |
| Log Bill of Material Changes | This field determines whether changes to the bill of material are recorded in the Bill of Material Change table (F3011). Valid values are:
Y – Yes, log changes. N – No, do not log changes. Blank will assume an N. When you log bill of material changes, the system saves the old bill of material and the new changed bill of material. |
| Master Routings (Y/N) | This field controls whether the system uses the master routing for an item or a routing defined for the parent item. Both routings are retrieved from the Routing Master table (F3003). Valid values are:
Y – Yes, use the master routing for an item, if one exists. The Shop Floor Control system will check the Item Cross Reference table (F4104), Cross Reference Type MR, for the parent item. If it finds a cross-reference, the system uses the master routing from the Routing Master table (F3003). If it does not find a cross-reference, the system uses the routing defined for the parent item. N – No, do not check for a master routing for the item. The system will always use the parent item's routing from the Routing Master table (F3003). |
| Status for Changes | This field specifies the status beyond which work orders and rates can not be changed in the Line Scheduling and Line Sequencing Workbench programs. |
| Work Hours Per Day | The number of work hours that the manufacturing plant typically operates in a day. This value is calculated based on hours defined in the manufacturing constants fields: WRHR + WRH2 + WRH3 (shift hours 1, 2, 3). This value is used in Back/Forward Scheduling. |
| Hours | The number of work hours that the manufacturing plant operates per day.
Form-specific information For repetitive manufacturing, identify the number of work hours per shift for the specified branch. The Resource Generation program uses the corresponding shift hours to calculate the available resource units for each shift, and the total for the day. Since the shift hours may apply to different days of the week, the system uses the total of the first three hours to define the work hours per day value. |
| Shift Code / Desc | A user defined code (07/SH) that identifies daily work shifts. In payroll systems, you can use a shift code to add a percent or amount to the hourly rate on a timecard.
For payroll and time entry: If an employee always works a shift for which a shift rate differential is applicable, enter that shift code on the employee's master record. When you enter the shift on the employee's master record, you do not need to enter the code on the timecard when you enter time. If an employee occasionally works a different shift, you enter the shift code on each applicable timecard to override the default. Form-specific information For repetitive manufacturing, use the six corresponding shift fields to identify all production line shifts for the specified branch. The Resource Generation program uses the corresponding shift hours to calculate the available resource units for each shift, and the total for the day. |
| Activity Rules Flag Y/N | A code that determines whether work order or rate schedule status changes are controlled by activity rules. |
6.2.1 What You Should Know About
| Topic | Description |
|---|---|
| Backflush options | This option determines if the location that is on the work center master (P3006) is used or not. If the operation sequence on the Bill of Material points towards a valid operation sequence on the routing, and the work center in that operation sequence has a valid location in the work center master then it will use the work center location regardless of available quantity. If this option is set to use the commitment control (1) then it will disregard the work center location. |
| Commitment control | This option is different than the commitment control in the Item Master/Branch. This option in the Manufacturing Constants controls where the commitments will happen. This option has three choices:
1 – Primary location 2 – Location with availability in any branch plant that may include primary 3 – Location with availability in the detail branch plant If the client wants commitments against their primary location this should be set to 1. If the client wants the system to select a location or locations to fill the order they should select 2 or 3 based on if they take inventory from different branch plants: 2 – The system can cross branch boundaries to fill commitments 3 – The system cannot cross branch boundaries |
| Hard and soft commits | This option determines what kind of commitment will happen and when it will happen. It works in tandem with commitment control to determine what kind of commitment should be made. This option also has three choices:
1 – Hard commit when the parts list is attached 2 – Soft Commit when parts list is attached and Hard commit when that parts list is printed 3 – Soft Commit when the parts list is attached until inventory is relieved A soft commitment cannot be generated for a secondary location. So if there is a location that is filled in on the parts list the part has to be hard committed. This is a hard rule that overrides other rules. If the system is set to soft commit until inventory is relieved, the system will not use the commitment control field because only a soft commitment to the primary location will be created and used until the inventory is issued. The system will not create a soft commitment to a secondary location. |
On Manufacturing Constants
Complete the following fields:
-
Labor Rate Source
-
Machine Rate Source
| Field | Explanation |
|---|---|
| Labor Rate Source | Selects either of two choices for the source of labor rates. The field is not used for standard costing.
Valid values are: 1 – System uses frozen work center rates from the Work Center Rates table (F30008) 2 – System uses employee labor rates from the Employee Labor Rates table (F00191) |
| Machine Rate Source | Selects either of two choices for the source of machine rates. The field is not used for standard costing.
Valid values are: 1 – System uses frozen work center rates from the Work Center Rates table (F30008) 2 – System uses the Equipment Rental Rate table (F1301) |
6.3 Setting Up Bill of Material Types
From any Product Data Management menu (G30), enter 29
From Product Data Management Setup (G3041), choose Bill of Material Types
You can set up user defined codes (40/TB) to define bill of material types, such as manufacturing bills, rework bills, and spare parts bills.
To set up a bill of material type
On Bill of Material Types
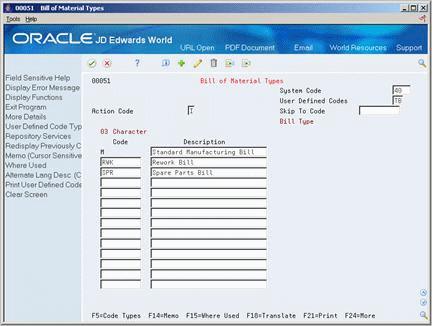
Complete the following fields:
-
Code
-
Description
| Field | Explanation |
|---|---|
| User Defined Codes | Identifies the table that contains user defined codes. The table is also referred to as a code type. |
| Description | A user defined name or remark. |
6.4 Setting Up Time Basis Codes
From any Product Data Management menu (G30), enter 29
From Product Data Management Setup (G3041), choose Time Basis Codes
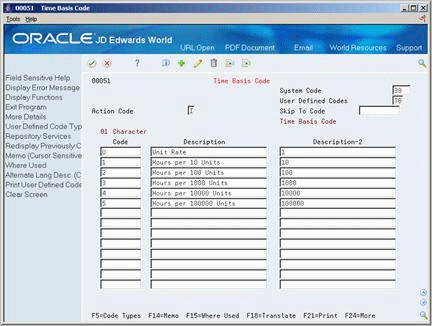
You can set up user defined codes (30/TB) to define time basis codes. You use time basis codes to identify the rate used for machine or labor hours as you enter a routing. The following programs use the time basis code value to determine run time per unit:
-
Lead time Rollup
-
Product Costing
-
Capacity Requirements Planning
-
Shop Floor Control
On Time Basis Code
Complete the following fields:
-
Code
-
Description
-
Description-2
| Field | Explanation |
|---|---|
| Code | This column contains a list of valid codes for a specific user defined code list. The number of characters that a code can contain appears in the column title. |
6.5 Setting Up Standard Procedure Descriptions
From any Product Data Management menu (G30), enter 29
From Product Data Management Setup (G3041), choose Standard Procedure Descriptions
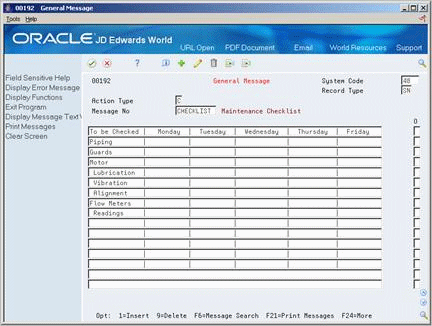
You can set up user defined codes (48/SN) to represent standard procedures for your company. For each code, you can define message text that is standard to your business.
If you use a standard procedure description code when you enter a routing, the system prints the standard procedure text on shop floor documents.
To set up a standard procedure description
On Standard Procedure Descriptions
Figure 6-5 Standard Procedure Descriptions screen
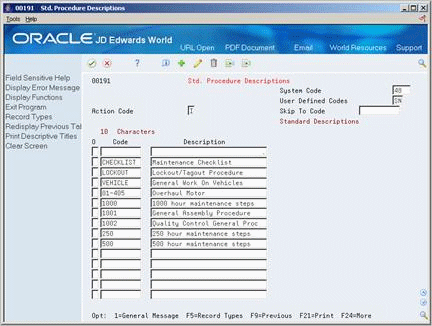
Description of "Figure 6-5 Standard Procedure Descriptions screen"
-
Access General Message for a code.
-
On General Message, type the text for the message.
6.6 Setting Up a Shop Floor Calendar
From any Product Data Management menu (G30), enter 29
From Product Data Management Setup (G3041), choose Shop Floor Calendar
Use the shop floor calendar to define work days by month and year for all branches/plants. The system uses this calendar to determine:
-
Manufacturing schedules
-
Start dates for work orders
-
Start and complete dates for work order routings
To set up a shop floor calendar
On Shop Floor Calendar
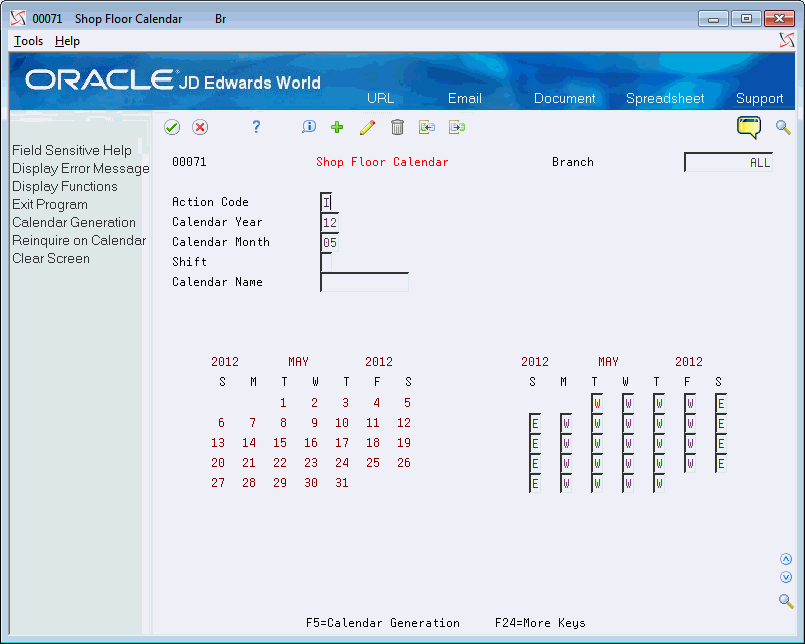
-
Locate the month and year to define.
The calendar on the left displays the calendar days for the month and year. The calendar on the right displays the defined work days.
-
To specify a work day, type W.
Note:
W is hard-coded to represent a work day. You can specify any other letter to indicate non-work days6.6.1 What You Should Know About
| Topic | Description |
|---|---|
| Using other day types | Use UDC table 00/TD to define work days. For example:
|
| Defining shift calendars | You can define up to six shift calendars. The shift hours must match the hours you set up in the manufacturing constants table.
For production lines using the default shop floor calendar, leave the Shift and Calendar fields blank. |
6.6.2 Generating Shop Floor Calendar
You use the Calendar Generation screen to add, change, or delete multiple calendar months and years for a specified date range simultaneously by establishing a weekly model of working and nonworking days. All systems using the Shop Floor Calendar program can use the Shop Floor Calendar process. A standard five day work week defaults into the Type of Day code fields.
Note:
The type of day code is used to define a typical weekly schedule for calendar generation. You have the option to automatically include holidays based on the 98/HL UDC table.From any Product Data Management menu (G30), enter 29
From Product Data Management Setup (G3041), choose Shop Floor Calendar
From Shop Floor Calendar, press F5 (Calendar Generation)
To generate a Shop Floor calendar
-
On Calendar Generation, perform one of the following:
-
Enter your branch unit in the Branch field to create a calendar for your branch
-
Enter All in the Branch field to generate a calendar for your branches
-
-
Complete the following fields:
-
Shift
-
Calendar Name
-
From Month/Year
-
Thru Month/Year
-
-
Click Change, Add, or Delete.

6.7 Setting Up a Make/Buy Table
From any Product Data Management menu (G30), enter 29
From Product Data Management Setup (G3041), choose Make Buy Table
Use the Make/Buy table (41/I) to maintain codes that indicate whether an item is purchased or manufactured. For example, you can define types such as subassemblies and purchased raw material.
M (manufactured) and P (purchased) are hard-coded and appear in the first character in Description - 2. You can use any other letter to define additional Make/Buy values.
On Make/Buy Table

Complete the following fields:
-
Code
-
Description
-
Description - 2
| Field | Explanation |
|---|---|
| Description-2 | A user defined name or remark. |
6.8 Setting Up Routing Types
From any Product Data Management menu (G30), enter 29
From Product Data Management Setup (G3041), choose Routing Types
You can set up user defined codes (40/TR) to define routing types such as alternate routing, standard manufacturing routing, rush routing, and rework routing.
On Routing Types
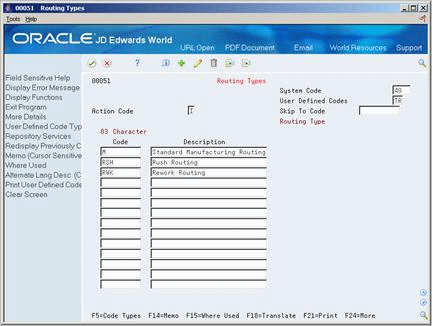
Complete the following fields:
-
Code
-
Description
6.9 Setting Up Kanbans
From Product Data Management (G30), enter 29
From Product Data Management Setup (G3041), choose Kanban Master Revisions
Before you can initiate any kanban transactions, you must set up a kanban master record for the item. You set up kanban master records in the Kanban Master Revisions program (P3016). When you set up the kanban master record, you define the information that the system uses to generate the transaction when you initiate a kanban trigger.
Each record in the F3016 table has a unique kanban ID. Each of these kanban records can have multiple containers or cards. When you define an item as kanban-controlled, you essentially define the relationship between a supplying location and consuming location. You define a kanban-controlled item by item number, consuming branch/plant, consuming location, supplying branch/plant, and supplying location. The system generates a unique kanban identifier for this specific relationship.
After you define kanban-controlled items, use Kanban Calculation to size the kanban, depending on the amount of inventory available. However, if you set the override flag on, the system does not update the record when you run the calculation program.
To set up kanban controlled items
On Kanban Master Revisions
Figure 6-11 Kanban Master Revisions screen
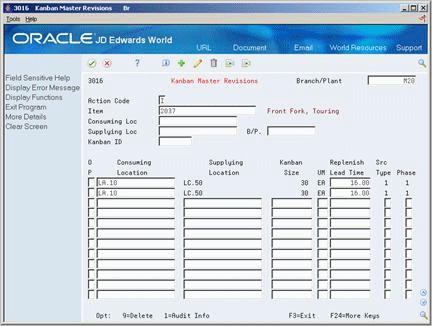
Description of "Figure 6-11 Kanban Master Revisions screen"
-
Complete the following fields:
-
Item
-
Branch/Plant
-
Consuming Location
-
Supplying Location
-
-
Complete the following optional fields:
-
Kanban Size
-
Replenishment Lead Time
-
Source Type (this field is required when adding a record)
-
Phase
-
-
Access the detail area (F4).
Figure 6-12 Kanban Master Revisions (Details) screen
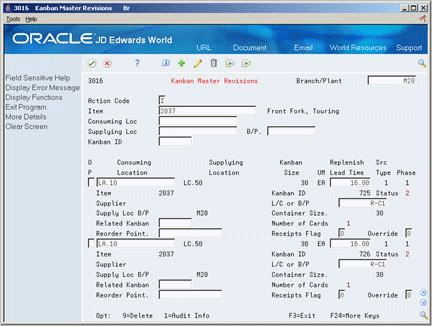
Description of "Figure 6-12 Kanban Master Revisions (Details) screen"
-
Complete the following optional fields:
-
Kanban ID
-
Supplier
-
Item
-
Supplying Location Branch/Plant
-
Line/Cell or Source Branch/Plant
-
Container Size
-
Override Flag
-
Receipts Flag
-
Related Kanban
-
Reorder Point
-
| Field | Explanation |
|---|---|
| Supplier | A number that identifies an entry in the Address Book system. Use this number to identify employees, applicants, participants, customers, suppliers, tenants, and any other Address Book members. |
| Replenish Lead Time | The time required before a consuming work center will have a replacement kanban available from its supplying location.
This value is used only for kanban card processing in Shop Floor Control. |
| Container Size | The capacity of a container in a kanban controlled environment. |
| Override Flag | This flag can be used to lock the kanban size and quantity to prevent changes by the Kanban Calculation program. |
| Kanban Size | The total size of the kanban. |
| Receipts | Flag used to indicate the receipts process will be executed at kanban check in time. This is only used for a source type 3 (supplier) |
| Phase | This field indicates the method used to transfer completed units from the supplying to the consuming location:
1 – One phase transfer. The completion is done directly to the consuming location. 2 – Two phase transfer. The completion is performed against the supplying location. A subsequent receipt of inventory is needed at the consuming location. |
| Kanban ID | Unique identifier for the first kanban assigned to an item in a specified branch/plant, consuming location, or supplying location. |
| Line/Cell or Source Branch/Plant | Defines a production line or cell. Detailed work center operations can be defined inside the line or cell. For rate based manufacturing to use this value for reporting.
Form-Specific Information When the source type is a 1 (work center), this field identifies the production line producing the kanban item. When the source type is a 5 (branch/plant), this field is used to establish the source branch/plant. |
| Supplying Location | A code that identifies the location in a branch/plant from which inventory is supplied. |
| Source Type | Indicates the type of supplying location for a kanban. Valid values are:
1 – Work center 2 – Inventory 3 – Supplier 4 – (Not Currently Used) 5 – Branch/Plant Note: When you check in or complete a kanban that is a source type 5, you must create a transfer order (ST/OT) in order to transfer inventory between the two Branch/Plants. You must then receive the transfer purchase order using the Enter Receipts by PO program (P4312). |
| Consuming Location | A code that identifies the location in a branch/plant to which inventory is received. |
| Item | A number that the system assigns to an item. It can be in short, long, or 3rd item number format. |
| Related Kanban | An additional Kanban ID used to replenish quantity of the original Kanban ID during a reorder point assessment of undersupply.
If a Kanban is undersupplied, the system checks-out the related kanban and creates either a purchase order or work order, if needed, based on the related kanban source type. |
| Reorder Point | A quantity to trigger a replenishment Kanban upstream in the supply chain when the available quantity is below this defined order point. |
6.9.1 Generating Kanbans
From Product Data Management (G30), enter 29
From Product Data Management Setup (G3041), choose Kanban Calculation
After you set up the item on Kanban Master Revisions, you can use the Kanban Calculation program to generate and print a kanban per item. However, you can set the override flag on Kanban Master Revisions to prevent the system from updating the master record.
Use the processing options to:
-
Run the program in proof mode
-
Print the calculation report
-
Update the Kanban Master
-
Specify a safety stock other than what is defined in the Item Branch
-
Control what percentage the system can change the size of the kanban
-
Specify the source for the demand
-
Specify a customized calculation program
6.9.2 Processing Options
See Kanban Size Calculation (P30450) in the JD Edwards World Shop Floor Control - Process Guide.