10 Work with Routings
This chapter contains these topics:
10.1 Working with Routings
After you define the item's components in the bill of material and identify where each operation occurs on the factory floor (that is, the work center), you must define the sequence of operations necessary to manufacture the item (routing).
For example, the routing for item 5120, an oak desk and chair, is:
-
Assemble the frame
-
Assemble the sides and back to frame
-
Attach the drawer slide kits
-
Attach the top
-
Finish
-
Package with the chair
For each item, you define routings that describe:
-
Production process
-
Operations
-
Sequence
-
Applicable work centers
-
Standards for setup and run times
Routing information is stored in the Routing table (F3003).
10.2 Entering Routings
From Daily Product Data Management (G30), choose Daily PDM Discrete
From Daily PDM Discrete (G3011), choose Enter/Change Routing
After you enter a bill of material, you must define the routing information for each item and for each branch/plant.
Entering a routing consists of the following tasks:
-
Enter a parent item routing
-
Enter engineering information
-
Enter batch routing information (optional)
-
Enter routing hours
Note:
This program supports Import/Export functionality. For more information, see JD Edwards World Common Foundation Guide.This program supports Attachment links functionality. For more information, see JD Edwards World Technical Foundation Guide.
To enter a parent item routing
On Enter/Change Routing
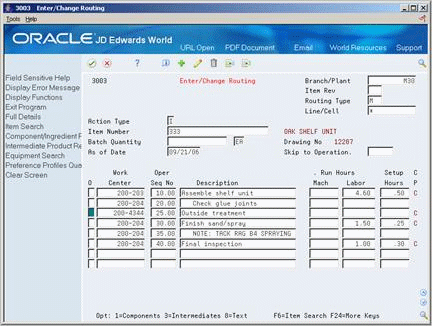
-
Complete the following fields:
-
Branch/Plant
-
Item Number
-
Routing Type
-
Item Revision
-
Line/Cell
-
Batch Quantity
-
Batch Quantity Unit of Measure
-
| Field | Explanation |
|---|---|
| Routing Type | User defined code (system 40, type TR) that designates the type of routing. You can define different types of routing instructions for different uses.
For example: M – Standard Manufacturing Routing RWK – Rework Routing RSH – Rush Routing You define the routing type on the work order header. The specific type of routing defined will then be used in the work order routing. Product Costing and Capacity Planning systems use only M type routings. |
| Item Rev | Indicates the revision level of a routing. It is usually used in conjunction with an engineering change notice or order (ECN or ECO). The revision level of the routing should match the revision level of its associated bill of material (data item BREV), although the system does not check this.
This value is user defined and not maintained by the system. |
| Line/Cell | Defines a production line or cell. Detailed work center operations can be defined inside the line or cell. For rate based manufacturing to use this value for reporting, this value must match the line cell in the header. |
10.2.1 What You Should Know About
| Topic | Description |
|---|---|
| Deleting a routing | When you delete a routing, the system prompts you to confirm the deletion. |
To enter engineering information
On Enter/Change Routing
-
To define a routing step, complete the following fields:
-
Work Center
-
Operation Sequence Number
-
Description
Figure 10-2 Enter/Change Routing (Engineering) screen
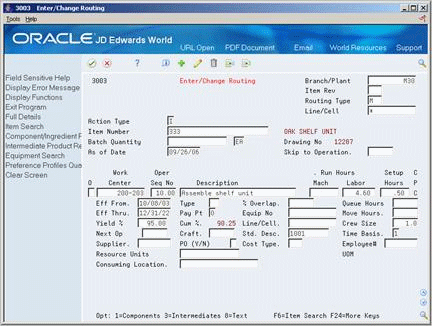
Description of "Figure 10-2 Enter/Change Routing (Engineering) screen"
-
-
Access the detail area.
-
To enter repetitive manufacturing information, complete the following fields:
-
Line/Cell
-
Resource Units Consumed
-
Replenishment Location
-
UOM
-
-
Complete the following fields:
-
Effective From
-
Effective Thru
-
Next Operation
-
Yield Percent
-
Type Operation
-
Pay Point
-
Craft
-
Percent of Overlap
-
Equipment Number
-
Standard Description
-
Crew Size
-
Time Basis
-
| Field | Explanation |
|---|---|
| Oper Seq No | In routings, this number is used to sequence the fabrication or assembly steps in the manufacture of an item. You can track costs and charge time by operation.
In bills of material, this number designates the routing step in the fabrication or assembly process that requires a specified component part. You define the operation sequence after you create the routing for the item. The Shop Floor Control system uses this field in the backflush/preflush by operation process. In engineering change orders, this number is used to sequence the assembly steps for the engineering change. Skip To fields allow you to enter an operation sequence that you want to begin the display of information. You can use decimals to add steps between existing steps. For example, use 12.5 to add a step between steps 12 and 13. |
| Yield % | Represents the planned output yield percent for a step. The Planned Yield Update program uses this value to update the Cumulative Percent in the bill of material and the Operation Scrap Percent in the routing. Materials Requirements Planning uses the step scrap percent and the existing component scrap percent to plan component demand. |
| Typ Op | A user defined code (system 30, type OT) that indicates the type of operation. For example:
A Alternate routing TT Travel time IT Idle time T Text (Enter text at Description) Form-specific information For Product Costing: Only operations with a "blank" type operation code are costed. |
| Craft. BB | A user defined code (07/G) that defines the jobs within your organization. You can associate pay and benefit information with a job type and apply that information to the employees who are linked to that job type. |
| % Overlap | The overlapping of successive operations. The actual overlap percentage entered for the operation sequence is the percent by which that operation overlaps the prior operation. For example, if you enter 80%, this indicates that work can begin on the overlapped operation when 20% of the prior operation is completed.
1. Overlapping has no effect on move and queue calculations. 2. The percent entered must be less than or equal to 100%. Enter percents as whole numbers: 5% as 5.00 |
| Time Basis | A user defined code (system 30, type TB) that identifies the time basis or rate for machine or labor hours entered for any routing step. You can set rates per unit, per 10, per 1000, and so on.
The system uses the values in the Description-2 field on the User Defined Codes form for costing and scheduling calculations. The description is what the code represents, but is not used in calculations. |
| Resource Units Consumed | Indicates how many of the line's resource units are needed to produce one item. |
| Replenishment Location | A code that identifies inventory locations in a branch/plant. You define the format of the location identifier by branch/plant. |
| UOM | Production unit of measure used to express the capacity of a production line. For example Stamps, injections, etc. |
To enter batch routing information
On Enter/Change Routing
-
Complete the task to enter a routing.
-
Complete the following fields:
-
Batch Quantity
-
Batch Unit of Measure
-
| Field | Explanation |
|---|---|
| Batch Quantity | The quantity of finished units that you expect this bill of material or routing to produce. This field allows you to specify varying quantities of components based on the amount of finished goods produced. For example, 1 ounce of solvent is required per unit up to 100 units of finished product. However, if 200 units of finished product is produced, 2 ounces of solvent are required per finished unit. In this example, you would set up batch quantities for 100 and 200 units of finished product specifying the proper amount of solvent per unit. |
On Enter/Change Routing
-
Complete the following fields:
-
Run Hours Machine
-
Run Hours Labor
-
Setup Hours
-
-
Access the detail area.
-
Complete the following fields:
-
Queue Hours
-
Move Hours
-
After you enter a parent item routing, you can enter outside operations.
| Field | Explanation |
|---|---|
| Setup Labor | This is the standard hours of labor expected in the normal production of this item.
The run labor hours in the Routing Master table (F3003) are the total hours it takes the specified crew size to complete the operation. The hours are multiplied by the crew size during shop floor release and product costing. Form-specific information For Equipment/Plant: This is the estimated number of hours needed to complete a maintenance activity. |
The purpose of a master routing is to reduce repetitive maintenance in situations where many manufactured items use the same routing.
A master routing is set up the same as a part in Item Branch/Plant Information. The routing is assigned an item number prefixed by MR to indicate that it is a master routing and not a true part number. You then assign a routing as in the Entering Routings section. The last step is to associate the master routing with a parent item in Item X-Reference Revisions.
-
Enter a "Y" in the Master Routing field in Manufacturing Constants (3009). This instructs the system to check the Item Cross-Reference table.
Figure 10-3 Manufacturing Constants screen

Description of "Figure 10-3 Manufacturing Constants screen"
-
Access Item Branch/Plant Information (41026) and set up the master routing as an item. Stocking Type should be M.
Figure 10-4 Stem Branch/Plant Information screen
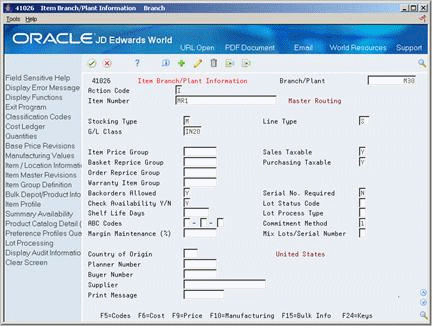
Description of "Figure 10-4 Stem Branch/Plant Information screen"
-
Access Enter /Change Routing (3003) and enter the routing to be used as the master routing.
Figure 10-5 Enter/Change Routing (Master Routing) screen
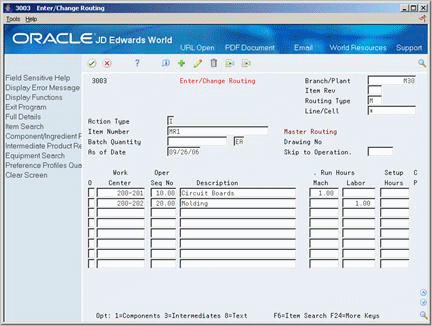
Description of "Figure 10-5 Enter/Change Routing (Master Routing) screen"
-
Access Item Cross-Reference Inquiry and inquire on the master routing item number you just set up.
Figure 10-6 Item Cross-Reference History screen
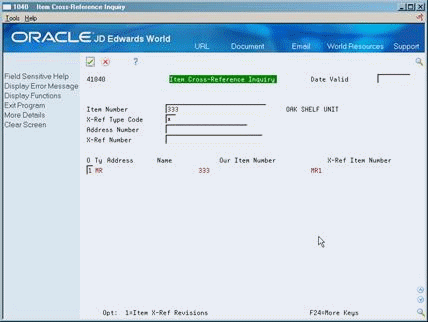
Description of "Figure 10-6 Item Cross-Reference History screen"
-
Enter 1 in the Option field and press Enter to access Item X-Reference Revisions.
-
Complete the following fields:
-
Action Code - A
-
Item Number - Enter the item number for the parent item.
-
Do not input an Address Number
-
-
Press F4 to display details and update the effectivity dates.
Figure 10-7 Item X-Reference Revision screen
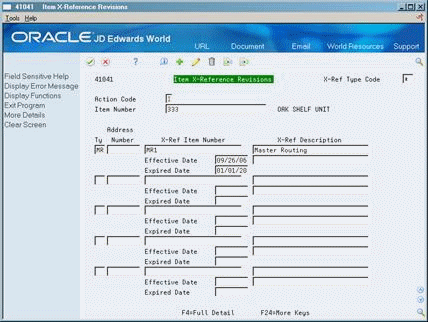
Description of "Figure 10-7 Item X-Reference Revision screen"
10.2.2 What You Should Know About
| Topic | Description |
|---|---|
| Reviewing equipment | You can review equipment that an operation uses to manufacture a certain part on Asset Search and Location. |
| Master routings | Operations by Work Center (P30202) will only display the master routing item number that you set up. It does not display the parent item for which master routing is used.
When you generate a work order for an item that uses a master routing, the system will generate a soft error "Routing does not exist." |
10.3 Entering Outside Operations
From Daily Product Data Management (G30), choose Daily PDM Discrete
From Daily PDM Discrete (G3011), choose Enter/Change Routing
You can define an outside routing operation to be performed on an item by an external supplier.
When listing the outside operation routing step, make sure that this step is followed by another routing step. An outside operation cannot be the final step in a routing for two reasons:
-
When using Super Backflush, the final operation must be a payable pay point. The pay point for an outside operation work center is zero.
-
The purchasing receipt generated does not update the Purchase Order Receiver file table. This prevents a voucher match.
Complete the following fields:
-
Supplier
-
Purchase Order (Y/N)
-
Cost Type
| Field | Explanation |
|---|---|
| Supplier | The address book number of the preferred provider of this item.
You can enter the number for the supplier or you can have the system enter it each time that you receive the item from a supplier. You specify whether the system enters the supplier using processing options for Enter Receipts. Form-specific information The supplier can be entered in the item branch record for an item manually, or you can choose to update this field when the item is first received. |
| PO (Y/N) | Determines if the Work Order Generation program (P31410) or Interactive Routing Instruction Revisions (P3112) creates a purchase order for a subcontracted operation within a routing. Valid values are:
Y – Yes, create a purchase order. N – No, do not create a purchase order. You will always create a purchase order for outside operations. |
| Cost Type | This code designates each element of cost for an item. An example of the coding structure is:
A1 – Purchased raw material B1 – Direct labor routing sheet rollup B2 – Setup labor routing sheet rollup C1 – Variable burden routing sheet rollup C2 – Fixed burden routing sheet rollup Dx – Usually used for outside processing routing sheet rollup Xx – Usually used for extra add-ons, such as electricity, water, and so forth. Up to 99 add-ons can be defined. Use the D cost component type for outside operations. If multiple outside operation steps exist on the same routing, use a different number for each outside operation. For example: D1, D2, D3, and so on. The optional add-on computations usually operate with the type "X" extra add-ons. This cost structure allows you to use an unlimited number of cost components to calculate alternative cost rollups. The system then associates these cost components with one of six user defined summary cost buckets. |
10.3.1 What You Should Know About
| Topic | Description |
|---|---|
| Using alternate routings | If you manually link the routing to a work order, the system includes alternate routing steps with the work order routings. If the Process Work Orders program links the routing, then the system does not include the routing steps. |
10.4 Working With Text
You can create text for a routing and bill of material and attach this text to the work order parts list and work order routing. Attached text is indicated by a highlight on the form.
You can locate the text on the following forms within the Shop Floor Control system:
-
Work Order Parts List
-
Routing Revisions
-
Rate Based Hours Entry
-
Rate Based Inventory Issues
When you locate the text on any of these forms, the text is unique to the parts list, routing, rate based schedule or inventory. You can change the text and it will not impact the text originally entered on bill of material or routing.
You can create separate text for the different batch routings of a parent item.
Working with text consists of the following:
-
Entering text
-
Revising text
-
Copying text models
-
Reviewing user information
The attachments (doc, jpg, bitmap, PDF, and so on) can be attached to detail lines using the text.
See Also:
-
Attaching Parts List Interactively in the JD Edwards World Shop Floor Control - Discrete Guide,
-
Attaching the Routing Interactively in the JD Edwards World Shop Floor Control - Discrete Guide,
-
Creating Rate Schedules in the JD Edwards World Manufacturing and Distribution Planning Guide,
-
Issuing Materials Manually in the JD Edwards World Shop Floor Control - Discrete Guide.
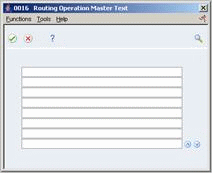
On Enter/Change Routing
-
Choose the Text option.
Figure 10-8 Routing Operation Master Text screen
Description of "Figure 10-8 Routing Operation Master Text screen"
-
On Routing Operation Master Text, type the text and press Enter.
On Routing Operation Master Text
-
Press F9 to delete a line.
-
Press F8 to insert a line.
-
Press Enter to save your revisions.
-
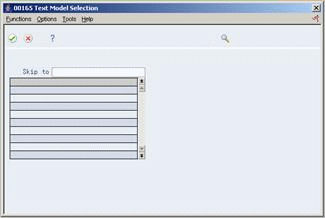
On Routing Operation Master Text, choose the Select Model Memo function.
-
Select a model.
On Routing Operation Master Text, choose the User Info option.
10.5 Updating Component Scrap
From Product Data Management (G30), enter 27
From Advanced Product Data Management (G3031), choose Planned Yield Update
During manufacturing, material loss often occurs at operations. Examples of loss include evaporation or items damaged during move time. You can update the amount of materials and labor hours to account for operation loss by running Planned Yield Update.
For the operations you choose, this program uses the operational planned yield percent to update the cumulative percent for the routing, and the operation scrap percent for the bill of material.
For example:
| Step | Operational Planned Yield % | Cumulative Planned Yield % | Operation Scrap % |
|---|---|---|---|
| 40 | 80% | 80% | (100%/80%) - 100% = 25% |
| 30 | 90% | 80% x 90% = 72% | (100%/72%) - 100% = 39% |
| 20 | 100% | 72% x 100% = 72% | (100%/72%) - 100% = 39% |
| 10 | 95% | 72% x 95% = 68% | (100%/68%) - 100% = 25% |
10.5.1 What You Should Know About
| Topic | Description |
|---|---|
| Operational planned yield percent | You enter this value on the routing.
This value represents the planned output yield percent for a step. The system uses this value to adjust the operation scrap percent for the components at that step. This enables MRP to use the step scrap percent along with the existing component scrap percent to plan component demand. |
| Operation scrap percent | The system updates operation scrap percent on the bill of material.
This represents the expected scrap at each operation. The system calculates this value by compounding the yield percentages from the last operation to the first operation. The system uses this value to increase or decrease the amount of materials to account for loss within the operation. |
| Cumulative planned yield percent | The system updates the cumulative planned yield percent on the routing.
This represents the item quantity that an operation is expected to produce. It is the ratio of usable output to input quantity. This value can be less than 100% due to loss at one or more operations. The system uses this value to increase or decrease the amount labor hours needed to make up for loss within the operation. |
10.6 Reviewing Routing Information
From Daily Product Data Management (G30), choose Daily PDM Discrete
From Daily PDM Discrete (G3011), choose Routing Inquiry
You might need to review routings to verify operations, labor, and setup hours.
On Routing Inquiry
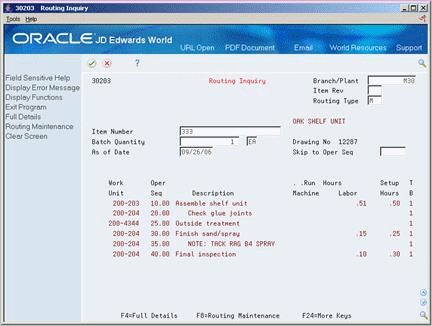
Complete the following fields:
-
Branch/Plant (required)
-
Parent Item (required)
-
As of
-
Requested Quantity
-
Skip to operation
Lead time information displays in the following fields:
-
Run Hours Labor
-
Run Hours Machine
-
Setup Hours
10.6.1 What You Should Know About
| Topic | Description |
|---|---|
| Viewing multiple routings | When you have defined more than one routing for an item, the system displays all available routings in a separate window. Choose a routing to work with. |
10.7 Printing Routing Information
Use the Routing Instructions report to print all routing operations for an item.
Caution:
JD Edwards World recommends that you do not change the order of the first three data selections.Figure 10-12 Standard Routing Information Report
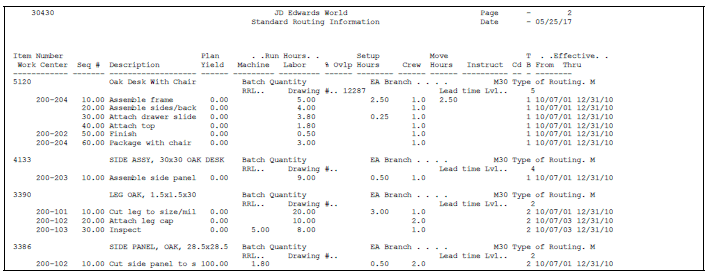
Description of "Figure 10-12 Standard Routing Information Report"