4 Create Work Orders
A work order is a request to produce a certain quantity of an item by a given date.
Creating work orders includes the following tasks :
As an alternative to entering work orders manually, you can use the Manufacturing Work Order Entry Z File (P48013Z) program to import an extensive amount of work orders into your system. See Appendix D, "Import Mass Data into Manufacturing Systems" for more information.
4.1 Entering Work Order Headers
From Shop Floor Control (G31), choose Discrete Daily Order Preparation.
From Daily Order Preparation - Discrete (G3111), choose Enter/Change Order
To enter a work order header, you identify the item, its branch/plant and quantity, and the requested date for the work order. You may, optionally, enter other information not required at order entry, such as the revision level for the bill of material or associated sales information.
The system calculates the start date based on the requested date that you enter. If the requested date is before the current date or is not defined as a work day, a warning message appears. The system cannot calculate the start date for the work order if the requested date is in error.
JD Edwards World recommends that you use different document types to identify the different types of work orders, such as rework, repair, or prototypes.
Use Engineering Change Order (ECO) Revision to create a work order against a prior revision level by:
-
Selecting a revision level to attach to the work order
-
Manually entering a different revision level
Entering work order headers includes the following tasks:
-
Entering identifying information
-
Entering scheduling information
-
Entering descriptive information (optional)
-
Entering planning information (optional)
-
Entering responsible persons (optional)
-
Entering sold to information (optional)
-
Entering accounting information (optional)
-
Entering a revision level (optional)
-
Use the processing options for order entry to control how the system processes information on the order and to access associated information, such as the order's parts list and routing instructions.
-
Set up the shop floor calendar for the work days and months that the order activity will span, including leadtimes. See Section 34.3, "Setting Up the Shop Floor Calendar."
-
Set up the document types that you use to identify different work order types in the following places:
-
User Defined Codes (00/DT) table
-
Processing options of the Supply/Demand Inclusion Rules program, if the new document types are to be used in other parts of the Manufacturing system
-
-
Enter the unit of measure in the processing options that you want the system to use for backscheduling the routing operations for an item.
-
Check the availability of the parts that are needed to complete a work order before you create the work order. See Section 14.1, "Reviewing Availability and Shortages."
-
Set up valid work center locations. See Section 34.6, "Setting Up Work Centers."
-
Use the processing options to initiate Warehouse Management system integration. See JD Edwards World Advanced Warehouse Management Guide for information about setting up Warehouse Management.
| Topic | Description |
|---|---|
| Locating related sales order information | You can access Order Address Information if you need the address of the customer on the sales order related to your work order. Blank fields appear when there is no sales order associated with your work order. |
| Adding description details | You can access Work Order Detail Entry to add detail to the work order description (F5). If the work order is printed the detail will appear as text lines. |
| Manufacturing Accounting system | If you use summarized journal entries in Manufacturing Accounting, the system uses Next Numbering to assign document numbers by document type for the batch of work orders being summarized.
See Reviewing Summarized Work Orders in the JD Edwards World Product Costing and Manufacturing Accounting Guide. |
| Blending, filling, and packaging | Use a processing option for the Enter/Change Order program for the blending and filling processes. You specify the program ID of the Formula Optimization routine the system calls when you select to optimize the formula from the parts list.
When you generate a work order parts list the system checks the allowed products matrix for an incompatibility between the parts list and the blending tank. The incompatibilities appear as errors. |
| Quality Management test results | As you create a work order, you can:
See Working with Test Results in the JD Edwards World Quality Management Guide for more information. |
| Import/Export | This program supports Import/Export Functionality. See JD Edwards World Technical Foundation Guide for more information. |
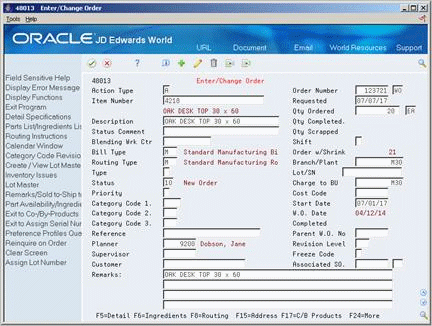
To enter identifying information
On Enter/Change Order
Complete the following fields:
-
Item Number
-
Branch/Plant
| Field | Explanation |
|---|---|
| Item Number | A number that the system assigns to an item. It can be in short, long, or 3rd item number format. |
| Branch/Plant | A code that represents a high-level business unit. It can be used to reference a branch or plant that might have departments or jobs, which represent lower-level business units (data item MCU), subordinate to it. For example:
Business unit security is based on the higher-level business unit. Form-specific information For Shop Floor Control and Manufacturing Accounting: This field identifies the branch/plant in which the item resides. |
To enter scheduling information
An error message appears if a scheduling problem exists on your work order. This message indicates that there is a difference between the work order start date and one or both of the following:
-
The start date of the first routing operation
-
The calculated start date for the work order, which indicates difficulty in backscheduling
On Enter/Change Order
Complete the following fields:
-
Requested
-
Quantity Ordered
| Field | Explanation |
|---|---|
| Requested | The date that an item is to arrive or that an action is to be complete.
Form-specific information For Shop Floor Control: When you change the requested date:
|
| Qty Ordered | The quantity of units affected by this transaction.
Form-specific information For Shop Floor Control Discrete Manufacturing: When you change the order quantity, the system recalculates the following:
Note: Order quantity should not be changed after transactions have occurred against the order. In the process industry: The quantity of co-/by-products produced by the process. |
To enter descriptive information
You can enter descriptive information to further identify the work order, such as classification, priority, lot identification, parent item, and the revision level of the related bill of material.
On Enter/Change Order
-
Complete the following optional fields:
-
Type
-
Priority
-
Remarks
-
Lot Number
-
Parent Work Order Number
-
Revision Level
-
-
Choose Work Order Detail Entry.
Figure 4-2 Work Order Detail Entry screen
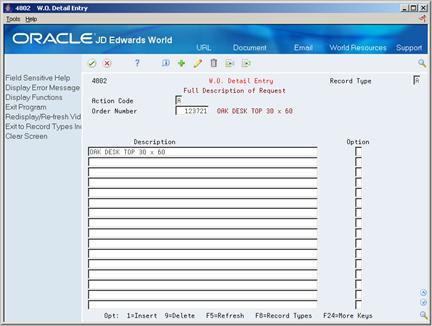
Description of "Figure 4-2 Work Order Detail Entry screen"
-
On Work Order Detail Entry, complete the following field to add detail text regarding the work order:
-
Description
-
-
Choose Work Order Record Types.
Figure 4-3 Work Order Record Types screen
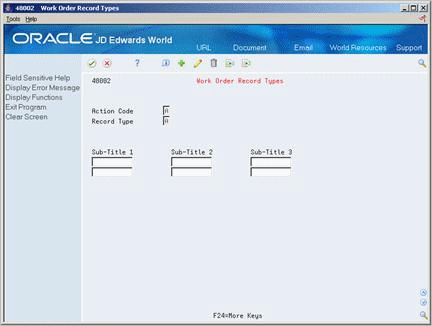
Description of "Figure 4-3 Work Order Record Types screen"
-
On Work Order Record Types, complete the following fields to identify up to three additional headings for the detail form:
-
Subtitle I
-
Subtitle II
-
Subtitle III
-
-
Choose Work Order Category Codes.
Figure 4-4 Work Order/Rate Category Codes screen
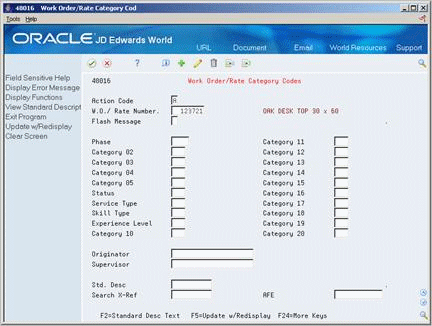
Description of "Figure 4-4 Work Order/Rate Category Codes screen"
-
On Work Order Category Codes, complete the following optional fields:
-
Phase (Category Code 1)
-
Category Code 2
-
Category Code 3
-
Category Code 4
-
Category Code 5
-
Status
-
Service Type
-
Skill Type
-
Experience Level
-
Category Code 10
-
Originator
-
Supervisor
-
Standard Description
-
Search Cross Reference
Field Explanation Type A user defined code (00/TY) that indicates the type classification of a work order or engineering change order. You can use work order type as a selection criteria for work order approvals.
Form-specific information
For Shop Floor Control:
If you leave this field blank on order entry, the system uses the value specified in the processing options.
Priority A user defined code (system 00, type PR) that indicates the relative priority of a work order or engineering change order in relation to other orders. A processing option for some forms lets you enter a default value for this field. The value then displays automatically in the appropriate fields on any work order you create on those forms and on the Project Setup form. You can either accept or override the default value.
Remarks: Extended description field for work order information. Form-specific information
For Shop Floor Control:
If you leave this field blank, the system displays the description for the item from the Item Master table. However, you can override this default by changing the field on the work order header.
Lot/SN A number that identifies a lot or a serial number. A lot is a group of items with similar characteristics. Parent W.O. No This is the parent work order number. You can use this number to: -
Enter default values for newly added work orders, for example, Type, Priority, Status, or Manager.
-
Group work orders for project setup and reporting
Form-specific information
For Shop Floor Control:
You can manually enter this number to:
-
Identify multi-level configured items
-
Provide the default for work orders for the lower configured item (if you enter it for the top-level configured item)
-
Group work orders for project setup and reporting
Revision Level Indicates the revision level of a bill of material. It is usually used in conjunction with an engineering change notice or order (ECN or ECO). The revision level of the bill of material should match the revision level of its associated routing (data item RREV), although the system does not check this. This value is defined and maintained by the user. Sub-Title Description A subtitle, description, remark, name, or address. The text you type in this field appears as a column head on the Work Order Detail Entry form for the record type indicated.
Category Code 1 A user defined code (00/W1) that indicates the current stage or phase of development for a work order. You can assign a work order to only one phase code at a time. Note: Certain forms contain a processing option that allows you to enter a default value for this field. If you enter a default value on a form for which you have set this processing option, the system displays the value in the appropriate fields on any work orders that you create. The system also displays the value on the Project Setup form. You can either accept or override the default value.
Status A user defined code (system 00, type W6) that indicates the status of the work order. Service Type A user defined code (system 00, type W7) that indicates the service type for the work order. Skill Type The type or category of work order. Form-specific information
For Shop Floor Control:
A user defined code (system 00, type W8) that indicates the skill type for the work order.
Experience Level The type or category of work order. Form-specific information
For Shop Floor Control:
A user defined code (system 00, type W9) that indicates the experience level for the work order.
Address Number - Originator The address book number of the person who originated the change request. Supervisor The address book number of the supervisor. Note: A processing option for some forms allows you to enter a default value for this field based on values for Category Codes 1 (Phase), 2, and 3. Set up the default values on the Default Managers & Supervisor form. After you set up the default values and the processing option, the information displays automatically on any work orders you create if the category code criterion is met. You can either accept or override the default value.
Message Number A user defined code (system 48, type SN) that is assigned to a standard note, message, or general narrative explanation. You can use this code to add instructional information to a work order. You set up codes for this field on Standard Description. Form-specific information
For Equipment/Plant Maintenance users:
You can use this code to assign narrative text for a standard procedure. The information appears on the Item PM schedule and the work order routing.
Reference An alphanumeric value used as a cross-reference or secondary reference number. Typically, this is the customer number, supplier number, or job number. -
You can identify where the work order is in the process and if it has been frozen.
On Enter/Change Order
Complete the following optional fields:
-
Status Comment
-
Status
-
Freeze Code
| Field | Explanation |
|---|---|
| Status Comment | A brief description to explain the status of the work order. |
| Status | A user defined code (00/SS) that describes the status of a work order or engineering change order. Any status change from 90 thru 99 automatically updates the date completed.
Form-specific information For Shop Floor Control: A processing option for order entry lets you enter a default value for this field. |
| Freeze Code | A code that indicates if the order is frozen. MPS/MRP will not plan for frozen orders.
Valid codes are: Y Yes, freeze the order N No, do not freeze the order (Default) |
You can identify the persons associated with the work order.
On Enter/Change O
rder
Complete the following optional fields:
-
Planner
-
Supervisor
-
Customer
| Field | Explanation |
|---|---|
| Planner | The address book number of a manager or planner.
Note: A processing option for some forms lets you enter a default value for this field based on values for Category Codes 1 (Phase), 2, and 3. Set up the default values on the Default Managers and Supervisors form. After you set up the default values and the processing option, the information displays automatically on any work orders you create if the category code criterion is met. (You can either accept or override the default value.) Form-specific information For Shop Floor Control: If you leave this field blank, the system uses the planner for the item in the Branch/Plant table. |
| Customer | The address number you want to retrieve. You can use the short format, the long format, or the tax ID (preceded by the indicators listed in the Address Book constants). |
You can identify associated sales information for the work order.
On Enter/Change Order
Complete the following optional fields:
-
Reference
-
Customer
-
Associated Sales Order
The fields listed above will contain default information if there is a sales order associated with this work order.
| Field | Explanation |
|---|---|
| Associated SO | A number that identifies a secondary purchase order, sales order, or work order associated with the original order. This is for information only. |
To enter accounting information
You can identify the business unit to be charged and its account.
On Enter/Change Order
Complete the following optional fields:
-
Charge to Cost Center
-
Cost Code
| Field | Explanation |
|---|---|
| Charge to CC | An alphanumeric field that identifies a separate entity within a business for which you want to track costs. For example, a business unit might be a warehouse location, job, project, work center, or branch/plant.
You can assign a business unit to a voucher, invoice, fixed asset, and so on, for purposes of responsibility reporting. For example, the system provides reports of open accounts payable and accounts receivable by business units to track equipment by responsible department. Security for this field can prevent you from locating business units for which you have no authority. Note: The system uses this value for Journal Entries if you do not enter a value in the AAI table. Form-specific information The default business unit for journal entries for the work order. The business unit on the AAI tables must be blank. |
| Cost Code | A subdivision of an object account. Subsidiary accounts include more detailed records of the accounting activity for an object account.
Form-specific information For Shop Floor Control and Manufacturing Accounting: If a value is not entered in the AAI table for subsidiary account, the system uses this value as a default in journal entries. |
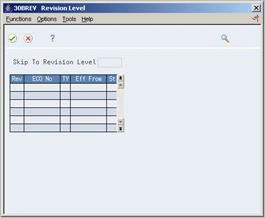
On Enter/Change Order
-
Do one of the following:
-
On Revision Level, select the revision level to be placed on the work order header.
The system closes the Revision Level window.
-
3. On Enter/Change Order, add the revision level to the work order header by pressing Enter.
| Field | Explanation |
|---|---|
| Revision Level | Indicates the revision level of a bill of material. It is usually used in conjunction with an engineering change notice or order (ECN or ECO). The revision level of the bill of material should match the revision level of its associated routing (data item RREV), although the system does not check this. This value is defined and maintained by the user. |
See Also:
-
Work with PC Import/Export in the JD Edwards World Technical Foundation Guide.
See Section 35.1, "Manufacturing Work Order Entry (P48013)."
4.2 Attaching the Parts List Interactively
From Shop Floor Control (G31), choose Discrete Daily Order Preparation
From Daily Order Preparation - Discrete (G3111), choose Enter/Change Order
After you enter your work order header, you attach a parts list to it. You can attach the parts lists:
-
Interactively, using a function key
-
Manually, entering the parts
-
Processing a parts list batch using Order Processing
-
Using the Work Order Parts List Z File (P3111Z) program to import an extensive amount of work order parts list data. See Appendix D, "Import Mass Data into Manufacturing Systems" for more information.
If a bill of material already exists in the system for the item, you can copy the bill of material information into the parts list. You can then attach this parts list to your order. You attach the parts list interactively using function keys.
After you attach the parts list to your work order header, you can:
-
Specify or change a substitute item or quantities from different locations
-
Choose substitute items and their quantities on hand when a component shortage is encountered
Use a processing option for Enter/Change Order to specify the substitute processing that you want to use:
-
Commit using the commitment control set in Manufacturing Constants
-
Commit using the commitment control set in Manufacturing Constants, but use substitutes for shortages
-
Commit using the commitment control set in Manufacturing Constants, but use substitutes if the quantity available can cover the shortage
-
Commit using the commitment control set in Manufacturing Constants, but display substitute availability when substitute quantity available can cover the shortage
Attaching the parts list interactively includes the following tasks:
-
Attaching the parts list
-
Entering substitutions (optional)
-
Choosing substitute items (optional)
-
Entering multiple locations (optional)
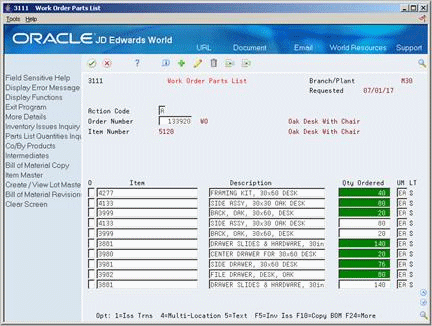
On Enter/Change Order
-
Choose Work Order Parts List.
-
On Work Order Parts List, choose the appropriate function key to copy the bill of material.
-
Add the bill of material to the parts list.
-
Review the following fields:
-
Item
-
Quantity Ordered
-
Description
-
Quantity Ordered Unit of Measure
-
Line Type
-
-
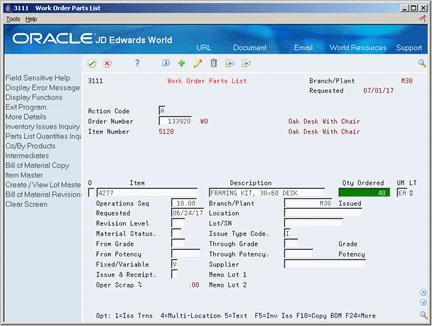
Access the detail area.
-
Review the following fields:
-
Revision Level
-
Material Status
-
Location
-
Lot
-
Operations Sequence
-
Requested
-
Fixed/Variable
-
Issue Type Code
-
Branch/Plant
-
From Potency
-
Through Potency
-
From Grade
-
Through Grade
-
Supplier
-
Issue and Receipts
-
| Field | Explanation |
|---|---|
| Description | A brief description of an item, a remark, or an explanation. |
| Location | A code that identifies inventory locations in a branch/plant. You define the format of the location identifier by branch/plant. |
| LT | A code that controls how the system processes lines on a transaction. It controls the systems with which the transaction interfaces (General Ledger, Job Cost, Accounts Payable, Accounts Receivable, and Inventory Management). It also specifies the conditions under which a line prints on reports and is included in calculations. Codes include:
S – Stock item J – Job cost N – Non-stock item F – Freight T – Text information M – Miscellaneous charges and credits W – Work order |
| UM | A user defined code (system 00/type UM) that identifies the unit of measurement for an amount or quantity. For example, it can represent a barrel, box, cubic yard, gallon, an hour, and so on.
Form-specific information If you leave this field blank for an existing component, the system uses the value in the Bill of Material Master table. If you leave this field blank for a new component, the system uses the component unit of measure from the Item Master table. For both of these situations, the system updates the quantities in the Item Location table in primary unit of measure. |
| Operations Seq | In routings, this number is used to sequence the fabrication or assembly steps in the manufacture of an item. You can track costs and charge time by operation.
In bills of material, this number designates the routing step in the fabrication or assembly process that requires a specified component part. You define the operation sequence after you create the routing for the item. The Shop Floor Control system uses this field in the backflush/preflush by operation process. In engineering change orders, this number is used to sequence the assembly steps for the engineering change. Skip To fields allow you to enter an operation sequence that you want to begin the display of information. You can use decimals to add steps between existing steps. For example, use 12.5 to add a step between steps 12 and 13. |
| Revision Level | The current revision level of a component on the bill of material. It is usually used with an engineering change notice or order (ECN or ECO). |
| Material Status | A code (table 31/MS) that identifies the current status of a particular component on the work order. |
| Fixed/Variable | Indicates if the quantity per assembly for an item on the bill of material varies according to the quantity of the parent item produced or is fixed regardless of the parent quantity. This value also determines if the component quantity is a percent of the parent quantity. Valid values are:
F – Fixed Quantity V – Variable Quantity (Default) % Quantities are expressed as a percentage and must total 100% For fixed quantity components, the Work Order and MRP systems do not extend the component's quantity per assembly value by the order quantity. For Process Manufacturing, the system stores percent components. Therefore, the system treats zero batch sizes like variable quantity components, and treats batch sizes greater than zero like fixed quantity components. |
| Issue Type Code | A code that defines how the system issues each component in the bill of material from stock. In shop floor control, it indicates how the system issues a part to a work order. Valid codes are:
I – Manual issue (default) F – Floor stock (no issue) B – Backflush (when part is reported as complete) P – Preflush (when parts list is generated) U – Super backflush (at pay-point operation) S – Sub-contract item (send to supplier) Blank Shippable end item You can issue a component in more than one way within a specific branch/plant by using a different code on the bill of material and work order parts list. The bill of material code overrides the branch/plant value. |
| Potency | A code that indicates the potency of the lot, which is expressed as a percentage of active or useful material (for example, the percentage of alcohol in a solution). The actual potency of a lot is defined in the Lot Master table (F4108). |
| Grade | This field contains the grade of a lot expressed as an alphanumeric code. The grade is used to indicate the quality of the lot. For example:
A1 – Premium grade A2 – Secondary grade The grade for a lot is stored in Lot Master table (F4108). |
| From Potency | A number that indicates the minimum potency, or percentage of active ingredients, acceptable for an item.
The system displays a warning message if you try to purchase or issue items that do not meet the minimum acceptable potency. The system does not allow you to sell items that do not meet the minimum acceptable potency. Form-specific information The From Potency field and the Through Potency field define the allowable percent of active ingredients for an item. The From Potency value should be less than the Through Potency value. These values are also used to determine the potency requirements of a component in a bill of material or an item in a purchase or sales order. For example, the value of the From Potency equals 70.000%, and the value of the Through Potency equals 80.000%. In this case, inventory allocations for this item are made for lots for which the potency is greater than or equal to 70.000%, and less than or equal to 80.000%. |
| From Grade | A code (system 40, type LG) that indicates the minimum grade that is acceptable for an item.
The system displays a warning message if you try to purchase or issue items with grades that do not meet the minimum grade acceptable. The system does not allow you to sell items with grades that do not meet the minimum acceptable level. Form-specific information The From Grade and the Through Grade fields define the allowable grades for an item. The From Grade should be less than the Through Grade. These values are also used to determine the grade requirements of a component in a bill of material or an item in a purchase or sales order. For example, the value of the From Grade equals A01, and the value of the Through Grade equals A05. In this case, inventory allocations for this item will be made for lots for which the grade is greater than or equal to A01, and less than or equal to A05. |
| Address Number - Input (Mode Unknown) | The address number you want to retrieve. You can use the short format, the long format, or the tax ID (preceded by the indicators listed in the Address Book constants). |
| Issue and Receipt | Indicates if an item is under a pay on consumption agreement.
Blank Purchases will be paid upon receipt of the item. 1 – Purchases will be paid when issued to the plant floor. |
| Oper Scrap % | The system uses this value to increase or decrease the amount of materials to account for loss within the operation. The system updates this value on Enter/Change Bill of Material when you run the Planned Yield Update program. The system calculates this value by compounding the yield percentages from the last operation to the first operation. Use a processing option in Enter/Change Routing to enable the system to calculate the component scrap percent. |
You can specify substitutions for the component items. To do this, enter the substitute quantities in the Component Item Substitutions form. If there is no quantity available, no information appears on this form.
On Enter/Change Order
-
Choose Work Order Parts List.
-
On Work Order Parts List, choose Component Item Substitutions.
Figure 4-8 Component Item Substitutions screen

Description of "Figure 4-8 Component Item Substitutions screen"
-
On Component Item Substitutions, complete the following field:
-
Quantity
-
-
Review the following default information:
-
Quantity Substituted
-
Unit of Measure
-
Item Number
-
Description
-
Quantity Available
| Field | Explanation |
|---|---|
| Qty Substituted - | The number of units affected by this transaction. |
| Unit of Measure as Input | The basic measurement used to designate the quantity of an inventory item. Examples are:
BA – bale LB – pound BG – bag MB – per thousand pieces BU – bundle MF – per thousand feet BX– box MW – per thousand weight CB – per hundred pieces PC – piece CF – per hundred feet PR – pair CS – per hundred square feet RL – roll CW – per hundred weight SF – square feet DM – drum SK – skein DZ – dozen TN – ton EA – each FT – feet |
| Quantity on Hand - Primary units | The number of units that are physically in stock. The quantity on-hand displays in the primary unit of measure. |
When the system encounters a component shortage, you can choose the available substitutes and quantity. After you enter the information, the system adds the selected items and quantities to the parts list and deducts the equivalent quantity from the component. You cannot access this form unless there is at least one quantity available.
On Enter/Change Order
-
Choose Work Order Parts List.
-
On Work Order Parts List, choose Substitute Availability.
Figure 4-9 Substitute Availability window
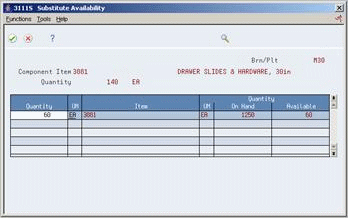
Description of "Figure 4-9 Substitute Availability window"
-
On Substitute Availability, review the following information:
-
Quantity
-
Item
-
Quantity Available
-
-
Change the following field as needed
-
Quantity
-
-
Select the record to place the equivalent quantity for the component in the parts list
The system calculates this quantity using the substitute item setup values (fixed or variable, partial, and so on).
You can specify more than one commitment location for the item. However, if you select a location that is not the primary location specified on the parts list, the system hard commits the item.
On Enter/Change Order
-
Choose Work Order Parts List.
-
On Work Order Parts List, choose Select Multiple Locations
-
On Select Multiple Locations, complete the following fields:
-
Quantity
-
Location
-
Lot
-
Branch/Plant
-
| Field | Explanation |
|---|---|
| Location | A code that identifies inventory locations in a branch/plant. You define the format of the location identifier by branch/plant.
Form-specific information If you select a location that is not the primary location specified on the parts list for a specific item, the system hard commits that item. |
| Available | The quantity available can be the on-hand balance minus commitments, reservations, and backorders. Availability is user defined and can be set up in branch/plant constants. |
4.3 Attaching the Routing Instructions Interactively
From Shop Floor Control (G31), choose Discrete Daily Order Preparation. k
From Daily Order Preparation - Discrete (G3111), choose Enter/Change Order
After you enter your work order header, you attach the routing instructions to it. You can attach the routing instructions:
-
Interactively, using a function key
-
Manually, entering the routing instructions
-
Processing a batch using Order Processing
-
Using the Work Order Routing Z File (P3112Z) program to import an extensive amount of routing instruction data. See Appendix D, "Import Mass Data into Manufacturing Systems" for more information.
You can copy the routing instructions from an existing work order and attach it to your work order header. You do this using a function key.
-
Verify that a record for the parent item exists in the Item Master and Item Branch tables
-
Enter the document type, line type, and status code for the purchase order in the processing options for Order Processing
To attach the routing instructions interactively
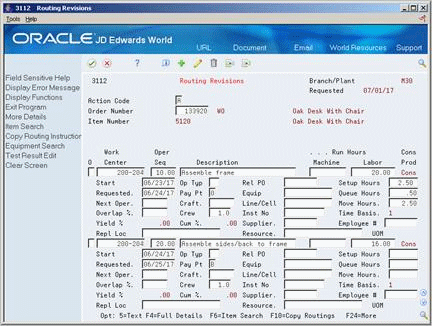
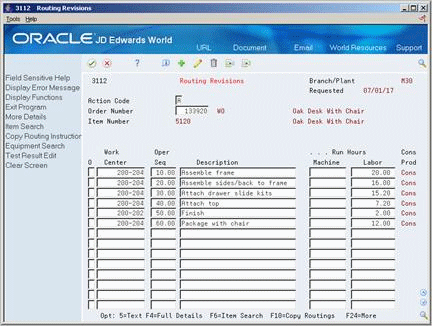
On Enter/Change Order
-
Choose Routing Revisions.
-
On Routing Revisions, choose the selection option to copy the routing.
-
Add the routing to the routing revisions.
-
Add the routing to your work order header.
-
Review the following fields:
-
Work Center
-
Operation Sequence Number
-
Description
-
Machine Run Hours
-
Labor Run Hours
-
Consumed/Produce/Both
-
-
Figure 4-11 Routing Revisions screen (Detail area)
Description of "Figure 4-11 Routing Revisions screen (Detail area)"
-
Review the following fields:
-
Equipment
-
Instruct Number
-
Start
-
Requested
-
Type Operation
-
PayPoint
-
Crew
-
Setup Hours
-
Queue Hours
-
Move Hours
-
| Field | Explanation |
|---|---|
| Description - Line 2 | A second, 30-character description, remark, or explanation. |
| Machine | This is the standard machine hours expected to be incurred in the normal production of this item. |
| Labor | This is the standard hours of labor expected in the normal production of this item.
The run labor hours in the Routing Master table (F3003) are the total hours it takes the specified crew size to complete the operation. The hours are multiplied by the crew size during shop floor release and product costing. Form-specific information For engineering change orders: This is the standard hours of labor expected to complete this step for the ECO. |
| Cons Prod | This flag indicates whether consumed resources, produced resources, or both are defined for the operation. Possible values are:
Blank No consumed or produced resources are defined for the operation. Cons Consumed resources (components, ingredients) are defined going into the operation. Prod Produced resources (co-products, by-products) are defined coming out of the operation. Both Both consumed resources (components, ingredients) and produced resources (co-products, by-products) are defined for the operation. Note: When using Process Manufacturing, if this field is highlighted, an intermediate exists for the operation. |
| Yield % | Represents the planned output yield percent for a step. The Planned Yield Update program uses this value to update the Cumulative Percent in the bill of material and the Operation Scrap Percent in the routing. Materials Requirements Planning uses the step scrap percent and the existing component scrap percent to plan component demand.
Form-specific information This field is not input-capable. The system uses the value in the Routing table. |
| Op Typ | A user defined code (system 30, type OT) that indicates the type of operation. For example:
A Alternate routing TT Travel time IT Idle time T Text (Enter text at Description) |
| Pay Point Code | A code that indicates if a work center will have labor, material, or both, backflushed through it when quantities are reported against operations occurring in the work center. The default value for this code is the routing sequence record unless overridden when the routing is defined. Valid codes are:
0 Not a backflush work center B Backflush material and labor M Backflush material only L Backflush labor only P Preflush material only If you leave this field blank, the system uses the value in the Enter/Change Routing table. |
| Crew | The number of people who work in the specified work center or routing operation.
The system multiplies the Run Labor value in the Routing Master table (F3003) by crew size during costing to generate total labor dollars. If the Prime Load Code is L or B, the system uses the total labor hours for backscheduling. If the Prime Load Code is C or M, the system uses the total machine hours for backscheduling without modification by crew size. |
| % of Overlap | The overlapping of successive operations. The actual overlap percentage entered for the operation sequence is the percent by which that operation overlaps the prior operation. For example, if you enter 80%, this indicates that work can begin on the overlapped operation when 20% of the prior operation is completed.
Note:
Enter percents as whole numbers: 5% as 5.00 Form-specific information If you leave this field blank, the system uses the value in the Routing table. |
| Unit or Tag Number | A 12-character alphanumeric code used as an alternate identification number for an asset. This number is not required, nor does the system assign a number if you leave the field blank when you add an asset. If you use this number, it must be unique. For equipment, this is typically the number stenciled on the equipment. |
| Time Basis | A user defined code (system 30, type TB) that identifies the time basis or rate for machine or labor hours entered for any routing step. You can set rates per unit, per 10, per 1000, and so on.
The system uses the values in the Description-2 field on the User Defined Codes form for costing and scheduling calculations. The description is what the code represents, but is not used in calculations. |
| Setup Hours | The standard setup hours you expect to incur in the normal completion of this item. |
| Queue Hours | The total time (in hours) that an order is expected to be in queue at work centers and moving between work centers.
The system stores this value in the Item Branch table (F4102). You can calculate this value using the Leadtime Rollup program or you can enter it manually. When you run the Leadtime Rollup program, the system overrides manual entries with calculated values. |
| Move Hours | The planned time in hours that is required to move the order from this operation to the next operation in the same work center.
If the Routing Master values are blank, the default value comes from the work order routing. However, the system uses these values only for backscheduling variable leadtime items. |
See Also:
-
Section 5.1, "Processing Work Orders" for instructions on running the Order Processing batch program.
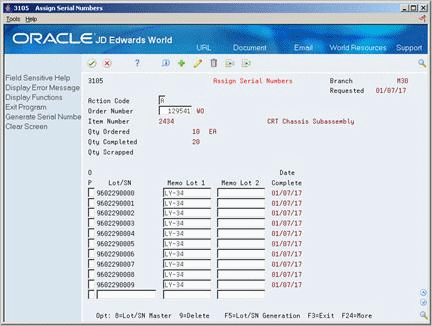
4.4 Assigning Serial Numbers
From Shop Floor Control (G31), choose Discrete Daily Order Preparation.
From Daily Order Preparation - Discrete (G3111), choose Enter/Change Order
Alternatively, you can choose Assembly Serial Numbers from the Daily Order Preparation - Discrete menu (G3111). However, if you access Assembly Serial Numbers from the menu, you can use it only to locate existing serial numbers. You cannot update or add serial numbers when you access this program from the menu.
You assign serial numbers to your work orders to track serialized items within lots. You can assign serial numbers to work orders at any time. When you enter serial numbers, the system creates Serial Number Master records, as well as Work Order (Lot/Serial Numbers) LSNs. The system does not validate any serial number that you enter until you complete the work order. If you do not assign a serial number to a serialized assembly, the system requires a number before you can complete the work order. After you complete a work order, you cannot modify any serial numbers that are assigned to the assemblies.
You can assign serial numbers to specific assemblies at any time prior to completing the work order using Assign Work Order LSN. You can also assign serial numbers to specific assemblies at the time of work order completions using Associate Issued Item LSN's. You can associate serialized components to a specific assembly either at inventory issues or work order completions. You must issue serialized components in their respective primary unit of measure to allow for association.
Assembly Serial Numbers assumes a quantity of one in the unit of measure on the work order. For serialized assemblies, this will be the primary unit of measure. You cannot enter more serial numbers than the quantity on the work order.
-
Set the Lot Process Type and Serial Number Required fields on the Item Master Information form for serial number processing
| Topic | Description |
|---|---|
| Deleting serial numbers | You can only delete serial numbers if there is no activity detected for the number. |
On Enter/Change Order
-
To locate the work order you want to assign serial numbers to, complete the following field:
-
Order Number
-
-
On Assign Work Order LSN's, choose LSN Generation to assign serial numbers to your work order.
-
To view the serial numbers that were assigned, relocate your order number.