43 Enter Interim Checks
You enter interim checks when you need to prepare paychecks outside the normal payroll cycle or to record manual calculations.
This chapter contains these topics:
-
Section 43.4, "Entering an Interim Check for a Termination,"
-
Section 43.5, "Entering an Interim Check to Record Manual Calculations,"
-
Section 43.7, "Entering an Interim Check for a Flat Dollar Advance,"
-
Section 43.9, "Entering an Interim Check for a Net Advance."
43.1 Overview
You can enter all types of interim checks and prepare them either on the computer or manually. Interim checks can include the following:
-
Computer - The system calculates and prints the payment on the computer printer.
-
Hand manual - You manually calculate the information and write or type the payment.
-
Auto manual - The system calculates the information, and you write or type the payment.
You can enter interim checks in either a standard or an automatic advance format.
When you enter a standard interim check, also called Format 1, the system stores all calculations including, gross pay amounts, taxes, and DBAs. You can use batch or interactive processing when you enter an interim check in Format 1.
Alternatively, you can enter an interim check using Format 2. The system makes all calculations in temporary workfiles (QTEMP library). You can only use interactive mode to process checks that you enter in Format 2. You can use Format 2 for the following purposes:
-
You can use Format 2 to test check calculations. The system calculates gross pay, taxes, and DBAs to determine a net pay amount, but does not save the calculated information. Use this calculation for informational purposes only.
-
You can use Format 2 to calculate an automatic advance. The system calculates gross pay, taxes, and DBAs to determine a net pay amount. When you choose the Update function, the system stores only the net pay amount and does not save any of the other calculations. The system then includes the net pay amount as a deduction to the employee's DBA instructions.
If you perceive there is an error with the calculation of the interim checks, you can set the Create VERTEX Employee Report (Y/N)? field to generate a Vertex employee report. This creates physical file members in the VERTEXLOGS of the production library for the Vertex Employee Report, Vertex Debug Log and Vertex EI Log. You can then review the reports by entering DSPPFM or WRKMBRPDM on the command line. To print and send the reports to Vertex, you must use a File Transfer Protocol to send the reports to a PC in a text (.txt) format.
Additionally, you can set the Create VERTEX XML Files (Y/N)? field to generate the actual XML input/output files, which are useful when troubleshooting tax calculations. The Q Series generates the request and the response files as XML files in an Integrated File System (IFS) location that you specify in the XML Processing Option. P06VTXXML creates the files as xxxXMLRequest.xml and xxxXMLResponse.xml where xxx = the employee address book number. See Setup Import/Export in the JD Edwards World Technical Tools Guide for more information about importing and exporting files, and IFS.
43.1.1 Before You Begin
-
Specify the location of the Employee Master table. To do this, choose Constants Information on the History and Turnover Setup menu (G0748). On Constants Information, use the Change action. The system updates the Master File in the Library field with the appropriate library.
-
Specify the program version for the appropriate time entry form in the processing options.
-
Specify the DBA code that processes advances as a declining balance deduction in the processing options.
-
If you want to enter interim checks for accumulated wages, generate the timecards for accumulated wages.
43.2 Entering a Standard Interim Check
From Payroll Master (G07), choose Interims and Special Post
From Interims and Special Post (G0721), choose Interim Check Entry
Entering a standard interim check consists of entering the minimum requirements for paying an employee outside the normal payroll cycle.
A bonus is an example of a standard interim check. You enter an interim check for a bonus to pay an employee an amount over and above the regular payment.
Entering a standard interim check includes the following tasks:
-
Entering interim check parameters
-
Entering interim check information
-
Reviewing interim check calculations
-
Entering paycheck transparency details
To enter interim check parameters
Figure 43-1 Interim Check Parameters screen
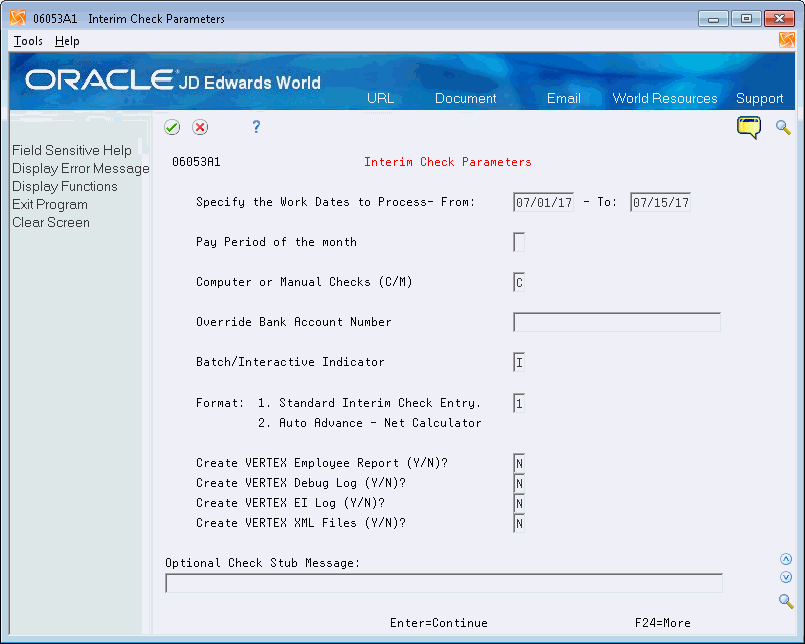
Description of ''Figure 43-1 Interim Check Parameters screen''
-
Complete the following fields:
-
Work Date to Process From
-
Work Date to Process To
-
Computer or Manual Checks
-
Batch/Interactive Indicator
-
-
To include DBAs in the calculation, complete the following field:
-
Pay Period of the Month
-
-
Complete the following optional fields:
-
Override Bank Account Number
-
Create VERTEX Employee Report (Y/N)?
-
Create VERTEX Debug Log (Y/N)?
-
Create VERTEX EI Log (Y/N)?
-
Create VERTEX XML Files (Y/N)?
-
Optional Check Stub Message
-
-
To designate that this is a standard interim check, enter 1 in the following field and press Enter:
-
Format
-
After you enter the parameters, enter interim check information.
| Field | Explanation |
|---|---|
| Specify the Work Dates to Process- From: | The date that the payroll period starts.
Form-specific information The beginning work date. To include previously entered but unprocessed timecards in the process, set From and To dates to include them. |
| - To: | Pay period date to be used to include time cards up to and including this date.
Form-specific information The ending work date, which represents the pay period ending date and the check date for all computer interim checks. You can override the check data at a later point in the process. |
| Pay Period of the month | The pay period of the month. This controls which deductions and benefits the system calculates. Leave this field blank if you do not want any deductions or benefits to be calculated. |
| Computer or Manual Checks (C/M) | Specifies the type of check you want to produce. Valid codes are:
C – Produce computer checks during this session of interim check processing M – Produce or enter data for manual checks All checks that you enter during one session of interim check processing must have the same type code. |
| Override Bank Account Number | The input account number could be one of three different account numbers. These are:
Upon entry, the first character of the account number is examined to determine which of the three possible account numbers was entered. This first character is defined as the Account Mode in the G/L Constants Revisions program (see General Accounting Operations Control). For example: / – may represent the short account ID number * – may represent the long, unstructured, 25-digit, account number blank – may represent the standard business unit-object-subsidiary number This facility allows you to use the account ID number for high speed data entry, the unstructured number when a chart of accounts change would be too disruptive, or the BU/Object/Subsidiary number when you have fully adopted the JD Edwards World style of account coding. IMPORTANT: SEE SPEED CODING (G0516). Form-specific information The override bank account number against which the system drafts the interim checks. If you leave this field blank, the system determines the bank account number from the payroll accounting rules table. |
| Batch/Interactive Indicator | A code indicating how you want to process interim checks. Valid codes are:
B – Process all interim checks entered during this session when you exit from Interim Check Entry. I – Process each check entered individually in an interactive mode. Note: You cannot use the Batch mode when processing advances. This is a required field. |
| Format: | A code that indicates the format for interim checks. Valid values are:
1 – To process a standard interim check 2 – To either:
Note: You can only use interactive processing with format 2. You cannot use batch processing for format 2. |
| Create VERTEX Employee Report (Y/N)? | Y/N flag used to control the generation of the Vertex Employee Report. This report is used for troubleshooting issues and generally should only be generated at the request of Oracle or Vertex Customer Support. |
| Create VERTEX Debug Log (Y/N)? | Y/N flag used to control the generation of the Vertex Debug Log. This file is used for troubleshooting issues and may become very large. It should only be generated at the request of Oracle or Vertex Customer Support. |
| Create VERTEX EI Log (Y/N)? | Y/N flag used to control the generation of the Vertex EI Log. This file is used for troubleshooting issues and generally should only be generated at the request of Oracle or Vertex Customer Support. |
| Create VERTEX XML Files (Y/N)? | Y/N flag used to control the generation of the Vertex XML Files. Two files are created for the XML request and the XML response. These files are used for troubleshooting issues. They may be generated at the request of Oracle or Vertex Customer Support.
The generation of these files requires the use of an IFS directory where the files will be stored. The user will need to specify the IFS directory to be used in the processing options of the interim check parameters programs. |
| Optional Check Stub Message: | A message of up to 80 characters that appears on the check stub only. This field is optional. |
43.2.1 Entering Paycheck Transparency Details
After you enter the check parameters, you can select the function F8 to enter paycheck transparency details for the interim entry.
To enter paycheck transparency details
| Field | Explanation |
|---|---|
| Processing Flag | Enter a value from UDC 07/23 that determines whether paycheck transparency is turned on or off during pre-payroll and interim payment processing. It also determines how paycheck transparency processing should be applied to both non-exempt and exempt employees when the feature is turned on. Valid values are:
Blank: Paycheck Transparency off 1: Print for all employees 2: FLSA Non-Exempt, Exempt Status 3: FLSA Non-Exempt, No Status |
| Pay Cycle Code | Enter the code that identifies the values for a master pay cycle. |
| Certified Jobs Only | Enter a value to specify whether all jobs or only certified jobs are processed when the Paycheck Transparency processing is turned on. If you enter 1, the system prints weekly totals for certified jobs only, and if you leave it blank, the system prints weekly totals for all jobs. |
| Source Business Unit | Enter a value from UDC 07/24 to control the business unit from the Timecard Detail (F06116) record that is to be used to determine whether the business unit has been defined as certified. Valid values are:
Blank/Default: Chargeout Business Unit (MCUO) 1: Work Business Unit (MCU) 2: Home Business Unit (HMCU) |
| Certified Category Code | Enter a value from UDC 07/25 that represents the Business Unit Master (F0006) Category Code (RP01 - RP30) data item that identifies a business unit as certified. Enter a value between RP01 and RP30, such as RP05. |
| Certified Category Code Val. | Enter a value from UDC 00/02 that identifies the value for the certified category code. |
| Custom Line Detail Level | Enter a value from UDC 07/26 that determines the level of detail to be shown on Paycheck Transparency custom stub lines. Valid values are:
Blank/Default: Display full detail (hours, rate and gross pay are all shown) 1: Display hours only (rate and gross pay are not shown) |
43.2.2 Entering Interim Check Information
After you enter the check parameters you can enter interim check information.
To enter interim check information
-
Complete the following optional fields:
-
Net Pay Instructions
-
Enter company if different than employee's home company
-
-
To include time already entered for the employee, complete the following fields:
-
Do you wish to include time data already entered
-
Enter the range of dates - From
-
Enter the range of dates - Thru
-
Home Company
-
Pay Cycle Group Code
-
Business Unit
-
-
To process a manual interim check, complete the following fields and use the Add action:
-
Check Number (Manual)
-
Check Date
-
-
If you set your processing options to verify information, use the Change action to display Time Entry.
If you are not verifying information, the system displays Time Entry.
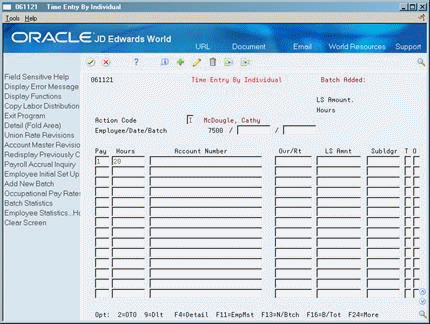
Figure 43-3 Time Entry By Individual screen
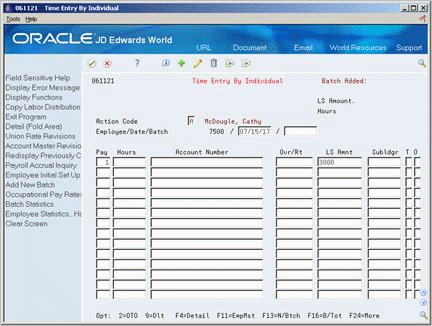
Description of ''Figure 43-3 Time Entry By Individual screen''
-
On the time entry form, complete the steps for entering timecard information and click Add.
-
Exit the time entry form.
-
On Interim Check Entry or Interim Check Inquiry, review the value supplied by the system for the following field:
-
Check Control Number
For batch processing, the system returns to Interim Check Entry allowing you to enter the next check in the batch. The system submits a mini pre-payroll for all checks in the batch when you exit Interim Check Entry.
For interactive processing, the system processes the mini pre-payroll for this check and displays Interim Check Inquiry.
-

| Field | Explanation |
|---|---|
| Check Control | A number that the system uses to group all payroll transactions for each payment or individual interim payment. The system carries this number to the accounting journal entries to update the actual check number after it prints the payment. The system also uses the check control number to automatically void payments. The payment work file contains both the actual check number and the check control number. The system uses the check control number to automatically reverse all associated payment transactions.
The check control number is not the actual check number. |
| (Release A9.3 Update) Net Pay Instructions | An option that you use to specify whether you want to override the employee's automatic deposit instructions for an interim payment that is computer-generated. The system cannot create an automatic deposit for a manual interim check. Valid values are:
0 The system follows the automatic deposit instructions that are defined for the employee in the Automatic Bank Deposit Master table (F065016). Employees who do not have automatic deposit instructions will receive a check. Off is the default. 1 The system creates a check for the employee, regardless of the employee's automatic deposit instructions. R Override all auto deposit instructions and direct the entire payment to the remainder method code instruction (R, Q or D). |
| Check No (Manual) | The number of the matching document, such as a receipt, payment, adjustment, or credit. You apply a matching document (DOCM) against an original document (DOC), such as an invoice or voucher.
Form-specific information The number of the check, if you are entering manual check information. Leave this field blank if you are processing computer checks. |
| Check Date | This is the check or item date.
Form-specific information For manual checks, the date of the check. For computer checks, the To date in the processing parameters. The system does not use this date to update history or print on the check. Instead, it uses the check date you enter on Print Interim Checks for these purposes. |
| Do you wish to include time data already entered (Y/N)? | A Yes/No field indicating the timecards the system will process. Valid values are:
Blank – The system will only include the timecards you enter during this session. N – The system will only include the timecards you enter during this session. Y – The system includes all unprocessed timecards that meet the range of dates you enter in the date range fields. If you enter Y, the timecard dates you enter must be within the date range you entered on Interim Processing Parameters. You enter Y and still restrict prior timecards. To do this, enter values for the home company, pay cycle group, and business unit. |
43.2.2.1 What You Should Know About
43.2.3 Reviewing Interim Check Calculations
To review interim check calculations
You should review each interim check that you enter. If you are using batch processing, after you enter the interim check you must choose the Check Inquiry function to review the calculations.
Figure 43-4 Interim Check Inquiry screen
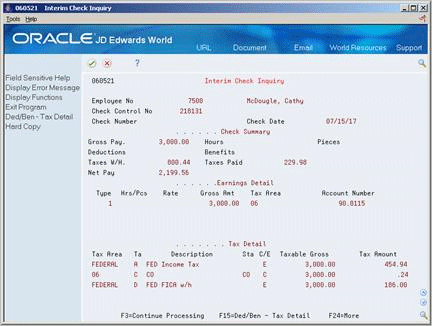
Description of ''Figure 43-4 Interim Check Inquiry screen''
-
To review more information, place the cursor in the Earnings Detail or Tax Detail area and scroll down.
-
To toggle the display between Tax and DBA detail, choose the Deduction/Benefit-Tax Detail function.
-
Choose the Continue Processing function.
-
On Interim Check Entry, do one of the following:
-
Enter additional interim checks
-
Exit the program
-
43.3 Changing an Interim Check
From Payroll Master (G07), choose Interims and Special Post
From Interims and Special Post (G0721), choose Interim Check Entry
You change an interim check when you entered information in error. After you change the information, the system recalculates the gross amount, taxes, and DBAs. Until you print a computer check or update a manual check, you can change any information that you originally entered on any of the forms.
On Interim Check Parameters
-
Complete the following fields and press Enter:
-
Work Date to Process From
-
Work Date to Process Thru
-
-
On Interim Check Entry, locate the interim check.
-
Make the necessary corrections.
-
Choose the Additional Parameters function to make corrections and use the Change action.
-
On the associated time entry form, make the necessary corrections and use the Change action.
43.4 Entering an Interim Check for a Termination
From Payroll Master (G07), choose Interims and Special Post
From Interims and Special Post (G0721), choose Interim Check Entry
When an employee terminates between payroll cycles, you might need to pay the employee's last payment immediately. You can enter an interim check for this employee.
When you enter termination information, the system immediately updates the Employee Master table (F060116) with the reason for termination, the pay status, and the termination date.
To enter an interim check for a termination
On Interim Check Parameters
-
Complete the following fields:
-
Work Date to Process From
-
Work Date to Process To
-
Pay Period of the Month
-
Computer or Manual Checks
-
Override Bank Account Number
-
Batch/Interactive Indicator
-
Create VERTEX Employee Report (Y/N)?
-
Create VERTEX Debug Log (Y/N)?
-
Create VERTEX EI Log (Y/N)?
-
Create VERTEX XML Files (Y/N)?
-
Optional Check Stub Message
-
-
To designate that this is a standard interim check, enter 1 in the following field and press Enter:
-
Format
Figure 43-5 Interim Check Entry (Termination) screen
Description of ''Figure 43-5 Interim Check Entry (Termination) screen''
-
-
On Interim Check Entry, complete the following fields:
-
Termination Date
-
Change Reason
-
Pay Status
-
-
Complete the remaining steps for entering a standard interim check.
| Field | Explanation |
|---|---|
| Termination Date | The date that the employee was terminated, if applicable.
Form-specific information If you enter a date, you must enter an alphabetical code in the Change Reason field. |
| Change Reason | A user defined code (07/T) that indicates:
Note: The default reason code for new hires is the default value for the Change Reason data item. |
| Employee Pay Status | A code that indicates whether an employee's pay status is active or inactive.
Codes for active pay status employees are numeric. Codes for inactive pay status employees are alphabetic. The system omits all employees with alphabetic pay status codes from the payroll run. To process an employee's last check, the pay status must contain a numeric code. After the system processes the check through final update, you can change the pay status to an alphabetic code. |
43.5 Entering an Interim Check to Record Manual Calculations
From Payroll Master (G07), choose Interims and Special Post
From Interims and Special Post (G0721), choose Interim Check Entry
You enter a manual check to save tax calculations that you previously calculated by hand. When you enter a manual check, you prevent the system from recalculating the taxes. If you do not enter the tax information as you calculated it for the manual check, the system uses the tax withholding information from the Employee Master table. You can enter a maximum of eight tax overrides.
To enter an interim check to record manual calculations
On Interim Check Parameters
-
Complete the following fields:
-
Work Date to Process From
-
Work Date to Process To
-
Pay Period of the Month
-
Override Bank Account Number
-
Batch/Interactive Indicator
-
Create VERTEX Employee Report (Y/N)?
-
Create VERTEX Debug Log (Y/N)?
-
Create VERTEX EI Log (Y/N)?
-
Create VERTEX XML Files (Y/N)?
-
Optional Check Stub Message
-
-
Enter M in the following field:
-
Computer or Manual Checks
-
-
To designate that this is a standard interim check, enter 1 in the following field and press Enter:
-
Interim Processing Format
Figure 43-6 Interim Check Entry (Manual Calculations) screen
Description of ''Figure 43-6 Interim Check Entry (Manual Calculations) screen''
-
-
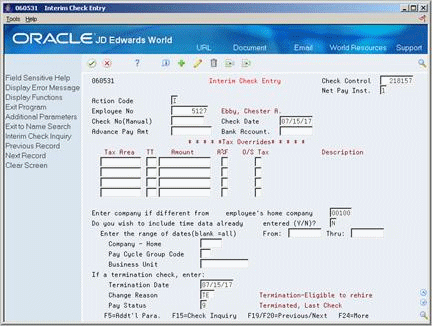
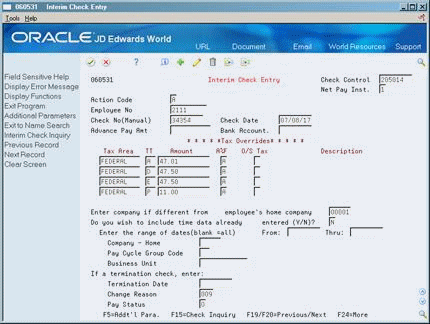
On Interim Check Entry, complete the following fields:
-
Tax Area
-
Tax Type (TT)
-
Amount
-
Additional/Flat Tax Amount (A%F)
-
Occupational or School Tax (O/S)
-
Occupational or School Tax (U.S. Payroll only)
-
-
5. Complete the remaining steps for entering information on a standard interim check.
| Field | Explanation |
|---|---|
| A%F | Based on the value of this field the corresponding additional/flat amount field has one of the following functions:
% – A percentage to replace the tax rate from the table. A – An amount to be added to the tax computed from the table. F – An amount to replace the tax computed from the table. X – An additional amount added to the standard exemption amount, deducted (exempt) from the annualized gross to determine taxable pay. Y – An amount to override the standard exemption amount to be subtracted from the annualized gross prior to the tax calculations. |
| O/S Tax | The code for overriding the Occupational tax (type K) or School tax (type N). Valid codes are:
blank – Calculate city tax as the override 1 – Calculate county tax as the override |
43.6 Entering an Interim Check for Vacation Pay
From Payroll Master (G07), choose Interims and Special Post
From Interims and Special Post (G0721), choose Interim Check Entry
Some companies provide employees with vacation payments before they take a vacation leave. You can enter an interim check to pay an employee in advance of a regular pay period. This payment can replace the regular payment for one or more pay periods. If the payment spans one or more pay periods, you must enter a vacation, or taxation, factor to calculate the taxes for the each of the advance pay periods.
To enter an interim check for vacation pay
On Interim Check Parameters
-
Complete the following fields:
-
Work Date to Process From
-
Work Date to Process To
-
Pay Period of the Month
-
Computer or Manual Checks
-
Override Bank Account Number
-
Batch/Interactive Indicator
-
Create VERTEX Employee Report (Y/N)?
-
Create VERTEX Debug Log (Y/N)?
-
Create VERTEX EI Log (Y/N)?
-
Create VERTEX XML Files (Y/N)?
-
Optional Check Stub Message
-
-
To designate that this is a standard interim check, enter 1 in the following field and press Enter:
-
Interim Processing Format
-
-
On Interim Check Entry, complete the following fields:
-
Net Pay Instructions
-
Employee Number
-
-
Review the values in the following fields:
-
Include Time
-
Change Reason
-
Pay Status
-
-
Do not press Enter. Choose the Additional Parameters function.
Figure 43-7 Additional Parameters screen
Description of ''Figure 43-7 Additional Parameters screen''
43.6.1 Entering an Interim Check for Vacation Pay
-
On Additional Parameters, complete the following field:
-
Taxation Factor
-
-
Complete the following optional fields:
-
Replaces Next N Regular Checks
-
Stop Benefit Accruals for M Periods
-
Deduction Factor
-
Is this a Manual Void
-
-
Choose the Continue Processing function.
-
Complete the steps for entering information for a standard interim check.
| Field | Explanation |
|---|---|
| Stop benefit accruals for "m" periods | Enter the number of pay cycles (paychecks) that you want the system to bypass the benefit calculations.
Typically, you specify this information during the interim check process. If you leave this value blank when you enter an interim check, the system bypasses the same number of cycles that you enter in the Replace Next N Checks field. This number must be equal to or greater than the number of pay bypasses. If you specify less than this number, the system bypasses the same number of pay cycles that you entered in the Replace Next N Checks field. When you enter a value in this field, the system updates the employee's master record. If you change or delete the other information on the interim check, the system does not remove or adjust the bypass count. You must use the Change action on Additional Parameters to change the value in the Employee Master table. |
| Taxation Factor | Enter the number of pay periods that this check includes. This factor directs the Vertex payroll tax program to treat the pay as a vacation advance. The system averages the computed taxes over the number of pay periods you enter. See the Vertex system manual for an explanation on the method the system uses to calculate tax for vacation advances. |
| Deduction Factor | The number of periods that the check represents, and, therefore, the number of periods that the system applies the flat dollar deductions. The system multiplies this number by the standard deduction to calculate the amount to subtract from the employee's check. |
| Is this a Manual Void (Y/N)? | Use this field to indicate a manual check void.
Y – Net pay can be negative. N – Net pay cannot be negative. (default) |
43.6.2 What You Should Know About
43.7 Entering an Interim Check for a Flat Dollar Advance
From Payroll Master (G07), choose Interims and Special Post
From Interims and Special Post (G0721), choose Interim Check Entry
You enter a flat dollar amount advance interim check to pay an advance on an employee's wages. The system assigns the deduction to the employee's DBA instructions and deducts it from the employee's next payroll check.
The system does not calculate nor deduct any taxes. The default is for the system to deduct the entire advance in one lump sum from the employee's next payment. You can change the amount that the system deducts per pay period in the DBA instructions.
To enter an interim check for a flat dollar advance
On Interim Check Parameters
-
Complete the following fields:
-
Work Date to Process From
-
Work Date to Process To
-
Pay Period of the Month
-
Computer or Manual Checks
-
Override Bank Account Number
-
Batch/Interactive Indicator
-
Create VERTEX Employee Report (Y/N)?
-
Create VERTEX Debug Log (Y/N)?
-
Create VERTEX EI Log (Y/N)?
-
Create VERTEX XML Files (Y/N)?
-
Optional Check Stub Message
-
-
To designate that this is a standard interim check, enter 1 in the following field and press Enter:
-
Interim Processing Format
Figure 43-8 Interim Check Entry (Flat Dollar Advance) screen
Description of ''Figure 43-8 Interim Check Entry (Flat Dollar Advance) screen''
-
-
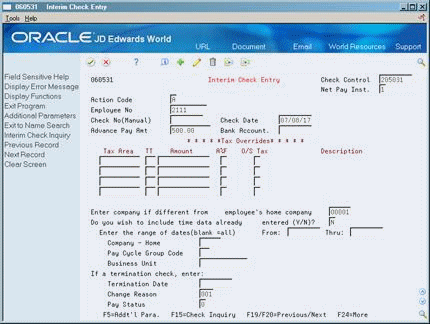
On Interim Check Entry, complete the following fields and use the Add action:
-
Employee Number
-
Advance Pay Amount
-
-
On Interim Check Inquiry, review the check detail.
| Field | Explanation |
|---|---|
| Advance Pay Amt | This amount represents an advance on the employee's future pay.
Form-specific information Enter a flat dollar amount or leave the field blank to enter timecard data on a time entry form later in the interim check entry process. |
See Also:
-
Setting Up an Advance Deduction in the JD Edwards World U.S. Payroll II Guide,
-
Section 43.9, "Entering an Interim Check for a Net Advance" for information about Format 2 to enter an advance interim check that does not include taxes or other deductions.
43.8 Deleting an Interim Check
From Payroll Master (G07), choose Interims and Special Post
From Interims and Special Post (G0721), choose Interim Check Entry
If the system has not yet merged an interim check into a payroll cycle, you can delete it. You cannot delete an interim check if the system is currently in the process of printing it or if you have already printed it.
You should not confuse the process of deleting an interim check with voiding a historical paycheck. The system stores voided checks in the interim check work files, but you cannot change or delete them.
On Interim Check Entry
-
Locate the interim check you want to delete.
-
Use the Delete action.
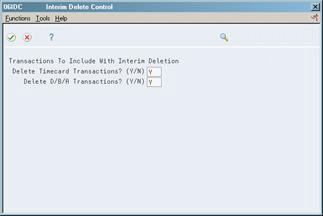
Figure 43-9 Interim Delete Control screen
Description of ''Figure 43-9 Interim Delete Control screen''
-
On Interim Delete Control, complete the following fields:
-
Delete Timecard Transactions
-
Delete DBA Transactions
-
-
Choose the Submit function.
| Field | Explanation |
|---|---|
| Delete Timecard Transactions? (Y/N) | This allows you to delete timecard transactions. Valid codes are:
Y – Delete all timecard transactions (default) N – Do not delete all timecard transactions |
| Delete D/B/A Transactions? (Y/N) | This allows you to delete D/B/A transactions.
Y – Delete D/B/A transactions N – Do not delete D/B/A transactions The default is set to Y. |
43.8.1 What You Should Know About
43.9 Entering an Interim Check for a Net Advance
From Payroll Master (G07), choose Interims and Special Post
From Interims and Special Post (G0721), choose Interim Check Entry
Use Format 2 to test possible check scenarios or to enter an automatic net advance. When you enter an interim check for a net advance, the system calculates the information in temporary work files and processes only the net check amount. The system does not save any of the other calculations. The system then enters an advance deduction in the employee DBA instructions for the amount of the check and withholds it from the employee's next payroll check.
You might want to use Format 2 to calculate a net advance when you want to issue an advance to the employee for only the time worked since the last paycheck.
You must use interactive mode to process an interim check with Format 2.
To enter a net amount advance interim check
On Interim Check Parameters
-
Complete the following fields:
-
Work Date to Process From
-
Work Date to Process To
-
Pay Period of the Month
-
Computer or Manual Checks
-
Override Bank Account Number
-
Batch/Interactive Indicator
-
Create VERTEX Employee Report (Y/N)?
-
Create VERTEX Debug Log (Y/N)?
-
Create VERTEX EI Log (Y/N)?
-
Create VERTEX XML Files (Y/N)?
-
Optional Check Stub Message
-
-
Enter 2 in the following field and press Enter:
-
Interim Processing Format
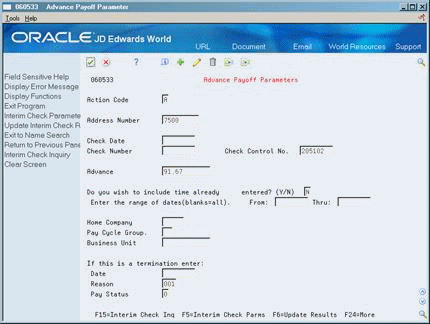
Figure 43-10 Advance Payoff Parameters screen

Description of ''Figure 43-10 Advance Payoff Parameters screen''
-
-
On Advance Payoff Parameters, complete the following fields:
-
Review the value in the following field:
-
Include Time
-
-
To process manual interim checks, complete the following fields and press Enter:
-
Check Number (Manual)
-
-
On the time entry form, complete the steps for entering timecard information.
-
Press Enter and exit the time entry form.
-
On Interim Check Inquiry, review the calculations.
-
Exit Interim Check Inquiry.
Figure 43-12 Advance Payoff Parameters (Update) screen
Description of ''Figure 43-12 Advance Payoff Parameters (Update) screen''
-
On Advance Payoff Parameters to save the net amount as an advance deduction, choose the Update Results function.
-
On Advance Payoff Parameters, choose the Update Results function to save the net amount as an advance deduction.
43.9.1 What You Should Know About
| Topic | Description |
|---|---|
| Multiple advances | When an employee has multiple advances, the advance deduction amount for the DBA is the total of all advances. |
| Estimated pay | To base the net amount advance on earnings to date when you have no existing time entry information, you can base the advance calculation on estimated pay.
When you use Format 2 for this type of advance, the system does not save the timecard. Enter E in the Source of Pay field on Pay Type Setup to define a pay type for estimated pay. See Setting Up Pay Types in the JD Edwards World U.S. Payroll II Guide. |
| Multi-check processing | Multi-check processing allows the system to track wages and taxes for any outstanding interim checks that the system has not yet updated to history. Newly calculated checks take the outstanding wages and taxes into account for limits purposes. Each time the system calculates a check, whether it is an interim check or a payroll check, the system verifies taxation history to determine if an employee has reached any earnings or tax limits for taxing purposes.
The system updates the interim YTD wage amount and an interim YTD tax amount in the Taxation Summary History table (F06136 for U.S., F0713 for Canada) whenever you:
When pre-payroll and interim check entry programs calculate taxes for subsequent checks, the system calculates the taxes based on the regular YTD amounts. The system clears the interim YTD amounts during the final update when it updates the interim check earnings and taxes to regular history. Multi-check processing uses tax limits, but not DBA limits. |