30 Set Up the Vehicle Master
This chapter contains these topics:
30.1 Setting Up the Vehicle Master
From Load and Delivery Management (G49), enter 29
From Load and Delivery System Setup (G4941), choose Vehicle Master
You set up the vehicle master to record information about vehicles operated by your company or by contractors. The Load and Delivery Management system uses the vehicles you define as a resource for the trip creation and delivery processes.
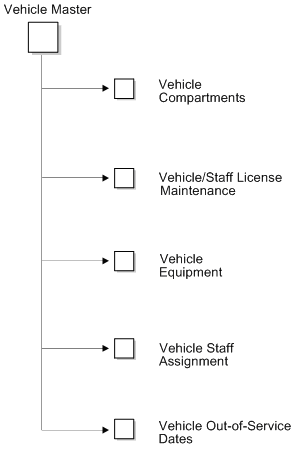
When you set up the vehicle master, you can specify:
-
Types
-
Dummy vehicle
-
Compartments
-
Licenses and registration
-
Equipment
-
Staff
-
Out-of-service dates
The system associates special handling codes with the vehicle to indicate whether the vehicle can hold product. For vehicles that do hold product, you specify whether the product is bulk or packaged. The system uses the value you specify to determine subsequent processing.
This section contains the following:
-
Defining a Vehicle
-
Setting Up Vehicle Compartments
-
Assigning Vehicle License and Registration
-
Setting Up Vehicle Equipment
-
Assigning Vehicle Staff
-
Setting Up Vehicle Out-of-Service Dates
You must define each vehicle you plan to use in the Load and Delivery Management system. You must also assign at least one compartment for every vehicle that carries product. For vehicles with compartments, you must define capacity information for each compartment.
You enter user defined codes (UDCs) to assign vehicle license and registration information for vehicles. This information identifies the different types of licenses and their effective dates. During the trip building process, the Trip Assignment program validates the setup and effective dates of the required vehicle license and operator license.
You also enter UDCs to define equipment associated with individual vehicles. When you are building a trip, you can view the vehicle master to determine if a vehicle has the appropriate equipment for a specific delivery requirement. For example, the dispatcher might be building a trip for a delivery site that is known to have a blocked entrance. In this case, the dispatcher needs to assign a vehicle equipped with a hose and pump so the operator can deliver the product.
You assign staff to operate your vehicles according to the job that the individual performs. You can assign a person to a particular vehicle or you can assign staff to a depot.
You can use status codes and dates to indicate when your vehicle is scheduled for routine maintenance or is unavailable because of a mechanical breakdown. The dispatcher uses this information to avoid assigning orders and trips to an out-of-service vehicle.
30.1.2 Before You Begin
-
Confirm that your vehicle type user defined codes are set up with the appropriate special handling codes.
-
Set up user defined codes. See Working with User Defined Codes in the JD Edwards World Technical Foundation Guide.
-
If you require your vehicles to be fixed assets, set up the vehicles to be fixed assets. See Creating an Asset Master Record in the JD Edwards World Fixed Assets Guide.
-
If your vehicles are set up as fixed assets, activate the Fixed Assets Interface in the Load and Delivery Constants program. See Section 28.1, "Setting Up Load and Delivery Constants."
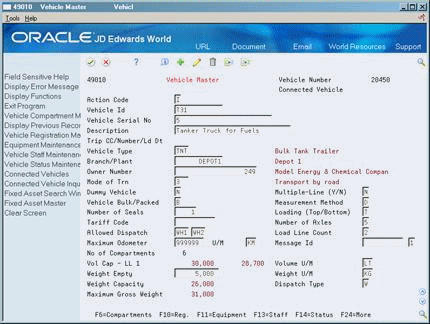
30.2 Defining a Vehicle
You must define each vehicle you plan to use in the Load and Delivery Management system. When you define a vehicle, you can specify such information as type, home depot, transport product type (bulk or packaged), and dispatch group.
If your vehicles are set up as fixed assets, you can return data from the Fixed Assets Master table (F1201) to speed the entry process and assign the vehicle number rather than using the next number, when you define a vehicle.
Information populated by the Fixed Assets Master table includes:
-
Vehicle ID
-
Vehicle Serial Number
-
Description
-
Branch/Plant
On Vehicle Master
Complete the following fields:
-
Vehicle ID
-
Vehicle Serial Number
-
Branch/Plant
-
Owner Number
-
Vehicle Bulk/Packaged
-
Allowed Dispatch
-
Measurement Method
-
Volume Unit of Measure
-
Weight Unit of Measure
| Field | Explanation |
|---|---|
| Vehicle Id | A unique identification number for a vehicle. This number serves as a primary identifier for a vehicle. |
| Vehicle Serial No | The vehicle serial number is an alternate vehicle identification number. This number is commonly used to track vehicles by the manufacturer's serial number. The Vehicle Serial Number field must be a unique number. |
| Owner Number | Identifies the address book number of the organization that owns and/or operates this vehicle or tank. The owner may be the address book number assigned to your company number.
Form-specific information For payable freight, this address will be the vendor on the A/P voucher. |
| Vehicle Bulk/Packed Flag | Indicates whether a vehicle carries bulk or packaged products.
When setting up a trip with vehicles that carry product, this field must match the bulk/packaged flag of the product. Valid values are: P – Vehicle carries packaged products. B – Vehicle carries bulk product. Blank – Vehicle does not carry products. If the special handling code in the vehicle type is N, this field must be blank. The vehicle type can be used to represent the cab (power unit) that is attached to one or more trailers. |
| Allowed Dispatch | A user defined code that identifies the dispatch group. A dispatch group is a grouping you make for products according to the physical characteristics that are important when storing and transporting those products.
During the trip building process, the system checks if the dispatch group for the item and the vehicle are compatible. The system only allows products belonging to the allowed dispatch groups to be assigned to the vehicle. Form-specific information A vehicle is allowed to carry items belonging to two dispatch groups, but not on the same trip. |
| Measurement Method | The method this vehicle uses to control and measure product as it is loaded into its compartments. |
| Multiple-Line (Y/N) | Identifies vehicles designed for bulk transport that can allow multiple order lines per compartment. This usually describes a vehicle that has a procedure or device to measure outgoing product during delivery.
'Y' (yes) or '1' in this field indicates that multiple lines are allowed per compartment. |
| Load Line Count | This is the number of load lines in a vehicle compartment. |
30.2.1 What You Should Know About
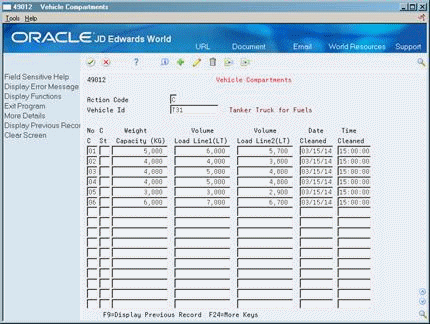
30.3 Setting Up Vehicle Compartments
You should assign at least one compartment for every vehicle that carries product. For vehicles with multiple compartments, you must define capacity information for each compartment.
To set up vehicle compartments
On Vehicle Master
-
On Vehicle Compartments, complete the following required fields:
-
Vehicle ID
-
Compartment Number
-
Weight Capacity
-
-
Complete the following optional fields:
-
Compartment Status
-
Date Cleaned
-
Time Cleaned
-
-
Complete the following optional fields if they appear:
-
Volume Load Line 1
-
Volume Load Line 2
-
| Field | Explanation |
|---|---|
| Compartment Number | The unique identifier associated with one of the storage compartments of this vehicle. Some vehicles (especially those designed to carry only packaged goods) have only a single compartment. For a single compartment vehicle, the compartment capacity represents the total storage capacity of the vehicle itself. |
| Weight Capacity Compartment | The weight capacity of this compartment. If you did not set a capacity for each compartment, you may still load product.
Form-specific information Type the total weight this compartment can handle. You will notice a two-character code in parenthesis to the right of the field name. This is the weight unit of measure (UM) that is populated from the Vehicle Master. |
| Status - Compartment | Identifies the current status of a vehicle compartment.
If you enter any non-blank value in the Compartment Status field, the system marks the compartment as unavailable. |
30.3.1 What You Should Know About
30.4 Assigning Vehicle License and Registration
For vehicles, you enter vehicle license and registration information. You also enter types of licenses and registration and their effective dates. During the trip building process, the Trip Creation/Maintenance program uses information you have defined as required in the load and delivery constants to validate the setup and effective dates of the vehicle license and registration.
To assign vehicle license and registration
On Vehicle Master
-
Access Vehicle/Staff License Maintenance (F10).
Figure 30-4 Vehicle/Staff License Maintenance screen
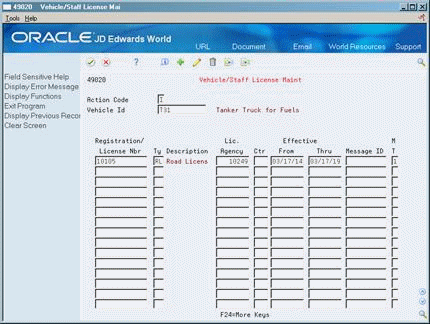
Description of "Figure 30-4 Vehicle/Staff License Maintenance screen"
-
On Vehicle/Staff License Maintenance, complete the following required fields:
-
Vehicle ID
-
Registration/License Number
-
Type
-
Licensing Agency
-
Effective From
-
Effective Thru
-
| Field | Explanation |
|---|---|
| Registration/License Number | Identifies the identification number that displays on the license, permit, or certificate. |
| Registration/License Type | Indicates the type of authorization or document required, for example, general driving license, safety training certification, yard access, and loading rack access.
Form-specific information In trip assignment, the system checks to make sure the operator of the vehicle has a current license of the type specified in the Load and Delivery Constants. You must enter a license of the same type as that specified in the License Type field for the Load and Delivery Constants. |
| Address Number - Licensing Agency | Identifies the agency responsible for issuing this license. This is an address book number, which allows for a telephone number and address information. |
30.4.1 What You Should Know About
| Topic | Description |
|---|---|
| Entering vehicle registration | You can also enter vehicle registration information on the Vehicle Registration Entry window. The system automatically displays this window during load confirm by trip if the vehicle for the trip is set up as a planning (dummy) vehicle.
See Section 11.2, "Confirming a Bulk Load by Trip" and Section 11.3, "Confirming a Packaged Load by Trip." |
30.5 Setting Up Vehicle Equipment
You enter UDCs to define equipment associated with individual vehicles. When you are building a trip, you can view the vehicle master to determine if a vehicle has the appropriate equipment for a specific delivery requirement. For example, the dispatcher might be building a trip for a delivery site that is known to have a blocked entrance. In this case, the dispatcher needs to assign a vehicle equipped with a hose and pump so the operator can deliver the product.
On Vehicle Master
-
On Vehicle Equipment, complete the following required fields:
-
Vehicle ID
-
Equipment Type
-
Effective From
-
Effective Through
-
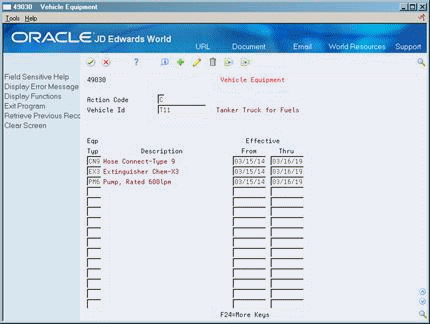
| Field | Explanation |
|---|---|
| Equipment Type | Identifies the type of equipment. |
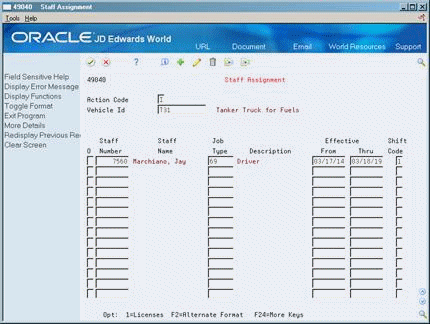
30.6 Assigning Vehicle Staff
You assign staff to operate your vehicles according to the job that the individual performs. You can assign a person to a particular vehicle or you can assign staff to a depot.
On Vehicle Master
-
On Staff Assignment, complete the following required fields:
-
Vehicle ID
-
Staff Number
-
Job Type
-
Effective From
-
Effective Thru
-
Shift Code
-
-
Access the detail area (F4).
Figure 30-7 Staff Assignment screen (Detail area)
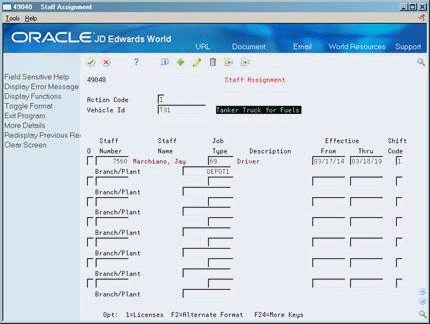
Description of "Figure 30-7 Staff Assignment screen (Detail area)"
-
Complete the following optional field:
-
Branch/Plant
-
| Field | Explanation |
|---|---|
| Staff Number | Identifies the address book number for the staff member. |
| Job Type | A user defined code (07/G) that specifies job classifications established for an organization. In the Load and Delivery Management system, the job type is used in the following ways:
|
| Shift Code | A user defined code (07/SH) that identifies daily work shifts. In payroll systems, you can use a shift code to add a percent or amount to the hourly rate on a timecard.
For payroll and time entry: If an employee always works a shift for which a shift rate differential is applicable, enter that shift code on the employee's master record. When you enter the shift on the employee's master record, you do not need to enter the code on the timecard when you enter time. If an employee occasionally works a different shift, you enter the shift code on each applicable timecard to override the default. Form-specific information If you enter blank, the system does not require that staff be assigned to a specific shift. This is also true when you are building a trip. |
30.6.1 What You Should Know About
30.7 Setting Up Vehicle Out-of-Service Dates
You can use status codes and dates to indicate when your vehicle is scheduled for routine maintenance or is unavailable because of a mechanical breakdown. The dispatcher uses this information to avoid assigning orders and trips to an out-of-service vehicle.
To set up vehicle out-of-service dates
On Vehicle Master
-
Access Vehicle Status Maintenance (F14).
Figure 30-8 Vehicle Out of Service Dates screen
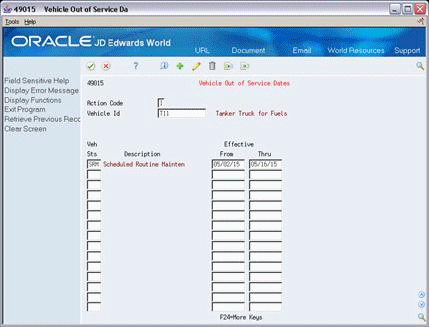
Description of "Figure 30-8 Vehicle Out of Service Dates screen"
-
On Vehicle Out of Service Dates, complete the following required fields:
-
Vehicle ID
-
Vehicle Status
-
Effective From
-
Effective Thru
-
| Field | Explanation |
|---|---|
| Vehicle Status | A user defined code that indicates why the vehicle is out of service, for example, Scheduled Routine Maintenance (SRM), Mechanical Breakdown (MB), or Collision Repair (CR). |