19 Work with Automatic Payments
This chapter contains these topics:
19.1 Understanding Automatic Payments
Use automatic payment processing to pay vouchers during your usual payment cycle. To process automatic payments, you assign formats to payment instruments. Then, you create payment groups. After you create your payment groups, you process automatic payments in the group. When you select the Write function for your payment group, the system determines which payment formats to generate based on the payment formatting programs that you assign to your payment instruments.
Working with automatic payments includes the following tasks:
-
Assigning formats to payment instruments
-
Creating a payment group
-
Working with payment groups for automatic payments
The following graphic illustrates working with automatic payments.
Figure 19-1 Working with Automatic Payments
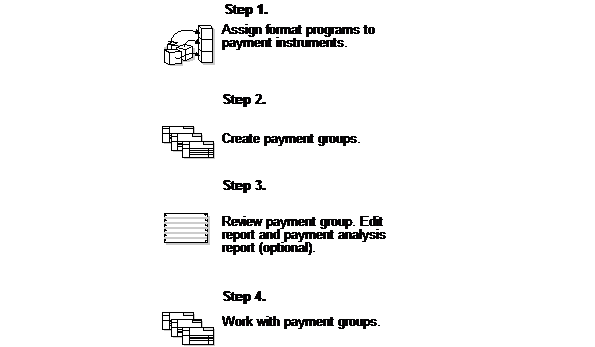
Description of "Figure 19-1 Working with Automatic Payments"
19.2 Assigning Formats to Payment Instruments
From Accounts Payable (G04), enter 29
From Accounts Payable Setup (G0441), choose Automatic Payment Setup
From Automatic Payment Setup (G04411), choose Payment Instrument Defaults
You can specify various output formats for automatic payments by assigning the programs that generate the formats to user-defined payment instruments. Payment formats can be printed or electronic. Payment instruments can include checks, magnetic tapes, and drafts.
The programs that you assign to your payment instruments determine the formats for payments and any additional output that the system generates when you process payment groups. The additional output components can include:
-
Payment registers - A printed list of payments.
-
Attachments - A printed report that contains the detail information that does not fit on a payment stub.
-
Debit statements - A printed list of debit balances. Debit statements list net amounts that can either decrease or clear the amount of a voucher.
To assign formats to payment instruments, you specify a format generation program for each component of a payment instrument. For example, you could assign program P04573 (for print standard attachments) to the attachments component of your payment instrument for drafts. Then, when you generate drafts, the system accesses this program to produce the appropriate type of attachment.
You can also define the specific uses for a payment instrument by assigning a specific bank account to the instrument. For example, you can set up two types of payment instruments for drafts with each type drawn on a different bank account.
Assign the following programs to payment instruments for Italy:
| Instrument | Program |
|---|---|
| Payment formats | Specify the following Write Programs to generate payment formats for Italy:
P04572I1 for electronic fund transfer format (diskette) P04572I2 for check format |
| Registers | Specify Register Program P04576I to generate the payment register for electronic fund transfer and check formats in Italy. |
19.2.1 Before You Begin
-
Set up a code on user defined codes 00/PY for each payment instrument that you use, and set up a code on user defined codes table 04/PP for each of your payment programs. See Section 1.3, "Set Up User Defined Codes for Italy."
To assign formats to payment instruments
On Payment Instrument Defaults
Figure 19-2 Payment Instrument Defaults.screen
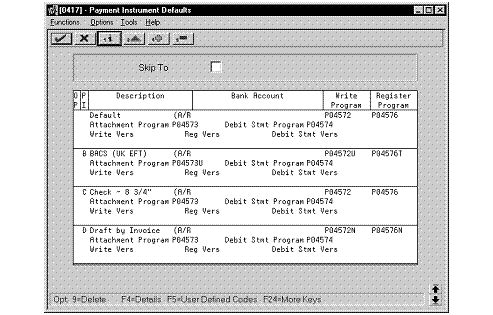
Description of "Figure 19-2 Payment Instrument Defaults.screen"
-
Complete the following fields:
-
Payment Instrument
-
Write Program
-
Register Program
-
-
Complete the following optional field:
-
Bank Account
-
-
Choose the Details function.
-
Complete the following fields:
-
Attachment Program
-
Debit Statement Program
-
-
To specify a particular version for a format program, complete the following fields:
-
Write Version
-
Register Version
-
Debit Statement Version
-
Attachment Version
-
To assign formats to payment instruments
From the Automatic Payment Setup menu (G04411), choose Payment Instrument Defaults.
On Work with Payment Instrument Defaults
-
Click Add.
Figure 19-3 Set Up Payment Instrument Default screen
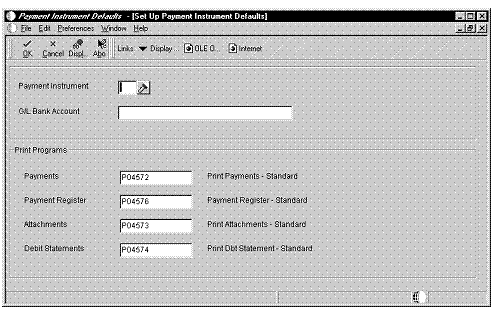
Description of "Figure 19-3 Set Up Payment Instrument Default screen"
-
On Set Up Payment Instrument Defaults, complete the following fields:
-
Payment Instrument
-
G/L Bank Account
-
-
Under the Print Programs heading, complete the following fields:
-
Payments
-
Payment Register
-
Attachments
-
Debit Statements
-
| Field | Explanation |
|---|---|
| Payment Instrument | The user defined code that determines the type of payment to be made to the supplier. |
| G/L Bank Account | A field that identifies an account in the general ledger. You can use one of the following formats for account numbers:
Standard account number (business unit.object.subsidiary or flexible format) Third G/L number (maximum of 25 digits) 8-digit short account ID number Speed code The first character of the account indicates the format of the account number. You define the account format in the General Accounting Constants program. |
| Payments | A user defined program used to print A/P payments. Only programs set up in user defined codes for 04/PP may be entered. |
| Payment Register | A user defined program used to print the A/P payment register. Only programs set up in user defined codes for 04/PR may be entered. |
| Attachments | A user defined program used to print attachments in A/P Payment processing. Only programs set up in user defined codes for 04/PA may be entered. |
| Debit Statements | A user defined program used to print debit statements in A/P payment processing. Only programs set up in user defined codes for 04/PD may be entered. |
19.2.2 Specifying Different Program Versions
You can specify different versions of the Write, Register, Debit Statement and Attachment programs that you assign to your payment instruments. To do this, access the versions list to create a new version of the program. Then, on Payment Instrument Defaults, access the detail area and type the new version name in the appropriate Version field.
19.2.3 Processing Options
See Section 42.2, "Processing Options for A/P Payments - EFT for Italy (P04572I1)."
See Section 42.3, "Processing Options for A/P Payments - Checks for Italy (P04572I2)."
See Section 42.4, "Processing Options for A/P Payments - Register for Italy (P04576I)."
See Section 42.5, "Processing Options for A/P Payments - EFT for Italy (R04572I1)."
19.3 Creating a Payment Group
From Accounts Payable (G04), choose Automatic Payment Processing
From Automatic Payment Processing (G0413), choose Create Payment Groups
From the Automatic Payment Processing menu (G0413), choose Create Payment Control Groups.
Before you can generate automatic payments, you must create payment groups. When you create payment groups, the system separates vouchers that have similar information, such as the same bank account and payment instrument. This allows the system to process similar vouchers in the same way. You use the payment groups when you review and write payments.
Each payment group contains information that determines how the group will be processed, including:
-
Bank account
-
Payment instrument
-
Output queue
Each payment group also contains control information that determines which format program the system uses to generate:
-
Payments
-
Registers
-
Attachments
-
Debit statements
19.4 Working With Payment Groups for Automatic Payments
From Accounts Payable (G04), choose Automatic Payment Processing
From Automatic Payment Processing (G0413), choose Work with Payment Groups
From the Automatic Payment Processing menu (G0413), choose Work with Payment Groups.
After you create payment groups for automatic payments, you can work with them to review and change transfer information. You generally review payment groups twice:
-
After you create payment groups but before you write bank transfers. This allows you to identify transfers that you want to change or remove from the payment cycle. You can:
-
Change information at the payment and voucher levels
-
Remove payment groups, payments, and vouchers from the payment cycle
-
Change control information for payment groups
-
-
After you write automatic payments but before you update the Accounts Payable ledger. This allows you to identify transfers that you want to void or remove from the payment cycle. You can:
-
Void the automatic payments that were written and rewrite them
-
Remove payment groups, payments, and vouchers from the payment cycle
-
19.4.1 Processing Options
See Section 42.8, "Processing Options for Work with Payments (P04257)."
See Section 42.9, "Processing Options for Work with Auto Payments (P04571)."