2 Work with SEPA Credit Transfers
This chapter contains the following topics:
2.1 About SEPA Credit Transfers
The EPC (European Payments Council) is the governing body and coordination body of the European banking industry in relation to payments. The purpose of the EPC is to support and promote a Single European Payments Area (SEPA).
The SEPA initiative for European financial infrastructure involves a zone in which all payments (credit transfers) and debits in euros are considered domestic. No distinction exists between the national and international payments. SEPA strives to improve the efficiency of international payments and developing common standards, procedures, and infrastructure to improve the economies of scale. As of March 2012, SEPA extends to the 27 EU (European Union) member states, plus Iceland, Liechtenstein, Norway, Switzerland, and Monaco.
You can generate credit transfers in the format required for SEPA when you use the automatic payment process. When you set up your automatic payment process, you can specify the SEPA Credit Transfer program (P7404572) as the Write program for the payment instrument that you use for SEPA credit transfers. You then continue with the automatic payment process to write and update payments, and then generate the output file. You convert the output file to an .xml file, and submit that file to your bank.
Before you can use the automatic payment process to create the SEPA credit transfer file, you set up your company and supplier bank accounts with the BIC (bank identifier code) number and IBAN (international bank account number) and specify that the accounts are for use for SEPA credit transfers. Both the company and supplier bank accounts must be set up to use the euro as the currency.
2.2 Common Terms
These terms are used in this chapter:
| Field | Description |
|---|---|
| Bank Type Code | Enter a value from UDC 00/BT that is set up for vendors.
If the bank account is for a supplier, the UDC value must be V or Vx, where x is a variable of your choosing. If the bank account is for the company, the UDC value must be G. |
| Cur Cod (Currency Code) | Enter the currency code that is associated with the euro. The currency code for the bank accounts that you use for SEPA must be the code for the euro. |
| IBAN (International Bank Account Number) | The International Bank Account Number or IBAN as it is commonly called, is a series of alphanumeric characters that uniquely identifies a customer's account held at a bank anywhere in the world.
The IBAN has a maximum of 34 alphanumeric characters: The first two alphabetic characters identify the country in which the account is held. The next two digits are the check digits. They validate the complete IBAN. The final part of the IBAN is the domestic account number, which in most cases consists of the account number itself, the number that identifies the bank and the branch, and one or more check digits. For some countries an extra bank identifier is included. The JD Edwards World system validates that the IBAN number you enter is valid. |
| Payment Instrument | Enter the value from UDC 00/PY that is set up for SEPA credit transfers. |
| SWIFT/BIC | The Society for Worldwide Interbank Financial Telecommunications (SWIFT) code is an international banking identification code used to identify the origin and destination of electronic (or wire) financial transfers.
The BIC (SWFT field in F0030) consists of the bank, country, location, and branch codes. The JD Edwards World system validates only the country code. The country code must be a valid value in the 00/CN UDC table. Use care when entering the BIC code because the bank will reject the file if the code is not valid. |
| SEPA (Single Euro Payment Area) | This flag indicates that a bank account is eligible to be paid using the SEPA credit transfer format. In order for the bank account to be SEPA eligible, it must have valid IBAN code assigned to it. For cross-border payments, you should also enter the assigned SWIFT/BIC number code. You must complete the IBAN field (and, optionally, the BIC field) before you enter 1 in this field. Values are:
Blank: SEPA credit transfer is not allowed. 1: SEPA credit transfer is allowed |
2.3 Setup for SEPA Credit Transfers
Before you can use the automatic payment process to work with SEPA credit transfers, you must set up:
-
Multicurrency processing.
-
Next numbers.
-
User-defined codes (UDCs).
-
Supplier master information.
-
Supplier bank information.
-
Company bank information.
-
Payment instruments.
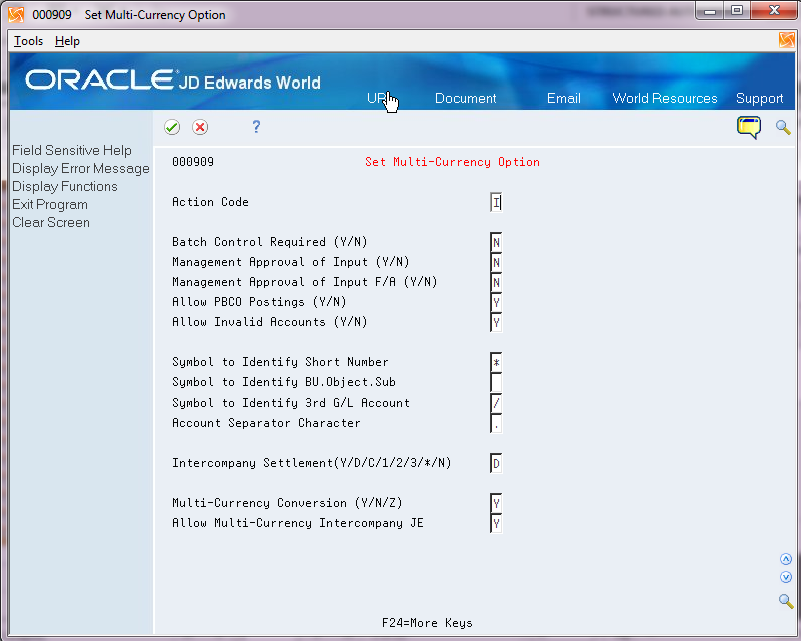
2.3.1 Multicurrency Processing
You must set up your system to enable multicurrency processing because fields required for SEPA processing are read-only when multicurrency processing is enabled.
From the Multi-Currency Setup menu (G1141), choose Set Multi-currency Option.
Figure 2-1 Set Multi Currency Option screen
Description of "Figure 2-1 Set Multi Currency Option screen"
See "Set Up Multicurrency" in the JD Edwards World Multi-Currency Guide.
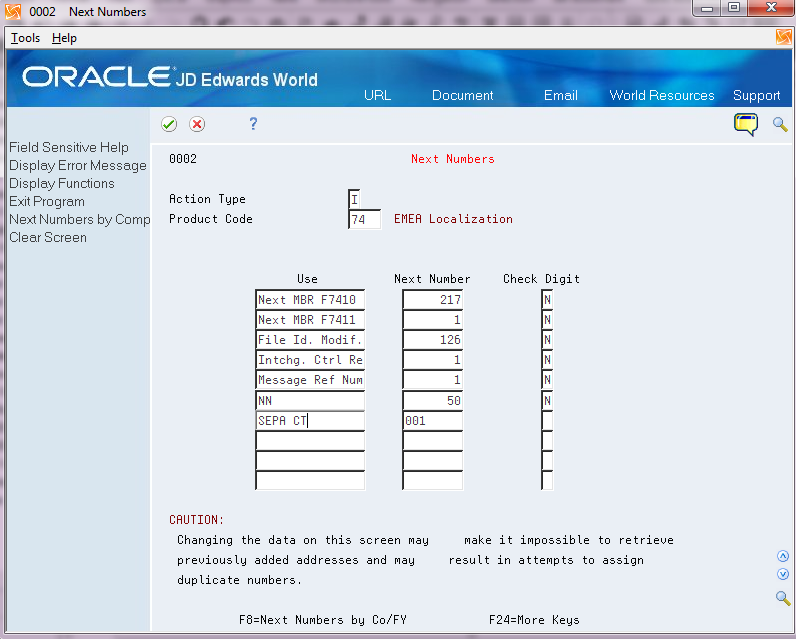
2.3.2 Next Number
Set up a next numbering schema for SEPA credit transfers on line 7 in system 74. The system writes the next number in the sequence to the header of the XML file.
2.3.3 User-Defined Codes
Verify that appropriate values are set up for these UDCs:
2.3.3.1 00/BE (PC Import/Export)
You must add P7404572 as a code in this UDC to enable the import/export function for the program. You must enter YN in the first two positions in the Special Handling Code field.
Figure 2-3 General User Defined Codes screen (00/BE)
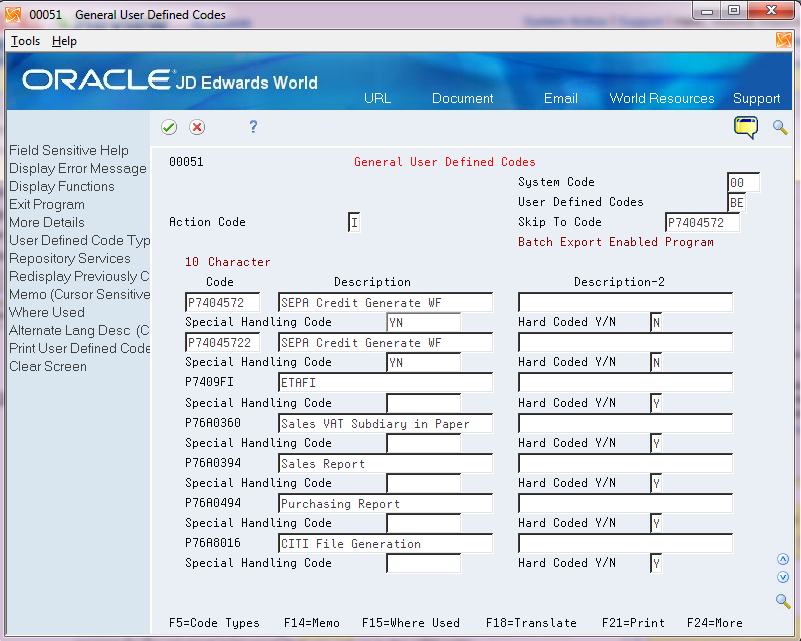
Description of "Figure 2-3 General User Defined Codes screen (00/BE)"
2.3.3.2 00/PY (Payment Instrument)
You must set up a payment instrument to use for SEPA credit transfers. The payment instrument should be unique and not used for other payment types. When you set up the supplier master information for the suppliers that you will pay using the SEPA credit transfer format, you assign the payment instrument code as the default payment instrument. When you set up the payment instrument in the Payment Instrument Defaults program (P0417), you assign P7404572 (SEPA Credit Transfers) as the Write program for the payment instrument that you set up in this UDC table.
2.3.3.3 00/BT (Bank Type)
You must assign a value of V or Vx (where x is a variable) as the bank type code in the suppliers' bank accounts. Verify that you have appropriate V-type codes that you can assign to your suppliers.
When you set up bank accounts for your company, assign bank type code G to identify the account as a internal bank account.
2.3.3.4 74/CP (Category Purpose)
Set up this UDC table with codes for the category purpose. Use codes that are acceptable under ISO message standards.
Examples of values are:
-
SUPP: Supplier Payment.
-
TAXS: Taxes
-
VATX: Value Added Tax Payment
You specify a category purpose code in the processing options of the SEPA Credit Transfer XML program (P7404572). The system includes the specified code in the XML file.
2.3.3.5 74/PC (Purpose Code)
Set up codes in this UDC table to describe the purpose of the credit transfer. Use codes that are acceptable under the ISO message standards. You specify a purpose code in the processing options of the SEPA Credit Transfer XML program (P7404572). The system includes the specified code in the XML file.
Examples of codes are:
-
COLL - Collection payment
-
AREN - Accounts receivables entry
2.3.3.6 74/RS (Special Characters Conversion)
Set up this UDC table with the replacement characters that you want the system to use instead of unacceptable characters that might exist in your data. You specify in a processing option whether to convert special characters.
When you run the SEPA Credit Transfer XML program (P7404572), the system scans the XML file for the characters that are specified in the Description 01 field in the 74/RS UDC table. It then replaces those characters with the alternative characters that you specify in the Description 02 field. Thus, the system deletes the unacceptable characters from the XML file and replaces them with acceptable characters. For example, if your bank does not recognize letters with umlauts, you can replace them with the two-letter equivalent, such as ae for ä, oe for ö, and so on.
The length of the text string does not change when you substitute multiple characters for one character.
Blank is a valid value for the Description 02 field. If you enter a value in the Description 01 field and leave the Description 02 field blank, the system replaces the Description 01 value with a "blank" value in each character string that includes the Description 01 value.
2.3.4 Setup Supplier Master Information
From the Supplier & Voucher Entry menu (G0411), select Supplier Master Information (P01054).
Figure 2-4 Supplier Master Information screen
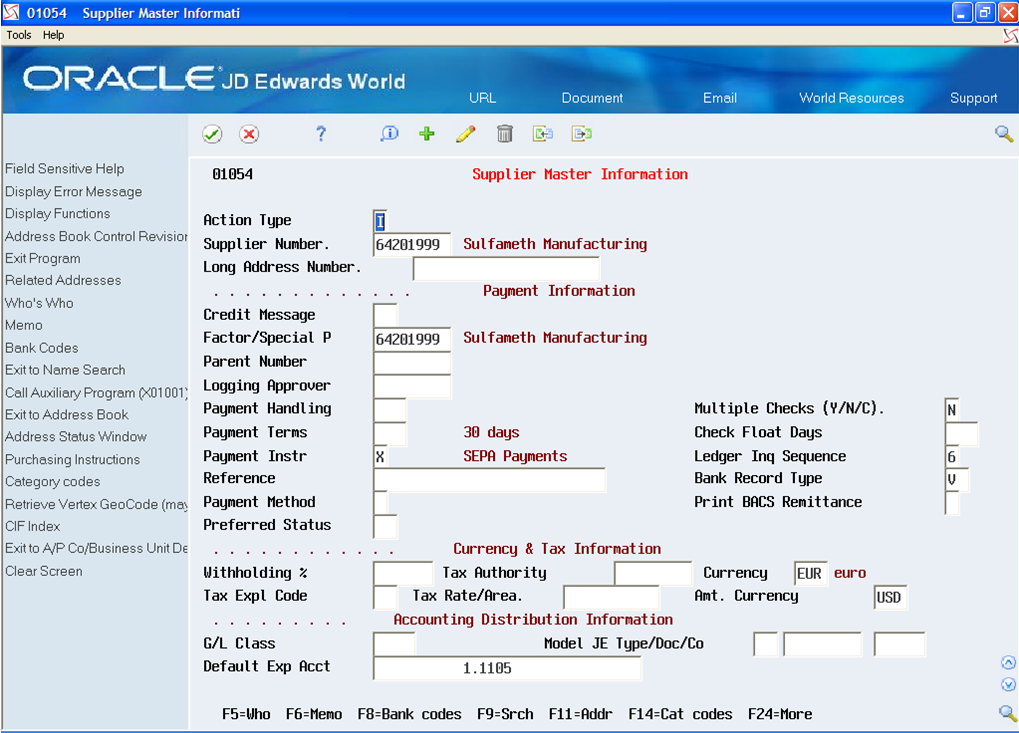
Description of "Figure 2-4 Supplier Master Information screen"
The supplier master record must include information that specifies that you want to pay the supplier using the SEPA credit transfer format.
In addition to the standard information required for supplier master records, verify that these fields are completed in the Supplier Master Information program (P01054):
-
Payment Instrument
Enter the payment instrument from UDC 00/PY that you set up for SEPA credit transfers.
-
Bank Record Type Code
Enter a value from UDC 00/BT that is set up for vendors. If the bank account is for a supplier, the UDC value must be V or Vx, where x is a variable of your choosing.
2.3.5 Set Up Supplier Bank Information
From the Supplier & Voucher Entry menu (G0411), choose Supplier Master Information (P01054), then press F8.
From the Automatic Payment Setup menu (G04411), choose Bank Accounts by Address.
Figure 2-5 Bank Accounts by Address screen
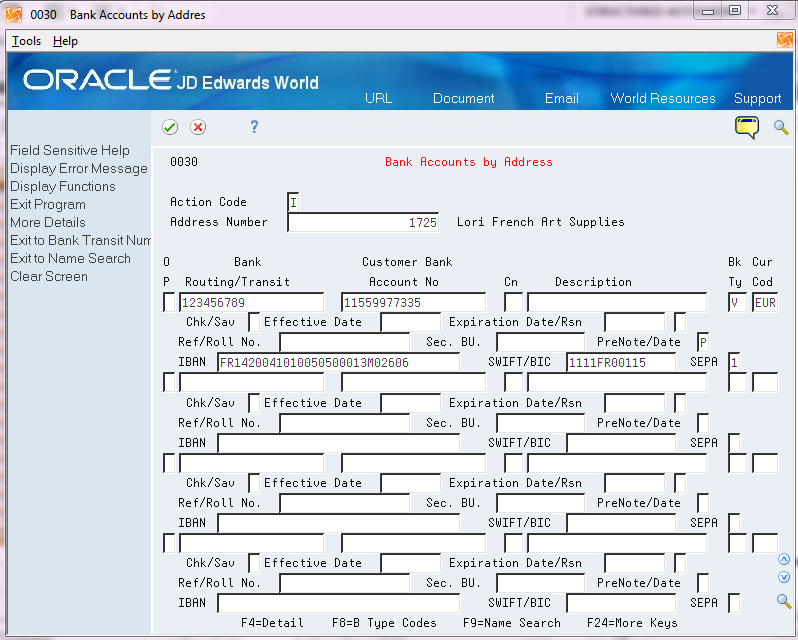
Description of "Figure 2-5 Bank Accounts by Address screen"
Before you process SEPA credit transfers (payments), you must set up the bank account information for the suppliers that you pay using the SEPA payment format.
To enter SEPA banking information for suppliers:
From Bank Accounts by Address:
-
Press F4 to display more details.
-
Complete these fields required for SEPA processing. Note that other fields are required, such as the Bank Routing number, but they are not specific to SEPA payments:
-
Bk Ty (Bank Type)
-
Cur Code (Currency Code)
-
IBAN (International Bank Account Number)
-
SWIFT/BIC
-
SEPA
-
2.3.6 Set Up Company (G/L) Bank Information
From the Multi-Currency Setup menu (G1141), choose Designate Company Currency.
When you set up your company, you can specify the domestic currency in the Cur Cod (Currency Code) field.
See "Overview to Multi Currency" in the JD Edwards World Multi-Currency Guide.
From the Automatic Setup menu (G04411), choose Bank Account Information.
You must set up bank account records for each bank account that you use to process SEPA payments. Complete the standard fields, and also complete the fields required for SEPA payments.
To set up a company bank account for SEPA payments:
From Bank Account Information:
-
Complete the standard banking fields.
See "Entering Bank Account Information" in the JD Edwards World Accounts Payable Guide.
-
Complete the banking fields required for SEPA payment processing:
-
SWIFT Co (Society for Worldwide Interbank Financial Telecommunications number)
-
IBAN # (International Bank Account Number)
-
SEPA Flg (SEPA Flag)
-
2.3.7 Set Up Payment Instruments
Figure 2-6 Payment Instrument Defaults screen
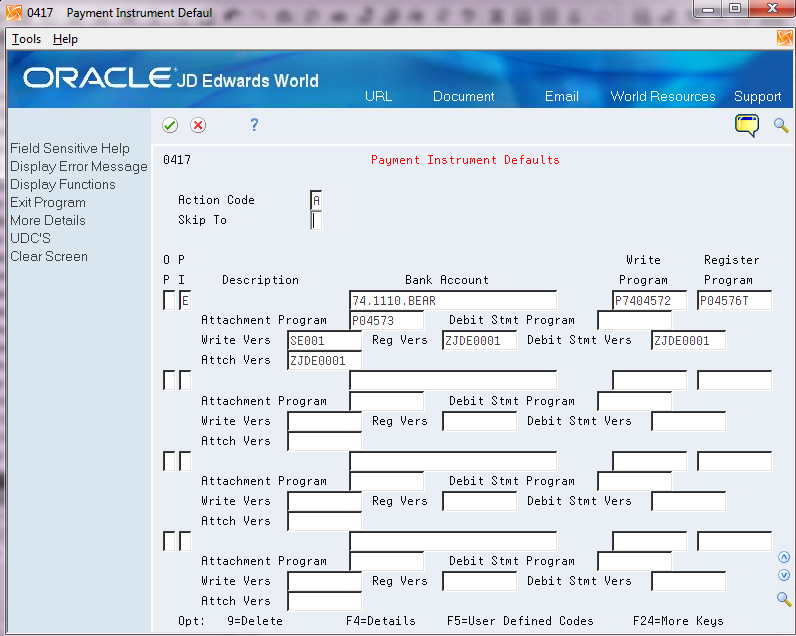
Description of "Figure 2-6 Payment Instrument Defaults screen"
When you set up the automatic payment process to use SEPA credit transfer processing, you set up one or more payment instruments to use during processing. You set up a code in the 00/PY UDC table, and then associate Write and Register programs to the code, as well as the versions of the Write and Register programs to use.
You use the Payment Instrument Defaults program (P0417) to set up payment instruments. Specify P7404572 (SEPA Credit Transfers program) as the Write program. You must also specify the version of the program to use. You can specify any Register program that you use for electronic payments, such as P04576T.
The P7404572 program includes processing options that you must set up before you run the automatic payment process. See Chapter 12, "SEPA Credit Transfers Processing Options"
2.4 Set Up Distribution Lists and Templates
Before you generate the SEPA credit transfer file, you must set up the users who will work with the programs, the distribution lists, and the templates used by the process. The setup includes these tasks:
-
Set up the email information for the address book record of the user who will access the files.
-
Create the distribution profile for the email address.
-
Create transformation templates.
-
Define batch export parameters.
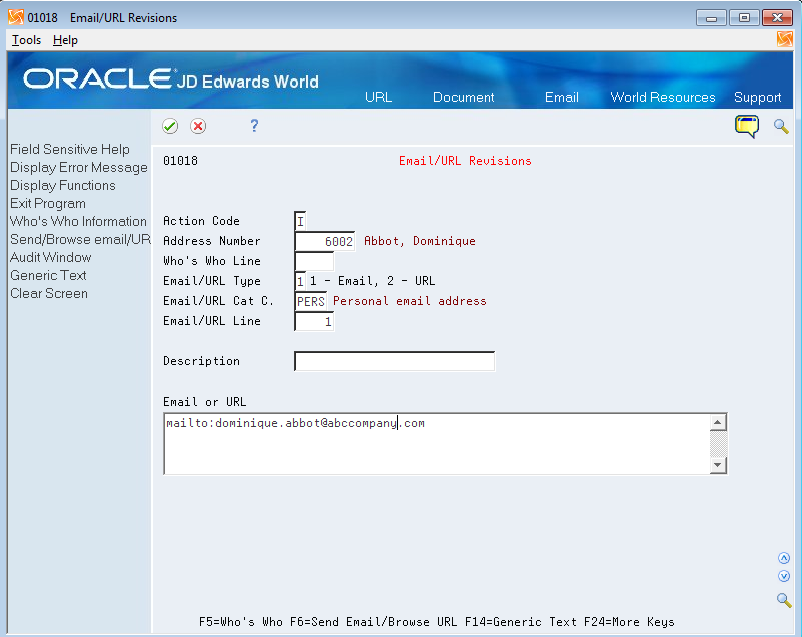
2.4.1 Set Up Address Book Records
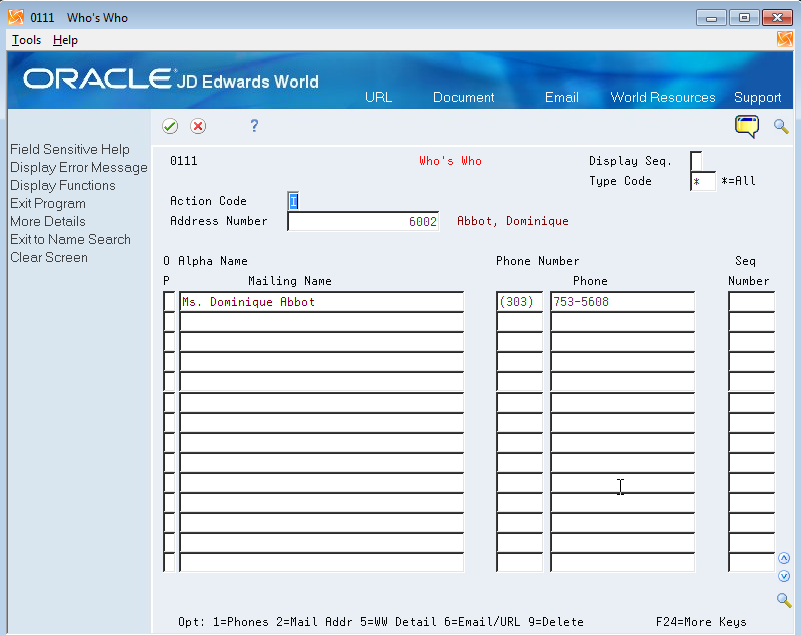
In the address book record of the users who will work with the SEPA credit transfer output, complete this setup:
-
In the Who's Who record, enter the Mailing Name of the user.
You access the Who's Who record using option 5 (Who) on the Address Book Revision screen.
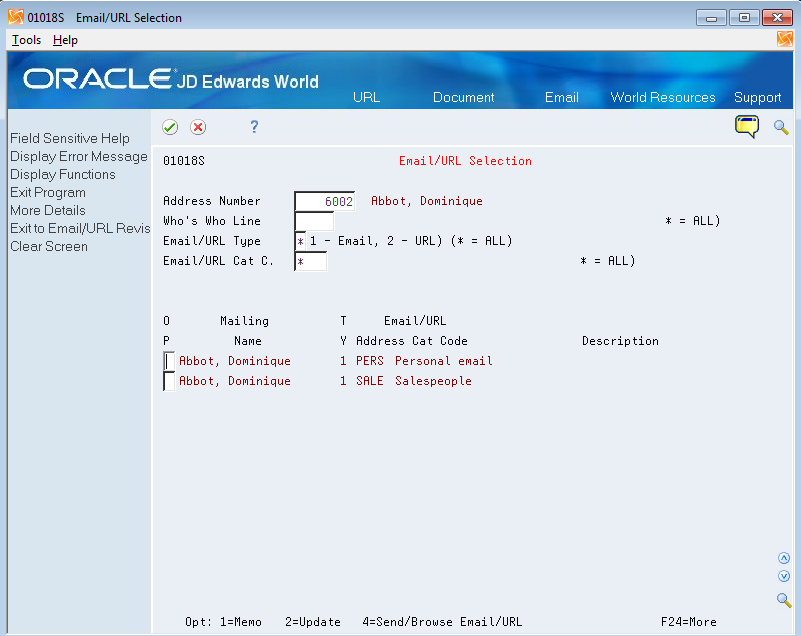
-
Set up the Email/URL record for the Who's Who record.
You access the Email/URL record using option 6 (Email/URL) on the Who's Who screen.
-
On the Email/URL Selection screen, use option 2 (Update) for the selection that you want to update, then enter the email or URL for the employee and click OK.
2.4.2 Create the Distribution Profile
To create the distribution profile:
-
From the Electronic Document Delivery menu (G00E), choose option 3 (Distribution Profiles).
-
On the Distribution Profiles screen, enter 2 to update a selection, or enter 3 to copy an existing profile to create a new distribution list. If you are creating a new list, enter the new distribution profile name.
Figure 2-10 Distribution Profile Copy screen
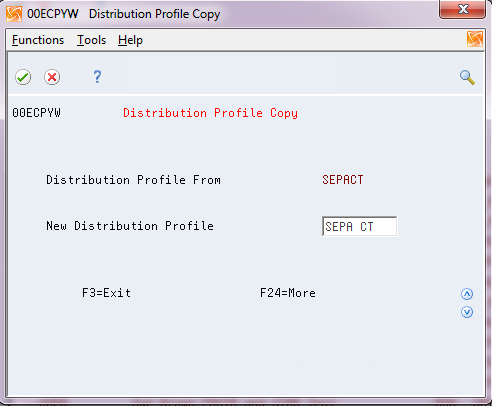
Description of "Figure 2-10 Distribution Profile Copy screen"
-
On the Distribution Profile screen, enter 2 (Update) for the distribution profile you want to work with.
-
On the Distribution Profile Maint. screen, enter the description of the profile, complete fields as necessary, and save your changes.
Figure 2-11 Distribution Profile Maint. screen
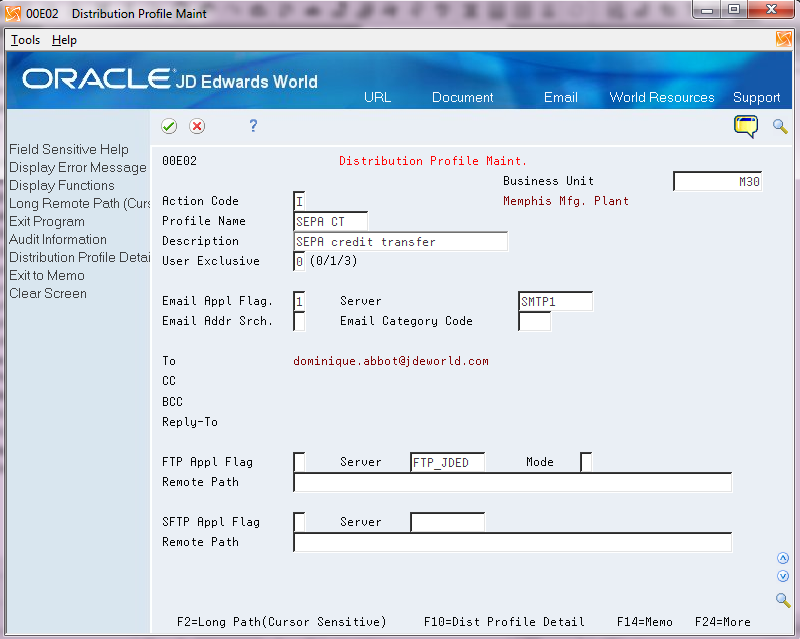
Description of "Figure 2-11 Distribution Profile Maint. screen"
Note: Use the same name here as you will use for the transformation template. For example, if you name the distribution profile SEPA CT, then name the transformation template SEPA CT.
-
On the Distribution Profile Maint. screen, press F10 (Dist. Profile Detail) to access the Distribution Profile Detail screen.
-
On the Distribution Profile Detail screen, add the users to the distribution list and save your changes.
Figure 2-12 Distribution Detail Profile screen
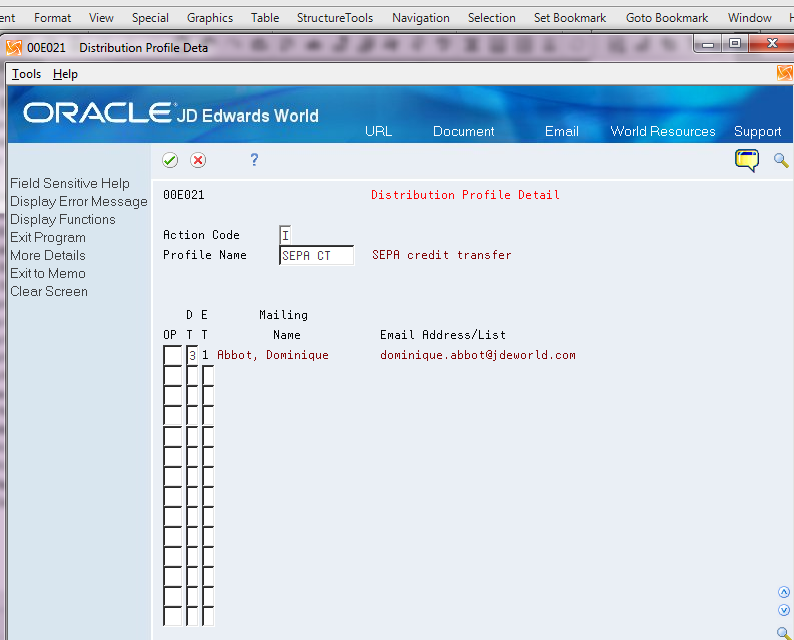
Description of "Figure 2-12 Distribution Detail Profile screen"
2.4.3 Set Up the Transformation Template
You must set up a type 1 transformation template to work with the SEPA credit transfer files. You set up a Type 1 template to transform the generated XML file to an XML file format required for the SEPA credit transfer. The Type 1 template converts the XML file using the Extensible Stylesheet Language (XSL) template.
Note:
Before you set up the transformation template, verify that the P740572.xsl file was downloaded and exists in the IFS directory of each user who will use the SEPA credit transfer process.To set up the Type 1 transformation template:
-
From the Electronic Document Delivery menu (G00E), choose 5. Transformation Templates.
-
On the Transformation Templates screen, enter 2 for a selection to update an existing template, or enter 3 to copy from an existing template to create a new template.
Figure 2-13 Transformation Template Maint. screen (Type 1 Template)
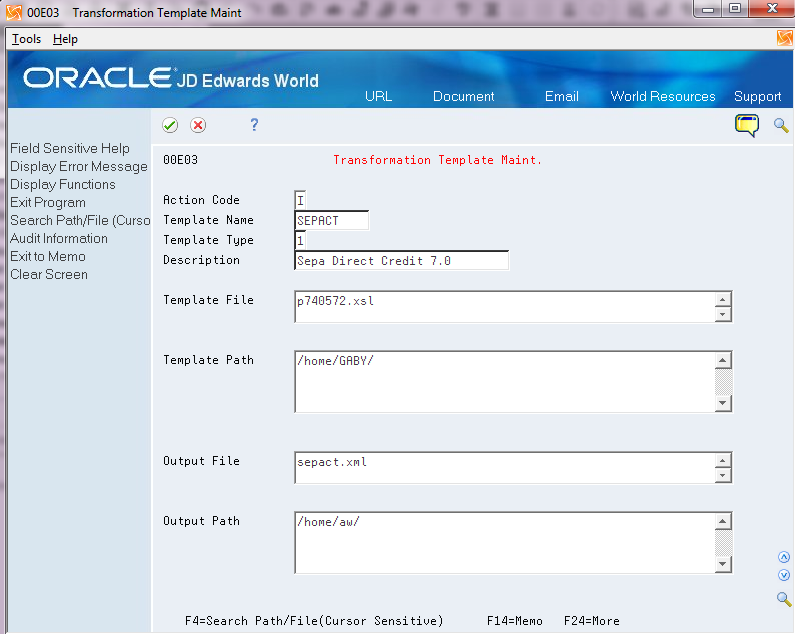
Description of "Figure 2-13 Transformation Template Maint. screen (Type 1 Template)"
-
On the Transformation Template Maint screen:
-
Enter 1 for the Template Type.
-
In the Template File field, enter the name of the XSL template that you use to transform the original XML output file to the formatted XML. For the SEPA credit transfer process, you must enter P740572.xsl.
-
Enter values for the Template Path and the Output Path fields.
-
In the Output File field, enter the name that you want to assign to the formatted XML file. You must assign a file name with the extension of .xml.
-
Save your record.
-
2.4.4 Set Up Spooled File Export Parameters
Before you run the SEPA Credit Transfer program (P7404572), you must set up the file export parameters. Generally, you perform this setup once, unless you want to change the location of the file.
By defining the Batch Export Parameters, you engage the Distribution Profile and the Transformation Template that you set up for the SEPA credit transfer process to obtain the automatic .xml generation.
To set up the spooled file export parameters:
-
From Versions List (VL), enter P7404572 in the Form field and press Enter to locate the version for the program.
-
Enter 1 (run), 2 (change), or 3 (add) in the Option field to access the version to work with.
-
Access the Additional Parameters screen.
-
Press F6 on the Additional Parameters screen to access the Spooled File Export Parms screen.
Figure 2-14 Spooled File Export Parms screen
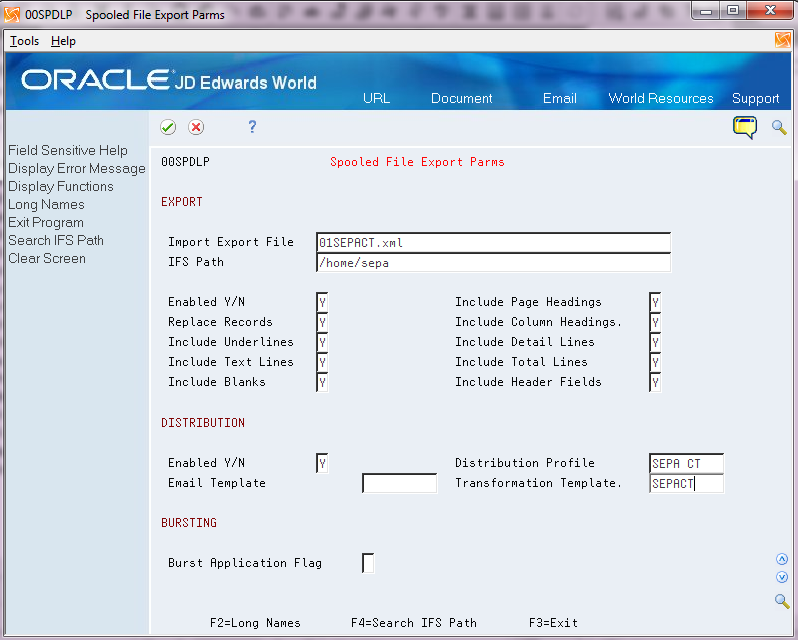
Description of "Figure 2-14 Spooled File Export Parms screen"
-
On Spooled File Export Parms, complete the following fields in the Export section:
-
Import Export File
-
IFS Path
-
Enabled Y/N
You must enter Y in this field.
-
-
Complete the following fields in the Distribution section:
-
Enabled Y/N
You must enter Y in this field.
-
Distribution Profile
Enter the name of the distribution profile that you set up for the SEPA credit transfer file.
-
Transformation Template
Enter the name of the transformation templates for the SEPA credit transfer file.
-
-
Complete other fields as desired and save your changes.
2.5 Process SEPA Credit Transfers
You use the same process to generate SEPA payments as you use to generate other types of automatic payments:
-
Create vouchers.
You can use many different methods to enter vouchers, such as using the Standard Voucher Entry program or the Speed Voucher Entry program.
-
Update existing vouchers.
For example, you can use the Speed Release program (P04114) to update the Bank Type, Payment Instrument, and G/L Bank Account fields.
-
Create payment groups.
You use the Create Payment Groups program (P04570) to create payment groups.
-
Work with payment groups.
You use the Work with Payment Groups program (P04257) to write and update payment groups. Specify the P7404572 program as the Write payment program. When you update payment groups, you can specify whether to automatically post amounts to GL accounts.
Be sure to set up the SEPA-specific processing options in the Create Payment Groups program. See Create Payment Group Processing Options for SEPA Credit Transfers
-
Post payments if you did not post them when you updated the payment group.
See Also:
See these Parts in the JD Edwards World Accounts Payable Guide:
2.5.1 Create Payment Group Processing Options for SEPA Credit Transfers
Set the processing options for the Create Payment Groups program using the same values as you use when you generate other electronic payments. You must also set processing options that are specific to SEPA credit transfer processing. In the Electronic Funds Transfer/EDI Only section of the processing options, set up these processing options:
-
25. Enter a '1' to validate the IBAN/BIC values on Payor and Payee banks and that the payment is being made in EUROs for SEPA payments. If left blank, the system does not perform SEPA edits.
You must specify 1 when you process SEPA payments.
-
26. Enter the currency code that represents EURO currency. If left blank, EUR will be used.
You must process SEPA credit transfers in euros.
-
27. Enter '1' to print IBAN & Swift/BIC on the report if available. If left blank, IBAN/Swift will not print.
You must specify 1 when you process SEPA payments.
2.5.2 XML Output File
Certain special characters are not allowed in the XML payment file that you send to your bank. You set up UDC 74/RS with the replacement characters, and then enter 1 in processing option 11 to use replacement characters in the XML file for characters that are not valid.
When you set up UDC 74/RS with the replacement characters and set processing option 11 to use the replacement characters, the JD Edwards World system writes the replacement characters to the XML file for these fields:
-
Address Line 1 and 2
-
Alpha Name
-
Company Name
-
City
-
Postal Code
Before you send the XML file to your bank, you should examine the file for special characters that were not converted and manually change the disallowed characters to the substitute values.
2.5.3 XML File Structure
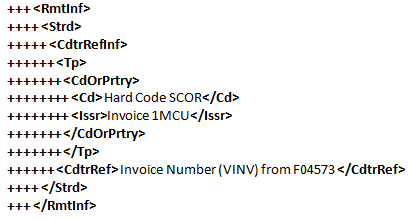
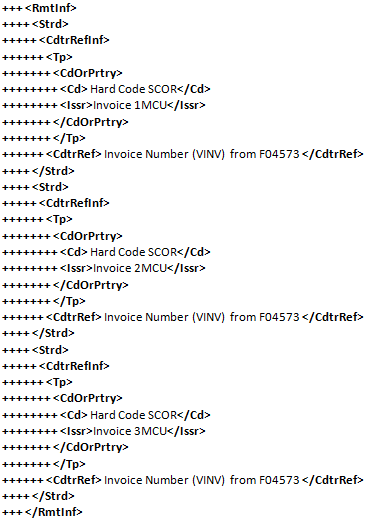
You can specify in the processing options of the P7404572 program whether to generate a structured or unstructured XML file. You can also specify whether to include a single invoices or multiple invoices from the A/P Payment Detail File (F04573) within the RmtInf (remittance information) element of the XML file. You generate a structured or unstructured file, and specify single or multiple invoices based on the needs of your bank.
When you generate an unstructured file, the XML output includes the invoice for each invoice record within the Ustrd (unstructured) element. If you specify to write a single invoice, then the system includes only one Ustrd element within each RmtInf element. If you specify to write multiple invoices, then the system can include multiple Ustrd elements with each RmtInf element.
This image shows an example of an unstructured XML file that includes a single invoice in the RmtInf element:
Figure 2-15 Example of Unstructured, Single Invoice

Description of "Figure 2-15 Example of Unstructured, Single Invoice"
This image shows an example of an unstructured XML file that includes multiple invoices in the RmtInf element:
Figure 2-16 Example of Unstructured, Multiple Invoices

Description of "Figure 2-16 Example of Unstructured, Multiple Invoices"
When you generate a structured file, the XML output includes additional elements to parse the file. As with the unstructured format, you can specify whether to include one invoice within each RmtInf element or multiple invoices.
This image shows an example of a structured file with a single invoice:
Figure 2-17 Example of Structured, Single Invoice
Description of "Figure 2-17 Example of Structured, Single Invoice"
This image shows an example of a structured file with multiple invoices:
Figure 2-18 Example of Structured, Multiple Invoices
Description of "Figure 2-18 Example of Structured, Multiple Invoices"